hot forging
Allows you to obtain a variety of items from ductile metal. Heating gives high plasticity to the material and the possibility of shaping it by force. Many methods of hot forging form a range of products for every taste.
When choosing this technology, it is necessary to consider:
- availability of a forge and provision of fire safety equipment;
- the final result depends on the properties of metals, not all of them can be forged and welded;
- high cost of equipment and materials;
- the effect of heating temperature on the properties of the workpiece.
Despite the shortcomings, the advantages of classical forging are in the variety and beauty of products.
How to weld a stainless steel tank with your own hands
For many residents of high-rise buildings, the problems of owners of private houses are not known. For example, welding a tank to fill with water can cause only an ironic grin in urban residents. Meanwhile, the question is not idle. The urgency of the problem lies in the question of which way to go - to order a finished product or to weld a water tank on your own.
Welding stainless steel using an inverter: features of the method, selection rules
Stainless steel is one of the most popular materials, because for more than a century people have been using it for the manufacture of various structures that are actively used in various fields. Based on it, elements such as bolts, fasteners, tanks, fittings, cans, etc. are created.
When it is necessary to produce or repair certain products, they usually resort to manual arc welding of stainless steel with an electrode, for which a device such as an inverter is used.
Next, we will talk about the nuances of this method, the positive and negative aspects, as well as the difficulties that beginners may encounter when conducting MMA welding.
What is the method of welding stainless steel with an electrode using an RDS inverter?
RDS of stainless steel with an electrode is a process characterized by the fact that during the melting of the rod, gas and slag protection occurs due to the presence of a coating on the electrode used. It has the appearance of a slag crust that separates the arc zone and the weld pool from the surrounding air.
The formation of a welded joint is facilitated by the molten metal of the element, as well as the metal of the electrode rod. In international practice, this technology has received a special name - MMA (Manual Metal Arc) welding.
Where is the method most commonly used?
Features of welding stainless steel using an inverter is that it can be used in any situation, regardless of the spatial position.
At the same time, it must be remembered that even the presence of experience does not guarantee the creation of high-quality vertical seams.
It makes sense to resort to manual arc welding with coated electrodes when it is necessary to create short seams, which is most in demand in small-scale production of parts.
A similar method of connecting products can also be used when installing metal structures only if a small amount of work is planned.
In most cases, RDS of stainless steel with coated electrodes is used in cases where tacks are performed during the installation of structures for welding. Also, this option can be considered in the case when it is required to eliminate defects present in small sections of the seam. This method can also be used for surfacing.
In light of this, we can conclude that it can be used in those situations where you have to deal with a small amount of work. It is also suitable for welding for personal and domestic purposes.The connected elements can be pipes, metal structures, tanks, stainless steel tanks, etc.
Pros and cons of the method
Against the background of other welding methods, for example, TIG welding, MIG / MAG welding in shielding gases, submerged arc welding, the use of the MMA stainless steel joining method provides a number of significant advantages:
- this technology involves the use of a special welding machine, which is distinguished by a simple design, affordable price and small size;
- RDS is focused on the connection of many types of ferrous and non-ferrous metals, and in addition to this, various alloys, regardless of their thickness;
- no need for additional flux or gas protection;
- this technology is applicable in cases where it is difficult to reach the treated area due to the small size of a particular welding machine.
Craft Ideas for Beginners
Before considering how to work with metals, it is worth dwelling on the ideas and drawings of possible crafts.
Metal crafts - decorations for any interior. Animal and plant subjects, monograms, geometric figures and national ornaments are popular.
A simple product for beginners will be a metal owl. It is made in many ways. So, rods bent into rounded shapes, welded together, form a wall stand for flowers in the form of an owl outline.
Do-it-yourself metal owl
Sheet metal products by welding are made in this way:
- a sketch of the product and its details are preliminarily prepared on paper;
- transfer the pattern to a metal sheet, carefully cut it out with a grinder and clean the edges;
- notches are applied with a chisel and a hammer so as to give the components the image of feathers;
- a beak is formed, parts of the paws are cut out of the rod, and bolts are threaded into the holes under the eyes made with a chisel in the head part;
- all parts of the bird are welded together;
- chemical solvent clean the surface from rust and varnish.
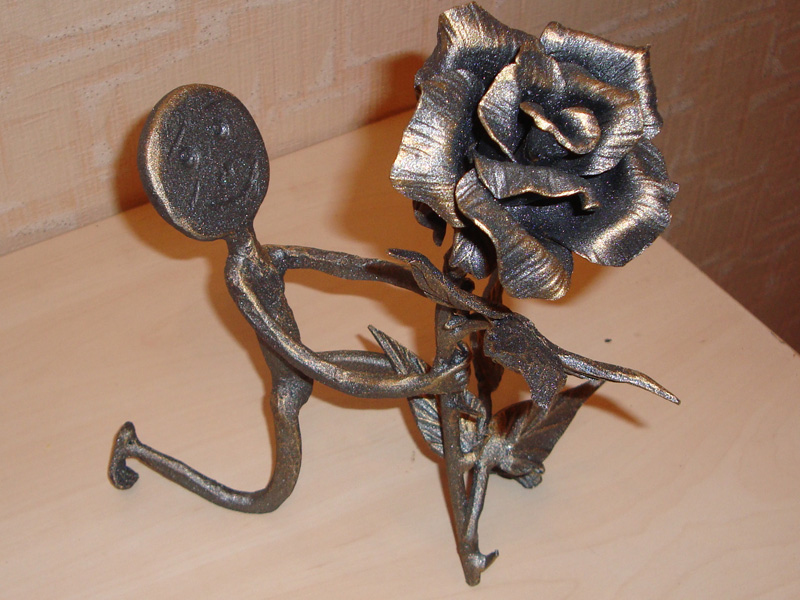
Protective grilles on windows or fences are decorated with floral ornaments, and a bouquet of iron roses can become an independent decoration of the room. For the manufacture of branches, flowers and leaves, cold and hot forging are suitable.
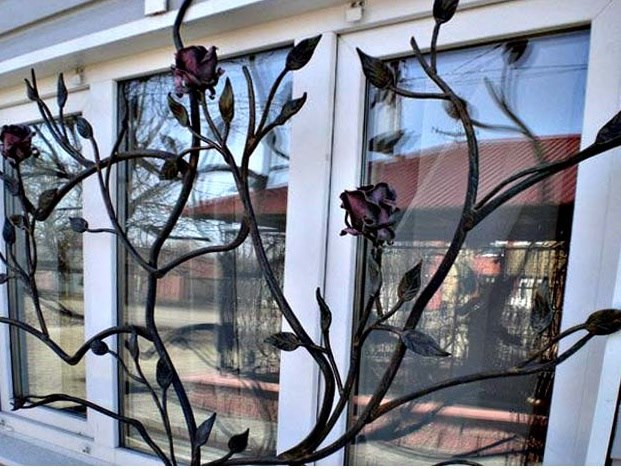
Wrought iron roses for windows
The leaves are cold forged from thin metal 3.5 mm thick, which bends well.
Briefly, the steps of the process can be described as follows:
- a sheet of the desired shape is cut out of cardboard;
- transfer images to a metal sheet, cut out with special scissors;
- the edges are polished with a machine;
- "burrs" are removed with a metal brush;
- clean and polish the surface;
- with a chisel, the veins are applied to the leaf plate;
- the edges of the leaves and petals are made thinner by beating them with a hammer;
- with the help of round-nose pliers, bend the edges and shape the products;
- finished forms are fixed by spot welding on the branches;
- paint the product or cover it with a special varnish.
Plant patterns made by high-temperature forging are stronger due to the compaction of the material. Use medium, hard and soft grades of steel. Those steel grades that contain the minimum amount of carbon - 0.25% are considered optimal. And they do not contain harmful additives - sulfur, chromium, phosphorus.
For example, cutting the barrel lengthwise, shelves are mounted inside, and wheels are mounted to the bottom. The outer side is painted with bright paint. And the little locker is ready.
Barrel locker
Cut across and painted, it turns into an unusual bedside table or coffee table.
Craftsmen decorate the walls of the barrels with openwork carvings, and then build a set for outdoor dining: a table and chairs.
Summer residents love do-it-yourself furniture from a profile pipe. This material is practical, inexpensive, allows you to create many useful things: from furniture to a greenhouse. It is combined with other materials: wood and plastic.
For the manufacture of benches with dimensions of 2.3x0.6x0.45 m, a profile pipe of square section 0.03x0.03 m, with a total length of 11 m, is used. As well as boards 2.3 m long, 0.06 m wide.
According to the drawings of the products, you can independently make a bench with a back, as well as a greenhouse from a profile pipe with square and rectangular sections of 0.2x0.2m or 0.2x0.4 m. Considering that a rectangular pipe is suitable for a solid frame, and a square one for partitions .
Metal parts of old mechanical watches, coins, paper clips, cans, cutlery, wire - material for the production of toys or jewelry.
Aluminum and tin are soft metals suitable for making toys. To create a cat, a dog, a hedgehog, a crocodile and a dragonfly, you need to transfer the sketch to a sheet of tin, cut out the shape and bend it, as shown by the dotted lines.
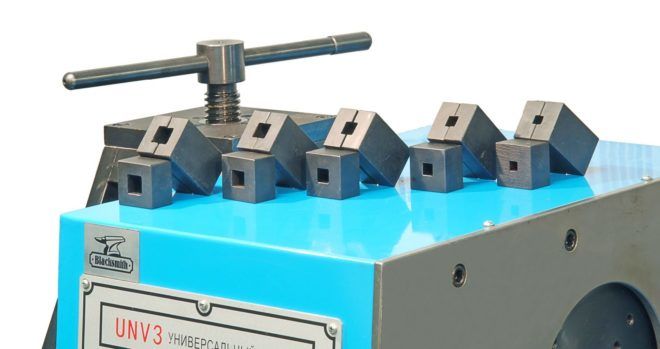
Torsion machines
Masters recommend twisting rods for artistic forging without using machines at all. To prevent the part from bending at the end clamped in a vice under the far end, use a stand with a small cutout on top where the rod should be fixed.
 Torsion machines
Rotary machines can speed up work, improve the quality of manufactured elements. Since the load strongly affects the support, the stand must be of increased strength, for example, channels welded together from one hundred millimeters.
The starting material is held by a square frame. Due to the reduction in the length of the rod, the reliability of the fastening of the frame should be carefully checked. To do this, the tailstock is made of a sliding type. It implies high quality cold forging of machine tools, otherwise the product will be fragile.
Any tool for cold forging requires careful personal care, timely repair and adjustment. And manual artistic forging does require skill and discipline from the master. All schemes, blacksmith machines and even home-made machines require order and cleanliness.
Related video: Cold forging
A selection of questions
- Mikhail, Lipetsk — What discs for metal cutting should be used?
- Ivan, Moscow — What is the GOST of metal-rolled sheet steel?
- Maksim, Tver — What are the best racks for storing rolled metal products?
- Vladimir, Novosibirsk — What does ultrasonic processing of metals mean without the use of abrasive substances?
- Valery, Moscow — How to forge a knife from a bearing with your own hands?
- Stanislav, Voronezh — What equipment is used for the production of galvanized steel air ducts?
The scheme is ready, you can choose a profile
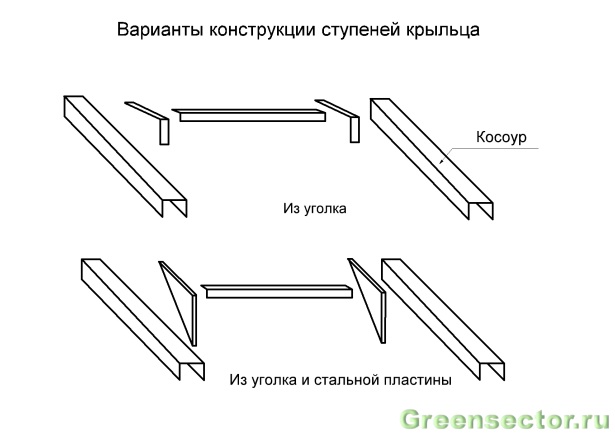
In order to make a metal porch, you need to buy a profile that is suitable in size. For stringers (sidewalls of the stairs on which its steps stand), channel No. 8 is suitable (wall height 8 cm, shelves - 4 cm). It is quite rigid, durable and steps and railing posts are easily welded to it.
To make the platform frame, you can take a steel corner with a 5 cm shelf. Steps can be completely made from the same corner, or you can buy sheet steel 3-4 mm thick and cut it into triangular “kerchiefs”. After that, a transverse corner must be welded to them, on which a corrugated steel sheet, a stone slab and a wooden board will lie.
In addition to the channel for the stringers of the stairs and the support posts of the porch, you can use a profile pipe measuring 40x60 or 60x60 mm.
For precise assembly of the porch frame and stairs, you should use a homemade template (OSB plate with a structure outline printed on it) and clamps. With their help, you can securely clamp all the parts and fix them with electric welding. If you do not have it, then you will have to use threaded connections (nut-bolt), although this work will be more complicated and lengthy.
Before you weld a metal porch with your own hands, you need to prepare support posts for it from a round or shaped pipe. A channel and a powerful corner (shelf 8-10 cm) are also suitable for this work.The length of the racks must be calculated so that it is enough to embed 15-20 cm into the foundation, and the floor of the platform is 2-3 cm below the door threshold.
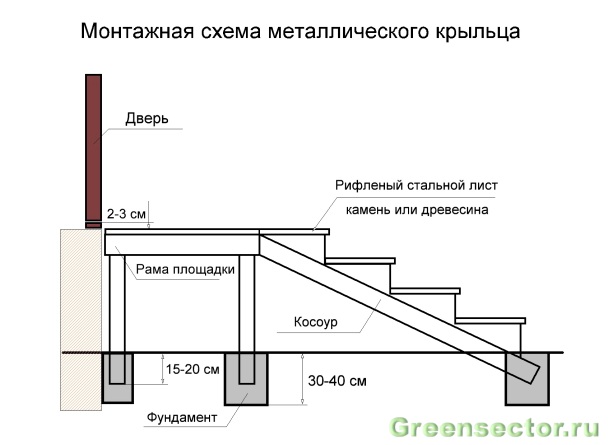
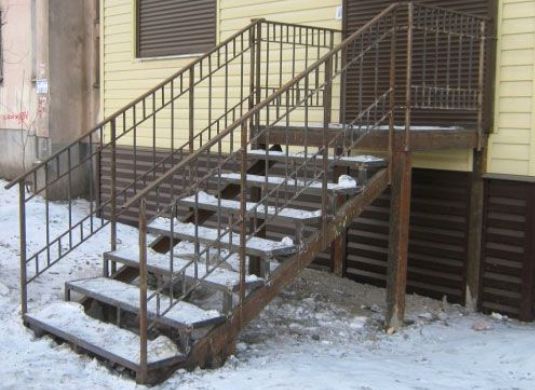
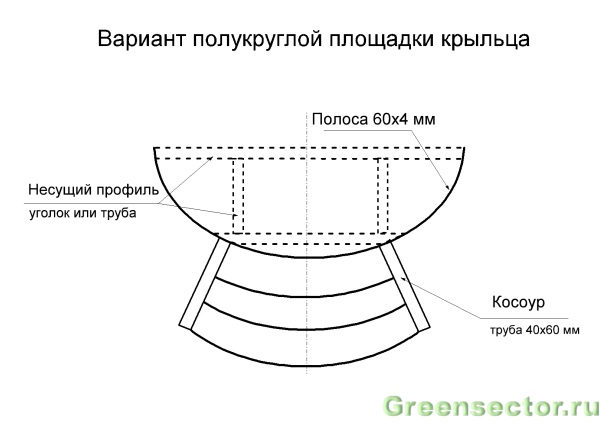
We examined the simplest version of a rectangular metal porch for a private house and summer cottage. The platform frame here rests on four racks. If you want to make a more original porch frame, then use the diagram shown in Figure 2.
 Rice. 2 (T and V-posts of the porch)
The T-shaped support post looks attractive, but compared to the traditional version, it requires the use of a more durable channel (10 cm) or a profile pipe (80x80 mm). V-shaped racks will help you create a metal porch of the original form.
In addition to supports, you can experiment with the shape of the site, making it not four, but hexagonal or oval. In the latter case, a metal strip 3 or 4 mm thick should be used. Carefully bending it according to your own template or giving it to the metalworking shop, you will get a solid supporting wall to which you can attach the supporting profile and the platform floor.
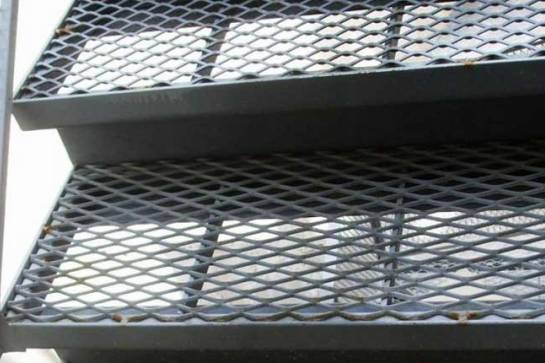
For the floor and steps of the metal porch, you can use not only corrugated, but also perforated sheet. It is not slippery in wet weather and rusts less because water does not linger on the mesh surface.
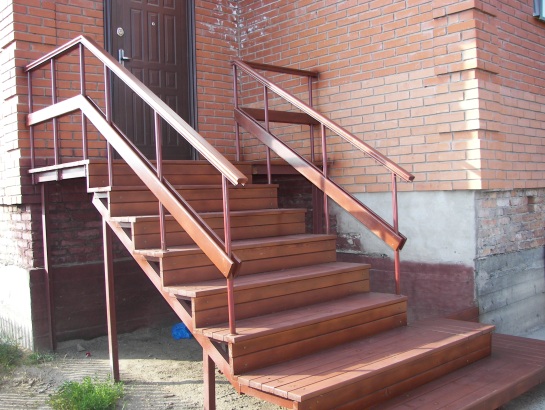
In addition to steel sheet, you can use antiseptic wood (preferably hardwood and at least 3 cm thick) or a stone slab. You can also cast steps from colored concrete yourself, reinforcing them with wire with a diameter of 4-5 mm.
Handrail railings are best made of wood. This material is not only pleasant to the hands, but also goes well with metal.
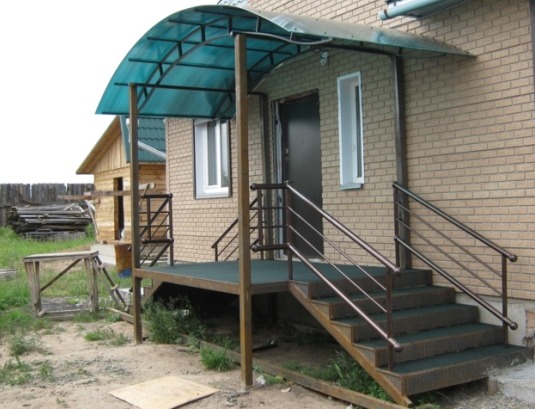
It is better to make a canopy over the porch from metal, fixing a sheet of polycarbonate or metal tiles on it.
If you want to decorate your design, then use ready-made elements of "cold forging" for this. They will give the product a finished and aesthetic look. When using steel decor, do not overdo it. Try to make your porch look concise and not fall out of the general style of the facade of the building.
Wicket installation
Making a gate with your own hands, as well as installing a gate, is a fairly simple matter. In addition, you can save money.
After the necessary materials are purchased and the tools are prepared, you can begin to manufacture the product.
Pillars on the sides
Do-it-yourself poles for gates and gates made of metal profiles are installed in the ground at least 1 m. But before that, you need to make markings and decide on the installation site.
The blank of the column should be 1 m larger. Having treated the surface of the metal profile against corrosion with a special liquid and a grinder, you need to wait for the columns to dry.
 Pole installation
After that, a hole is made in the ground at the marking site with their own hands, and its diameter should be 10 cm larger than the pipe size.
Having prepared a liquid cement mortar, you can install the pillars using crushed stone for tamping.
brick pillars
The gate can be fixed on brick pillars. For this, it is necessary to make a facing of a metal product with a brick, which looks quite beautiful.
The mortar for laying bricks should not be very liquid. The first row must be laid from a whole brick, but for the second row, use 3/4 bricks - this is necessary for a stronger connection.
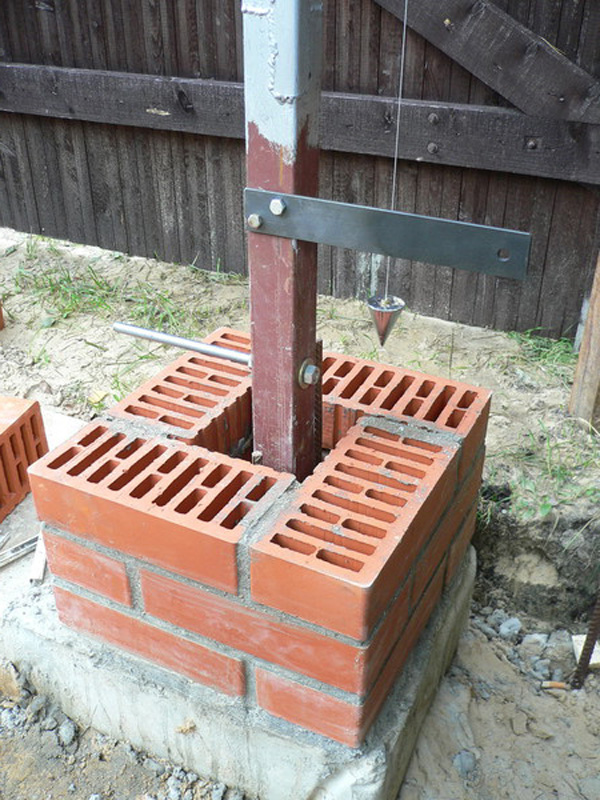 Pouring the foundation for the pillars
The stitching of the rows is done by hand after the solution dries. Metal caps can be made on top of the poles so that the product does not get wet during rain.
frame
The metal gate consists of a metal profile and a corner. The frame is chosen at the request of the owner of the house, although this is a secondary issue, because the installation is done as standard.
Accuracy is very important for a quality installation.First you need to lay the channel with your own hands, which should be approximately 20 cm less than the product itself.
The plane should be as flat as possible, therefore, in order to qualitatively do this stage of work, you must not forget to use the level. The corner is cut to size.
With the help of a grinder, burrs are removed. The blanks need to be laid out and fixed, and then the joints are welded by welding. Also, by welding, you need to connect the top and bottom so that the structure is dense and stable.
You can only use spot welding for this, so that the seams can be cleaned with a grinder. At the very end, the entire structure must be treated with an anti-corrosion agent.
Mounting to poles
Powerful fasteners are a prerequisite for reliable fastening of the wicket and gate. To do this, you can use a curtain with a built-in bearing.
Fastening a sheet of metal is done in several stages:
- Cut a sheet of a certain size from a metal profile.
- Remove burrs at cut points.
- Make a fastening to the frame.
- Do surface treatment against corrosion.
- Carry out painting in the desired color and hang loops.
After the installation work is completed, you need to think about how the gate will close.
To do this, you can install a lock or electric drive. Everything in this case depends on the preferences of the owner.
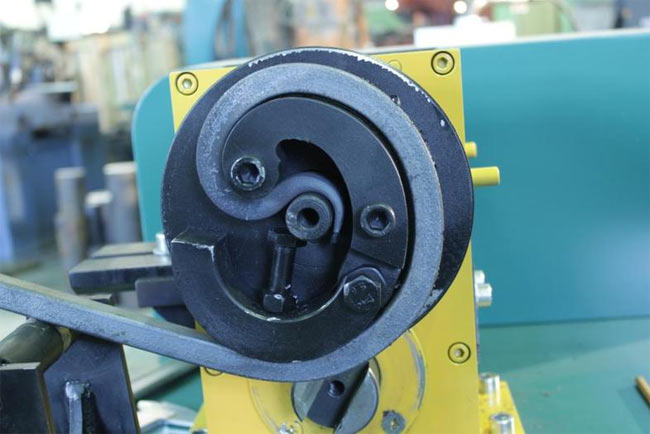
Building a curl for the machine with your own hands
Before you start creating a machine for cold forging with your own hands, you need to be able to calculate the parameters of the template spiral, because there are practically no special programs for such purposes. Such a template should not only be technically literate, but also have an attractive appearance.
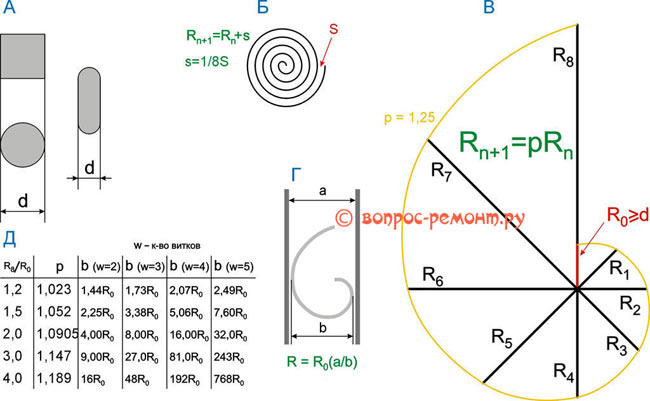
The calculation of such a template is based on a logarithmic spiral. Some of the nuances in the construction can be distinguished in the following list:
- the beginning of the construction is taken at the point R0;
- the turning radius will be equal to the fixed angle;
- the indicator of the length of such an angle must be multiplied by the divergence of the coil;
- the discrepancy in the standard version is basically taken equal to 1.2;
- for ease of calculation, as well as maintaining accuracy, the bending angle is best taken at an angle of 45 degrees;
- if there is a need to build a template that will have a denser spiral, then the 8th part (s) of a unit distance from the spiral should be added to the radius value;
- as for r0, it must be equal in size to the size of the cross section of the diameter that the workpiece for the spiral has.
Considering all the nuances, you can start making a “snail” template, for this it is best to be able to solve equations that have a cubic degree and higher. There is no exact formula for calculating such a device, but there is one that allows you to achieve the best result. The sequence when building a spiral pattern can be as follows:
- the initial point r0 is determined first;
- the turns that the template will have are taken arbitrarily, their number can be any;
- using tabular data, you should calculate the diameter (b), while making sure that it is smaller in width in the opening for the template;
- using the formula, the radius R is calculated;
- the last step is to transfer all the obtained points in accordance with the scale, after which you can proceed directly to the construction. In the process, let's adjust using a similar formula to the radius R in the final version.
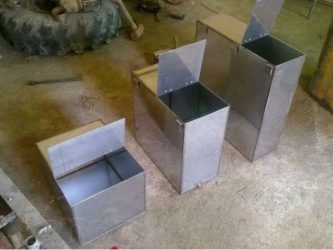
Manufacture of simple metal objects
If you do not have experience in making this kind of thing with your own hands, it is recommended that you start in this business by creating the simplest metal objects that anyone can handle. A metal box can act as an educational product. It can be used not only as a decorative element, but also used to store small items.
Necessary tools for the job
As a basis for creating a metal box, an ordinary tin can is suitable. To make the box, you will need the following tools and things:
- Sandpaper.
- Scissors.
- Ruler.
- pencil and pen.
- A solid base to be used as the work plane.
- Paper that will serve as the basis for creating a drawing.
The process of making the box begins with cleaning the outside of the can from paint and labels, for this, sandpaper is used. It is recommended to carry out the operation with a full jar
Otherwise, such preparation must be carried out very carefully, since the metal can easily be deformed.
Next, they begin to cut the can in such a way as to obtain a quadrangular blank. Before that you need:
- Cut off the bottom, then cut along the top. During this operation, irregularities are necessarily formed along the edges, which must be immediately sanded.
- Next, the jar must be placed on a hard surface. At this stage of work, you can start applying with a pencil the images that are previously drawn in the drawing.
Then proceed directly to the creation of the ornament.
The master has no prohibitions or any restrictions in the choice of jewelry for the box, but it is still better to use symmetrical details.
To create a pattern, you need a ballpoint pen, with which you can push through the aluminum layer. You can achieve the effect of a vividly expressed texture if you draw a pen several times along the contour lines of the pattern. Having done all the indicated work, the master will have to collect all the details of the box together.
Differences of cold forging
There is such a thing as "stamping", which is sometimes confused with cold forging. Cold forging itself has 2 principles by which this process can occur. The table shows the process differences.
| Process | Description |
| Stamping | The stamping process can be described as extruding certain shapes using a punch that works at a high level of pressure. An example of a stamping process is an aluminum can. The heating of the metal is not used. It is hardly possible to apply such technology at home, since it is impossible to create the necessary conditions for this. |
| Cold forging type (riveting) | This kind of cold forging, in fact, is hardening, namely, a certain number of blows of a very large force are carried out in the process, which allows the structure of the metal to change and become the required parameters in size and shape. Such manipulation is carried out with the help of a hammer, which can also be built with your own hands. |
| Cold forging type (bending) | Another variety is bending. With this technology, the metal structure remains the same, without changing its characteristics. This type of forging is possible for use at home, for it you just need to start creating a cold forging machine with your own hands. |
Cold forging, which is carried out according to the principle of bending, is quite simple to do, especially if there is special equipment of a stationary type, which greatly facilitates the process. The advantage of this variety is that you can assemble almost any cold forging machine with your own hands without spending a lot of money on it.
List of technologies
To create interesting do-it-yourself metal products for sale or for the home, it is recommended to use several technologies, including casting, forging, bending. With the help of casting, things are made from molten metal by pouring it into different shapes. The technique is considered rough. It does not provide for obtaining high-precision products. At the same time, the surface is rough. Casting is used in the manufacture of jewelry.
Another effective technique for making crafts from scrap metal with your own hands is hot forging.Under the influence of high temperatures and subsequent machining, the metal becomes ductile.
If you act on the metal by bending, pressing, you can get different elements of decor for courtyards and rooms. This technique is called cold forging. It provides for the connection of pattern elements by welding.
Bending and embossing
Modern methods of creating metal jewelry include art welding. The technology involves the use of gas welding. By heating products are painted with flowers. To give a curved shape to sheet metal, pipe, wire, bending or bending is used. Using the first technique, homemade metal frames are formed.
Other technologies:
- Drift. The method consists in striking with a hammer on a thin and cold metal sheet in order to stretch it, bend it. Technology is used to decorate tableware.
- Scan. It is considered a jewelry technique that allows you to get openwork patterns from twisted wire.
- Chasing. A method of drawing a pattern on a surface due to hammer blows. A tool is installed between the sheet and the hammer, which must give a specific shape.
Hot and cold forging
Cold forging affects the metal by pressing and bending. In the first case, there is a shock effect, which compacts the upper layer and promotes the mobility of the inner layer of the workpiece. In the second case, the sheet is bent along certain lines. The technique allows you to make waves, spirals, zigzags from stainless steel. The disadvantage of technology is the inability to correct the error.
With the help of hot forging, you can make different objects, as the metal becomes ductile. By heating, the raw material is given the desired shape. Hot forging is characterized by the following nuances:
- compliance with fire safety;
- the choice of metal, taking into account its properties;
- high cost of equipment;
- temperature effect on raw materials.
Art technology is considered a new trend in the field of welding. She brought technical welding to the level of a fine art. With the help of art welding, thin metal crafts are obtained. The technique provides for the presence of a welding machine, consumables, iron blanks. The main materials for making crafts are titanium, zirconium, stainless steel.
To make metal crafts, you will need an iron billet, scrap metal, special tools and equipment. For processing material using the cold forging technique, machines will be required: bending, torsion. To process a steel blank using hot forging, you need pliers, a sledgehammer, a handbrake, and a shaped hammer. The layout of the final product is carried out using a lathe.
If homemade is made from sheet material, you will need the following tools: