How to install underfloor heating Pro Handmade
Which underfloor heating system is better to prefer
We produce water and electric underfloor heating systems. Each type is quite in demand and it is impossible to say for sure that one or the other is the best. In order to choose, you need to study all the characteristics and find out which one is more suitable.
Water thermal coating
The main condition that should be taken into account when installing a warm floor is the ability to connect directly to the central heating system or create a separate boiler room. In multi-apartment buildings, such floors are used quite rarely and only if they were in the project. In an ordinary apartment, such a floor covering is prohibited due to the fact that the water pressure is designed only for radiator heating.
For such a warm floor, metal-plastic or polymer pipes are used, which are heat-resistant. Thus, the system has the ability to function smoothly for fifty years. This type of heating is low temperature and is used as auxiliary heating. If the room is small, such a floor can serve as the main source of heating.
Benefits of a water floor:
- long operating period;
- low energy consumption;
- there are no restrictions on the installation of furniture.
Disadvantages of the water floor:
- complex design and installation;
- there is a large load on the base;
- if a leak occurs, the flooring needs to be repaired and the circuit replaced.
Electric floor features
Electric floor heating systems are very popular. They are equipped with various types of heating elements, including cable, film, thermomats.
The cable type is the most common, as it is easy to install. Installation is carried out on a screed or tile adhesive and is very convenient for rooms with a small area. The cable is purchased ready for installation. For this reason, in no case should it be cut or extended. To avoid overheating, it is forbidden to install furniture above the cable.
The film type looks like a thin strip of heat-resistant film, inside of which the heating elements are sealed. Thanks to this device, fast and uniform heating is provided in the room. Such material must be assembled from several parts right at the installation site. Polyester strips are laid under the floor covering. It is not recommended to install them in a screed, since alkali has the ability to destroy the film.
The cable system will look like a thin roll of fiberglass in which the cable is fixed. If installation is carried out on a difficult surface, it is allowed to cut the fiberglass. Thermomats greatly simplify the installation of the system.
Direct installation of a warm floor is divided into the following stages:
- the working surface is initially prepared for laying the system;
- a reflective layer is laid;
- fasteners are installed;
- install a collector and a control group;
- lay pipes;
- connect the system to a power source;
- preparatory work before pouring;
- coating and system commissioning.
Why you can not cut the heating cable
Heating resistive cables (warm floor) are sold in the form of ready-made segments connected to a power cold cable. Each section has a certain length and power. When calculating heating systems, these values are used. But when an error creeps into the calculations and there is nowhere to mount the rest of the cable, the first decision that seems logical is to cut off the excess.
The instructions supplied with the heating sections prohibit any manipulation to shorten or extend the sections.Why? Indeed, in the catalogs, the same heating cable, for example, with a power of 20 W / m, is sold in sections from 5 m to 120 m. And it seems that if you approach the matter thoroughly, then at home you can make a very high-quality end sleeve, and use the rest of the cable somewhere else ...
It's not in vain that the instructions forbid cutting resistive heating cables. The thing is that despite the same article, in heating sections of different lengths, cables of different composition are used. For example, sections 10m long and 20m long, basically contain completely different heating cables. The manufacturer calculates the resistance of the cable in advance, setting at what length, the heating power will be 20W / m. And if this cable is shortened by half, then its power will increase by 2 times, which will already be 40 W / m. Structurally, both the heating conductors and the cable insulation are not designed for such heating. When plugged into the network, such a cable will overheat and burn out. This is comparable to an incandescent spiral in heating appliances, if it is shortened, it heats up almost white and quickly burns out.
When locally repairing a heating resistive cable in a screed, the damaged area should be replaced with a piece of heating cable from a similar section so that there is no overheating in this place. Do not insert a piece of cold connecting cable, as this will destroy the resistance of the remaining heating cable.
Expert answers
Vladimir Andreev:
You need to see the heating element. You can't cut across. I would ask the seller.
Dmitry Ostankov:
No. cannot be cut. If the mat has tails on both sides, then it is connected to the regulator with them. You need to expand it so that the second end comes up to the first. That is, so that he reaches the regulator. 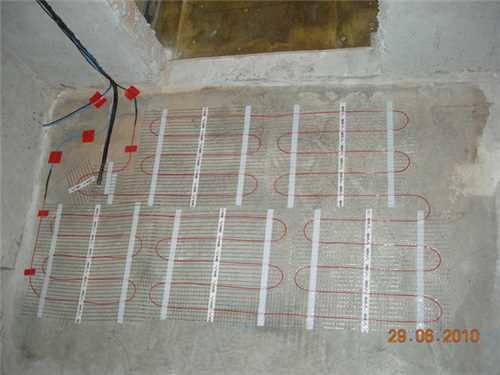
Scrapmaster Honored:
TP needs to be loaded. Read instructions. Yes, so that there are no voids around the wire, otherwise it will burn out too quickly.
Gennady Dudnikov:
I filled the screed.
Elizabeth Goshovskaya:
of course to do a coupler!
LUCK:
the temperature emitted by the warm floor will be maximum if you put a tile on it without a screed and the instructions say and experience tested our Russian warm floor (with wire) under the screed, the thickness of the screed 4-6 cm warmed up in 3-5 hours but also cooled slowly and matte under tiles began to heat after half an hour, the main thing is to rub the seams well and let the glue dry for a month at least. with a screed, matte floors didn’t see at all what was being poured, if only with a thin layer to fix it, but I still think it’s superfluous
Igor Shkurny:
On a thin warm floor (mats), tiles can be laid without a screed, use tile adhesive for warm floors
mikhalych:
one layer of glue smear under the mat, the second layer directly on the tile and connect ... get min. layer, if your height is critical... . but in general, it’s thinner to spread under the mat and smear it thinner, then press the mat and wait (this is the second option)
Anatoly Gorbachenko:
be sure to tie over the TP. firstly, the floor warms up more evenly, secondly, it is a kind of heat accumulator, and thirdly, it saves tile adhesive. on warm floors with a coolant, I practice a screed of at least 5 cm.
alxndrnn:
You can carefully lay the tiles under the comb right away, but we recommend that customers fill the mat with Vetonite 5000 to the thickness of the cable, and only then the tiles - it’s more correct.
Technology laying electric underfloor heating methods and tips
This page contains information about underfloor heating based on electricity, as well as methods and technology for installing such floor systems.
Unlike a central heating system, a warm floor evenly heats the entire floor covering and, consequently, the air in the lower part of the room, which is most comfortable for a person. Otherwise, warm air immediately rises to the very ceiling.
Variety of electric underfloor heating
Underfloor heating from electricity is of three types:
- cable,
- thermomat (mesh with attached cable),
- film (the heating element is inside the film).
Choosing the right system is necessary, based on the characteristics of the premises, layout and operating conditions. Of the first two, it is better to buy the second one in order to save time. For the cable, you still have to take mounting tape for fastening. And mats can be cut along the grid to fit the layout. For a film floor, only a “dry” installation is needed, and such a floor is undesirable, for example, for a tiled floor.
The technology of laying an electric underfloor heating directly depends on its type. Let's consider all of them.
Important!!! The base for any underfloor heating system must be flat and clean.
Method 1. Installation of thermomats
This option is the easiest. The thermo mat grid is 50 cm wide, but it can be cut and rotated in the desired direction. The main thing is not to damage the cable. You can fix the thermomat to the floor in any way. Before this, it is recommended to prime the surface to ensure better adhesion. From above - a small layer of screed (3 cm) or tile adhesive, and then the floor covering.
Options for laying thermomats
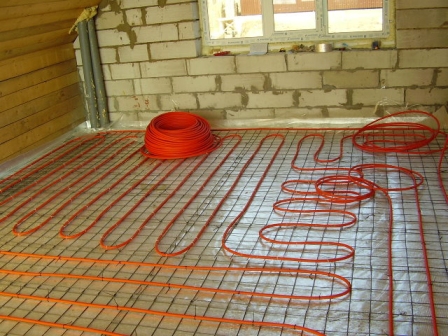
Method 2. Cable floor installation
This method involves preliminary leveling, thermal insulation and floor screed, which will increase its height. Then the cable of the required size is laid out with a “snake” or “snail” using a special mounting tape with fasteners that maintain the required distance between the cable, excluding the places where pieces of furniture will be located. In addition, be sure to make indents from walls and heating devices by at least 5-7 cm. You need to start laying from the place of connection to the thermostat. As in the case of thermomats, tile adhesive or screed (5 cm thick) is laid under the floor covering.
Attention!!! Do not cut or stretch the cable! Cable lines must not touch!
Cabling
Method 3. Film floor installation
The film floor has a small thickness, so only a small layer of coating is possible above it. As a heater under the film, only materials with low thermal conductivity can be used. The film itself must be cut into strips of the required size, laid them without overlapping one another, and connected with wires to the tires along the edges of the film. To protect a fragile system, it is worth putting plywood or drywall on top, and then the flooring. It is better not to install tiles, as the adhesive will not hold them well enough on the smooth structure of the film. Such a floor can be mounted throughout the room without exception.
Film underfloor heating for different coatings
After laying any electric floor, you need to lay the temperature sensor in a special tube, which must be equidistant from the heating elements and not walled up. Moreover, it must be placed at a distance of at least 50 cm from the floor to the wall for the correct display of data. Then connect it to the thermostat.
Temperature sensor placement
Don't forget to also draw or photograph a floor plan that may be needed for plumbing installations, for example.
Important!!! You can not turn on the electric floor until the fill is completely dry - about a month
Best Answers
Stas Shabanov:
Lots of nuances! You need to know where you are going to lay the mats, the thickness of the screed, the very information about the mats, power, quadrature
ip:
In my opinion, an electric heated floor is a waste of money. The degree of reliability of such a system is much lower than water floors, and they cannot be repaired (((Moreover, local overheating from moved furniture can already cause a reduction in resource, which does not happen in water systems ... And thermal physics for any floor is the same.If this is the second floor of a residential building, then let the ceiling on the first floor receive some of the heat, it’s not a problem at all.And if there is a cold basement below or, in general, a ventilated underground, then you need to insulate the floors even without heating)))
Uncle from the Future...
Mats, in contrast to the molded heating cable, have a much smaller thickness ... And due to their small thickness, their use is relevant when it is not possible to make a screed of considerable thickness .. That is, by their very design they do not imply a certain significant screed layer on top. Because of this, the mats are used directly on the surface of the base, and the finishing coating, for example, tiles, is glued directly to the mats. Because of this, even without insulation on the substrate, the mats heat the floor surface well. (due to almost direct contact with the finishing material of the floor) ... Otherwise, about the insulation on the floor, as such, it is said in the answer above ...
Network of branded stores TEPLY POL:
Thin mats are not laid on heat-reflecting insulation, as the adhesive will not adhere to the concrete. Cable and mats are different systems and the installation scheme is different, despite the fact that both systems are cable.
As for the cracking of the screed under the tiles, I'm not sure, I have never heard of this.
Those who say that concrete will not warm through so much are right. Due to the design features and laws of physics, heating mats in a layer of tile adhesive will heat both the concrete from below and the tile from above. And if the cable in the screed needs to warm up the screed itself first, and the screed will already heat the flooring (tiles and others), then the mats need to heat only the tile + glue. It should be noted that the floor temperature sensor is installed in the tile and the degree of heating is regulated by the tile. And since the tile heats up much faster than the screed under the mats, and even more so the concrete slab, it will not work to heat the neighbors from below.
booster boosters:
a
anon unknown:
try this liquid thermal insulation. Excellent quality nano34
artem TULISOV:
I have thermal insulation. When I wanted to make it, I was looking for a good company for a long time, this company nano34 did it for me.
Alex59:
You know a lot of different little things in this matter! When I was going to make a warm floor last year, I was advised to contact s.caleo guys, they all came and measured the next day, the floors were already ready, so there’s nothing to rack your brains for help. GOOD LUCK
Is it possible to cut underfloor heating
01.03.2019
The error in determining the length of the heating cable (including the electric mat - and the mat is also a heating cable, only on a grid) is quite common. The linear length and area, for example, of a mat, are often confused, the features of a room with a complex configuration are not taken into account, an arithmetic error is simply allowed, etc. As a result, after a part of the heating cable is laid, it turns out that there is a lot of excess left. What to do in this case?
exchange cable
Most likely, it will not be possible to return the cable with traces of installation, because such a product can only be returned if you understood the error before the installation began. If, for example, your foreman or electrician made a mistake, then he can take too long a cable for himself for the following objects, where it is more suitable, and buy a cable or mat of the right size for you. This is one of the solutions to the problem.
Reduce paving step
For heating mats and cables, it is possible to simply reduce the installation spacing within the limits specified by the manufacturer, i.e. reducing the distance between the turns of the cable. For example, the grid of heating mats is cut and the distance between the loops is reduced. All changes made must be documented. We recommend taking photos, and do not forget to draw a laying scheme.
Lay underfloor heating under furniture or bath
Is it possible to lay underfloor heating under furniture, bathroom, washing machine, etc.?
Of course, there is usually no point in heating the area under the bathroom or furniture, at the same time, if there is a little cable left, then in some cases, this is acceptable. Many of the manufacturers point to this possibility, stipulating, for example, the presence of furniture legs - 10-15 cm for heat dissipation.If a warm floor is made, for example, under a washing machine or large furniture with small or no legs at all, then the cable in this place will overheat, which will reduce its service life and ultimately may cause the cable to burn out.
Is it possible to glue tiles on an OSB board?
The bathtub has the required legs. But what if you planned an apron, for example, from drywall with tiles? In this case, it is difficult to say with certainty whether proper heat dissipation will take place and whether there will be overheating. At the same time, cable repair, if it fails, is very difficult, because. you will have to disassemble the entire structure and remove the bath. In the presence of such an apron, as a rule, only a technological hole is provided, which is closed by a panel with magnets, for example, for a plumber.
Lay the rest of the cable in an adjacent room or on the wall
One solution that is used in such cases is to lay part of the cable on the floor in an adjacent room (for example, in a corridor or hallway) or even on a wall.
shorten the cable
It is usually possible to shorten the heating cable. But no more than 10% of its length. You will need special tools and materials, and the work itself must be carried out by a specialist. Foreign heating cables are designed for foreign voltage of 230-240 V. Our voltage is 220 V. With proper termination of the remaining end, the characteristics of the cable will not change significantly. But this termination must be carried out by a competent craftsman. The cost of work is 2-3 thousand rubles (price level of 2014). You can specify the cost of the arrival of the master and installation of the coupling in the Repair of underfloor heating section. When sealing, special crimp sleeves, heat-shrink sleeves and a building hair dryer are used. You should not try to do it yourself with the help of universal tools and tools, because. in this case, there is a high probability that you will have to repair this place again, and for this you will already need to remove the tiles and open the floor.
In any case, before taking any irreversible action, we recommend that you evaluate your options and consult with experts. You can just call us.
Source: heat-svetlo.ru
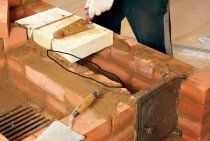
Ceramic tiles for heating
How to make a warm floor with your hands. Underfloor heating installation - Repair
So, the floor was chosen and bought, it was the turn of installation. The manufacturer claims that the mats can be laid in tile adhesive immediately under the tiles, but this is too easy for us :) In addition to laying the warm floor, we had another important task - to raise the level of the floor itself by 2.5 cm so that the tiles fit well with future parquet.
We consider how much: the thickness of porcelain stoneware is 8 mm, the tile adhesive is 4 mm, 13 mm remains - it is to this height that the floor needs to be raised. Next, we used photos from the website of the underfloor heating manufacturer and our own photos taken during the repair process.
1. First of all, you need to mark the location of the sensor and the underfloor heating controller, make a recess for the sensor:
A warm floor cannot be installed under a kitchen set, so keep this in mind when calculating and marking the floor. We retreated from two walls of 60 cm - the depth of the cabinets. From the wall with the battery - about 20 cm. There we do not need to heat the floor either.
2. Our floor is already filled with construction screed. We clean it of dust, sweep and vacuum, then cover it with a layer of primer. We mark where our warm floor will lie.
3. Install the corrugation for the sensor and grab it with plaster:
In the manufacturer's pictures, special tapes for mounting the wire are installed. We use mats.
4. Roll out the mats by cutting the mat and turning it in the desired direction
It is important to remember that the wires cannot be cut! Grid only. We have two separate blocks of mats here - 5 squares and 1.5 squares. They are attached to one regulator. We glue the mats in the corners to the floor with plaster so that they do not move or rear up
5. On top of the mats, we install metal beacons at the level we need. To do this, any building mixture is diluted - tile adhesive, plaster, glue for blocks - whatever. Hills of the required height are formed, on which beacons are laid. We check the evenness with a building level.
6. Pour the mortar-screed over the mats, between the beacons, align the screed with the rule.The screed should be quite liquid in order to spread well and fill all the voids. We had to install an additional fence in the form of a board in order to get a smooth edge on one side. We add water and a plasticizer additive for a warm floor to the dry mortar for the screed. We took Polish - Plaston. This may not be done, but it is still recommended, at least this is a small insurance against the fact that the screed can “buzz” and ruin the wire for us.
After the screed dries, you will need to get all the beacons, close up the resulting recesses with the same screed, and tiles can be laid on top. The sensor will be lowered into the corrugation installed by us, and we will connect the output wires of the warm floor to the regulator. A 13 mm screed like ours will dry for about a week. This is complete drying and curing. In reality, after 36 hours, you can already carefully walk on it.
Infrared floor design
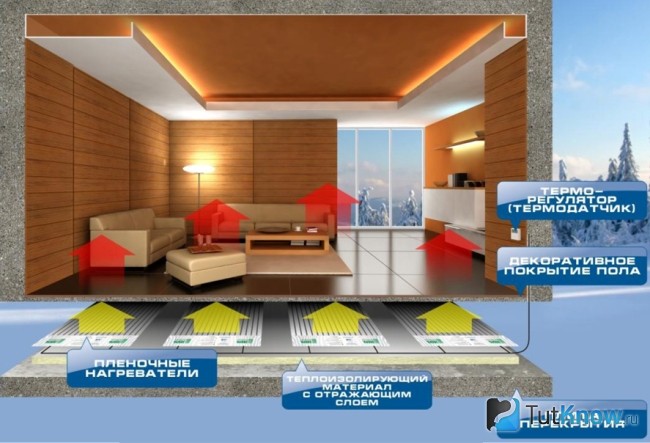
The main difference between infrared floor and other heating is its principle of operation. The energy of the warm infrared floor is not used to heat the air in the room, but is used to heat objects in its closed space. Those, in turn, accumulate and give off heat to the room, maintaining a natural microclimate in it. Infrared radiation is absolutely safe for the health of living beings and is comparable to solar heat.
The infrared heating system is made on the basis of heating elastic mats or lavsan film. The heating element has the form of conductive strips, which are arranged in 15 mm increments and are made according to Carbon NanoTube technology. Electricity, which initiates the heating element, is supplied to it through copper-silver contacts. The entire system is sealed on both sides with a polymer that has enhanced electrical insulating, fire and waterproof properties.
The connection of the infrared floor heating to the mains is carried out through the thermostat in a parallel way. The tightness of the connections, the high quality of the materials used and the use of carbon adsorbent spraying ensure the operation of the heaters in an efficient and continuous mode. Thanks to the parallel connection, the system will function even if any of its sections fails. Sometimes this happens with mechanical damage.
How to shorten the underfloor heating cableConiferous
Underfloor heating is no longer a luxury, but often a forced necessity for many people, because our winters are cold, and developers rarely worry about keeping everyone warm.
 So it is not surprising that many of us try to insulate as much as possible, including installing a warm floor. And everything goes very well if the floor is properly installed and everything works fine. Yes, sometimes there are situations when the cable for the warm floor is made too long, which causes great inconvenience, especially considering that during installation it is necessary to make sure that the cord does not bend or break anywhere, otherwise there may be big problems with operation, yes and no one then guarantees your safety. You have to be careful with electricity.
So it is best that even before installing a warm floor, its length is taken into account, because it is worth shortening the cable only in extreme cases. So take into account in advance that only the part on which there is no furniture is heated, and carefully measure all the parameters of the room.
But if, nevertheless, some kind of mistake happened and not everything was taken into account, then sometimes it is necessary to shorten the underfloor heating cable.
But, before doing this, you should find out that manufacturers do not support such an idea and strongly do not recommend shortening the underfloor heating cable yourself.So if you had a valid warranty for such a floor, then it automatically ends when you decide to shorten the underfloor heating cable.
Don't forget about it.
As for the process itself, try not to do it yourself, but still trust the hands of a professional. Find a good craftsman who will help you cut the cable correctly so that there is no short circuit later, and so that the whole structure does not burn out.
But still, if you decide to do it yourself, then, after cutting the wire itself, put a resistor in the cut that will limit the current.
This must be done, because when the cable is cut, its resistance decreases significantly, as a result of which the current increases.
It is also very important to choose the right resistor, because if its value does not correspond to the resistance that was inherent in the piece of wire that was cut off, then again problems may arise, due to which the entire structure will have to be changed. Bath interior options
Bath interior options
Multizone air conditioners