Furnace heating design
Before direct construction work, a special project must be made. Its formation is considered a rather complicated work that requires the ability to make certain calculations. It includes a detailed diagram of the future furnace, as well as ordering and some other documents.
The project should include many nuances, so it is important to consider the following features of the house itself and the future furnace when creating it:
What material is the house made of, since it can be formed from timber or SIP panels, and it is also often necessary to install a fireplace or stove in a frame structure.
Will the design be cooking and heating or will it be intended exclusively for space heating;
Whether a fireplace or stove will heat two or more rooms.
What will be the configuration of the structure, as well as its shape, for which its separate scheme is made.
Since the stove is usually made of bricks, ordering is important, and the choice should also fall on high-quality and reliable bricks.
It is important to consider what size the building itself has, since the power of the resulting heating structure must be appropriate.
The project should contain calculations of the wall thickness of the future structure, its height, features of the material from which the chimney will be made, as well as other nuances and elements of work that will be implemented by hand.
Consider air circulation.
For effective heating of the room, take into account air circulation: warm air rises, and cold air descends.
Therefore, when choosing a stove or fireplace, consider their placement. You may need to purchase a ceiling fan or other appliances. If the fireplace is located on the first floor, and the second floor is also planned to be heated, you need to see how warm air will be supplied there. The first option is free circulation. But then the heating will be uneven: in distant rooms it is colder and they warm up longer. And if the premises are isolated (the door is closed), they will not warm up at all, or the warming up will be very long. The second option is to separate the sleeves with warm air, when warm air flows from the heater through the duct and enters the room through the ventilation grill. Here you need to consider how long you need to pull the sleeves - for a long length, you may need a special fan.
Types of foundations for a stove in a wooden house
When choosing a suitable foundation, consider the following:
-
Installation cost
- the price of building materials, installation and preparatory work is taken into account. -
Foundation characteristics and soil features
- the choice is based on the total weight of the structure, the type of soil (clay, sandy, black soil, stone). -
Dimensions of the foundation for the furnace in the house
- depending on the area occupied by the furnace equipment, the total weight of the structure, the required type of base is calculated.
All existing foundations are usually classified into several groups:
- On piles and poles.
- Concrete bases.
Foundations on piles and pillars
The base is made in three ways: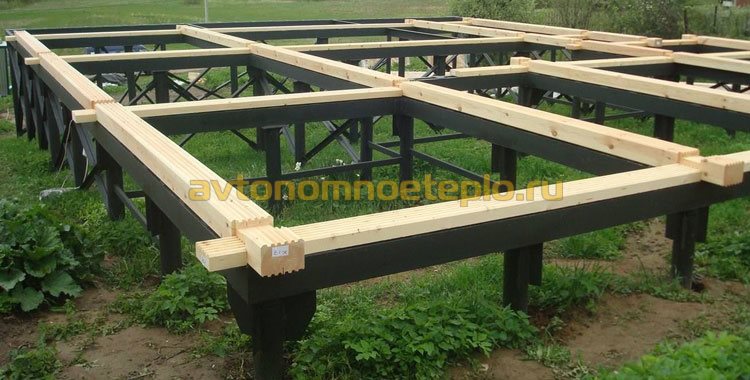 If you want to make a foundation for a stove in a wooden house with your own hands, without the involvement of outside help, it is better to choose a pile structure that is easy to install and does not require (with the exception of a screw device) serious material investments.
During installation, the foundation is insulated, thereby preventing the appearance of condensate on the walls of the furnace or lining. Poles without insulation will be "cold bridges", which will negatively affect the operation of furnace equipment.
Foundations made of concrete
Device advantages
: the ability to withstand heavy loads on strength, the possibility of self-manufacturing, relatively low financial costs.
Minuses
: time required for installation and excavation.
The concrete foundation is made in two ways: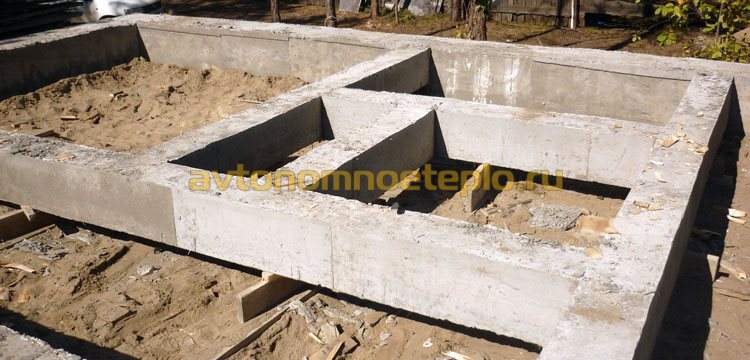
The foundation is gaining strength gradually. The installation of a metal furnace and lining it with stone is started no earlier than 28-30 days after pouring concrete.
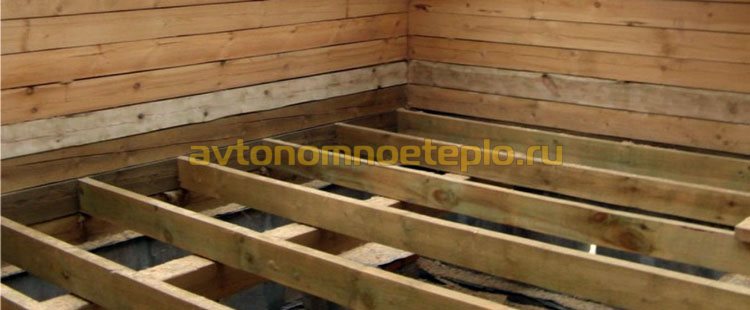
Floor placement (installation on the floor)
The existing building codes for installing a home heating stove in a wooden house allow you to mount equipment that does not have a cladding directly on a wooden floor. When installing on the second floor, you will need to strengthen the logs with metal corners and channels.
To prevent fire, the tree is protected with a metal sheet or a clay-brick layer. Otherwise, self-installation of a wood-burning stove in a wooden house is not difficult.
Manufacturers of heating equipment must include detailed installation instructions. By following the recommendations and the step-by-step installation plan specified in the technical documentation, you can independently install the stove and connect it to the chimney.
The main characteristics of stoves for home heating
The main characteristics of stoves for heating a house, which must be taken into account when choosing a design, are heat capacity and cooling time.
Active Volume
- a value characterizing the volume of the furnace mass, which is heated during the combustion process (including the voids of the structure). Its value is determined by the product of the calculated (active) height of the furnace and the area of the lower level of the furnace. The active height in the calculations is taken from the bottom of the furnace (or the bottom of the furnace channel located below) to the upper (if the ceiling thickness is less than 14 cm) or lower (14 cm) ceiling plane. If the value of the active volume is 0.2 m3 or more, then such furnaces are classified as heat-intensive, if less than the specified value, they are classified as non-heat-intensive.
According to the temperature of the heat-releasing surface of the furnace, they are divided into:
- moderate heating (having a wall thickness of 12 cm or more, warm up to 90 ° C);
- increased heating (having a gas duct wall thickness of up to 7 cm, they heat up to 110-120 ° C);
- high heating (surface heating temperature is not limited).
Depending on the movement of flue gases, furnaces can have the following schemes:
- flue gases move through channels connected in series: single-turn - with one lifting channel, double-turn - with two lifting channels;
- flue gases move through channels connected in parallel: single-turn, double-turn;
- flue gases move freely: channelless (bell-type);
- flue gases move through a combined system of channels with bottom heating: with a channelless overhead part, parallel, sequential;
- flue gases move through channels connected in series around the heat-air chambers.
Classification of furnaces according to the type of finish and material of the array in descending order of heat capacity: brick tiled; brick and metal in cases; brick plastered; steel with an internal lining of refractory bricks; concrete from heat-resistant blocks; cast iron without lining.
Flue gases in furnaces can be removed:
- through root and mounted chimneys;
- through internal channels.
In the brickwork of the building, in-wall smoke channels are laid. Furnaces are connected to them with metal pipes placed horizontally. The length of these nozzles should not exceed 40 cm. Packed pipes are placed above the furnaces. Sometimes root pipes are laid out on independent foundations.
According to the functional purpose, the furnaces are divided into the following types:
- heating;
- household;
- special;
- heating and cooking;
- furnaces-heaters;
- combined.
It is desirable that the selected design has a high coefficient of performance (COP), warms up well over the entire surface and gives off heat evenly throughout the day. The furnace should be simple, technologically advanced, reliable in operation and safe.
The heat generated by the furnace must correspond to the heat loss of the room. In this case, the air temperature in the room will always remain at the desired level.
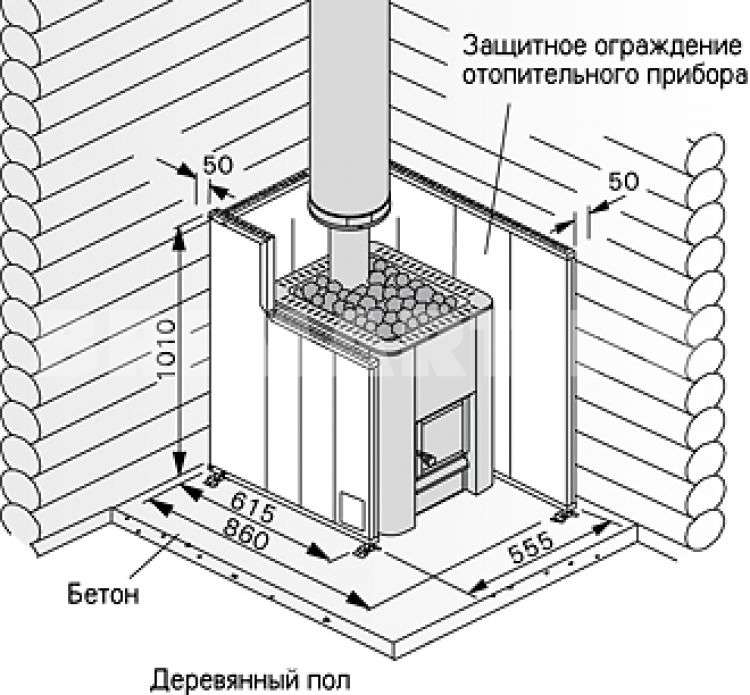
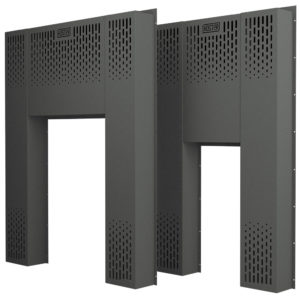
Application of protective screens
Screens are shields made of brick or metal, covering the walls from intense thermal radiation. Similar protection is used when installing metal furnaces.
- Metal screens are made from steel or cast iron sheets, these
casings surround the heat source with a distance of 3-5 cm.
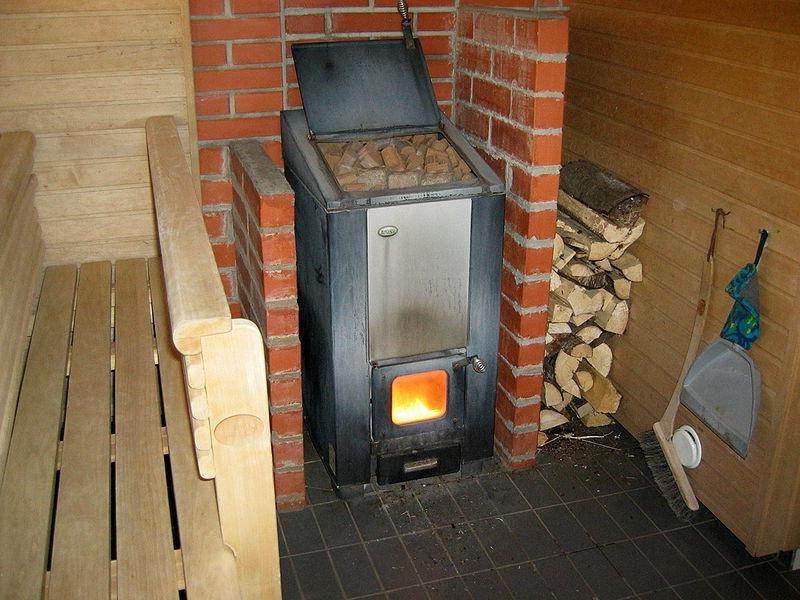
Advice! When purchasing a metal stove for a bath, you should give preference to a model equipped with a metal casing. Its cost is not much higher, but the issues of wall insulation are removed.
Additional front or front shielding, which is located on the walls, depending on the location of the furnace, will not interfere. Protection guarantees wood from overheating, reducing t ° by 100 degrees or more, and provides an opportunity to save space in the steam room. The oven protected by a casing can be installed at a distance of 50-55cm from the wall.
Screen installation is simple. The casing, equipped with legs, is attached to the floor with side or front screens - with galvanized nails or self-tapping screws.
- Brick screens are masonry, which sew up the oven with
all sides, the same casing, only made of brick. Another way is laying half a brick between the firebox and a wall of solid fireclay bricks laid on a solution of clay and cement. The width of the wall should be 120mm, although there is an opinion that it is permissible to put 60mm bricks in a quarter, but it should be remembered that in this case the thermal insulation index is reduced by exactly half. In height, it is recommended to raise the masonry 20-30 cm above the surface of the firebox, but if you raise it to the ceiling, it will not be worse.
The screen should be placed at a distance of 10-15cm from the wall, 5-15cm from the stove, that is, the space saving is 30-40cm
Important! In the lower part of the masonry, functional holes for heat transfer should be made. Protective screens are effective, they reduce the temperature to a level acceptable when using high-temperature fuel units
The same function is performed by wall cladding made of non-combustible materials.
Protective screens are effective, they reduce the temperature to a level acceptable when using high-temperature fuel units. The same function is performed by wall cladding made of non-combustible materials.
Types and features of two-story ovens
Two-level hearths are of two types: with one and with two fireboxes. For a country dwelling, the most interesting are two-story "Swedes", complemented by a hob. There are modifications with couches, but heavy extensions are always on the first floor. On the second level, a false or functional fireplace is sometimes built, the first one increases heat transfer, and a full-fledged fireplace insert helps to quickly warm up the room.
In models with one firebox, the combustion chamber is located on the ground floor, while vertical channels must be provided on the upper level. For separate heating of floors, dampers are used to block the movement of flue gases.
Stove for a two-story building with one firebox, stove and fireplace
Some stove-makers do not recommend choosing models with one firebox for the house, since the cooling flue gases form condensate in the second-level heating shield, which destroys the masonry. Designs with two fireboxes heat the room faster and are more convenient if there is often a need to heat one floor. Schemes of stoves with two fireboxes necessarily include two-channel chimneys.
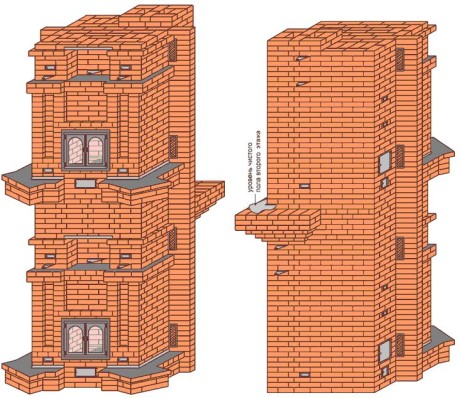
Modern brick two-story hearth with two fireboxes
Brick ovens for a two-story house weigh almost twice as much as standard modifications, so a reliable foundation is needed. No less durable should be the interfloor ceiling - a concrete reinforced slab that can withstand the weight of a brick building. The place for installation is chosen along the main internal walls.
Heating of a one-room house

There are three ways to place a stove in a house where there is only one room and not a single wall is supposed to be, even separating the kitchen or hallway.
- If the room is not very large, such a fact as free space comes to the fore. A stove, even the smallest, if placed in the middle, will steal a lot of it. The heat transfer in this case will be maximum, there is nothing to say here, but constantly cruising around it is not very convenient. This option is suitable only with a spacious room.
- If you put the stove against the wall, there will be more free space. But, you say, in this case, one working surface of the wall will work idle, directly heating the wall near which it is located. This is true, and in this case, the wall must be protected from overheating with the help of heat-insulating materials. Or put the stove so that there is a small gap between it and the wall, at least 15 centimeters wide. And the wall will be safe, and the warm air circulating in this opening will also work to heat the entire room.
- In very small houses, a stove of a special design is placed in the corner, observing all safety measures. Usually two working surfaces are enough to heat the entire room.
However, we must not forget that real craftsmen-stove makers can even make a small stove in such a way that it can fit a stove, an oven and other accessories. Well, with proper operation, it will heat no worse than a real Russian village stove.
Protective screens near or around the oven
Such a system will need to be performed when installing a potbelly stove in the corner of the room. You can mount or lay out of brick several screens installed at a short distance from each other. In this case:
- the first screen protects a person from touching the iron furnace and getting burned. It is customary to make it from refractory or fireclay bricks;
- to protect walls made of combustible material, a second layer of protection is provided. It can be laid out in brick or covered with a sheet steel barrier with a mirrored front surface. In this case, heat waves will be reflected from the mirror and spread faster around the room;
- if the foundation is insufficient in size or it is impossible to manufacture it, it will be necessary to lay a protective screen made of durable refractory material on the wooden floor. It can be a sheet of steel or a decorative layer of heat-resistant clinker tiles or porcelain stoneware. The surface will first have to be covered with a layer of thermal insulation.
Installation of metal screens
This is the easiest way to make surface protection. It is better to use sheets with a polished front surface. Before fastening, the wall surface at the desired level along the height of the screen is covered with a layer of thermal insulation. Thus, we protect the surface of the walls from heat.
You can lay a layer of thermal insulation or fix the metal on self-tapping screws with inserted ceramic gaskets. But it is better to fix the screen on the strips treated with a layer of protection or a metal profile. In this option, the air gap will not allow heat to pass freely to the walls, reliable insulation of the stove from the wooden wall is ensured.
A special gap is made in the lower part of the wall for the passage of cold air, ventilation of the wall and screen. When arranging the wall with a layer of thermal insulation, a number of longitudinal guides are installed on the surface. The space between them is filled with a layer of mineral wool or other material.Then sheets of metal are installed, screwed to the crate with screws.
In this design, the gap in the lower part can not be left. The air will not be able to calmly pass, but the wall will be reliably protected from high temperatures. To protect the floor of the house, a plate made of non-combustible durable material can be used.
brick screens
This protection option is usually installed near the furnace. Thus, it is possible to protect not only the wall, but also a person from burns. By installing a brick wall, you can reduce the distance from the stove to the wall. For laying, it is better to use ceramic or refractory bricks.
The work is carried out in several stages:
- you will need to make a small foundation or remove the boards from the floor along the marking lines for laying the screen and, having drilled holes in the concrete of the base of the building, insert metal rods to fasten the bottom of the wall and the foundation;
- having leveled the floor surface, lay out a layer of mortar and lay the first row of bricks, it is required to place the bricks in the same plane without distortions. It depends on how even your entire wall will stand. Do not forget to make small ventilation slots, for this you can move a few bricks from the bottom row.
- checking the level and pulling the twine for laying each subsequent row, all the bricks are laid on a mortar of clay and sand. Having raised the wall to the required height, the top is sealed with a layer of mortar or covered with a board. So you can make a shelf for decorative ornaments and all kinds of little things.
The brick is laid out no higher than the top of the furnace at a distance of at least 40-100 mm from it.
With the help of protective screens of both types, it is possible to reduce the distance from the furnace to 500 mm.
Examples of installing brick protective screens in the photo:
What criteria should have a stove for a summer residence
Many consider the traditional brick oven (Russian, Swedish or Dutch) to be the best option for heating a summer cottage. However, such devices are designed for continuous use and are not very suitable for occasional heating, because. take too long to heat up. To raise the temperature in the house, they sometimes - it depends on the weather - need more than a day.
For quick heating of a room that has not been heated for weeks, not traditional, but modern metal stoves are better suited - Buleryan, Breneran, Butakova. They give a comfortable temperature much faster - within a few hours
What else is important when choosing a means for heating the cottage?
- Ease of installation. Not everyone is ready to spend a lot of effort and money on building a reliable and massive brick oven in a small country house.
- The speed of heating the room. The dacha resident, having decided to raid the dacha on the weekend, does not agree to sit in a cold house for a long time - he wants to be warm faster.
- Duration of burning of the furnace. Getting up at night, in the cold, to put firewood in the firebox is not a job for the faint of heart. And in the daytime, you don’t want to work on the stove all day. What's the rest like?
- Fire safety. Many country houses are wooden, so the issue of reliability and safety of heating equipment is one of the first places.
Heat-efficient furnace with one firebox
This two-story model has a high heat capacity - one firebox per day for 2-2.5 hours is enough to heat the house. Fuel consumption - about 60 kg of dry firewood. Average heat transfer - 5500 kcal / hour.
Design description and materials
The channel single-turn furnace has one fire chamber on the first floor. Dimensions of the building: 89 * 115 cm. Height - 715 cm. The dimensions of the heating shield on the lower floor are 77 * 102 cm, on the second floor - 77 * 95 cm.
For masonry, you will need the following materials and stove appliances:
- 1900 red ceramic bricks;
- 170 pieces of fireclay bricks;
- 2.1 m3 of red oven clay;
- 0.2 m3 refractory clay;
- 2.3 m3 of mountain sand;
- grate (40*40 cm);
- steel sheet (50*70 cm);
- firebox door (35*35 cm);
- blower door (13*12 cm);
- 5 cleaning doors (13.5*12 cm);
- 2 latches (13*26 cm).
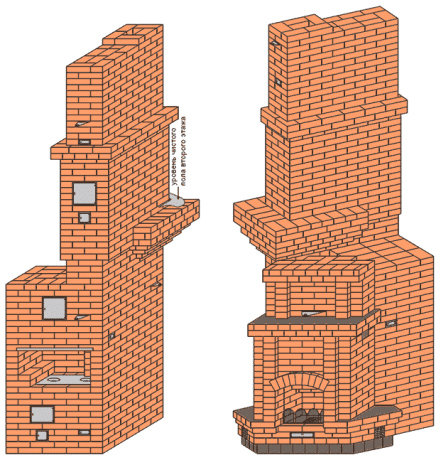
Sections of the building and masonry scheme
A detailed arrangement of the furnace on 2 floors clearly shows the arrangement of smoke channels and the principle of gas movement. Red and fireclay bricks in the scheme are easy to distinguish by color.
Important! Ceramic and refractory bricks must not be tied in the same dressing. The scheme is completed by a shell-type pipe erected directly above the furnace
The scheme is completed by a shell-type pipe erected directly above the furnace.
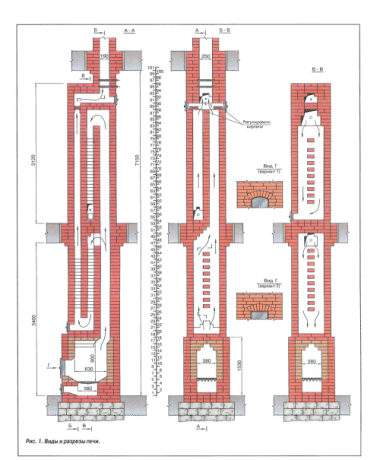
Sections of a bunk oven
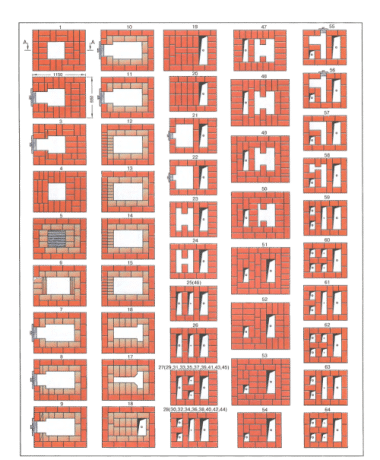
Masonry from 1 to 64 row
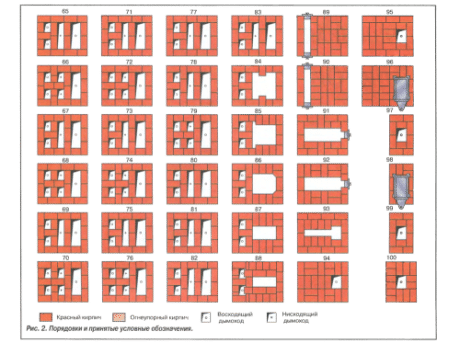
Top row layout
The presented model is designed for a ceiling height of 3.4 m, but if necessary, the structure can be easily reduced or enlarged by amending rows 26 to 46 and 60 to 82.
Note! Modernization will entail changes in the heat transfer characteristics specified in the description
How to help your stove burn more efficiently
How can you “make” a metal stove heat up longer and more efficiently perform the function of heating a house? Let's consider some options:
Some summer residents recommend overlaying a metal stove with bricks. In their opinion, the body will first heat the bricks, and they, in turn, giving off heat, will heat the house. This is the principle of operation of a conventional stone stove. Theoretically, this is so, but there are several buts. Firstly, the brick will still not warm up as much as in a traditional oven, which means that you will not achieve the desired effect. Secondly, you will also reduce the life of your stove. Due to the lack of free space, the metal case will not cool well. For this reason, the metal will burn out faster. And finally, due to the strong heating of the case, the risk of fire increases. By the way, some people lay bricks over a metal furnace for safety reasons (approximately 2/3), because. In the lower part, such devices get quite hot.
Another option used by summer residents is a water tank. Suitable for ovens with a horizontal top surface. Place a container filled with water on top. During a strong burning, the water will heat up, and then it will gradually give off its heat to the room
This method cannot be called very effective, but for some time the heat of heated water is enough.
It is also important what kind of wood you use for heating.
Here, pay attention to 2 criteria: the combustion temperature and the amount of tar, tar, oils, etc. released during combustion. - substances that contribute to the formation of soot
Soot is formed when any firewood is burned.
However, most of all substances that clog the chimney are present in coniferous firewood (resin), in birch logs with bark (tar is present in it) and in fuel briquettes, which consist of seed husks (oil). Therefore, they should be avoided whenever possible. We recommend using hardwood firewood for heating: they emit a lot of heat and little soot-forming products.
Of great importance is also the quality of the fuel with which you "feed" your stove. In no case should you burn the waste that remains from the repair in the oven: the remains of fiberboard, chipboard, chipboard, etc. This will harm not only the heater, but also your health. We also do not recommend burning branches, tree trimmings and similar debris without prior drying, because the firewood (or the material that replaces it) should be as dry as possible (according to the instructions for such stoves, their moisture level should not exceed 20%). When burning undried firewood, moisture evaporates. Water vapor rises. There they meet small particles of ash, which is formed during combustion, and stick them together. The resulting pieces settle on the walls in the form of soot and soot.Thus, wet wood clogs your stove. Thirdly, when using such firewood, it is not possible to reach such a temperature as when burning dry ones.
Metal stoves are generally not designed to keep heat. They heat only while they are burning. Therefore, in order for the device to warm the air for as long as possible, it is necessary to properly organize the combustion mode. Such furnaces have a long burning mode. It is quite economical, because. does not require a lot of fuel.
Summer residents who have been operating such heating devices for many years recommend the following algorithm of actions:
- Light the stove and heat it well.
- When the firewood burns with a bright flame, add an armful of dry firewood to the firebox - about 2/3 of its volume. Some people add firewood in combination with fuel briquettes, some only briquettes (not made from seeds).
- Close the valve and blower. Due to the lack of oxygen, the firewood will not burn with a strong flame, but only smolder. Thanks to this, one bookmark can last for 7-8 - and even more - hours. This method saves fuel and your strength, and also gives a constant comfortable temperature in the room.
Each heating device requires a special attitude. If you study all his whims and fulfill all his wishes, he will thank you with his warmth.
How to protect a country house from fire when installing a stove
- The use of thermal insulation materials with a high degree of fire resistance to protect walls and ceilings at the installation site.
- Application of fire protection: impregnation and mastic.
Fire retardant treatment of wooden structures
Mastics and impregnations have been developed for protection. The former provide better fire protection, the latter are almost colorless.
The sequence of installation regarding fire safety measures specified by the manufacturer is specified in the technical documentation. Fire protection works are carried out by representatives of the Ministry of Emergency Situations. It is possible to carry out fire prevention measures on your own, but before putting the furnace into operation, you will need to obtain a certificate from the inspector of the Ministry of Emergencies on the fulfillment of all the requirements of the PPB.
Detailed installation parameters of a solid fuel heating country stove are described in the technical documentation attached to heaters from leading European and Russian factories. Compliance with the described rules is mandatory.
Since ancient times, it was believed that the stove in the house is the main property. It not only heats and makes it possible to cook delicious and healthy food. She is a symbol of comfort, a hearth that should be kept and protected. Therefore, stove-makers have always been considered a privileged caste. After all, it was necessary to fold the house nurse in such a way that it could be quickly and hotly heated, so that in the most severe frost the whole house would be warm and comfortable, and the sizzling of cooking food and the aroma of pies would spread from room to room. But before you start building, you need to calculate the location of the furnace in the house. So that not a single molecule of heat is wasted in vain.
The first and indispensable requirement when choosing the location of the furnace is the complete design of the house. That is, the location of the stove in the house should be planned simultaneously with the walls. In this case, it will not turn out that it will be unbearably hot in one room, and the frost will be fierce in the other. And the foundation under it is much easier to fill before the floors are laid.
But there are other rules to follow.
The foundation for the furnace must in no case be connected to a common foundation. The house will definitely shrink over time and the least that will happen is the stove will be covered with cracks, from which wisps of smoke will constantly curl, making it impossible and even dangerous to stay indoors. Well, at most it will simply warp and a very large repair will be required.
The place must be chosen in such a way that the chimney is in close proximity to the internal main wall
It will be possible to support the pipe on the ceiling beam.
Be sure to take into account the layout of the house. Number of rooms and windows
The need to heat the second floor, if any. And the material from which the house is built.
Next, the approximate heat loss of the entire structure is calculated. From here, the heat transfer of all surfaces of the stove is calculated.
The design of the furnace itself must also be thought out in advance.
Well, the last. If the house is too large and one heater is not enough, you should calculate how many stoves you will need to put in general and in what places.
Many years and even centuries of experience shows that building too many chimneys means spending an increased amount of firewood. It is not necessary to make a separate stove for each room. The ideal location is called so because with a minimum of space, the largest possible area is heated.
And one more important fact
The stove, no matter what type of fuel it is heated, is a device around which some amount of garbage, dirt, ash, soot and other dirty substances always accumulate. Therefore, it is better to make a firebox opening in a room that is closest to the front door.
Then you don’t have to carry firewood, buckets and bags of ash through the whole house. Believe me, after these voyages, the rooms will definitely have to be cleaned.
Heating of a multi-room house
One-room houses can now only be found in collective gardens, where the size of the garden is much more important than one's own comfort. And in winter, the owners rarely come there, and the house usually stands unheated from autumn to spring. By and large, this is not required, so a small stove is enough for them.
Another thing is when the house is multi-room or even two or even three-story. There is no way to do without a well-thought-out heating system. And if in order to heat the second and even more so the third floor, you have to design and lay an entire heating system, for example, water or air, then in a one-story house you can get by with one, properly located stove.
And then you have to dance ... not from the stove. And on the number and location of rooms and interior partitions.
As already mentioned, the location of the Russian stove must be calculated at the design stage of the entire structure. And not just point your finger at the plan of the future home, but think carefully about where the entrance hall, kitchen, bedroom, and so on will be. It will depend on this not only where the stove will stand, but also in which direction it will be turned, which means that the stove-maker will be able to fold it in the most optimal way, laying the chimney so that it heats the necessary surfaces, and the cleaning holes would not come out above the bed .
- Two rooms. For their uniform heating, the stove must be built into the interior partition so that it has the working surface of the stove in the first room, and the second in the second. Firebox to do in the room that is closer to the exit.
- Three rooms. In this case, you really have to dance from the stove. It should be located approximately in the middle of the entire building, and the interior partitions should be attached to it so that the stove is evenly divided between all three rooms. An exception in a big way can be made in favor of the kitchen.
- Four rooms. And such an option is quite possible. The principle is the same as in a three-room house, only the stove will have to be divided into four parts. And it's easier than ever. The Russian stove is usually four-sided, so there shouldn't be any big problems.
- Stove with a fireplace. This option requires more skill from the stove-maker than from the designer. It is he who must fold the stove in such a way that in one room there is an ordinary firebox and, if necessary, a stove. But in the second fireplace hearth.The difficulty is that the firebox in the fireplace is open and a direct chimney is needed to create traction, otherwise the fireplace will smoke into the room.
In even more spacious houses, or in those where there are only two, but huge rooms, a single stove may not be able to cope. And then you have to put an assistant to her, or make a heating system.