Compost box with your own hands what to do
To make compost in the country, people use various improvised materials. Some simply dig holes and throw torn weeds into them, others adapt old containers (barrels, boxes, etc.) for this purpose, and still others take the matter of making compost so seriously that they build special boxes for this purpose. Naturally, the most optimal material for the manufacture of this device is wood - of course, they don’t buy it on purpose, but use a used one. For example, they disassemble unnecessary wooden products - in most cases, pallets for building and other materials. The board used for them is usually good and it fits perfectly for such a device - a pallet compost box lasts a very long time.
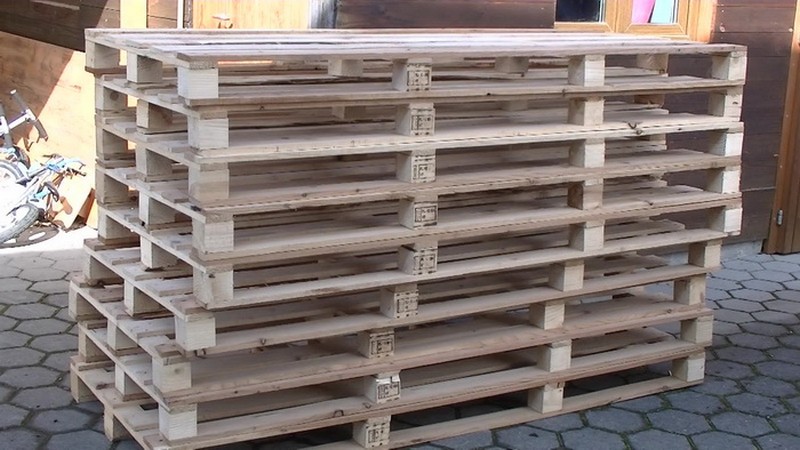
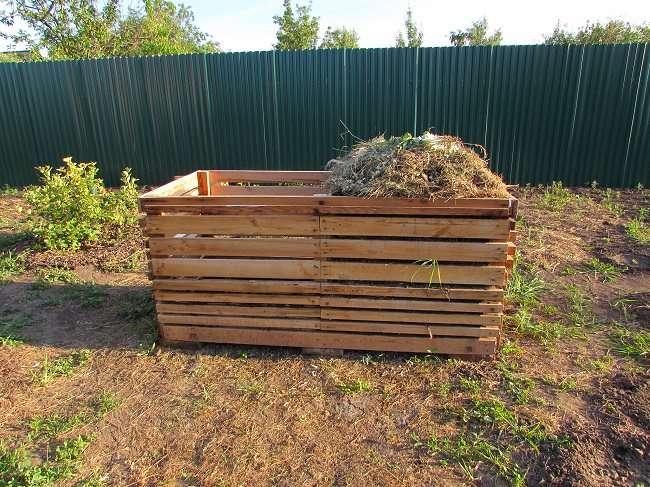
Pallet compost bin photo
In addition to such wood, you will additionally need a wooden beam with a section of 50 by 50 mm, a large pile of self-tapping screws, trimmings of the UD drywall profile (guides will be made from them, which will allow you to get easy access to the finished compost, usually located at the bottom of the box). Also, it will not be superfluous to think about tools - the boards will need to be cut, and the screws to be screwed. In addition, you will need a shovel to install shields - in principle, this is a standard country tool that is available in any country house. And one more thing - despite the fact that solid wood is used for the manufacture of pallets, it will not be superfluous to take care of its safety. Impregnate with an antiseptic composition and, if possible, paint - after such processing of wood, a compost box made from it will serve for a very long time. You can see how to make a compost bin with your own hands in this short video.
How to make a compost bin with your own hands dimensions and layout
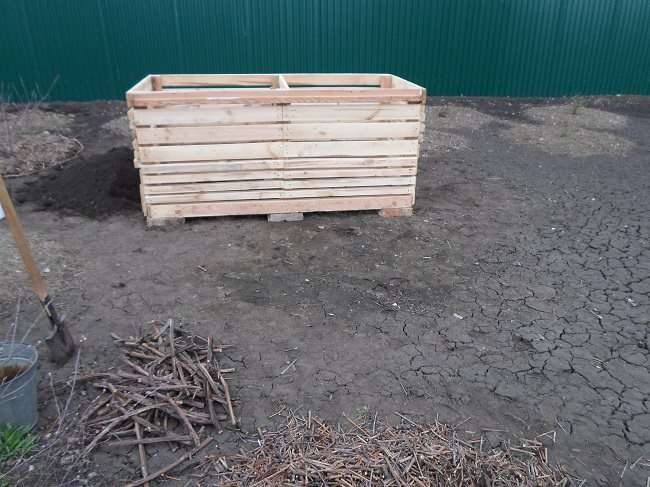
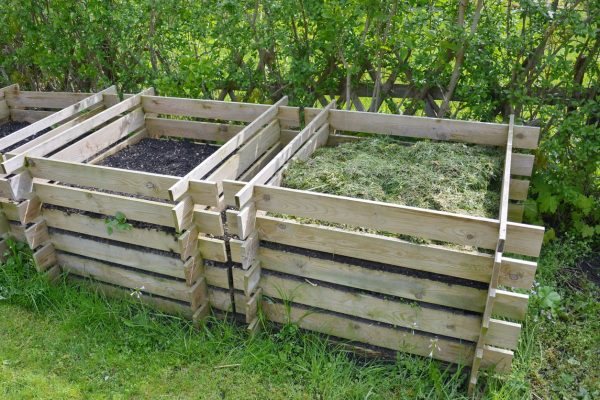
In principle, no one will give you any exact dimensions of compost bins - for the most part, their dimensions are determined by the area of \u200b\u200bthe cottage (or rather, the amount of grass pulled out per year) and the size of the source material. You have boards with a length of 2000 mm, which means that the dimensions of the box should be adjusted to fit them. This will not work with pallets, since their width is approximately 1000mm - not enough, of course, but there is a way out. You just have to do not a single box, but a double one. On the one hand, this is even better - you get a two-year compost bin. In one you load the grass this year (next season it will be used as a ready-made fertilizer), and the mowed grass will be loaded into the second compartment. Thus, compost in the required quantity is at your disposal.

How to make a compost bin in the country
This is with regard to the design of the compost bin - we have decided on it. Now you can safely do the preparatory work. They are not difficult, and all you need to do is three things.
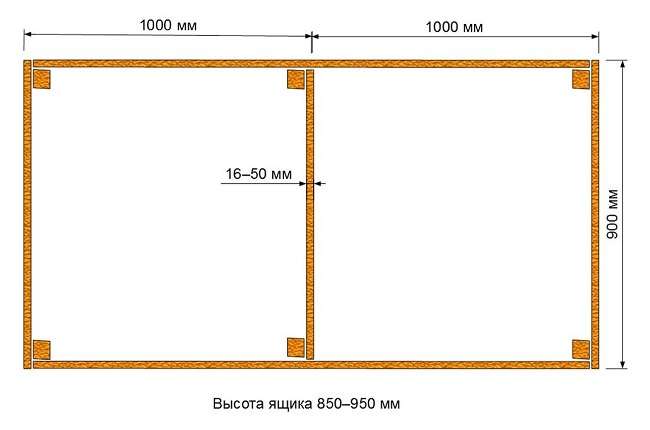
- First of all, mark a rectangle with a size of 1115mm by 2230mm in the selected place of the summer cottage and install four pins in its corners, on which to pull the thread.
- According to the stretched thread along the long side of the box (on both sides), at a distance of 1115 mm from any corner, install a couple more pins - these are the middle racks that divide the product into two equal parts.
- Dig holes 300-400 mm deep in the places marked with pins.
In principle, this is all the preparation, having finished with which it will be possible to safely proceed to the manufacture of the box itself - this is what we will do next.
The benefits of compost
High-quality compost is saturated with nutrients that are formed during the decay of organic materials.
Useful substances are in a form that is easily absorbed by plants.The compost mass is comparable in its characteristics to mullein and can be applied even under garden crops that cannot tolerate fresh manure. There are many applications on the compost site:
- Bookmark in the holes when planting vegetables, flowers, shrubs and trees.
- Scattering on the ground before planting root crops.
- Embedding in the soil during autumn and spring digging.
- Mulching of tree trunks.
Compost is good in every way.
For plants, this is an excellent organic fertilizer, for the earth it is a good loosening agent, and for people it is an easy way to get rid of waste.
Features of the Finnish waste composting technology
The process of maturation of compost in natural conditions is quite long: 2 - 2.5 years until fully prepared. There are components that rot faster - these are green grass, straw, cleaning. Others need more time and "quick" ingredients help them.
It is better to compost waste according to Finnish technology in boxes of your own production, since their production will be much cheaper than buying factory containers. The principle is to alternately empty one of the boxes and use the finished mixture as fertilizer in the garden.
Bookmark process:
The first box receives spring garden waste, filled with accelerators and left for 2 months. After this time, the mixture will be ready.
The second box is filled with waste a month after the first box.
In the third - in another 1.5 months.
After two months, the waste in the first box, if properly cared for, will mature and can be used as fertilizer. After the compost is taken, the waste from the second box is reloaded into the first one. You may have questions - why do the extra work:
Firstly, it is necessary to stir the mass in any case. This speeds up the ripening process. This is done once a week. Thus, decaying residues are enriched with oxygen and bacteria multiply and feed faster.
Secondly, there is less risk of making a mistake where which compost is located. And the first box will always contain ready-made fertilizer, the second - ripening, in the third - a new bookmark.
By the same principle, you can build a compost pit using Finnish technology with your own hands, but the difference will be that the waste is processed by another type of microorganisms - anaerobic, which do not need air.

The principle of operation of the purchased tank
Finnish dry closets are in demand, which work with microorganisms that process organic matter.

They are designed for outdoor and indoor country houses. The principle of operation is as follows:
An insulated sealed tank with a closed bottom is installed indoors or outdoors.
Above the seat is a tank into which filler of natural origin is poured - peat or sawdust. After each trip to the toilet, a certain amount of this substance is poured into the waste tank.
The dry closet is equipped with ventilation, which prevents odors from accumulating inside the room. The pipe is brought to the roof both from the house and from the outdoor toilet.
Periodically, a biological solution of bacteria is added inside to make the processing process faster. From the back of the house there is access to the bottom of the composter. It can be opened using a special door and pick up the finished fertilizer.
The toilet does not require special expenses, electricity or water. The filler can be any carbonaceous material.
Selection of materials for self-production
The best material for making a composter using Finnish technology is wood. This is the most common material and can be replaced at any time. Many summer residents use pallets, the advantage of which is that they are already treated with antiseptics against decay and moisture. It's easy to nail a couple more boards to the pallets to make the gaps smaller and control airflow.

The slate composter is a fragile invention. In addition, according to reviews, the compost in it ripens longer. Without prior experience, making holes for screws will be problematic.
Metal mesh is also suitable for composting, but it is installed on wooden or metal corner supports. To prevent the mesh from stretching, it is fixed with several boards around the perimeter.
For the construction of a stationary composter, foam blocks with holes are suitable.

This is an environmentally friendly material that solves two problems at once - the stability of the structure and the ventilation of the compost. It is easier to make a roof and attach sheds to concrete than to slate. But you will have to buy material if there are no blocks from the construction site left in the storerooms, as well as buy cement and a trowel to fasten the blocks together.
Scheme of a three-section box according to Finnish technology
As already described above, the optimal dimensions of the composter are 1 m high, 1 m wide, 3 m long. Along the length it will be necessary to divide it with two partitions. The dimensions of the common door are 1 m by 1 m.
The dimensions of the lower door are 50 cm high, 1 m wide - it is mounted in a common sash. The roof can be made sloping or gable, while dividing the canopies in half, so that it is convenient to open the box, turn the contents over and lay a new one.
If you make a more voluminous box, then in height and width it can be increased by 50 cm. The length remains unchanged. In length, any compost pit or heap is made arbitrarily.

Making a compost bin step by step instructions
Some gardeners make a compost heap instead of a compost bin, but it's important to remember that the latter option has quite a few downsides. First of all, this is an unsightly appearance - it is unlikely that your guests will be delighted when they see an unpleasantly smelling mass in the middle of the site.
In addition, it is problematic in this case to lay organic residues and kitchen waste. In addition, if you put all the ingredients randomly, it will all roll down, which will cause a lot of trouble.
Someone chooses a pit instead of preparing a compost heap. Yes, this option is also possible, but only if you add all the ingredients at once and forget about its existence for at least two years. In this case, the compost will be prepared under anaerobic conditions.
So, in the garden there will be an incredibly specific “aroma”. This is acceptable in a large area where you can find a remote place to organize a compost pit. in small garden plots of 10 "acres" it is best to choose a compost bin.
Moreover, a compost bin can be easily built from materials that are at hand. However, before starting work, you should familiarize yourself with some rules for the construction of such a structure.
It is best to build a compost heap out of wood, especially since trimming boards can clearly be found on any site. True, you still shouldn’t take completely bad wood, especially if you want the structure to be not only strong and durable, but also beautiful. It is best to take fairly thick boards for construction, having soaked them in advance with a composition from decay.
This is indispensable, since the contents of such a box will be quite “aggressive”, saturated with various bacteria and microorganisms, which can lead to wood rot.
All walls, except for the front, must be made with slots, which is important for aeration and normal air access. And the front sweat is done a little differently:
- About a third of it is made stationary.
- Above, transverse boards are laid end-to-end so that they can be taken out to the height that is required.
Everything is simple here: you need to fill the vertical bars so that “grooves” form, where we put the boards. Such a scheme will allow you to get the compost with maximum convenience when it is ready.
There is an option where you can save money - make all the walls except the front not from boards, but from sheet slate.The advantages of such material include the fact that it does not rot, which means it will theoretically last longer. True, in this case, the box should be more spacious so that oxygen “walks” quietly inside.
Another important point is the placement of the compost bin. Undoubtedly, it should not be placed in a visible area - choose a secluded corner so that it is not completely in the open sun, but not in the shade - the sun is required in order to maintain the required level of humidity inside the container. It is also worth considering approaches for laying new ingredients.
What is the ideal size for such a structure? It all depends on factors such as:
- The area of cultivated garden.
- The number of people in the family.
- Time spent in the garden.
The size of the plot greatly affects the size of the compost bin. For example, if you have a large garden and lawn, where you will take the "ingredients" for the compost, it is worth making a larger box, but if the site is very small, of course, you definitely do not need a large structure.
This also applies to the number of members of your family - the more people, the more waste, which means that the box itself should be larger.
It is also important how often you visit the dacha - do you live there the whole warm season or come a couple of times a month
Filling the compost bin
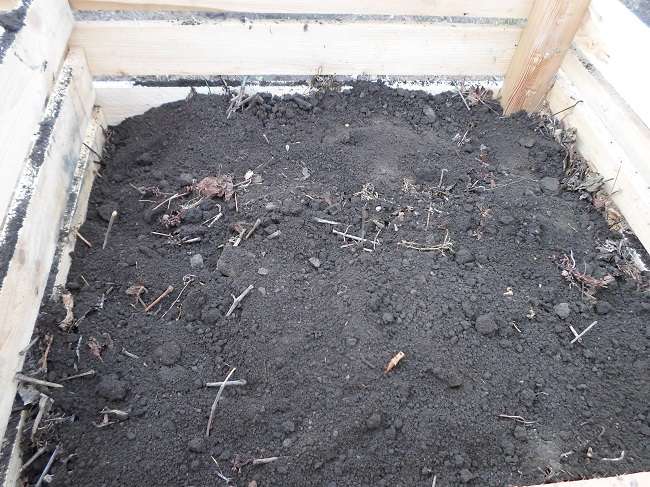
At the bottom of the composter, drainage is arranged from large branches left after pruning trees.
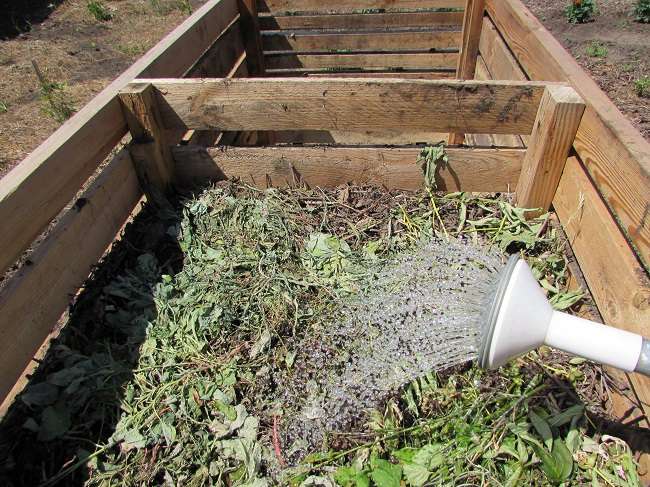
Waste is laid in alternating layers 30–40 cm thick, using various materials and pouring water from a watering can. The more varied the filling of the laid "pie", the better the finished product.
Among the possible compost bin fillers, the most common components are:
-
green manure plants. Increase the nitrogen content and quickly decompose.
When laying, they are shuffled with coarse materials (bark, wood chips, sawdust).
- Foliage. It contains few nutrients, it is laid dried and crushed.
- Straw and hay. They give the compost a porous structure, facilitating air access. Hold moisture well. Stacked in thin layers, alternating with green tops.
- Sawdust and bark. They decompose poorly, therefore they are introduced along with manure, tops and bone meal or urea.
-
Kitchen waste. They rot quickly, significantly enriching the compost.
They are placed in a box mixed with other materials.
- Manure. A valuable ingredient in a compost bin. Accelerates the process of decay, as it contains a lot of nitrogen. The laid layer of manure is sprinkled on top with earth.
Bones, coals, diseased plants, bindweed roots and similar aggressive weeds are not suitable for composting.
The contents of the compost bin are mixed every 2-3 months, new portions of organic matter are added as they become available.
The finished mass has a crumbly structure, dark color, and smells like forest land.
Of course, compost can be bought ready-made, but only home-made fertilizer claims to be called “garden gold”.
Filling the compost bin
A do-it-yourself compost bin is filled with various organic debris that lends itself well to the rotting process, waste from the kitchen. And of course, the main filling of the box is plant residues. This is mowed lawn grass, rotten hay, moldy straw. Last year's castings, weeds, sawdust and shavings from wood waste are removed into the compost bin. In general, the compost bin is filled with everything that can rot, excluding chemical waste, plastic, polyethylene, glass.
In order for the processes of decay to occur faster in the compost bin, the compost must be periodically turned over, watered with water, and slurry. You can put a layer of fresh manure on the bottom of the box in advance, thereby ensuring the greenhouse effect. The heat will rise up, speeding up the decay.
Conditions for the decomposition of plant materials
It seems that it is enough to throw leaves and branches into a pile, add green tops, and then nature will do everything.
In fact, certain factors influence the maturation of compost:
- Humidity in the compost is maintained taking into account the different ability of materials to absorb water: in fibrous and woody waste, it is higher than in green mass. Accordingly, sawdust, shavings and hay require more moisture compared to tops and grass.
- Oxygen is necessary for the growth of microorganisms, which is achieved by the device of slot ventilation and limiting the depth of the compost bin.
- Temperature determines the rate of decomposition.
In the first months, microbiological activity leads to the heating of the compost to 60–70 °C, while the organic material is rendered harmless. At this stage, the contents of the composter need additional moisture.
An effective method of accelerating the decay of biomass is the introduction of compost bacteria at the stage of preparation, which immediately begin to process waste at a high speed.
Of course, the remains of plants piled up in a heap will someday be overheated, but this will happen after a few years.
The process goes much faster in a container - a purchased plastic or home-made wooden one.
Which garden composter to choose Overview of the best views for giving 100 photos
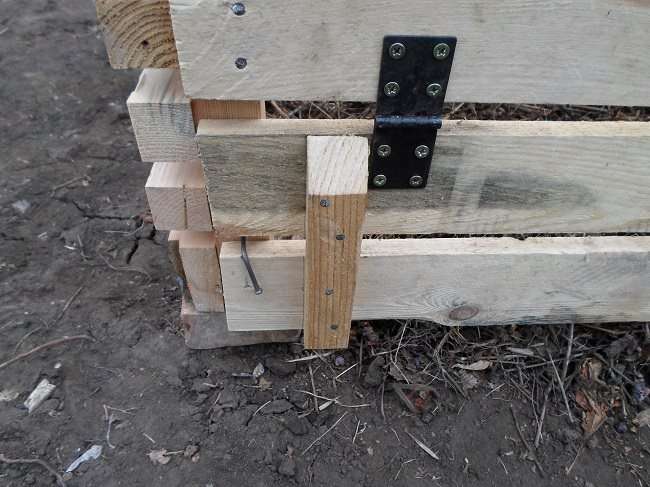
The latter are interconnected with blocks and serve as a door necessary for raking out the ripened compost.
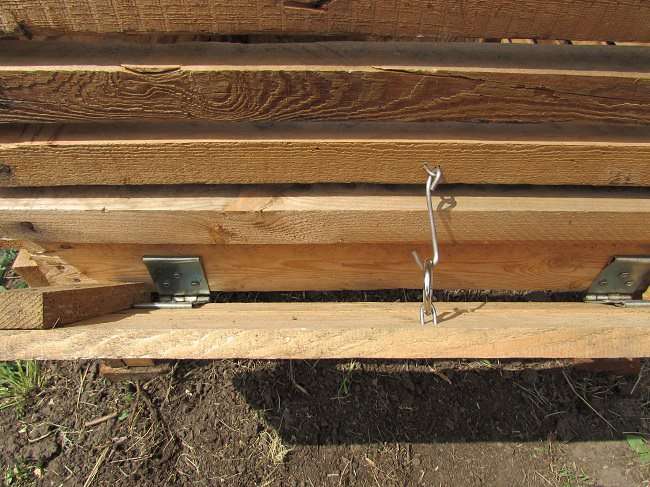
The hinged parts are hung on hinges, and a thick nail is driven in as a fixing device and bent with pliers at a right angle.
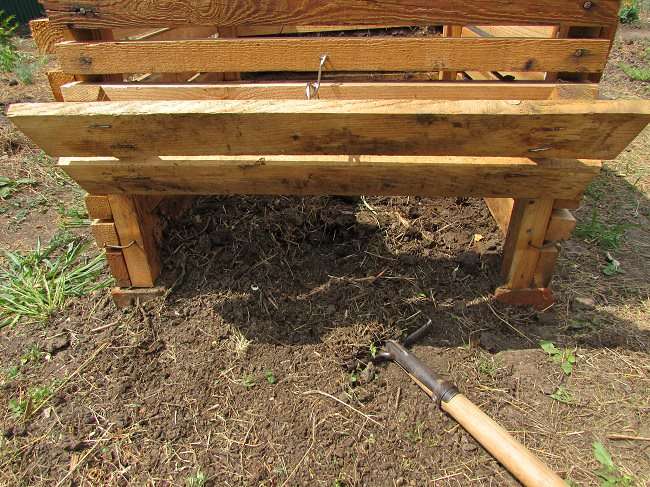
A shovel outlines the perimeter of the box, overturns the structure on its side and removes the fertile layer of soil under it.

Bricks are laid under the corner and middle racks, the structure is turned over into place.
To hold the doors open, hooks and rings are made of steel wire, fixed in wood by means of bent nails with a cut head.
A simple compost bin is ready and does not require a significant investment.
Proceed to filling the compartment, using the selected soil as a separator of the laid layers.
General rules for making a compost bin
These rules follow from the peculiarities of the manufacture of vegetable fertilizer. In order for the compost not to burn out and turn out to be really useful for the garden, several conditions are needed:
- air access, since bacteria need oxygen to process plant residues;
- humidity, so that the mass of plants folded in a box decomposes;
- protection from rain and snow, otherwise all the resulting compost will simply be washed away with water;
- shelter from the sun and wind so that grass, branches and other waste do not dry out too much;
- the ability to cook for a long time to achieve the desired consistency.
Based on these rules, we understand that a good compost bin should consist of walls with holes and a tight, moisture-proof lid. Two compartments are needed: compost is prepared in one, used from the second. Sometimes they make three branches. It is better to put the structure away from the house and the recreation area so that the unpleasant smell does not interfere with enjoying the delights of country life. The place should be far enough from the neighbors. It’s great if the sun and the shadow fall alternately on the box.

 The compost bin should be located far from the residential building
Separately, it is worth mentioning the bottom of the compost box. Some gardeners don't do it at all, just placing the box on the ground. This can lead to the fact that most of the useful fertilizer is simply washed away with melt water. In addition, it will be inconvenient to get it, since it will partially mix with the ground. Therefore, two options are recommended:
- make good drainage - lay a layer of branches and boards at least 25 cm thick on the bottom, like a warm bed;
- to make a ventilated bottom from boards, a polypropylene mesh, a metal grate - which is available on the farm.
A plastic or iron bottom is preferable here, as it is more durable.
How to do the stages of work with your own hands
The first thing to do is to dig a hole for the corner supports. Use a drill or a regular shovel for this. When the posts are installed and the ground is rammed, boards or pallets are nailed. Screws will also work, but in this case you need a drill. The gap between the boards is about 1 cm.
The bottom of the composter is made at a distance of 10 cm from the ground. This is necessary so that the nutrient fluid does not go into the soil, and the contents of the compost heap are additionally ventilated from below. Sometimes the bottom is covered with durable material - film or plastic.
The roof is knocked down from the boards as tightly as possible so that precipitation does not penetrate inside the composter and does not create a swamp in it. This lowers the combustion temperature and slows down maturation. The roof consists of two equal parts, which are connected by canopies.
Lastly, the lower doors for unloading are attached. They can only be made in the first box, since the maturation and laying of the components will take place in the second.
Video: DIY compost box
Foam block composter
For a massive stationary composter, it is necessary to correctly calculate the number of blocks. So that the mass does not sag, a platform is concreted before laying out the walls - this will be the bottom of the compost heap. When the concrete has completely hardened, you can make walls.
It is recommended to make the front wall twice as low, so that it is convenient to work with a pitchfork, and make the roof sloping. Such a structure is usually mounted behind a house or other place where the sun shines least. It should be borne in mind that rotting waste emits a characteristic smell, so they are looking for a suitable place right away - it will be impossible to move a concrete structure.

Hello, dear readers! I am the creator of the Fertilizers.NET project. Glad to see each of you on its pages. I hope the information in the article was helpful. Always open for communication - comments, suggestions, what else you want to see on the site, and even criticism, you can write to me on VKontakte, Instagram or Facebook (round icons below). All peace and happiness!
You will also be interested in reading:
How to make compost from chicken manure: how to prepare fertilizer and dosage of ingredients
Compost from tree leaves - what is the use, how to make humus
How to use compost as a fertilizer in spring and autumn. The benefits of organics for the soil
Humus: what is it, what is its advantage. Types by storage time
Homemade compost bin
It is not necessary to use new lumber to build a compost bin; in the backyard there will always be suitable blanks from unnecessary pallets or old window boxes.
From such rubbish, more or less whole boards without visible rot are selected, at least 90 cm long, the number of which depends on their width. You will also need four long blanks (200 cm) and six bars with a section of about 5x10 cm.
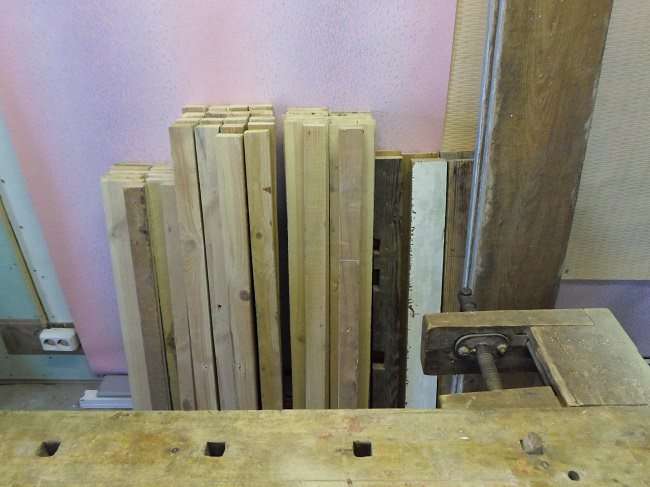
Compost bin drawing:
The wooden box of the specified dimensions is convenient to use, its contents "breathe" and warm up quickly.
One compartment is intended for fresh waste, after filling to the top, the biomass is left to rot, and the following components are placed in the second compartment.
This design allows you to get a new portion of organic fertilizer every year.
The selected boards are marked according to the drawing, trying not to use chipped and cracked ends.
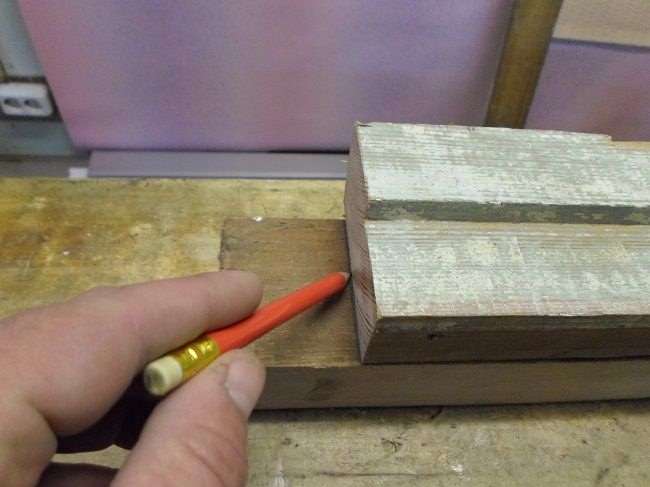
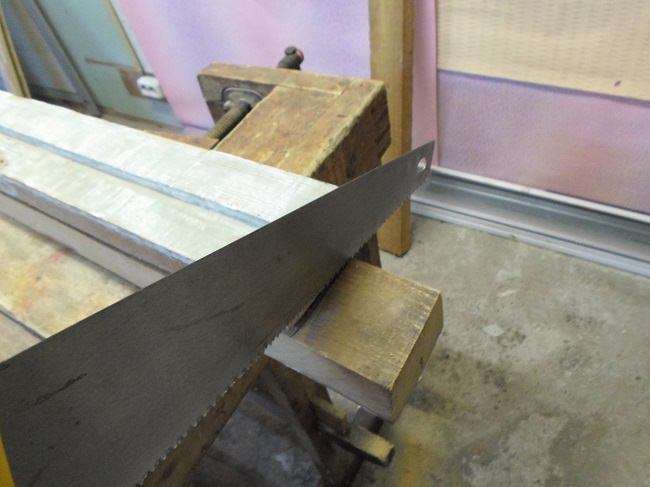
The blanks are sawn with a hacksaw and planed if it is planned to process parts with protective compounds.
The assembly of the compost bin begins with the manufacture of two long shields.
Three beams are placed on a flat surface and prepared boards are nailed to them, leaving gaps of 30–40 mm.The assembled panel is set aside and the next shield is made.
Short blanks of the side walls are fixed with nails directly at the location of the bunker, except for the two lower boards.