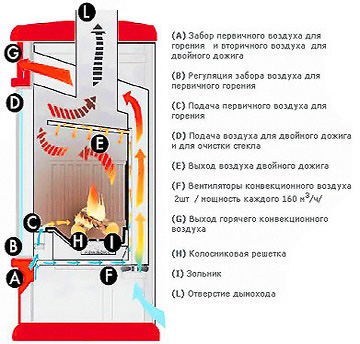
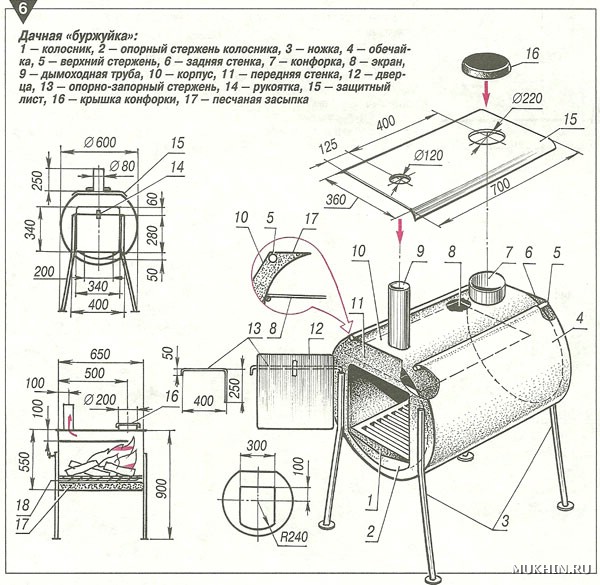
How to make a potbelly stove from steel
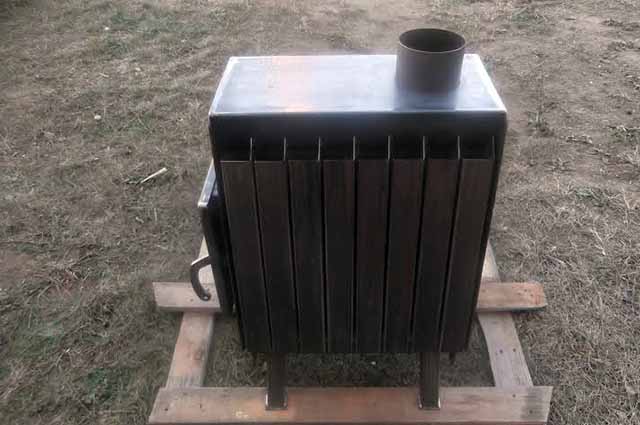
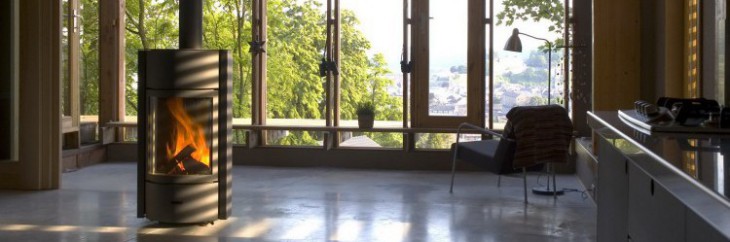
Stove potbelly stove of convection type.
If you need to heat a house in the country and cook food, you should definitely know how to weld a potbelly stove yourself from sheet steel. This design will not require a lot of fuel. This is achieved through the installation of partitions in the furnace, reliable fastening of the doors and the ability to adjust the air flow. To make such a device with your own hands, you will need to prepare the following elements:
- metal sheet with a thickness of 4 mm or more;
- metal with a thickness of 8-12 mm, from which partitions will be made;
- lattice;
- chimney;
- corners from which the legs will be built;
- welding device.
Manufacturing sequence
From the steel sheet, the first step is to cut out the elements for the body and several partitions that will be mounted on the top of the firebox. They will be able to make a labyrinth for the smoke, as a result of which the efficiency of the stove will increase. In the upper part, you can make a recess for the chimney structure. The recommended recess diameter is 100 mm. Next, you will need to make a recess for the hob with a diameter of 140 mm.
Stove potbelly stove made of sheet steel.
Using a welding device, you need to attach the side elements to the bottom of the structure. To the side walls you will need to attach strips of metal of great thickness. As a result, it will be possible to attach the grate. It can be a sheet of metal with recesses with a diameter of about 20 mm. The lattice can be made of reinforcing bars. At the next stage, supporting elements from a metal strip must be attached to the side walls. After that, the installation of partitions is carried out.
Doors for the firebox and ash pan should be cut out of metal. They can be installed on ordinary hinges. However, a more reliable option is to use curtains made of steel pipes and rods. They can be fixed on wedge hecks. The elements are cut from a stainless steel sheet, after which they are fixed with bolts. In order to be able to adjust the intensity of fuel combustion, on the door that closes the ash pan, it is necessary to make a recess for mounting the damper.
To the recess for the chimney structure, you need to attach a sleeve 200 mm high, on which the pipe will be mounted. A damper in the tube will help keep the heat in. For her, it will be necessary to cut a circle from a metal sheet. One extreme part of the steel rod must be bent. After that, several parallel holes will need to be made in the tube. Next, a rod is mounted, after which a round damper is welded to it.
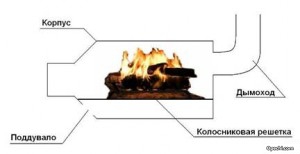
Diagram of a brick fence for a potbelly stove.
The flue pipe must be installed at an angle of 45°. If it passes through a recess in the wall, in this place the part must be wrapped with fiberglass, and then fixed with a cement mixture.
To prevent the occurrence of burns from touching a red-hot stove, it will be necessary to build a steel protection screen from several sides and place it at a distance of 50 mm. If there is a desire to increase the heat transfer coefficient, the structure can be overlaid with bricks. After the firebox is finished, the brick will heat the house for some time. Laying should be carried out at a distance of 12 cm from the metal body.
The air cushion can become heat protection.
For its implementation, holes for ventilation must be made in the masonry above and below.
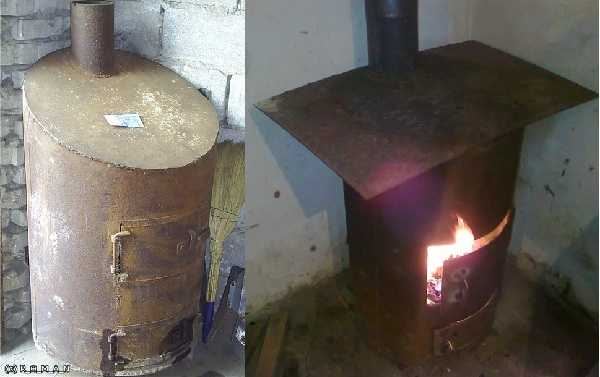
The second life of a gas cylinder
It's a good idea for a small stove to reuse containers that can handle a lot of heat.We have already talked about barrels, but how do you like, for example, a potbelly stove from a gas cylinder or even two? These containers are good because they allow you to make a stove for a country house or garage, both vertically and horizontally.
To create such a potbelly stove, you will need the following tools:
- welding machine;
- grinding machine with circles;
- drill with drills;
- brush with metal bristles;
- tape measure and construction pencil for marking;
- hammer, chisel, pliers.
Materials for making a stove with your own hands need the following:
- 1 or 2 gas cylinders;
- Metal sheet for the ash pan and hob (thickness must be at least 3 mm);
- cast-iron doors (old ones are suitable, for example, from a wood-burning stove, or do-it-yourself made from sheet metal);
- chimney pipe;
- thick metal fittings for the manufacture of legs and grate.
Before starting work in a gas cylinder, open the valve and leave it in this state for at least 12 hours so that the container is ventilated. Another way to clean the cylinder is to fill it to the top with water, and then empty it completely.
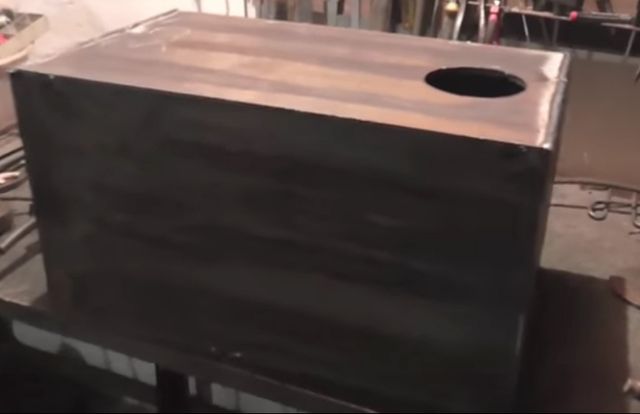
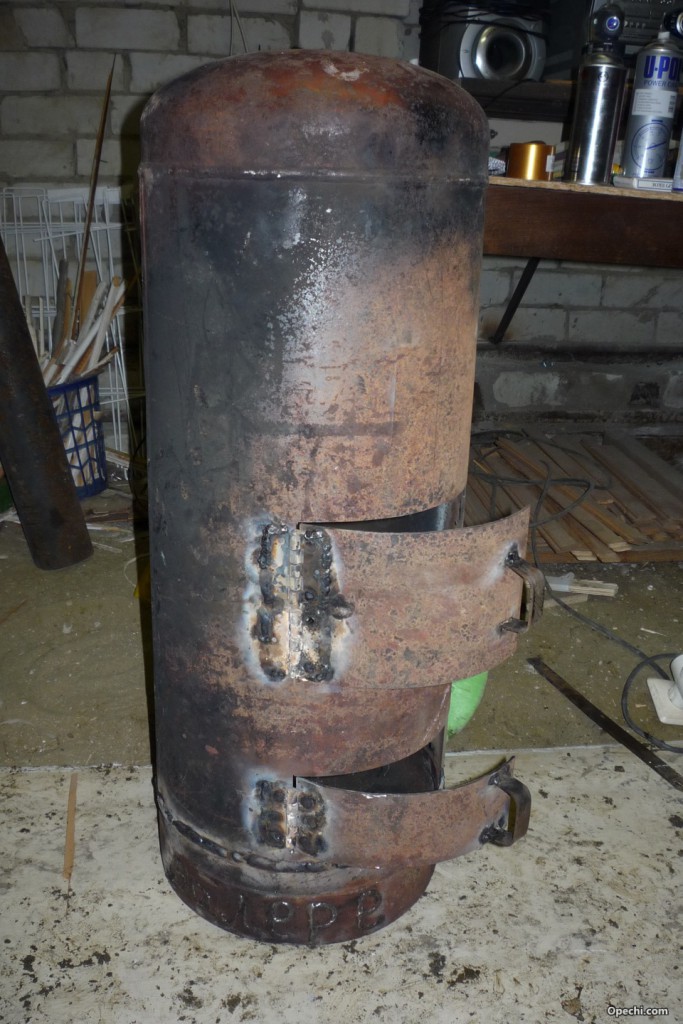 Potbelly stove from a gas cylinder
For a vertical potbelly stove, the gas cylinder is placed in a standard position for it, the neck is released and markings are made for the future firebox and blower. The marked pieces are cut out with a grinder. A grate is made separately - for this, reinforcement cut to the required dimensions is welded in the places marked from the bottom of the cylinder.
Hinges are welded to the cylinder, on which the doors are hung. Further, hecks are equipped, which are designed to secure and increase the efficiency of the potbelly stove. A smoke exhaust pipe is welded on top or side of the cylinder.
For a horizontal potbelly stove, the cylinder is installed on the "legs" sideways. A square hole is cut out in it for the door and a round one for the chimney pipe. Instead of a grate, a series of holes are drilled at the bottom, and a rectangular container is welded below the cylinder to collect the ash. The stove is almost ready, it remains to hang the door with your own hands and install a chimney.
If desired, the complete set of vertical and horizontal stoves from gas cylinders can be expanded with a hob made from a sheet of metal attached on top.
Potbelly stove-homemade
Making a potbelly stove with your own hands is easy even without a drawing. Improvised materials are suitable for work, whether it be a gas cylinder, a milk can, a barrel, a piece of pipe, or sheet iron lying around in the garage. Having decided what can be put into action, choose for a potbelly stove with your own hands a drawing of a rectangular or circular section of the combustion chamber.
For example, you need to make heating in your country house yourself and you have an unused milk can (for arranging the stove itself), a bent piece of pipe (to create a chimney) and a piece of metal reinforcement with a diameter of at least 6 mm (for a grate). To make a stove out of all this, it is enough to be friends with the tools, as well as apply a little ingenuity.
 Potbelly stove from a can
The can is installed on its side - this is the basis of our do-it-yourself potbelly stove, its combustion chamber. A rectangular blower is sawn under the neck, the edges are processed with a file. The blower can be left in this form, or you can attach a damper to it, getting a stove with adjustable draft at the exit.
In the upper part of the bottom of the can, you yourself need to make markings for the chimney (it should be 2-3 mm smaller than the diameter of the pipe). We cut a hole and tightly drive a piece of pipe adapted for the chimney into it. Half of the work is done.
Next, we deal with the insides of the potbelly stove. With our own hands we make a grate in the form of a “snake” from a metal rod. We introduce the rod into the neck of the can and position it so that the grate stands horizontally in the future combustion chamber.That's all! If desired, you can put the resulting stove on an iron pallet and a rack of bricks. This will help to avoid heating the floor, as well as minimize the likelihood of a fire.
Note that a similar algorithm of actions can also be applied if you want to have a potbelly stove from a barrel. Such stoves cannot boast of long-term burning, but they cope well with the function of quickly heating the premises.
Do-it-yourself grate installation
Metals tend to expand when heated. It is for this reason that when installing grates for a fireplace or potbelly stove, it is necessary to make gaps on all sides of at least 5 mm. The ledge on which the grate will be laid must be cut off.
For brick models of the fireplace, the cooled grate should be located one brick below the firebox door. This is necessary to prevent coal from falling onto the floor. Different degrees of heating affect all metals differently, for this very reason, in the case of monolithic fixation of elements. possible deformation or cracks in the masonry.
After laying the grating with your own hands, the grooves are filled with sand without admixture of cement. If the lattice is based on triangular bars, the top should be directed down.
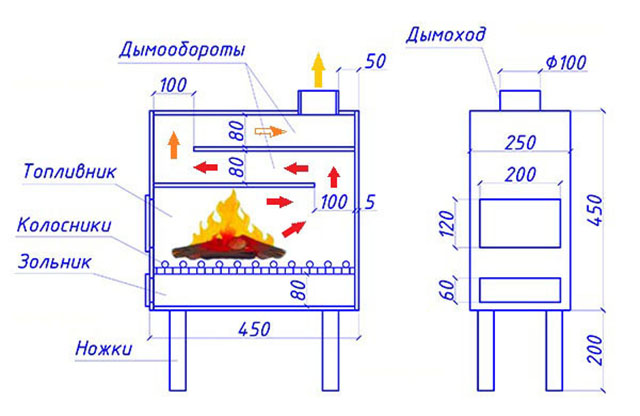
The main stages in the manufacture of potbelly stoves
1. All details are marked on a sheet of metal: 6 steel rectangles for the walls of the furnace, 1 rectangle for creating a smoke reflector, plates for the grate and a latch for the door. 2. cut out a sheet of metal is possible at any metal base. The guillotine, unlike the grinder, allows you to cut (chop) it more accurately. In this case, straightening (alignment of sheets) will not be necessary.3. The furnace body is made in the form of a rectangle. Their sides are joined together at an angle of 90 ° and welded together.
4. To avoid mistakes, at first the oven box is only tacked by welding in several places, and only then, after checking its horizontal and vertical lines, its seams are welded.
Important! All connections in the body are carefully welded; to check the joints for tightness, you can coat the joints with chalk or kerosene. 5
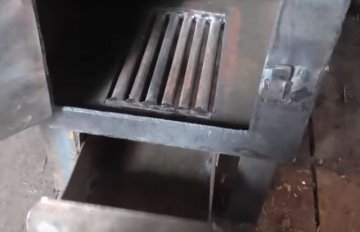
Welding seams are cleaned with a metal brush.6. The internal space of the potbelly stove is divided into three parts: a firebox, a smoke chamber and an ash pan. To separate the firebox from the ashpit, a grate is laid between them, on which the fuel will be placed. To do this, at a height of 10-15 cm from the bottom of the furnace, 5x5 cm corners are welded on the sides and on the back of the box. On which the grate will be located
5. Welding seams are cleaned with a metal brush.6. The internal space of the potbelly stove is divided into three parts: a firebox, a smoke chamber and an ash pan. To separate the firebox from the ashpit, a grate is laid between them, on which the fuel will be placed. To do this, at a height of 10-15 cm from the bottom of the furnace from the sides and on the back of the box are welded corners 5x5 cm. on which the grid will be located.
Advice. The grate is best made from 2-3 detachable parts. Otherwise, when replacing a burned-out grate, it will be difficult to get it out of the furnace.
7. The grating is welded from thick steel bars or strips 30 mm wide. They are attached to 2 stiffeners - rods with a diameter of 20 mm. Since the grate burns out over time, it is better to make such a grate removable.
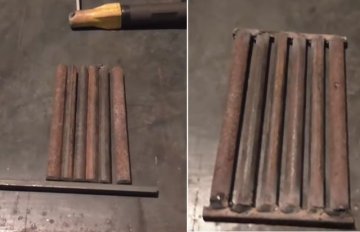
 Making a grate
8. At a distance of 15 cm from the top of the box, two strong rods are welded on which will be placed one or two removable reflectors - thick-walled metal sheets that will delay the flow of hot gases and send them for afterburning. However, they should not completely block the oven. In order for hot smoke to be able to enter the pipe, about 8 cm is indented from the front (for the first sheet) and the back of the furnace.
 Scheme of the passage of gases in the simplest potbelly stove and a furnace with an installed reflector
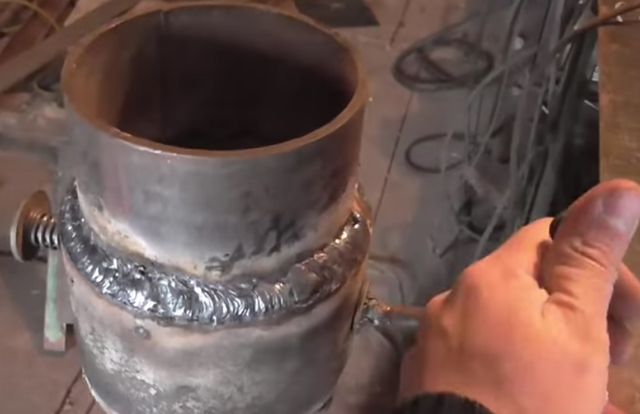
9.Next, the upper part of the box is brewed, and then cut out in it pipe hole .
 pipe hole
10. The front part of the stove with holes cut out in it for the doors of the furnace and ash pan, is welded last. 11. The size of the firebox door should be sufficient so that it is possible to load fuel and change the grate without effort. The hole for the ash pan is made a little smaller. 12. The hinges are first welded to the door, and then to the potbelly stove body. They can be bought ready-made or welded from two tubes of different diameters. Door handles can be made from a strip of metal or a bar.
Important! When attaching the doors, they should be adjusted to the body as tightly as possible; for this, they are straightened (aligned) and cleaned with an emery wheel. The wedge locks that close the doors are fitted to the body as tightly as possible
13. On such an oven you can cook food or warm water. To do this, a hole of the required diameter is cut in the upper part of the box. Burner for oven. which will be inserted into this hole, can be purchased at any hardware store.14. For ease of use, the design mounted on legs or a welded pipe stand.15. The chimney is connected to the stove using a sleeve. 16. For inserting a slide gate. regulating the exit of smoke, two holes are drilled in the pipe. A metal rod is inserted into the holes and bent at 90 °. A "penny" made of metal is attached to it in the center of the pipe - a gate, the diameter of which should be slightly less than the diameter of the pipe itself by 3-4 mm.
 Smoke damper
Potbelly stove from two barrels
Even more different homemade bourgeoisie. There are a lot of structures. From the most elementary to quite complex designs.
The most common heaters for garages and cottages are potbelly stoves
A very interesting version of this potbelly stove from two barrels of different diameters nested one into the other. How to make it: you need two barrels of different diameters, bricks instead of legs (you can weld metal if you wish), doors and hinges, metal for making a grate and a lid. Pebbles, clay and sand will be needed to make backfill.
Potbelly stove from two barrels
- Let's start with the manufacture of backfill: mix pebbles, sand and clay and ignite on fire.
- We cut the same holes in both barrels for the blower and fuel filling. But you need to do it with an offset. We start with a smaller barrel. We cut out the blower door 2-3 cm above the bottom, above it 10-15 cm above the door for laying fuel. We also do it in a larger barrel, but the bottom hole is already at a distance of 10-15 cm from the bottom, respectively, the second door is also higher (the distance between the doors is exactly like on a smaller barrel).
- In a smaller barrel above the hole for the blower door, weld a grate circle in which holes are cut.
- At the bottom of the larger barrel, pour the prepared backfill. We select the level so that the holes for the doors coincide. Moreover, the barrels are in contact with the front sides, and a decent distance remains behind. Fill this entire distance with the same backfill, compacting it well.
- Aligning the holes, weld them around the perimeter, weld hinges and doors, install locks.
- Next, you need to install the stove cover, cutting a hole in it for the chimney, and weld it well.
- The last step is to install the chimney.
Everything, the potbelly stove from the barrel is ready. The uniqueness of this design is that it gives softer heat: most of the hard radiation is absorbed by the backfill. This structure can probably even be filled with stones, having finalized the lid so that it is possible to serve the stones (change the destroyed ones).
Whatever design you choose, there are some rules that you should follow in order to comply with fire safety:
- The stove of any design must be placed on a base made of fireproof materials, such as heat-resistant tiles, bricks or asbestos board sheets.
- The dimensions of the oven must be such that the space in front of the oven to the wall is at least 1.2 m.
- Do not place a metal furnace closer than 1 m from the wall. If the bath wall is upholstered with metal or plastered with a layer of at least 2.5 cm, this distance can be reduced to 80 cm.
- Sufficient insulation of the chimney is also very important. It is safest to make it from a sandwich pipe.
Follow these simple rules, and your homemade metal sauna stove will delight you with excellent work and strong heat for a long time. You can read more about how to install a stove in the article "How to install a metal stove for a bath".
Bourgeois schemes
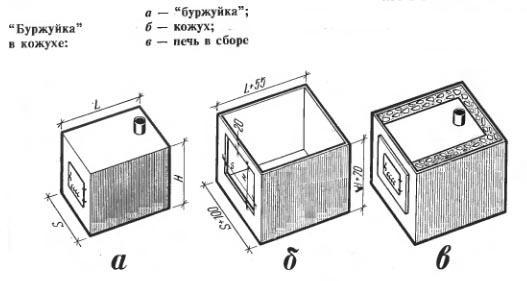
The main advantage of the rectangular stove. unlike oval products made of pipes or gas cylinders, it consists in a larger heated surface area, so its efficiency will be much greater. The optimal size for a potbelly stove is 800x450x450 mm. An oven of this size does not take up much space and can easily fit even in a small room.
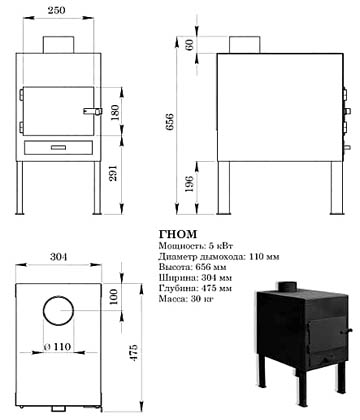
The simplest design is the Gnome stove, which consists of a box with a pipe welded to it.
An important difference loginov ovens is the presence of two plates (reflectors ) in the upper part of the furnace compartment. Because path of gases at the same time, the heat transfer of such a potbelly stove is significantly higher than that of a conventional metal furnace.
Advice. If it is required to reduce the size of the Loginov furnace, then it is desirable to change only its width. When changing the length and height of the structure, its efficiency can be significantly reduced.
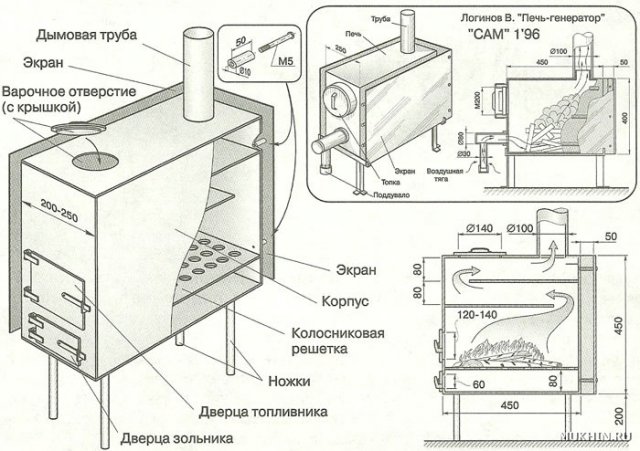 Detailed diagram of Loginov's potbelly stove
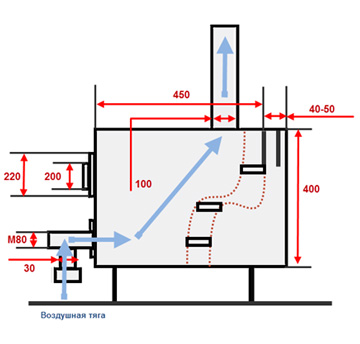
We make a potbelly stove at work
Diesel fuel and used engine oil are very high-calorie fuels. If you get it inexpensively, then it makes no sense to mess with firewood and coal, it’s easier to make a reliable stove - a dropper. Its principle of operation is to burn mining, dripping into a red-hot bowl. Moreover, along the way, liquid fuel has time to warm up, as it passes through the oil pipeline built into the pipe - the afterburner. The drip-type potbelly stove device is shown in detail in the drawing.
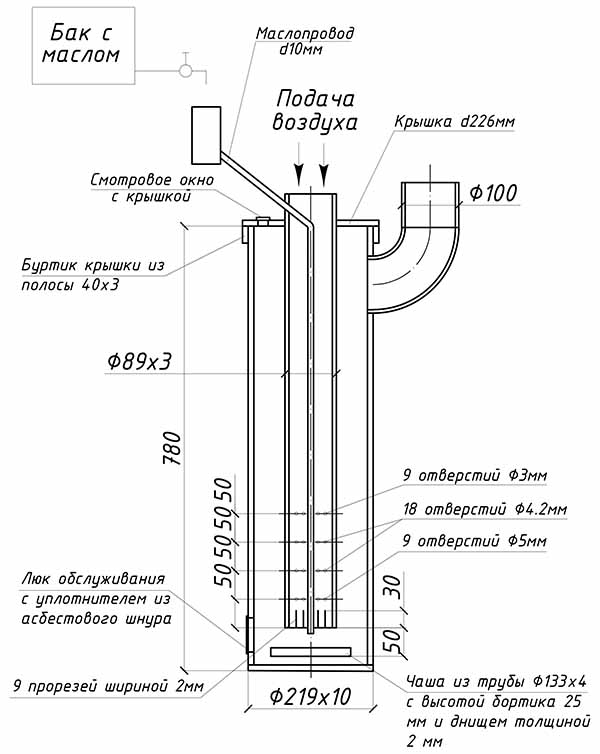
For efficient combustion of oil, air is pumped into the stove using a fan, and mining flows naturally from a tank suspended from the wall next to the heater. Another option is the forced supply of fuel by pressurizing the fuel tank (for example, with a hand pump).
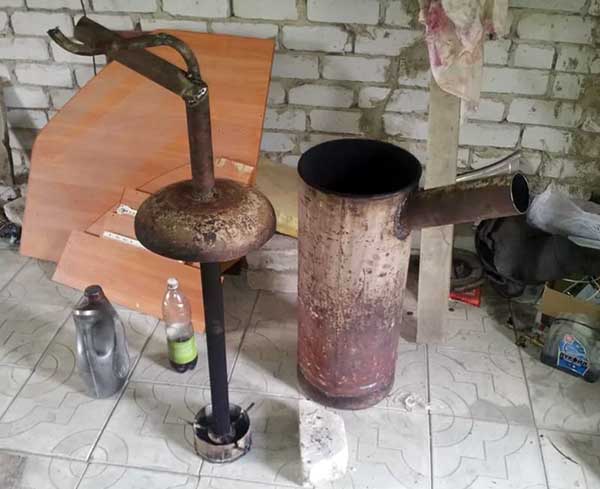
Both a pipe Ø219 mm and a propane cylinder with a diameter of 30 cm can act as a furnace body. Making an oil potbelly stove with your own hands is a simple task, the main thing is to make holes and slots in the afterburner correctly and lay the fuel pipe to the bowl installed at the bottom. A complete assembly guide is provided in our other article. You can get a closer look at the operation of the heater from the video:
Increasing the efficiency of the furnace
The potbelly stove is able to heat the room in just a few minutes. Moreover, you can throw everything that comes to hand into the furnace: since it does not have an extensive network of chimneys, and the smoke in it comes out “directly”, you can not be afraid that they will clog.
But if a conventional heating stove installed in premises for permanent residence has an extensive network of chimneys that trap heat, in a potbelly stove it goes directly into the pipe, so its efficiency is not too high. That is why it is too "gluttonous" and requires a lot of fuel.
To reduce fuel consumption, you can use the following tips from experienced stove builders: • firebox door and blower in such an oven should be as tight as possible; otherwise, the air supply to the potbelly stove will increase, and the fuel will burn out too quickly; • to regulate the output of warm smoke in the chimney it is desirable to provide a gate valve ;• next to the stove it is possible to provide side metal screens at a distance of 5-6 cm from the stove, in which case it will heat the room not only due to heat radiation, but also with the help of convection (warm air circulation);
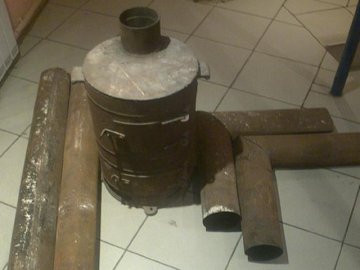
 Potbelly stove in a casing
 Round furnace with an afterburner and a casing with a heat gun
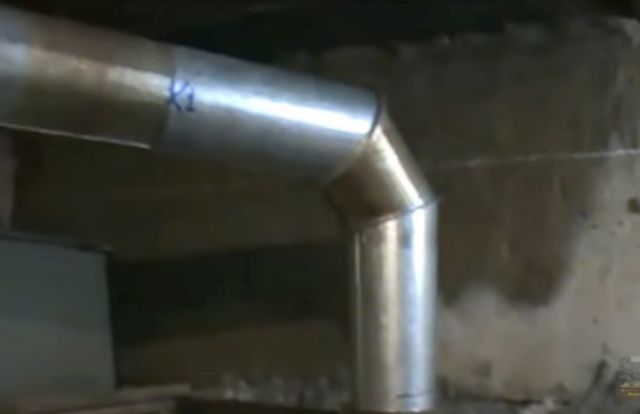
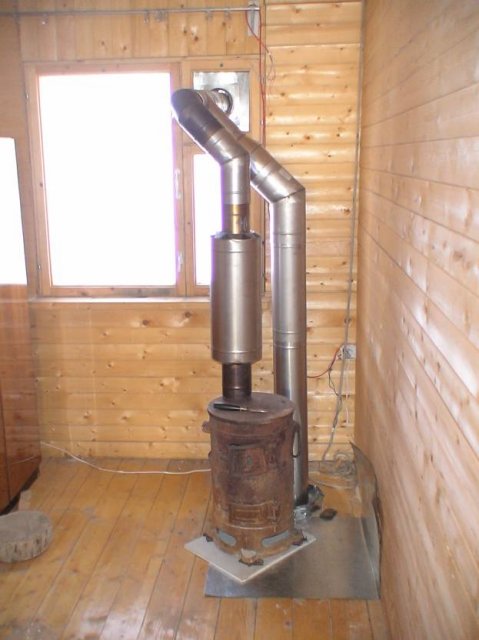
• to retain heat in the room, it is necessary to increase the elbow in the pipe; however, at the same time, soot will linger in them, therefore it is desirable to create a collapsible structure; • the pipe can also be given a stepped shape: place the knees in stages, with each step making a turn of 30°; at the same time, each of the knees must be securely attached with bars to the wall;
 Stove with chimney elbows
• chimney capacity it should be less than the productivity of the furnace itself, in which case hot gases will not go into the pipe immediately; its diameter should be only 2.7 times larger than the furnace volume, for example, with a furnace volume of 40 l, the diameter should be 110 mm; blowing the chimney with a fan – this will turn the stove into a kind of smoke gun; • to reduce air circulation firewood in the oven should fit as tightly as possible; if it is heated with coal, it is necessary to stir up the resulting ash as little as possible; • to regulate the air flow, the door to the blower can be made adjustable by providing it with vertical slots and shutter. which will cover these slots; • to increase the heating area, it can be ribbed, that is, welded onto its body perpendicular to the furnace metal strips ;• if you put steam on the stove buckets or metal box with sand. then they will accumulate heat and store it even after the furnace is extinguished; sand backfill or heat accumulator made of stones can be sewn inside the metal body of the furnace;
 Scheme of a potbelly stove with sand filling, the furnace is made of a pipe with a diameter of 500 mm, its length is 650 mm
• bake, lined with 1-2 layers of brick. will keep warm much longer;
• the volume of the furnace also matters: the larger the area of its walls. the more heat they will give to the room; • bricks or sheet metal. on which the stove is installed, will help not only to protect the room from fire, but also to keep warm.
Related video: Do-it-yourself potbelly stove
Chimney device
• So that precious heat does not escape too quickly through the pipe, it must be of a special design. Such a device has two main parts: vertical height from 1.2 m, installed at an angle of 90 ° above the furnace and an inclined part, called upland. 2.5-4.5 m long or more, in which the smoke burns out. It is the hog that gives up to 1/4 of the heat of the entire furnace.
 Chimney Hogs
• A tall person can touch the heated pipe, so the bur must have a protective cover in the form of a mesh. To avoid burns, the distance from the floor to this pipe should be 2.2 m. The vertical part of the pipe coming from the furnace is additionally wrapped with thermal insulation.
Important! The pipe should be located away from plastered walls at a distance of 1.2 m. Distance from wooden structures - 1.5 m
Advice. Laying a pipe through a wooden ceiling and roof is a rather laborious process. It is much easier to bring it out through a hole in the wall or window.
 Smoke outlet through the window
warm brick
A potbelly stove on wood, coal and other types of fuel can significantly increase its efficiency. To do this, it is enough to build a screen of baked clay bricks around it with your own hands. If you look closely at the drawings of such a mini-building, you can see that the bricks are laid at a short distance from the walls of the stove (about 10-15 cm), and if desired, around the chimney.
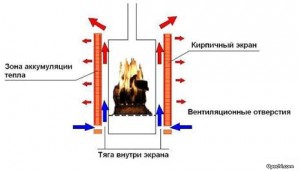 Brick screen for potbelly stove
Bricks need a foundation. Do you want the masonry to last a long time? Then pour the base at a time to form a monolith. The material for the foundation is better to take concrete, which should be reinforced with steel reinforcement with your own hands. It is desirable to make a reinforcement layer at a distance of approximately 5 cm from the surface of the concrete pad.
Ventilation holes are made at the bottom and top of the brickwork, which will ensure the movement of air (heated masses will go up, cold air flows from below). Ventilation also prolongs the life of the metal walls of the potbelly stove, postponing the moment of their burnout due to cooling by circulating air.
Bricks laid around the stove accumulate heat, and then give it away for a long time, warming the air in the room even after the potbelly stove goes out. In addition, brickwork additionally protects the objects surrounding the stove from fire.
If desired, the stove can be completely laid out of brick. Such a structure is beneficial in that it will last for many years without additional effort on the part of the owner. However, there are also certain disadvantages. The disadvantages of this option include the following:
- the process of laying out such a stove is quite laborious and is suitable only for those people who have experience in masonry with their own hands;
- a brick potbelly stove is quite expensive, as it requires the use of refractory materials, including fireclay bricks and special clay for mortar.
In order to get a small potbelly stove on wood, it is enough to lay out a cone measuring 2 by 2.5 bricks, 9 bricks high. In the combustion chamber, 2-4 rows are laid out from fireclay bricks. Ordinary clay baked brick is suitable for a chimney, into which you must remember to insert a stainless steel sleeve.
Whatever the method of making a miniature stove or a potbelly stove with your own hands, you make them according to a drawing or by eye, the main thing is that at the output you get an effective heater, and in an expanded configuration also a hob for cooking. Look around for suitable materials (barrels, sheet metal, etc.) and go to your own homemade stove or even a potbelly fireplace!
How to make a wood splitter with your own hands? How to install a sandwich chimney with your own hands It is not difficult to build a chimney for a boiler with your own hands Do-it-yourself metal stove How to make a smokehouse yourself at home or in the country
Assembling an efficient potbelly stove
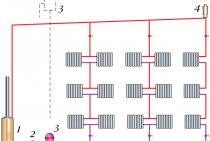
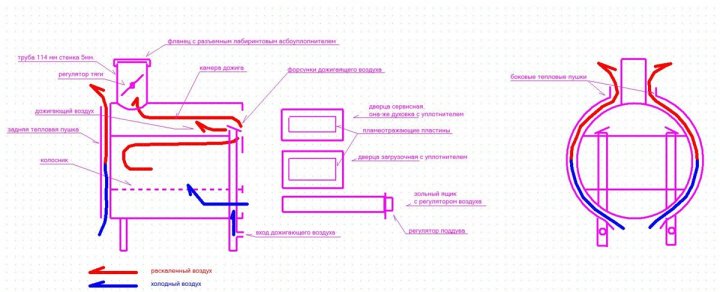
It is well known that conventional iron stoves are characterized by low efficiency (about 45%), since a significant part of the heat goes into the chimney along with the flue gases. Our design implements a modern technical solution used in solid fuel boilers - the installation of two partitions on the path of combustion products. Going around them, the gases transfer thermal energy to the walls, which makes the efficiency higher (55-60%), and the potbelly stove is more economical. The principle of operation of the unit reflects the drawing - diagram:
For manufacturing, you will need a sheet of low-carbon steel 4 mm thick, a piece of pipe Ø100 mm and rolled metal for the legs and grate. Now about how to make an economical potbelly stove:
- Cut metal blanks according to the drawing and make openings for the doors of the firebox and ash pan.
- Weld a grate from corners or fittings.
- From the cut parts, make doors with locks.
- Assemble the unit on tacks, and then weld the seams solid. Install the flue pipe and legs.
Advice. The lower partition, strongly heated by the flame, is best made of thicker iron - 5 or 6 mm.
For better heat transfer, craftsmen practice welding additional outer ribs to the body, as is done in the photo.