Installation of a corner on a new bath
When installing a new bath, the sequence of work and the type of corner used depend on the above factors that determine subsequent operations.
 Installation of a corner on a bath
However, the general workflow is as follows:
- The purchased bath is removed from the package and its sides are cleaned of dust and dirt, for which detergents and a sponge (soft cloth) can be used;
- To install the bath, the elements of its fastening to the floor are mounted (legs, frame, podium, etc.);
- On the surface of the wall mating with the bathroom, markings are made corresponding to the height of the side from the floor level;
- Further work is carried out depending on the type of plinth used.
inner corner
When using a tile corner, installation is carried out as follows:
- The surface of the wall and the edge of the bathtub are degreased, the bathtub is installed close to the wall surface.
- A silicone sealant is placed in the gap between the wall and the side and time is given for it to solidify.
- After the sealant has hardened and on the basis of the markup made, the plinth is cut and installed.
- The plinth is fastened in such a way that its lower (horizontal) plank lies on the side of the bathtub, and the vertical one lies on the wall surface.
- For fastening to the wall, expansion dowels or other fasteners are used.
- The wall is being finished, for which tiles, finishing panels or other waterproof material are used.
When using a corner on a tile, work is carried out in the following order:
- The preparation of the wall and the bath is carried out in the same way as when using a tile corner.
- The surface of the wall is being finished, while the laying of tiles and other finishing elements is carried out in accordance with the markings (from the upper edge of the bathtub rim).
- After finishing the wall, the bathtub is installed and the places where it adjoins the wall are sealed (similarly, as in the case considered above).
- After the sealant has hardened, the plinth is cut and with the help of adhesives (sealant, mastic, liquid nails, etc.) the corner is attached to the wall and the horizontally located edge of the bath.
- When installing the plinth, fittings (corners, connectors, etc.) are used, fastening is carried out by pressing the element to be fixed to the covered elements.
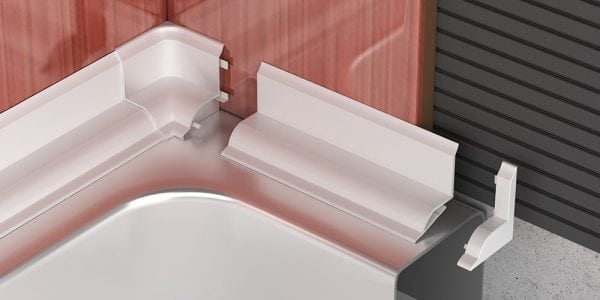
outer corner
When an external corner is used that is installed on the side of the bathtub, then the key to successful operation in this case will be the correct preparation of the wall surface at the junction of the bathtub, as well as matching the size of the plinth to the size of the bathtub.
The surface of the wall is cleaned of dust and dirt, after which the outer corner is put on the side of the bathtub and glued to the wall surface by means of an adhesive layer.
Collapsible corner
When using a collapsible corner, the technology of its installation combines the methods of mounting the corner under the tile and on its surface.
Initially, the internal component of this type of profile is mounted, while the work is carried out as in the case of mounting the inner corner going under the tile.
After that, the second part of the profile is mounted, for this silicone is used and a special design that connects both components of the corner into a single whole ("thorn groove").
Types of plastic corners for the bathroom
Bath skirting boards are made of polyvinyl chloride in the form of a plank in the form of a corner of various geometric dimensions and characteristics, such as:
- in rigid, semi-rigid and soft form;
- in glossy and matte finish.
 Matte bathroom corner
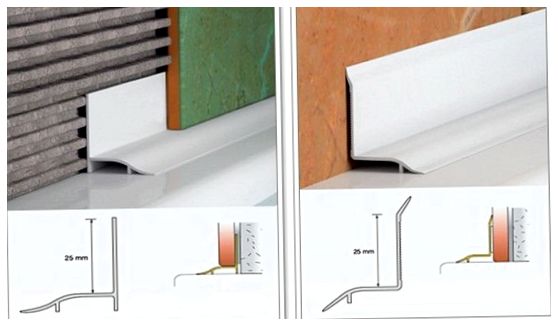
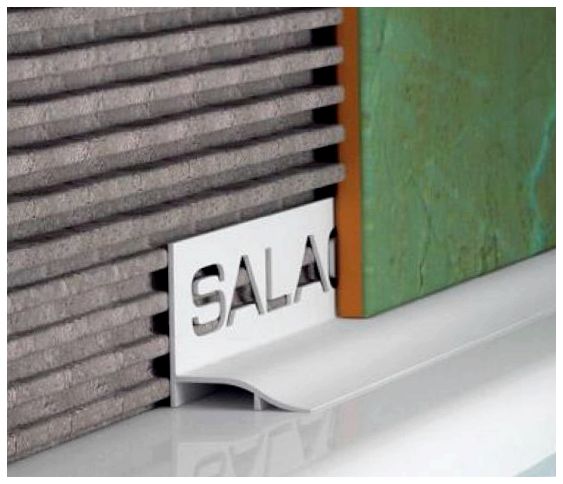
Plastic bath corners are classified as:
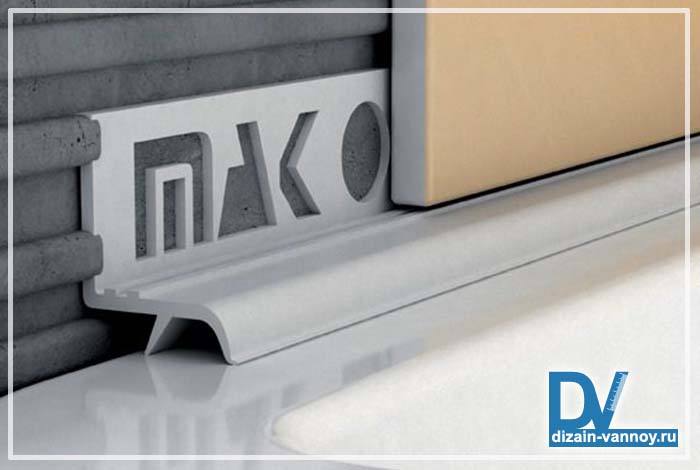
- Internal - mounted on the wall.
This type of skirting board can be mounted both under the tile, expressed in the imposition of one of the shelves of the corner on the side of the bath, and the second - under the wall finishing layer, as well as on the tile - when one side of the plinth is located on top of the tile, the second - on the surface of the bath.
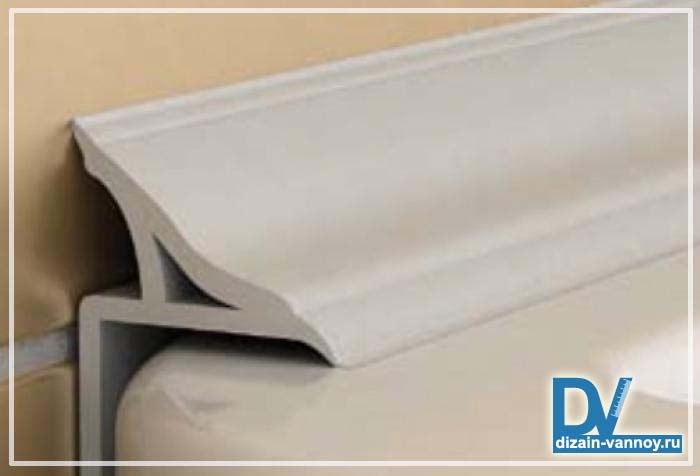
- External - installed on the sides of the bath.
The presence of a self-adhesive edge of the plinth, located on the side of the wall, ensures the tightness of the junction and prevents water from penetrating the wall behind the bathtub being installed.
- Collapsible.
This type of plinth is more difficult to install, because. its design assumes the presence of two components (internal corner and external decorative side). Thus, effective protection against moisture penetration to the enclosing structure (wall, podium, etc.) is achieved, which prevents the formation of mold and fungus on their surface.
Geometric dimensions may vary and are within:
- width - from 30.0 to 50.0 mm;
- length - 1.8 to 3.0 meters.
In the manufacture of plastic tapes used as a bath skirting board, a film with a thickness of 150 microns, an edge width of 20.0 mm and a length of 3.0 meters in the coil is used.
Adhesive for borders
What is the best way to glue skirting boards if they are not self-adhesive? Usually, craftsmen advise laying them on a sealant with silicone, while periodically changing the gluing. Any sealant darkens from water (after 2-3 years), gradually lags behind the wall. It is necessary to remove the installed plinth, clean and disinfect the wall and the edge of the bathtub, and reattach the material. With a low quality sealant, its service life can be reduced to 4-8 months, which depends on the intensity of use of the bath and the type of ventilation in the room.
There is a way out, you need to follow these tips:
- Use the "correct" sealant that is designed for aquariums. Thanks to antiseptic additives, a special composition, it does not darken, it is not susceptible to mold.
- Choose a white or transparent product (the latter usually costs more).
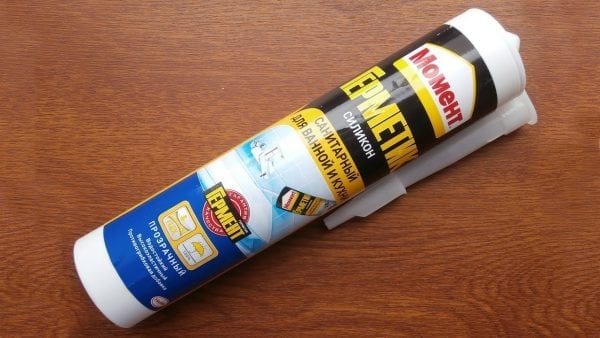
- Buy only expensive sealant of a well-known brand. If there are MS-polymers in the composition, this gives high hydro-repellent properties (Moment Crystal is an example).
- The elasticity of the sealant must be at a high level, this will allow the product to maintain integrity with small movements of the bath.
If there is no sealant, you can use other means. A reliable adhesive composition for borders with high moisture resistance and the addition of acrylic, silicone, and polymers is suitable. Suitable "liquid nails", tile adhesive.
Installation of a plastic corner
Sequence of work
Dismantling the old curb. The border, which has partially or completely moved away from the wall, where rot has already begun to form, is carefully separated, after which the dirt is removed from the wall, the remnants of old glue or sealant with a knife / chisel / spatula.
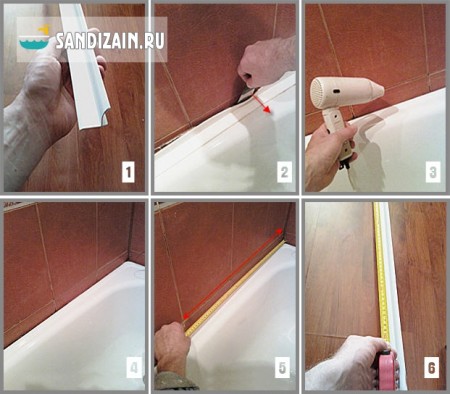
- Foundation preparation. The surface is wiped with a damp cloth or sponge dipped in water with the addition of bleach to completely remove all dirt. You can also use white spirit. After cleaning, the surface of the wall and bathtub is dried with a household hair dryer or allowed to dry naturally.
- Taking measurements. The length of the bath is measured using a construction tape measure, and then the resulting distance is measured and marked on the curb.
Cut to desired length and angle. The border is sawn off to the desired length, while the two edges that create the inner corner must be cut at an angle of 45 degrees (to create that same inner corner) - a miter box is used for this. After that, a fitting is performed to make sure that it closes the joint between the tub and the tile.
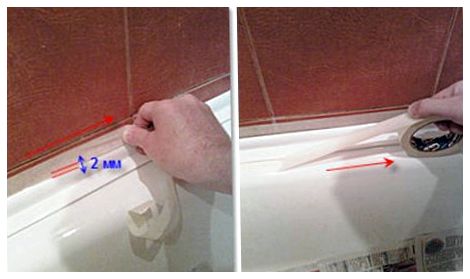
Sticking tape. The bath plinth along its entire length at a level of 2 mm above and below from the edge is pasted over with a line of masking tape. After that, the border is removed, leaving the glued adhesive tape.
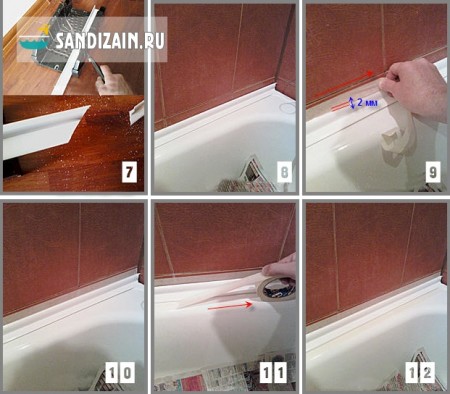
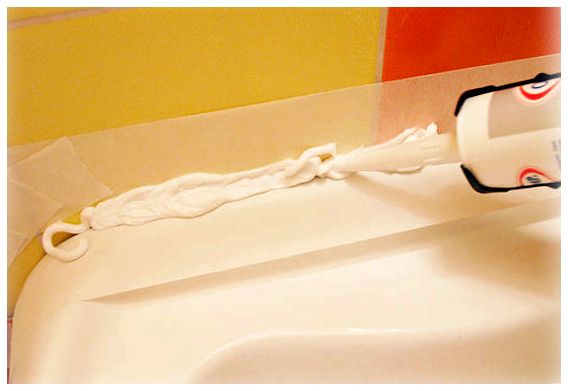
Application of sealing foam or sealant.Using a construction tool, a small layer of foam or sealant is applied along the place where the bath plinth will be attached, being careful not to go beyond the height of the masking tape.
Sealing. 20 minutes after the foam has dried, the joint between the tile and the curb itself is treated with sealant, gently pushing the edge of the curb with a spatula. The filled seam is very carefully smoothed out with a rubber spatula so that the sealant is evenly distributed along the entire curb. With the help of a sealant, all joints, both top and bottom, and corners, must be filled, after which the tape is removed.
Fixing the plastic curb
When making repairs in the bathroom, the question inevitably arises: how to properly install a corner in the bathroom so that even after a long time you will not be disappointed with the result?
The installation process is divided into certain stages. Placement of adhesive tape on the working surface. Adhesive tape will not allow sealant and glue to get on the enameled bowl and tile. Preparing the border for installation: measuring and trimming. It is easier to measure the material with a tape measure. Plastic cutting can be carried out both with a hacksaw and a knife, depending on the density of the product and its characteristics. Product fastening. Liquid nails are applied to the inner surface of the curb, after which the part is pressed against the joint with force. In the place where the edge of the corner adjoins the bowl and the wall, a transparent silicone sealant must be laid. Mounting a ceramic border It has been described above how to install a plastic corner on the bath most correctly and quickly.
Plastic borders
 This is the most common and economical option. Each hardware store offers a large selection of different plastic curbs. You can attach such parts both under the tile and on top of it. Having picked up a similar option, you need to think about how to stick a plastic corner in the bath. It is much better to use "liquid nails". Specialized silicone glue is also great.
To install plastic curbs, you do not need to have any specialized skills in construction. In addition, they are inexpensive, and there are quite a few ways of different colors and sizes. All this is done by plastic corners, a material that is quite popular for sealing gaps in bathrooms. When purchasing this border, you first need to think about how to stick the corner on the bath, and more specifically to the wall: under the tile or on top of the tile.
 Consider what types of plastic borders are.
They are produced in the form of corners and skirting boards. The two options are great for conspiring the connection between the wall and the plumbing. Borders in the form of an angular profile can be installed both on top of the tile and under it. If, for example, you pick up a plastic skirting board, then it is placed only on top of the cladding material. Now manufacturers have begun to release curbs with rubberized edges. This makes it possible to perform a more reliable seal. Along with the profiles themselves, you need to purchase all the necessary accessories (plugs, corner components)
Features of installation work
If the walls in the plumbing unit are tiled, then there are two options for fastening the curb:
- under tile
- Top tiles.
Which option to choose and how to stick a plastic corner on the bath?
 Of course, the first option must be used if, along with the installation of plumbing, borders, wall tiling is also expected. The tile will lie on top of that half of the corner, which is fixed to the wall. This is quite a job that requires a lot of work, requiring great abilities. And therefore, if you have chosen this option, it is better to ask professionals. The priority of such fasteners is considered to be sufficiently large waterproofing: water in this embodiment will definitely not leak. But if you have to change the curb after a couple of years, this can only be done by dismantling the tiles above the bathroom.
The second option is much easier.If the walls are already sheathed with ceramic tiles, then everyone can handle the task of how to stick a border on the bathtub. In this option, you need to start by cutting a plastic corner or plinth into pieces along the length of the bath.
 It is best to first “measure” these pieces to the opening and circle them with chalk or a pencil. Then stick the adhesive tape on those parts of the wall and bathtub where the glue should not get.
This will make your next job much easier. Of course, the surface must be prepared in advance (as in the variant with curb tape). How to stick a plastic corner in the bathtub and the wall?
“Liquid nails” are much better suited: this is one of the most reliable options. If the gap is large enough, seal it in advance with sealant or mounting foam.
When it is dry, apply glue to the back surface of the corner and press it against the wall and edge of the bath for 20-30 seconds. When the part is glued, it will be necessary to install the components and remove the repair tape.
 In the apartments of our time, PVC panels are often used instead of tiles in the form of finishing material. Consider how to stick a plastic border on a bathtub, if you actually have this case. In this embodiment, it is better to choose rubberized curbs.
Panels are also usually placed both on top of the corner and under it. If the distance is large, then you can “bring closer” the wall with the help of a repair profile, on which the panels will be installed.
And then the corner can be put on top of the panels. Here, instead of a corner, you can also use a plastic skirting board, just do not forget to fix the seal with a specialized sealant. After all the work is done, you need to leave your bathroom for the day. Only then can you safely use it for its intended purpose.
Now the question of how to stick a corner on the bath will not cause you any difficulties.
Choosing a border for sealing the gap
The absence of gaps near the sink, baths without sealing can only be achieved by perfect alignment of walls, floors, the most accurate installation of plumbing and tile laying. It is not always realistic to produce work of such high quality, and without great experience it is almost impossible. Even after the installation of tiles and baths, craftsmen most often leave a thin gap. The risk of water intrusion, increased humidity and mold growth is greatly increased.
The choice of materials for sealing seams is not too large; there are several options for borders on sale. The most budgetary of them is self-adhesive tape, the more expensive ones are products made of ceramics, natural or artificial stone. It is necessary to choose the right border size. When choosing by length, they are guided by the following recommendations:
- ceramic products - according to the width of the tile;
- plastic plinths - along the length of the side;
- border tape - for the entire length of the seam.
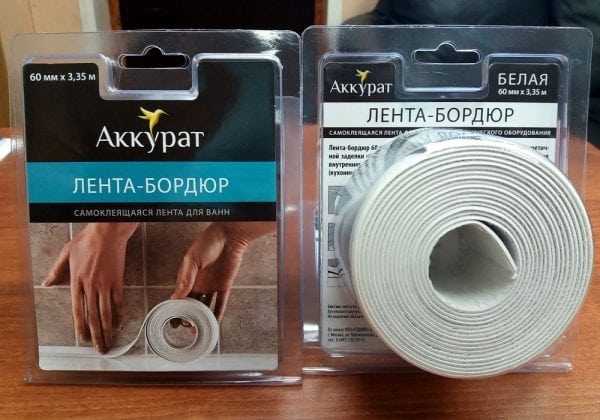
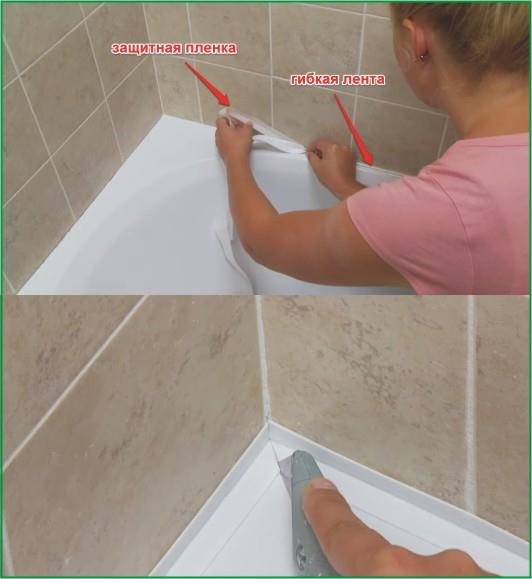
Flexible self-adhesive border tape
Tape border, or curb tape - an original material that allows you to seal the joints between the bathroom and the wall. Nta can be mounted with your own hands, you do not need to have special skills for this. The disadvantage of such a border can be called relative fragility (average service life is 3 years), but due to its low cost, it will not be difficult to change it. In addition to protection from dirt and moisture, curb tape is used to give a finished look to the room - gluing the strip completes the repair. The plinth is perfect for an acrylic bath - which one is better to choose, you can decide depending on its shape (oval, square).
The elastic plinth for the bath is made of special plastic with various polymer additives. The reverse side is coated with liquid butyl adhesive, covered with a peel-off film. The material is sold in rolls of 3.5 meters, in shape it is angular and figured. The specified length is enough for pasting any standard bath.Some manufacturers sell kits with applicators and cutting knives, as well as a pair of corners. Skirting boards are also produced with antiseptics and fungicidal additives from fungus and bacteria in the composition.
plastic borders
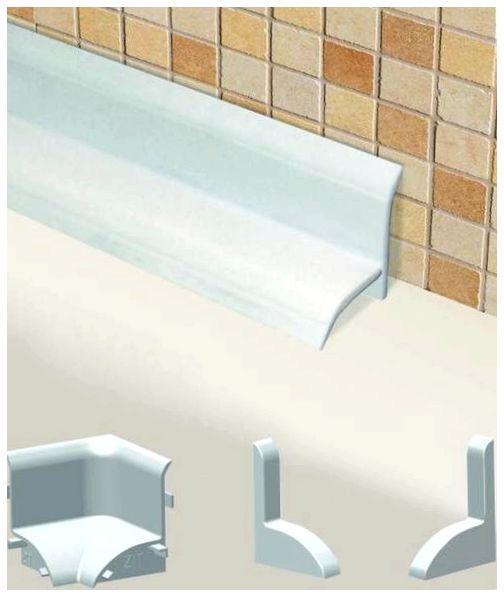
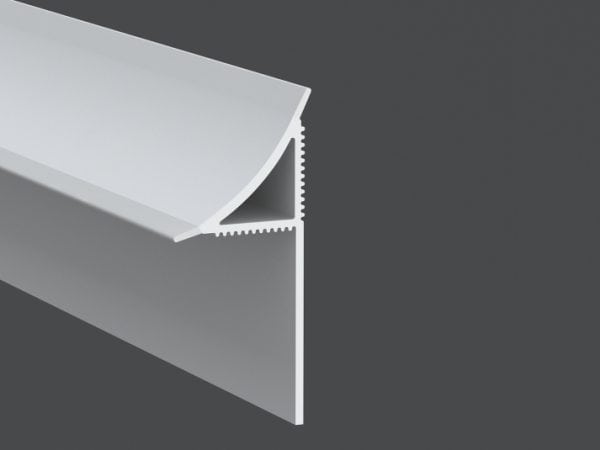
A plastic corner is a budget option for closing an unsightly gap near the wall. The highest quality plastic borders imitate a ceramic surface. There are several types:
- internal, they can be put under the tile;
- outdoor, mounted at the joints after the completion of wall cladding;
- two-part profiles from a holder bar and a top decorative element.
The dimensions of plastic borders are usually 3-5 cm in width, the length of individual elements is 1-3 meters. For a standard bathtub, 2 elements of 1.8 m each or one three-meter one are enough. Before installation, the skirting boards are cut according to the desired dimensions. Additionally, you should buy end caps and sprockets for mounting in the corner. Plastic profiles can have different shades - beige, green, pink, blue. Unfortunately, over time, the material darkens from water and household chemicals, after a couple of years it will have to be changed.
Ceramic borders
Ceramic plinth in the bathroom to the tiles will suit better than others. He is not afraid of water, does not lose gloss for decades, has a unique wear resistance. Other advantages of the material:
- ecological cleanliness, harmlessness to humans;
- frost resistance (can withstand large temperature changes);
- fire resistance - ceramics does not burn, does not emit harmful substances.
The material provides good protection against leakage, does not peel off at high humidity in the bathroom, while the pattern on the borders does not lose its brightness. A skirting board will be ideal even if there is a large gap between the bathroom and the wall. In this case, the gap is closed with bricks, then covered with decorative elements. Ceramic borders do not turn yellow over time, and the soap coating covering them is easily cleaned. The range of products is very rich, many are perfect for tiles and are sold with it as a set. They are not only functional, but also aesthetic:
- emphasize the geometry of the tile;
- complement the thematic drawing;
- highlight the perimeter of the bath.
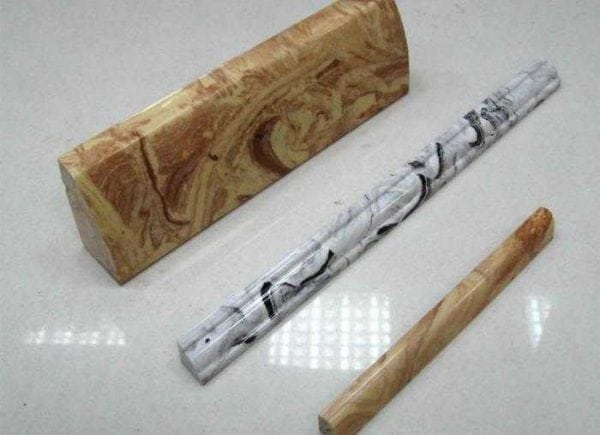
Natural stone borders
In terms of characteristics, such products are similar to ceramic tiles - they serve reliably and are durable. True, the design of the bathroom must be appropriate - solid, otherwise the stone borders will not look the best. There are economy-class products (manufactured in Moscow, Ukraine) and more expensive ones. Marble and granite profiles have a beautiful appearance, travertine elements look luxurious. Such an interior can only be designed by a professional, independent installation of stone borders is not recommended.
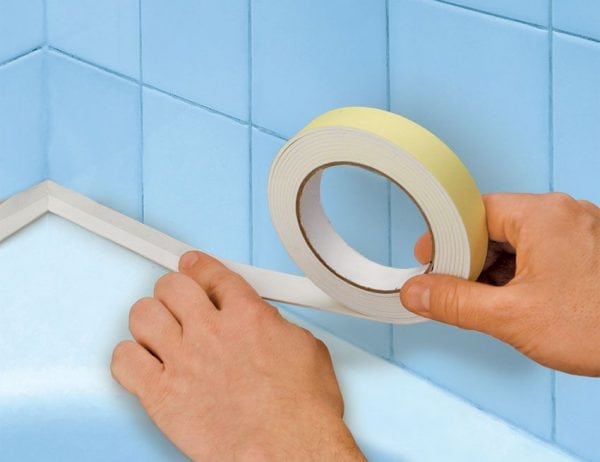
Tape gluing
The easiest way is to lay a curb tape at the junction. The curly one is somewhat different from the angular one - it has an average longitudinal sector without an adhesive composition. It is necessary to do preliminary markup. The border is glued with paper tape at the right height, since it is difficult to wash off the pencil or marker from the surface of the tile. At the end of the work, the adhesive tape can be removed.
Before installation, cut the border. For each section of the bath, you need to make an allowance of 2 cm. Then the profile is bent in the right place, warming up with a hot hairdryer. After it becomes elastic, it will acquire the desired shape. This is also necessary so that the tape does not peel off ahead of time. The installation instructions are as follows:
start work from a corner;
carefully separate the film from the tape in small sections - 15 cm each;
in parallel, press the profile with the applicator, do this as hard as possible (then the tape will stick stronger);
pay attention to the places of contact of the product and tile joints;
put a border in the corners with special care, the general appearance of the bath depends on this (the corner tape is left flat on top, cut from below at an angle of 45 degrees to about the middle);
insulate the joints of the tape with sealant;
do not use the bathroom during the day, then, if there are lagging areas, glue them with “liquid nails”.
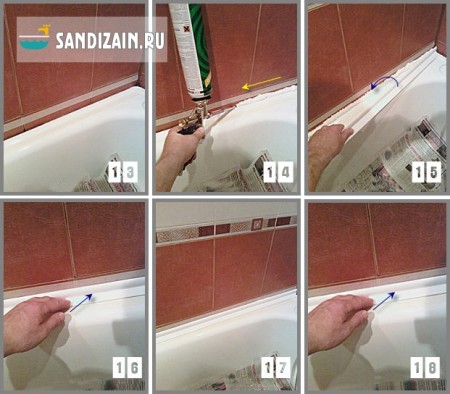
Installation of plastic plinth
It is necessary to install a plastic border in a different way, but the preparatory measures are similar. Next, you need to measure the length of the bathtub with a tape measure, make a mark on the border, cut off the material. The easiest way is to immediately cut out elements equal to two sides of the bath. Cut the corners at a 45 degree angle. Next, glue paper tape 2 mm above and below the future corner so as not to stain it with glue.
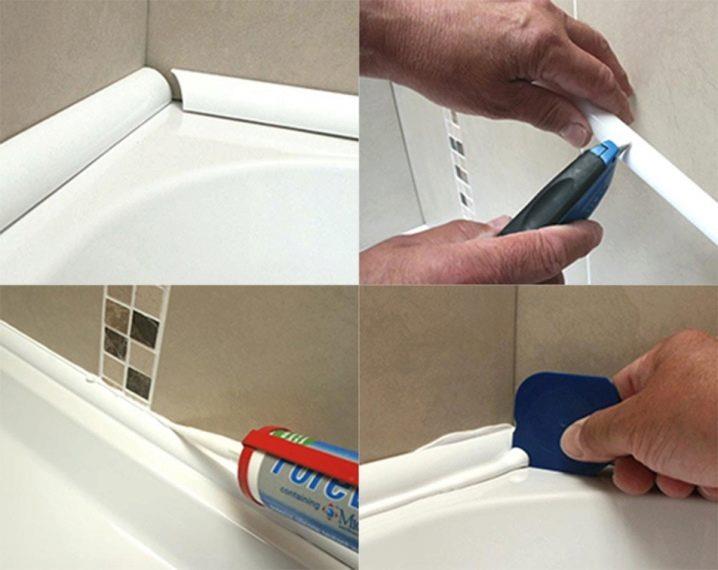
The sequence of work is as follows:
- attach a piece of the border to the wall, press it;
- bend the corner from above, leaving space between the wall and the curb;
- insert the tip of the gun, squeeze the sealant or “liquid nails” into the slot;
- gently smooth the sealant with a spatula;
- do the same with the lower part of the curb;
- strongly press the corner;
- Remove the tape after a few minutes.
Adhesive ceramic corner
Laying ceramic corners is more difficult, but even beginners usually get the job done after a little practice. Under the tile, the material is mounted as follows:
- apply a layer of sealant between the bathroom and the wall, filling the gap evenly, level with a spatula or with a wet hand;
- knead the tile adhesive according to the instructions;
- cut borders for joints and corners at an angle of 45 degrees, using a grinder, a tile knife (you can use “biting off” with pliers, then sand the surface with sandpaper);
- start work from a corner;
- put tile glue on the back of the borders, glue to the joint, remove excess with a spatula;
- continue installation, leaving minimal gaps between the elements;
- the next day, pour water over the corners to seal the glue, another day later, apply sealant or grout for joints.
The curb is mounted on the tile in a different way. It is necessary to process the wall with “liquid nails”, press the ceramic corner against the wall, perform similar steps for other elements (do not forget to use the level). After the glue has dried, fill the seams with sealant.
original solution
If you want aesthetics, plastic corners for the bathroom for some reason do not suit you, pay attention to ... borders for kitchen sets. In fact, these are the same plastic corners, they can be smooth or convex, they are equipped with corner elements and plugs to aesthetically close the cut ends with them.
Their distinctive feature is that all of them are necessarily produced with an elastic band, which additionally protects against leaks.
It is mounted in the same way as ordinary plastic corners.
The only drawback of such designs is that they can not be bought everywhere. In the salons of kitchens, corners are often sold only complete with a kitchen. But sometimes they can still be ordered separately. As an independent product, they can be found in large construction hypermarkets.
Varieties of corners for the bathroom
Before you learn how to properly install a plastic corner on a bath, you should understand what they are in general in order to choose the best option for your home. People also call them borders, which are an inexpensive, practical tool that allows you to eliminate gaps between walls and fonts.
There are such types of corners:
- Internal borders. These are the corners that are installed in the process of facing the walls with tiled materials, and then the sides of the bath are mounted on top of them. Thanks to this design, it is possible to reliably isolate the joints between the wall and the bowl from moisture.
- External borders. These are plastic corners that are mounted on top of the sides of the bowl. In other words, these are planks bent in the form of an angle of 45 degrees. Such self-adhesive sides do not allow water to penetrate between the wall and the bath, since all the liquid flows down them into the container.
- Collapsible corners for the bathroom. They consist of two parts - an inner and a decorative outer side. Their installation is more complicated, but they perfectly protect against the formation of mold and moisture penetration.
Corner installation
The installation process of the corner depends on its type. However, before performing installation work, it is recommended to prepare the surface.
Preparing to install the corner
How to glue a corner on a bath? First of all, it is necessary to carefully prepare the surface, which will increase the level of adhesion between the corner and other surfaces and, as a result, provide the necessary tightness and extend the life of the element.
The preparation process takes place in the following sequence:
- cleaning from the old corner (when replacing the sealing device);
- alignment of the walls and the bath, which will provide a tighter fit;
- complete cleaning of all types of contaminants;
- degreasing;
- maximum drying (in the absence of time for drying, you can use a building hair dryer);
The corner will adhere more firmly to a completely dry surface.
applying sealant to the gap, which will increase the level of protection. It is recommended to use exclusively moisture resistant sealant.
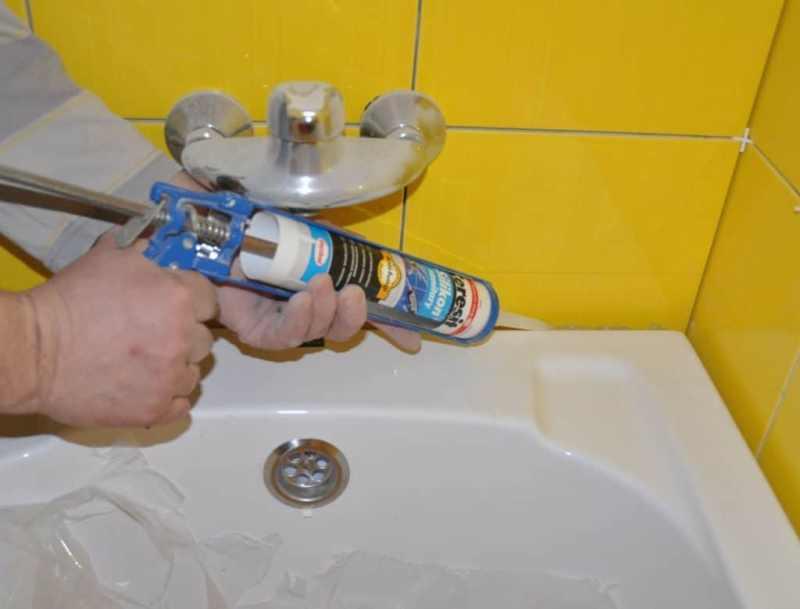
Applying a sealant to the gap
Installation of self-adhesive tape
Installation of self-adhesive tape starts from one of the corners of the bath in the following sequence:
- removal of the protective layer by 10 cm - 15 cm;
- sticking the tape in compliance with the dimensions;
- a fold is formed in the corner, which is subsequently cut and sealed.
Soft tape gluing process
The bathroom can be used 24 hours after installation work. This is the time it takes for the glue to dry completely.
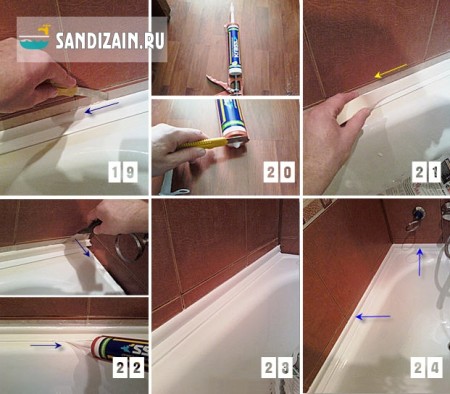
Installation of hard curbs
Installation of hard corners is done as follows:
- the surface of the bath and the wall is pasted over with masking tape to prevent contamination during the work;
- an adhesive composition is applied to the corner between the wall and the bath, as well as to the edge of the bath and the wall (glue can be applied directly to the corner);
- a corner cut to size is glued;
- the seams formed by the contact of the corner and the bath (wall) are treated with a sealant;
- expected until complete drying of the used formulations.
Installation of a hard corner on the bath
The process of installing a plastic border is shown in the video.
Subject to all the working conditions for the selection and installation of a sealing element for a bath, you can do it yourself, without the help of professionals.
Material selection

For work on installation to the side of the skirting bath, special attention should be paid to the choice of glue. It is desirable that it be transparent, because
the composition may protrude beyond the edges of the part.
After the adhesive has dried, its excess is removed. This can be done using a strong solvent or improvised means, although this option is not always possible. A bathtub made of PVC is not cleaned this way - glue should be removed from its surface with white spirit. What you need to fix the curb and how to install
- metal or rubber spatula;
- hair dryer for drying surfaces;
- knife;
- measuring tape;
- if necessary - a hacksaw for metal or a grinder;
- mounting gun;
- adhesive tape and mounting tape.
If a border was previously installed on the bowl, it must be removed and the dirt formed under it cleaned off. This should be done with a cloth or sponge dipped in water with chlorine. After that, the surfaces are degreased and dried. The adhesive tape is attached 2 centimeters above the place where the curb will be installed. The adhesive should be applied starting at the corner joints. The composition must be laid evenly. The space between the wall and the corner must be sealed. Sealant in this case, you should choose silicone. Sealing is best done with a mounting gun.In order not to accidentally stain the tiles and the bath bowl, a mounting tape should be glued under the plastic corner and at a distance from its edge. The edge of the plinth is bent with a spatula, after which the curb is filled from the inside with a silicone compound. Its layer is then leveled with a rubber spatula. These actions are carried out both with the upper and lower edge of the plinth. Corner joints must be especially carefully filled with sealant.
It is easy to install the corner yourself. But it is necessary to approach the choice of the product itself very carefully. Inspect the plastic for damage such as scratches, nicks, and dents. The plinth should bend easily at the edges and be durable. Plastic strips are much cheaper than ceramic ones, and in most cases they are not inferior to them in terms of reliability, functionality and aesthetics. A careful approach is also needed to a ceramic product. The border must be smooth and without flaws. The ceramic corner looks very nice and really transforms the bowl, while simultaneously performing its direct function - sealing the joints.
Properly installed ceramic border can last for decades. The fastening of such an element is more difficult, but it can also be done without the help of others.
plastic border
Laid-on plastic border for a bathtub
Plastic bumpers for the bathroom are the most common option for sealing the joint, since their service life with high-quality installation is 3-4 years. They are low cost, easy to install and have a wide variety of types. To date, there are two types of curbs for outdoor and indoor installation. Corners for outdoor laying are mounted over the joint when the tile is already installed. Internal models are installed before facing work, after which the tiles are installed.
For your information. Before purchasing a bathtub border for tiles, please note that the service life of this product is not long and, if it is necessary to replace it, you will also need to dismantle the row of tiles laid on the corner.
If you have chosen an inner corner between the bathroom and the tiles, then this procedure is quite complicated and time-consuming, and for its implementation it is better to invite qualified workers. If you have an overhead corner, then the installation process is as simple as possible:
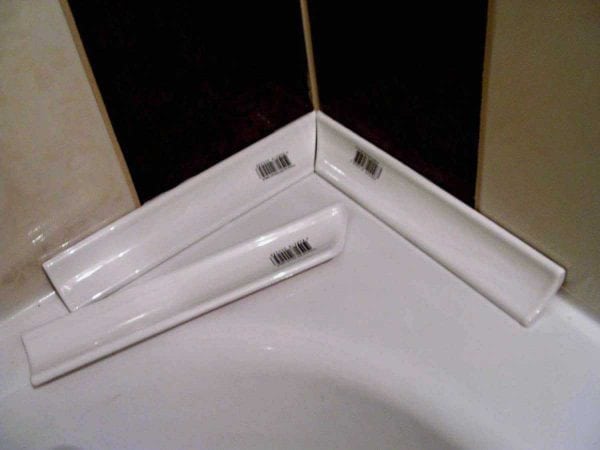
- the first step is to cut the corner to size and attach it to future installation sites for an accurate fit;
- then, without removing the corner, stick mounting tape on the tile along the upper edge of the curb in order not to stain it with sealant or foam;
- before sticking the corner on the bath, cut off the corner joints at an angle of 45 degrees.
Under-tile border
For your information. If you doubt that you can make beautiful corner joints, then it is better to buy ready-made corner modules in advance, which will greatly simplify the work.
- prepare the surface, clean from dust and grease. Alcohol or white spirit can be used for cleaning. Dry the joint with a hair dryer.
- if the gap is too large, then before gluing the border on the bath, seal it with mounting foam.
- for reliable gluing, it is better to use liquid nails and, after all the elements are in place, carry out additional sealing of the joints with silicone.
On this we can assume that the corner in the bathroom is installed. At the end of sealing, remove masking tape and allow time to dry within 12-24 hours.