Before proceeding to surface coloring water-based paint, it is necessary to prepare it. If this is not done, then all the shortcomings of the ceiling will immediately appear again after it is painted. To avoid re-painting the same surface in the near future, it is necessary to prime the ceiling before painting.

Purpose of the primer
- Significantly reduces the consumption of paints and varnishes.
- Reduces the possibility of stains.
- Reliable fastening of the finishing layer.
- Increased surface protection against moisture.
- Durability of operation.
The presence of even one such item confirms that the primer of the ceiling is a necessary part of the work, and not a waste of time.
Water-based paint is an aqueous emulsion of small particles bonded together. If such a paint was applied to a primed base, then during drying, a gradual evaporation of water occurs, which leads to the combination of molecules and the formation of a film coating on the surface. The structure of unprimed brick, drywall, concrete, plaster and putty is porous and if the paint is applied immediately to it, and not to the primed surface, then the water, instead of slowly evaporating, will begin to be absorbed into the base. This can cause differences in the color of the coating and its haze, as well as the appearance of spots.
Although the primer for the ceiling used for water-based painting is itself most often an acrylic emulsion, however, its molecules are much smaller, and they manage to impregnate the top layer of the base and create a waterproof film. Due to this obstacle, water from the finish paint is not absorbed, but evaporates, which leads to compliance with the technology and savings in building material.
Preparing the premises for renovation
Before proceeding with the repair, you must first remove from the room those things that paint can get on. Those items that cannot be taken out should simply be covered with a large film, just like windows and doors. The chandelier and lamps that hang on the walls must be removed in advance. You also need to immediately clean the walls of the old coating in order to prevent dust from getting on the fresh paint of the ceiling in the future.
Preparation for painting the ceiling surface
- Removing the old coating. It is easy to get rid of wallpaper on the ceiling using a drill with a special nozzle or a wide spatula. Whitewash must be washed off with warm water and roller, which is periodically lowered into the water, and then rolled out on the ceiling. It is necessary to wet the surface of the ceiling well until the whitewash is thoroughly wet. Wet whitewash then needs to be removed with a spatula. After that, the ceiling should be wiped well with a damp cloth several times to remove all remnants of whitewash. If it was applied to the walls, they must also be washed. It is much easier to remove the tile, for this you only need a spatula, which will need to tear it off. Residual glue should be washed off with warm water.

- Preliminary inspection and surface treatment. After the old coating is removed, the surface needs to be treated. But before that, you need to carefully examine it to find places where the plaster falls off. If such places have been found, you need to scrape off the plaster well with a wide spatula, which will greatly facilitate and speed up the work. It is also necessary to check the joints between the ceiling and the wall for voids. This is easy to do with an ordinary screwdriver.If voids are found, then they must be carefully cleaned and then covered with putty, otherwise all work at the junction with the wall and on the ceiling itself in terms of priming and painting will be done poorly.

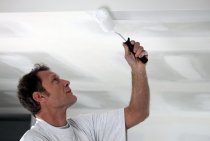
- Primer. It is not difficult to choose a primer for painting for the ceiling, since it is presented in large quantities on the shelves of markets and shops. The primer is either alkyd or water based. A roller and a brush are used to prime the ceiling, since with their help all existing irregularities can be well processed. If the surface is affected by a fungus, then you first need to make an antiseptic primer, which helps prevent the appearance and development of bacteria.

The primer of the ceiling is carried out in several stages and before applying each next layer, the previous one must dry completely.
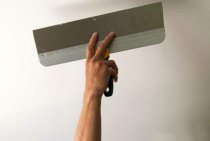
- putty. Proper surface preparation for painting also includes putty, which allows you to cover up all the cracks and irregularities that are there. For very large cracks, it is necessary to stick a reinforcing mesh to prevent the appearance of small cracks in this place. After that, you can proceed to putty, which is also applied in several layers, not forgetting about the joint between the ceiling and the wall. Each previous layer must be completely dry before the next layer is applied. All layers of putty should be very thin.

Then the surface of the ceiling needs to be primed again, which can be done with a roller. When the primer dries, the final putty is performed from several layers. It is best to do this with a wide spatula, which will greatly facilitate all the work. After applying the finishing layer of putty, it is necessary to let it dry, and then you can clean the surface with sandpaper.

After that, the surface of the ceiling will be ready for applying water-based paint, so you can safely start painting it.