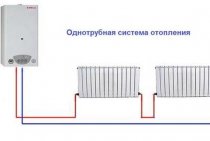
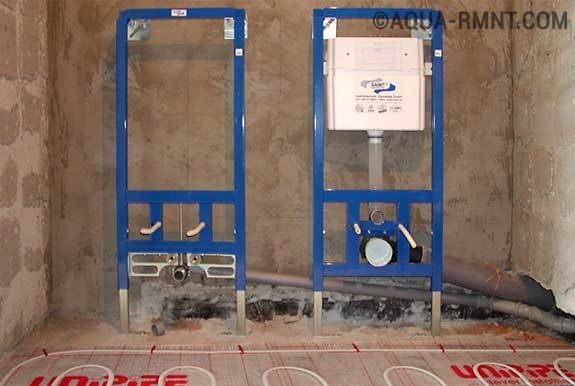
Niche preparation
Installing a wall hung toilet involves using a niche to accommodate the frame. As already mentioned, a certain strength of the walls is necessary for fastening. The design of the installation can withstand a weight of up to 400 kg, part of the load from which is transferred to the wall. This issue must be approached with particular care.
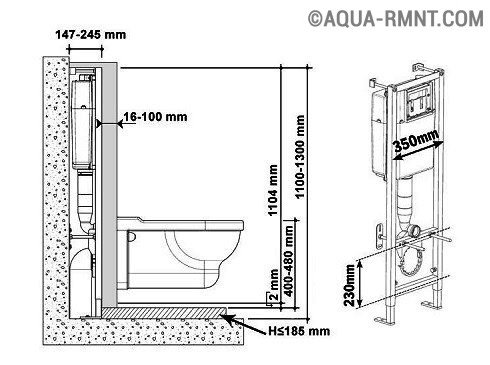
In order to place the installation, it is necessary to prepare a niche. It should be the following:
- Height - 1 m;
- Width - 0.6 m;
- Depth - up to 0.2 m.
In some cases, it is problematic to create such a depth. In such cases, it is necessary to go deep to the possible value, and hide the remaining elements with plasterboard panels.

By hiding the main part of the device, certain opportunities open up for decorating and improving the interior. It’s not worth just placing the installation near the wall and sheathing it with GKL, because. placing a conventional toilet will be cheaper and easier. In addition, it will take up less space.
Installation installation
Installing a do-it-yourself toilet installation on a special frame fixed to the wall is a more expensive process, but faster and more reliable. The installation will be fixed to the floor and a solid wall.
The technological sequence is as follows:
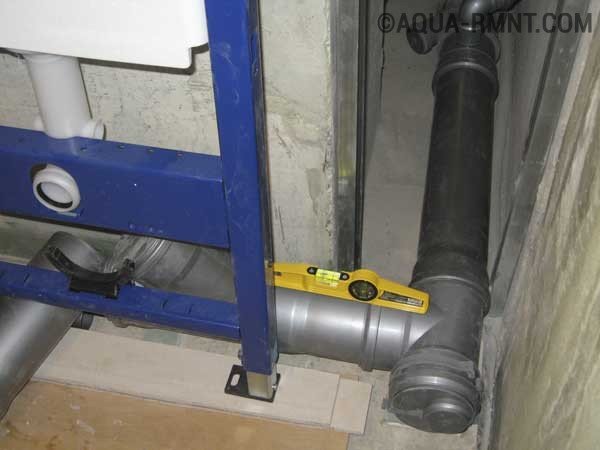
1. Fixing the metal frame. It has corresponding holes with which it is fixed to the surfaces with dowels. Two points for fixing to the floor and two to the wall. Sewer and water pipes are connected to the installation site. The installed frame must be checked for evenness using a spirit level. It is necessary to maintain exact parallelism to the wall being installed, because even slight distortions can lead to interruptions in operation and even breakdowns. Horizontal adjustment is carried out using wall mounts that change their position.
This stage also involves setting the height of the hanging toilet. It will depend on the height of the residents, usually 0.4 m. The height of the bowl can be adjusted in the future.

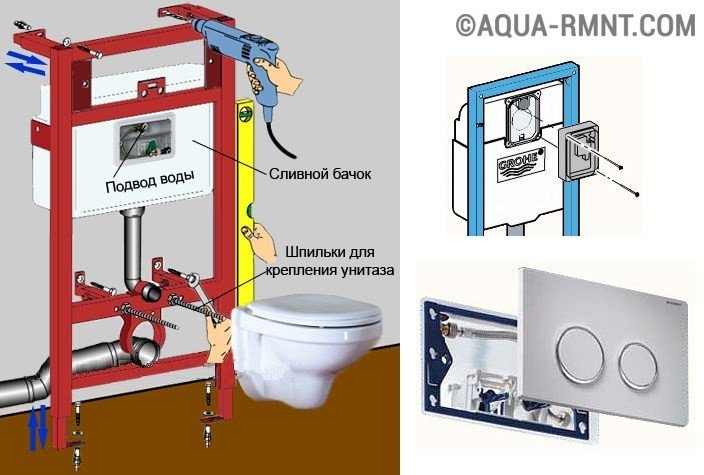
2. Leading to the drain tank of water. You can use a flexible or rigid system. Professionals often use hard, because. she can last longer. Flexible hoses can also be used, but if they fail, it will not be possible to get to them and replace them quickly. During the installation of the liner, the valve valve of the tank, as well as the drain from it, must be closed.
After connecting, check the reliability of the connections. To do this, open the water supply and start filling the tank. If there are leaks, they are fixed. Water may remain in the tank.
3. Connection to the sewer. The toilet drain hole must be inserted into the outlet of the sewer pipe using the appropriate corrugation, but some models can be connected without using it. At the end of the connection, check the tightness of the system by test drains. To do this, you will need to temporarily screw the bowl to the frame. After that, remove it again, it will be installed in the final installation.
The correct connection of the sewer pipe must be performed even before the installation is started. Pipe diameter - 100 mm. It must be laid with an appropriate slope. You can read about it in the corresponding article.

4. Closing with plasterboard sheets. The installation of a wall-hung toilet must be accompanied by a decorative finish of functional elements. To finish the bathrooms, you must purchase a waterproof double drywall.It is more durable than normal. Sheets are required to be mounted to metal profiles and directly to the toilet frame. The installation manual must contain the necessary information on the cutting method, indicating the points for cutting holes.
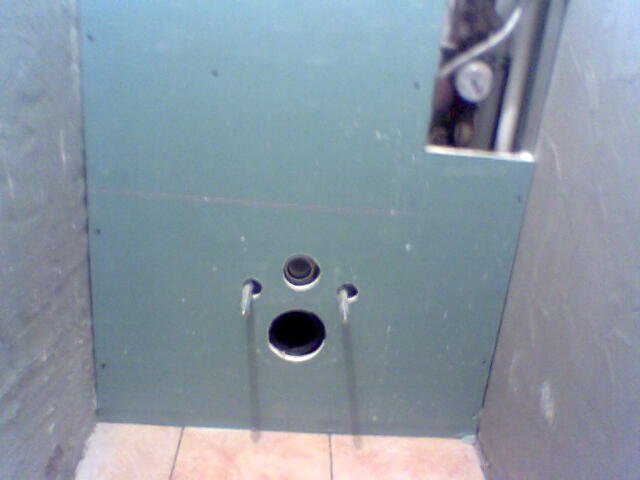
Sheathing can be done in two ways: over the entire wall area or only along the installation plane. The second method involves the formation of a small shelf above the bowl, which can be used to place the necessary items.
Subsequently, the installed barrier is finished with tiles or panels together with the rest of the area of \u200b\u200bthe room.
5. In conclusion, it is necessary to install the toilet on the installation, namely the bowl. It should be hung in the appropriate place using two fasteners.
6. The last, most simple step is to install the flush button. They are pneumatic and mechanical. The process is not difficult, because. everything should already be connected to the required opening in the wall. The mechanical button is installed using special pins with their subsequent adjustment. For pneumatic, you only need to connect the appropriate tubes, everything is ready.

In the process of activity, it is necessary to especially control the process of mounting the frame-installation,
because the course of further installation will depend on the correctness. Figuring out how to install a toilet installation is actually not difficult. It is enough to follow the recommendations of the installation instructions, and in addition to watch the corresponding video about the process, and you will succeed.
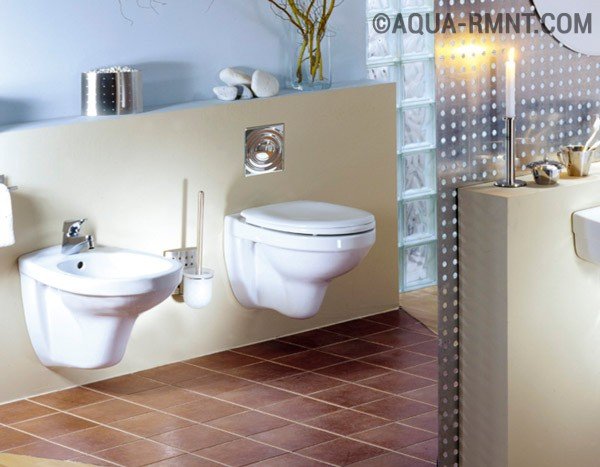
Suspended plumbing fixtures are gradually gaining popularity, especially among owners of small bathrooms. However, not everyone likes hanging toilets - outwardly they seem unstable and unreliable. This impression is deceptive, because it is carried out using the installation system, which is hidden behind the finishing material of the wall. Let us consider in more detail the advantages of suspended plumbing objects and get acquainted with the instructions for their installation.
Choosing and buying a toilet bowl with installation
The main condition for purchasing an installation is that it must match the model of the toilet bowl you have chosen. Often, wall-hung toilets are equipped with an installation system initially, it is best to prefer this particular option.
Take measurements of the niche where the installation will be installed
The installation must match the size of the niche in which it will be placed.
Installations are of two types.
block
- fastened to the wall using conventional anchor bolts, which are the main support of the entire structure.

Framework
- is a frame on legs, thanks to which the height of the toilet is adjusted. The frame is attached in four places. It is possible that all four fasteners are fixed on the wall - this method of installation can only be used in the case of solid walls.
If the wall is not stable enough, choose an installation with two mounts on the wall and two on the floor. The last two fasteners bear the main load.
- Provide a technological hatch just below the drain button. This will greatly facilitate if necessary.
- Use modern flush buttons that save water. It can be two separate buttons, one of which drains the full volume of water in the tank, and the other half. Another option is the presence of "Start" and "Stop" buttons.
- Consider the location of the drain button relative to the tile elements. Design the button either strictly between two tiles, or in the center of one of them.
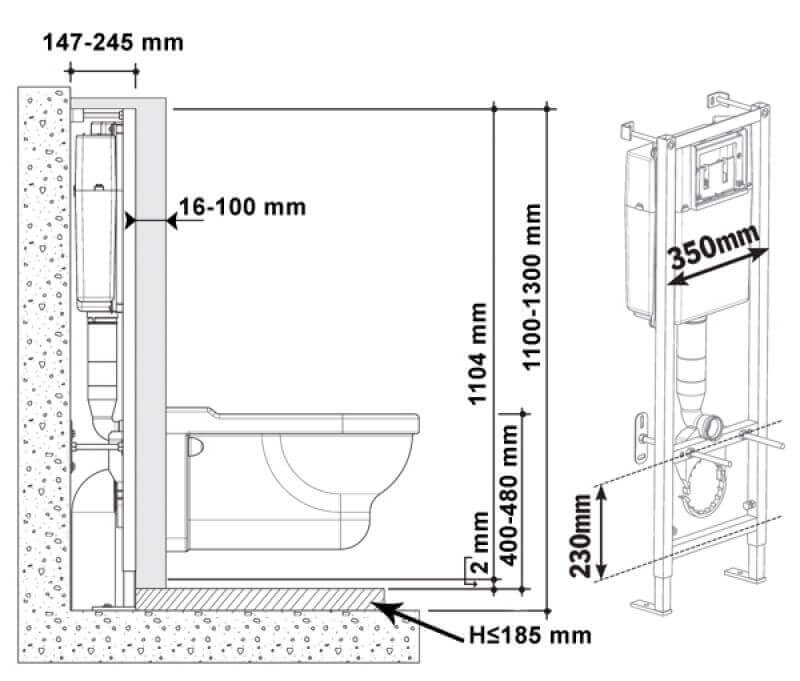
- The top edge of the toilet must be no higher than 45 cm from the floor and no lower than 40 cm.
- The thickness of the wall hiding the installation system should not exceed 7 cm.
- A standard distance of 18 or 23 cm is maintained between the mounting holes of the toilet bowl.
- Control the correct installation at all stages of work. This will help to avoid gross errors during installation and problems during the operation of plumbing equipment.
The toilet bowl installed according to all the rules with the installation is able to withstand a load of up to 400 kg!
If you doubt that you can do all the work correctly and efficiently, we advise you to resort to the help of qualified specialists. Well, to save the budget, of course, self-assembly of the installation system will help. Feel free to use technological and design know-how to create an original and practical interior.
Updated: 12/21/2017
103583
Installation of a toilet bowl without installation, on a concrete base
Sometimes they are interested in how to install a hanging toilet without installation. Of course, installing a toilet on a frame can be replaced with a cheaper option - mounting on a do-it-yourself concrete base.
Metal structure with special fixtures, designed to fix plumbing fixtures
, is called installation
. It is used for mounting bidets, sinks, and toilets. Plumbing attached to the wall helps save space and create a feeling of lightness. In addition, the installation of the installation helps to hide all communications and pipes.
, which are located in the wall, allowing you to achieve an attractive appearance of the room and hygiene.
We install with our own hands
Performing the installation of the installation of the toilet with his own hands, a person can use the previously acquired skills, the instructions attached to the design, and video clips from the Internet. There is enough information to get an idea of how the design should look like in the end, how to achieve the desired result. But, if you have doubts about your strengths, it is better to seek the help of professionals. Using modern tools, they will quickly cope with this task, and in the near future will provide a worthy result of the work.
If it seemed to you that there was not enough information, you can always supplement it and express your opinion in the form below “Your opinion”.
Recently, conventional floor-standing toilets are increasingly being replaced by suspended structures. They involve placement in a smaller area, and also have a more modern appearance. Therefore, the process of displacement of traditional models by them is quite natural. However, following modern trends has its negative sides - more complex installation, longer and more expensive. However, you can successfully get out of the situation if you learn how to install a hanging toilet with a do-it-yourself installation.
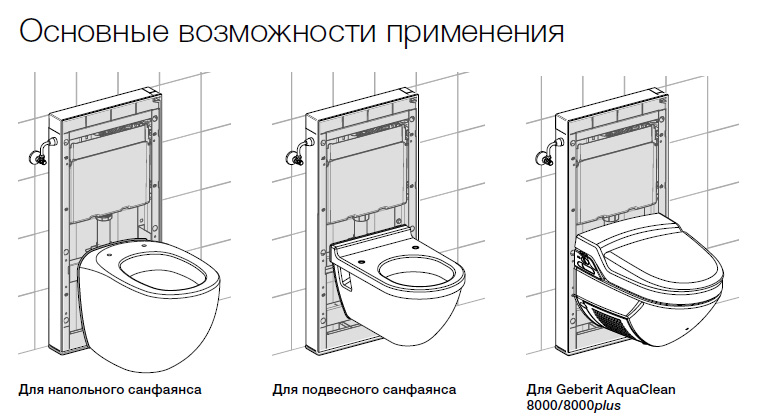
Types of installations for the toilet
To date, there are 2 types of installations that have their own design features.
Block structures
mounted only on the main walls and consist of a plastic tank with fittings. A set of fasteners is additionally attached to the toilet bowl. This type of installation for toilets is installed in a pre-prepared niche and is completely hidden in the wall. The main advantage of this design is accessibility, but if there are no main walls in the bathroom, then installation is impossible.
After buying a toilet, many decide to install it themselves. The procedure is very simple and does not require special skills. Increasingly, people are buying in order to save space, there is an additional design - installation, it provides fastening of the toilet to the wall. In such cases, installing a toilet installation with your own hands can raise a number of questions. To provide a complete picture of the work process itself, there is a special toilet installation instruction that will help in gaining all the necessary knowledge.
Let us consider in more detail the entire sequence of work that must be carried out when installing the installation of a wall-mounted toilet bowl.
Before starting work, you need to check the availability of all the tools that may be needed in the process. This is a tape measure, pencil or marker, a hammer drill with concrete drills, a building level, cap and open-end wrenches.
Now you should unpack the box with fasteners, see if everything is in stock. Manufacturers try to complete their products as much as possible so that a person does not have to buy additional fasteners. Therefore, it is enough to compare the equipment available with the one indicated in the instructions. Let's start the workflow.
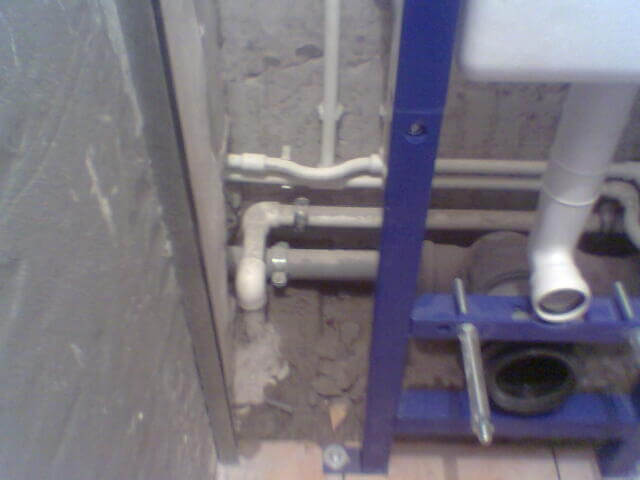
The first step is to start applying the markup, which will indicate the place of attachment. Consideration should be given to the location of sewer drains to ensure the installation procedure is as simple as possible. Typically, the installation system should be located at a distance of 14 mm from the wall.
Now it is necessary to mark the attachment points of the drain tank, usually it is located at a height equal to 1 meter from the floor level.
It is also necessary to mark on the wall and floor the points of attachment of the installation elements.
After marking, it is necessary to make holes in the wall, floor, where the installation fasteners will be located, using a perforator, insert dowels into the holes.
Regardless of the type and features of the installation, it will require horizontal and vertical fastening.
Mounting anchors must be installed in the holes with installed dowels, with their help the installation will be attached to a vertical plane.
When installing, it is important to follow the sequence so that in the future there is no need to adjust the vertical level.
Now you can install the installation structure itself, attach it to the levels.
It is very important to install the chassis in a level position relative to the vertical and horizontal levels.
Only after the installation is installed correctly, it is possible to tighten all fasteners and bolts, firmly fixing the structure.
Now comes the stage at which the sewer is connected to the installation, it is fixed.
The design was initially equipped with special plastic clamps, which will greatly facilitate the work and speed up the execution.
After all work is completed, you need to once again make sure that the installation is secure, that the bolts are properly tightened, and that the design complies with the levels. At this stage of control, one should be extremely careful, any inaccuracy or poor fixation of the structure in the future can lead to breakage.
We study the installation of the installation on video
Installation installation can be done in several ways. For example, to provide structures with higher reliability, people buy special brackets. But, the suspension manufacturer does not provide for such a design, so the brackets are not included in the package, they are not mentioned in the instructions.

Therefore, in order to understand how the work will differ, you can visit the Internet pages and watch the corresponding video, which shows all the intricacies of the workflow. On the video clip, each stage will be described in as much detail as possible, so that even a person who does not have an idea about this procedure can cope with the work quickly and efficiently.
As a result, a strong and reliable fastening of the toilet installation, which will last for a long time.
Design features
Before proceeding directly to the installation, you should understand the design. Installation of a wall-mounted toilet bowl will become much easier when its structure and principle of operation are known. It will immediately become clear how to act correctly and what is needed.
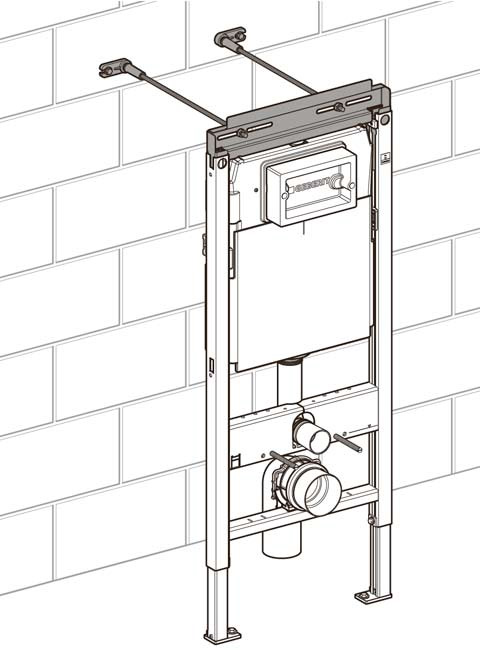
The main feature of the product is that only the bowl remains in sight.
The basis of the whole structure is a solid metal frame. The visible part is directly fixed to it. It is from this element that all installation work starts. The frame must be firmly fixed to the wall and be stable on the floor. As a result, it should easily withstand an adult. Based on this, we can say that fixing the frame to a weak wall will not work.
The frame has an element that allows you to change the height of the bowl, which is attached using special pins. They are the main fasteners when installing the toilet installation.
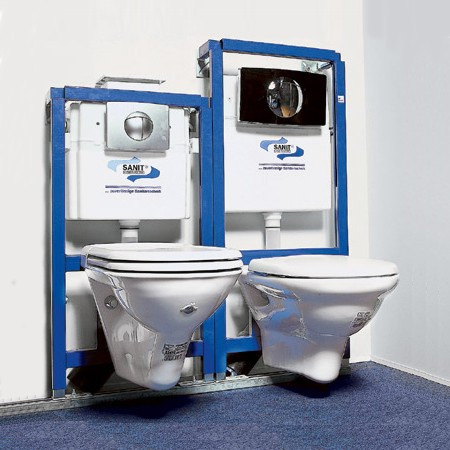
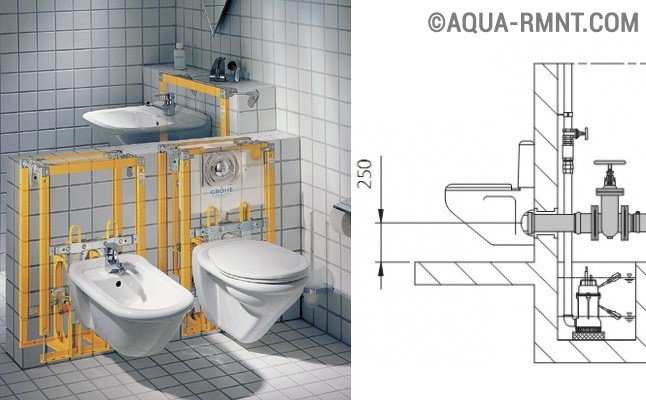
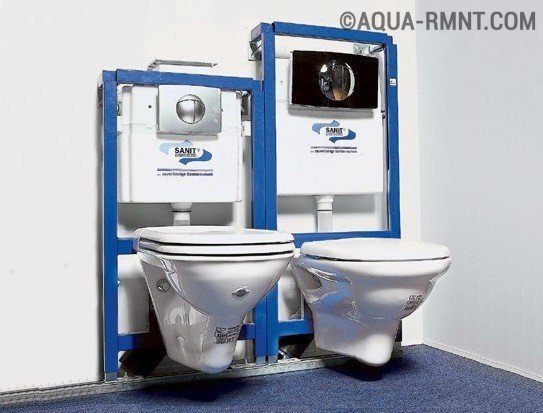
A common option for attaching two installations at once is a toilet and a bidet.
The second element is a plastic drain tank. He also hides in the wall. It has a specific shape, because. must fit in a limited space. The tank is also installed in a metal frame and is insulated with a special material that prevents the formation of condensate. On the front wall of the tank there is a cutout for mounting a drain button. Modern models, including floor models, have a metered water drain - 3 or 6 liters.
The next element is the toilet bowl. The only part that is visible and in active use. It has a traditional shape, but some designer models have original configurations.
The package contains all the necessary parts and accessories. The attached instructions are also able to show the entire installation sequence of the toilet installation.
Advantages and disadvantages
Toilets-installations have the following advantages:
- Attractiveness and aesthetics;
- Minimum dimensions that allow maximum use of free space in small rooms;
- Missing legs and support simplifies the cleaning process;
- Versatility of design, providing a choice to taste and budget;
- Rarely occurring breakdowns, and in case of occurrence - not a difficult repair.
The disadvantages include the high cost. Taking into account the peculiarities of installation with the need for additional work, the installation price can exceed up to 2 times the price of placing a floor analogue.
But given the growing popularity, manufacturers have organized the release of relatively inexpensive models that are becoming available to a wider range of consumers.
Another disadvantage is the presence of hidden elements that are not very accessible for maintenance and repair.

Installation technology for installation
Mounting a wall-hung toilet with a special frame installed in the wall is more expensive, but more reliable and faster.
The installation must be mounted to the floor and the main wall
Installation steps:
- Installation of a steel frame - through special holes it is attached to the main wall and floor with dowels. At the installation site, sewer and water pipes are removed. The frame (installation) should be checked for evenness using a level. It should be clearly parallel to the wall to which it is attached. At this stage, the installation height of the hanging toilet bowl is also set - 40-43 cm. It depends on the height of the apartment owners.
The height of the toilet bowl is adjustable during installation
- Water supply to the tank. It can be flexible or rigid. Experts insist on a hard option, as it lasts much longer. While the liner is being installed, the valve in the tank is in the closed state.
At the time of work, the drain of water from the tank should be blocked.
- Connecting the toilet to the sewerage system. The toilet outlet is inserted into the sewer outlet, the connection is fixed with a corrugation. After installation, it is necessary to test the system - make a test drain. To do this, the toilet bowl is completely screwed to the frame for a while. Then it is removed again, as it is usually installed at the final stage.
Many installation kits connect to a sewer pipe without using corrugations
- Sheathing of the working area with sheets of drywall. For the plumbing unit, sheets of waterproof double drywall are chosen, more durable than usual. The panels are mounted to the frame and a metal profile, which is mounted on the wall. In the instructions attached to the product, there is a detailed scheme for cutting the material with the places for cutting the necessary holes. There can be two options for sheathing: for the area of the entire wall or just to close the installation. In the second case, an impromptu shelf will appear above the toilet bowl.
An impromptu shelf above the toilet and bidet can be used for decor or the right things
- Facing the partition with ceramic tiles or panels similar to the finishing material of the bathroom.
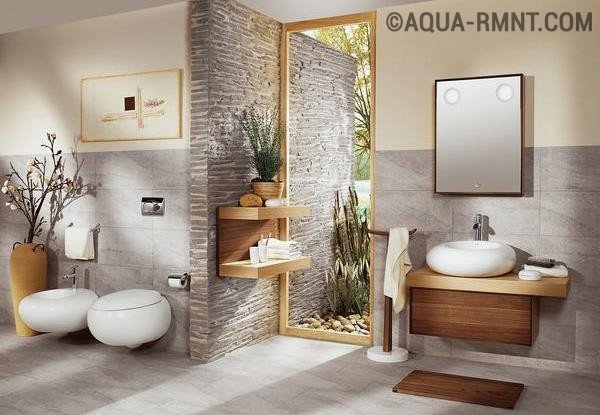
Wall cladding behind the toilet should be in harmony with the rest of the room.
- The final stage is the installation of a wall-mounted toilet bowl, specifically its bowl. It is hung on the allotted part of the steel frame with two studs.

Lined drywall sheets cover the installation and cistern, leaving the toilet bowl and flush button
Particular attention should be paid to the correct installation of the installation, since the correct execution of subsequent work depends on it.
Internal arrangement and principle of operation of the structure
If you understand the design features of the product, it becomes clear how to install a wall-mounted toilet.
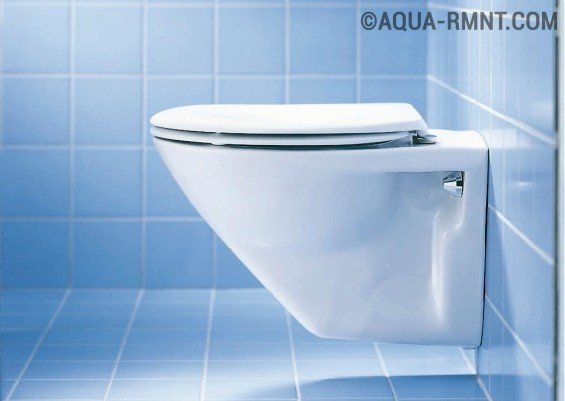
The design of the wall product is such that only the toilet bowl is a visible element.
The first element is a strong steel frame, which is the basis to which the visible part of the structure is attached - the toilet bowl. It is with its installation that the installation of a hanging toilet begins. The frame is securely fixed to the wall, also fixed to the floor - as a result, it must withstand the weight of a heavy person.
Accordingly, it is unacceptable to mount this structure to weak walls (for example, drywall), since the wall simply cannot withstand it. The frame is equipped with a device that allows you to adjust the height (400-430 mm), on which the bowl of the product is mounted. It is suspended from the frame using special pins - this is the main fastening of the hanging toilet.
Often two installations are installed simultaneously - for the toilet and for the bidet
The second element is a plastic drain tank hidden in the wall. Its shape differs from the traditional one, since the container must fit in a narrow design. It is mounted in a steel frame and insulated with a special material that excludes the appearance of condensate - styrene. The front wall of the tank is equipped with a cutout for mounting a trigger button device. In case of repair, this cutout is also used. Almost all modern cisterns involve drain dosing: for example, the volume of drained water can be either 3 liters or 6 liters, depending on the purpose.
Cisterns of flat configuration are fixed inside the installation
The third element is the toilet bowl, the only visible and actively exploited part of the structure. Its shape is traditional, oval, although designer models come in both round and rectangular configurations.

The toilet bowl can be rectangular or even round - it all depends on the imagination of the designer and the desire of the client.
There should be no problems with fasteners, since a set of necessary parts and tools and installation instructions are included with the product. Sometimes it is required to additionally purchase a Teflon tape, a polyethylene outlet, a flexible hose, and studs.