Popular Models
To make a win-win choice at the time of purchase, it is worth determining which models are the most attractive and popular. Among them, there is sure to be the perfect combination that suits you.
It is the bathtubs that stand separately, unlike the built-in ones, that erase all the boundaries of the imagination, because the manufacturers have taken care of a large selection of different shapes, colors, and dimensions of this design. The attention of the buyer is presented to oval, round, rectangular, and even baths of the sample as in the old days, figured, each of which has the size you need, for example, the Roca brand.
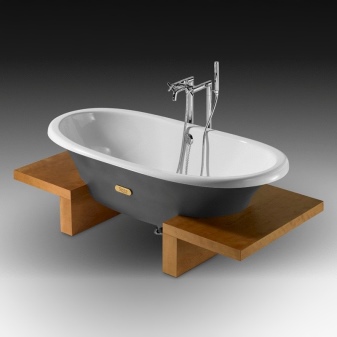
Cast iron bathtubs are more and more classically shaped, while an acrylic bathtub has an enormous range of colors and shapes. Bathtubs made of unusual materials such as wood, artificial marble, exclusive glass are also very original. This is pilotage of all the desires of the consumer. Of course, it is very difficult to give your preference and make a choice. But after the bath model is nevertheless selected and installed, you can apply some more tricks in the interior of your bathroom. For example, you can install a canopy with a white or transparent, weightless tulle curtain.
It looks very original and sophisticated. Designers attribute the need for such eye-catching products to modern consumer desires to acquire something unusual and add chic to an ordinary interior. It is with the help of catchy and irresistible baths that an opportunity opens up to express your good taste. You can decorate the interior with a beautiful fountain or a small aquarium, and then the bathroom will look like a Garden of Eden.
Practical fixing of the acrylic bathtub to the wall
You can fix the design of an acrylic bath in various ways.
Most often, choose exactly the type of installation to the wall:
- Niche cut. If this option is chosen, then it is necessary to carry out work at the time of finishing the premises, as there will be too much dust, dirt and debris. In other words, a metal frame and drywall niche is first prepared, and after that, finishing work is required to complete the repair.
- Metal corner. Most often, they try to mount acrylic bathrooms on a metal corner structure. It is not necessary to buy it, but it is quite possible to make it with your own hands. The frame is installed along the wall along the side of the bathroom, after which it is placed on this support.
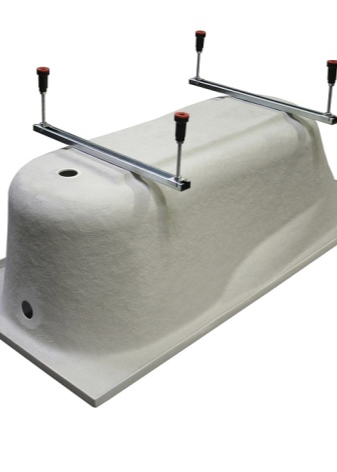
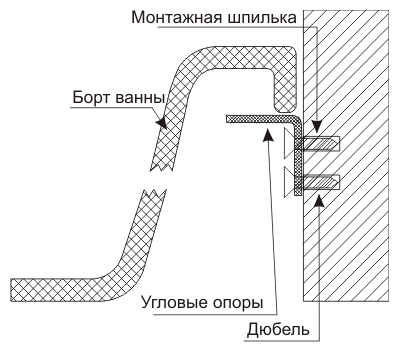
- The most ideal way to attach an acrylic bathtub is to install hooks, or select special brackets. As a rule, they come with plumbing equipment, but if they are not available, you will have to purchase additionally. Initially, you need to put the bathroom in its place of permanent location and level it with a building level. Next, a retreat is made from its corners by 20 cm. Next, the product is moved away, the thickness of its side is measured, this distance is measured down from the previously set marks on the wall surface, and holes for dowels are prepared. A dowel, a bracket are screwed into them and the bathroom is installed. A plinth made of ceramic or plastic is installed on the surface of the seam.
It is worth noting that it is permissible to make a tie-in in the room where there is already a tile, but in this case, it will be necessary to adjust not the tie-in for the bath, but the design for the parameters of the room.
There is one nuance. The frame of any bath should be arranged not only on the surface of the wall, but also on the floor, so that there is no distortion of the structure and deformation of the container for water procedures during operation.
The main methods of attaching bathtubs
Method 1. Mounting foam
This is perhaps the most affordable option for those who want to know how to fix the bath to the floor and walls.
After you have adjusted the height of the bath and set it exactly parallel to the floor (you can verify this by using the level). Manufacturers have already provided for a slight angle of inclination of the bottom of the product so that water can drain freely, so there is no need to tilt the bathtub additionally.
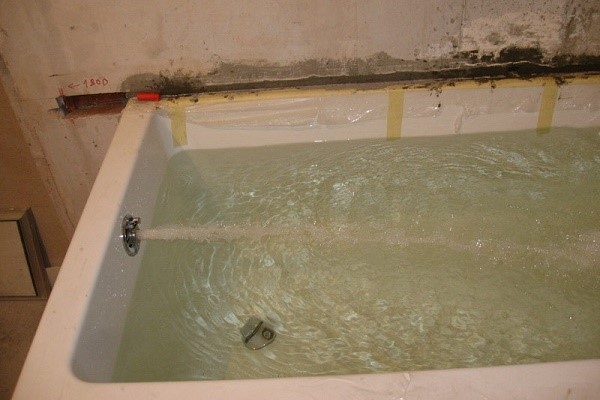
There should be a gap of about 1 cm along the perimeter along the wall. Next, the bathtub is filled with water, and the gaps between the product and the walls, in the places where the legs are attached, and also in the gaps of the linings (if they were used) are filled with foam.
Mounting foam must be applied in such a way that, when expanded, it does not dislodge the structure from its original position. It will be possible to continue finishing or start using the bath after 4-5 hours.
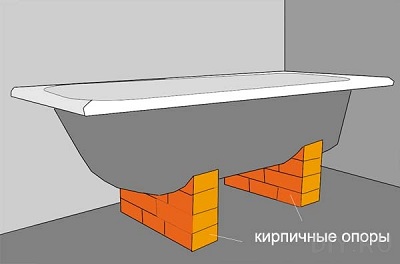
Method 2. Brick frame
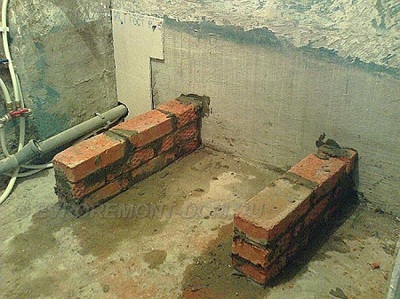
As we have already said, this method is the ideal choice in cases where the design of the bath does not provide for the presence of legs. However, it can be resorted to in other cases, since this method of fastening is considered one of the most reliable.
The distance between the brick base and the bottom of the bath should be 1 cm. In addition, this design should not restrict access to the siphon. Having installed the base itself and partitions, it is necessary to allow the masonry solution to dry. Then the bathroom is installed in the resulting brick niche.
In the intervals between the brick frame and the tank itself, mounting foam should be used for better fixation. As in the previous case, the bathtub is filled with water, and after carrying out all the work, you must wait until the foam dries.
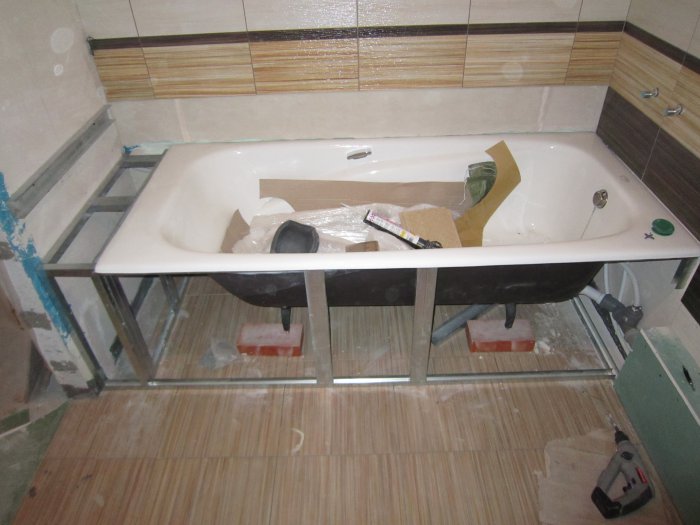
Method 3. Metal frame
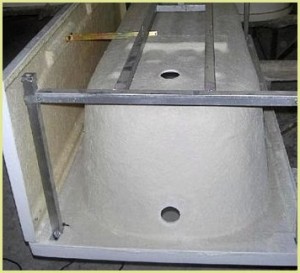
Most often, this method is used to fix acrylic models. Metal frames are included with some products, however, if necessary, such an accessory can be purchased separately. The main thing is that in terms of parameters it fits your bath.
The frame itself is installed in advance under the guide baths or side seals. After all the elements are attached to the tank body (legs, rails, etc.), it can be installed on a metal base
It is important that in the end the bathtub is installed without distortion, and its weight is evenly distributed between the "native" legs and the supporting walls of the frame
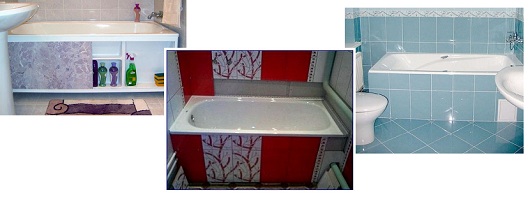
You can ennoble the appearance of an already installed and fixed bathtub using a special decorative screen (photo below).
You should also be aware that some masters recommend combining several methods of fixing bathtubs to the floor and walls in order to achieve the best result. Get answers to some technical questions, as well as understand the basic steps for fixing products, the video How to fix a bathtub, presented on this page, will help you.
Step by step installation procedure
 This order of work must be studied step by step before fixing the bathtub with legs to the floor:
- The first step is to connect the drain pipes. It is easier to do this if you turn the bowl on its side.
- Then the drain must be fixed.
- Attach the fasteners-supports and put the bathroom in place.
- Attached drain pipe
- The font is pushed close to the wall.
- It is recommended to install plates (made of metal) under the legs so that the bowl is slightly tilted towards the drain
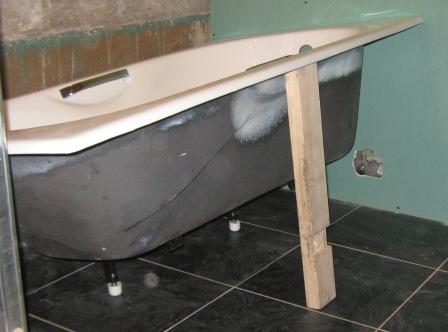
- If the length of the font is less than that of the wall, then it must be moved to the wall, the level must be set correctly (by twisting the supports). Insert spacers on the sides so that they hold the bowl as firmly as possible. Otherwise, it will be very loose during operation.
- If the edges of the font do not reach the surface of the walls, this gap must be sealed with moisture-resistant gypsum, sealant or grout.
It is recommended in these cases to use flexible compositions specially designed for baths. They well resist temperature fluctuations, are not susceptible to moisture.
How to properly fix the bath, depending on the material
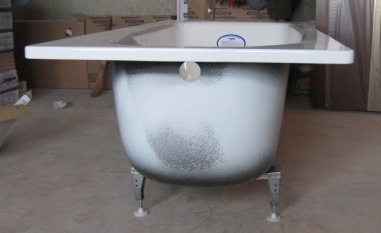
Cast iron
Cast iron products have a sufficiently large mass, which ensures their stability. Therefore, they can be installed almost anywhere in the room.
As a rule, such baths are installed on four legs, firmly attached to the body of the tank itself. Depending on the design of the bathtub, the supports can be screwed with steel bolts or by hammering metal wedges.
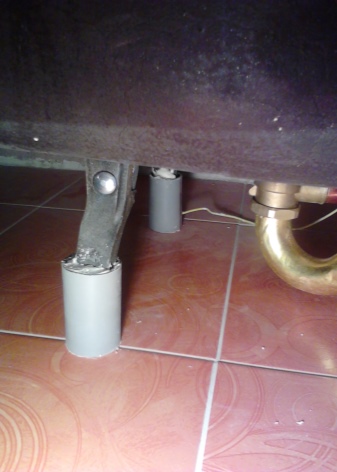
If we are talking about installing a cast-iron bath on a floor that does not have high hardness, an additional metal lining with a diameter of at least 5 cm and a thickness of 0.5 cm is installed under all supports.
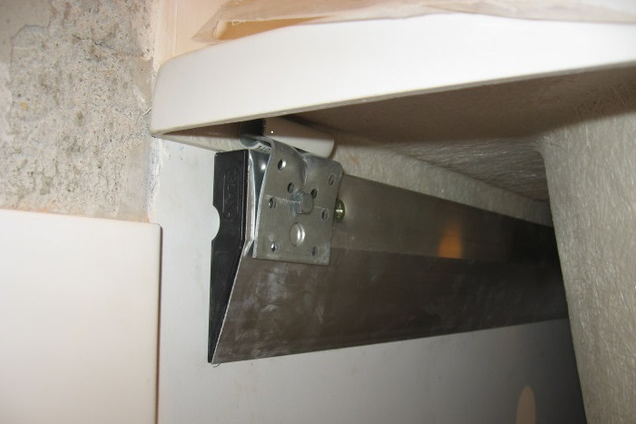
Additional fixation measures can be the construction of a brick base or a metal frame (see photo). In addition, fastening to the walls with the help of metal corners will be very effective. Corners are attached to anchor bolts or dowels around the perimeter or on both sides of the bath. When the bath is finally installed, it receives additional support.
Steel
Separately, we should talk about how to fix a steel bath. Such products weigh much less than cast iron structures, and therefore they must be installed near the wall.
As an additional fixation, here you can use mounting foam (see photo) or a brick frame. The second method, as a rule, is used in cases where the bath model does not provide for the presence of its own legs. If there are legs, a metal profile frame will help to increase strength.
Acrylic
How to fix an acrylic bath? To avoid cracks and deflections, experts recommend ensuring an even distribution of the load by installing the product on bricks or a podium. Just as in the case of steel and cast iron models, it is possible to use metal and brick frames - they effectively support the product and make the fastening especially reliable.
Video
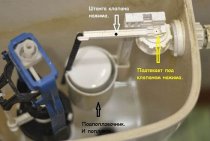
This video shows how to use the special fixings for mounting acrylic bathtubs:
One of the most important bathroom accessories is a bathtub. And let many lovers of showers doubt such a statement, but admirers of relaxed lying in hot water with foam adhere to their opinion.
But it is important not only to choose a font, but also to know how to fix the bath. It is important to align the sides, firmly install the font so that it does not stagger
And you also need to understand how to fix the bath to the wall so that water does not get into the cracks. As a rule, special fasteners are included with the supports. Depending on the type of bath, they differ for acrylic, steel or cast iron, from which the bowl is made.
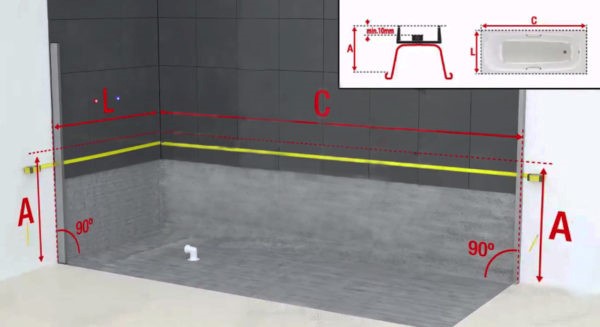
The gap between the wall and the bathroom and the choice of border
If the bath was installed after finishing the walls, a gap inevitably remains between its side and the wall. Large or not very - depends on how smooth the walls are and whether the bath itself is evenly exposed. In any case, it is better to close this gap. Firstly, there will be no dampness under the bath, and secondly, the appearance is better.
To choose a border for a bathtub, one must proceed from the width of the gap. Depending on the distance to the wall, the installation sequence changes:
- If the distance between the bathroom and the wall is up to 3 cm, you can immediately install the side. Only its lower shelf should be wide - it should be 3 times wider than the gap. And yet - in this case, only hard corners are suitable - ceramic or plastic. It is better to glue the curb tape with a small gap of a few millimeters or pre-seal it with a cement-sand mixture.
- If the distance from the side to the bath is more than 3 cm, it must first be repaired. There are three options:
- Attach the formwork from below, pour concrete, after setting (at least three or four days), work can continue.
- Close the gap with moisture-resistant drywall in two layers. A frame is assembled, which is attached to the wall with dowels, and to the bathtub - with mounting foam or liquid nails.If the shelf is large, put vertical supports. In general, they collect a full-fledged frame. A corner or ceramic tile can be mounted on the fixed drywall if the gap is very large and the width of the corner is not enough to close it.
-
Make a side from the same tiles as the walls. A variant familiar from previous years, but today it is already unpopular.
Having decided on the technology for sealing the gap, you can choose a border for the bath. It's not as easy as it seems - there are many different options, so you can get lost.
Fixing various types of bathtubs
Fixed bath
The fasteners used for the bathtub depend on what material it is made of:
Fixing a cast iron bath
- Cast iron bathtubs are usually installed on four cast supports (legs) rigidly fixed to the bathtub body. The fixation of the supports depends on the design of the bathtub and is carried out either by driving in the metal wedges included in the kit, or by tightening the tie bolts.
steel bath
- Unlike heavy cast iron bathtubs that can be securely installed even in the middle of the bathtub, light steel bathtubs are securely fixed by adjoining three walls of the bathtub. The bath is installed before the wall tiles are laid, and ideally the end walls are at a distance of 3-5 mm from each other exceeding the length of the bath.
Installing an acrylic bath
- An acrylic bathtub is fixed in much the same way as a steel bathtub. The main difference is that the supports are most often not fastened with bolts, but are screwed directly to the bottom of the bathtub with screws. If there are no ready-made holes in the seats for complete screws, they must be drilled independently.
Important: When drilling holes in acrylic, only stop drills should be used as drilling in acrylic is very easy.
What mount to use, options for conducting, working with communications
Regardless of the choice of the owner regarding the material for the bath, there are certain claims for doing quality work on your own.
First, the product is completely turned over to attach the legs of the support, which are positioned in such a way that access to the connection to the siphon is not blocked.
The drain pipe is attached to the bath, laid on its side in such a way as not to damage the coating. After that, they are connected to the siphon with a plastic, flexible pipe.
Now the plumbing fixture is placed in a permanent position on the legs, followed by horizontal alignment by adjusting the height of the supports. After performing these manipulations, a check for leaks is carried out, for which water is drawn into the bath and they look for smudges. When a leak is nevertheless detected, it is necessary to seal the seam line with silicone sealant, or to fit the pipe joints tighter.
Only after that it is possible to close the bottom of the bath with a podium, curtain or other type of sheathing.
There are several variations of the fixing procedure, with which you can install the bath with high quality.
Inset. The model is cut into a small niche, which is created after finishing, or left at the stage of roughing the walls. In the second case, the product is placed in the right place, and the wall space is finished with plaster and other materials. At the end of the junction line, the bathtub with the wall is covered with a sealant to eliminate the possibility of leaks. When the creation of an empty cavity is nevertheless required, it is formed not due to the external coating, but by creating a recess inside the wall itself.
Metal corner. Cast iron or steel is installed on metal corners, which are mounted along each wall and on which a side is placed. If the owner wishes, skirting boards can be installed, and the docking points can be worked out with a sealing compound.This method is not suitable for an acrylic container, as its rim will remain unsupported from the inside, after which it will soon move away from the place, allowing moisture to pass through.

Hooks and brackets. This option is optimal when attaching an acrylic model. To fix the bracket or hook, the bathtub must first be placed in its permanent location, adjusting the horizontal position using the building level. Now the product is removed, and at the marking points, the thickness of the sides is measured down, after which it remains to drill holes for the dowels. Fixing materials are installed on them, where a hook or bracket is placed, and on top - the sides of the bath. From above, it is allowed to install a plastic plinth, followed by the application of sealant.

Peculiarities
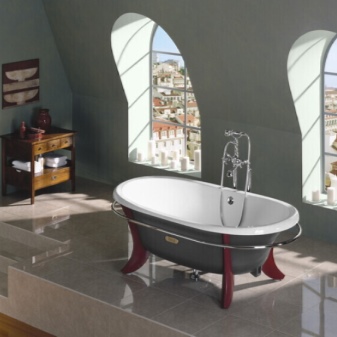
It is possible that a comfortable bath in the form of a graceful design can be placed in the center of the room. In modern design, such a move is a luxurious addition to the interior, it is considered an elegant solution, it looks very dignified. Today, a variety of options for the location of baths are practiced. But do not forget that it should be not only beautiful, but also reliable. Today, modern bathtubs with graceful legs are no longer considered an exotic element, they can be easily bought in a regular plumbing store.
An important criterion is the size of these same legs. Before purchasing such accessories, you need to think about the actual height of the installation of a cast-iron or steel bath. If you choose between models that are not adjustable in height and models that must be adjusted, please note that the type of support elements depends on this choice.
Non-adjustable legs have a standard height: short 19-20 centimeters, and high - 40 centimeters. Decide immediately at what level you need to mount the bathroom. Subtract the height of the font from the resulting number and get the exact data at what level you need to install the legs. The optimal height of non-adjustable models is 120 mm.
Unlike non-adjustable models, adjustable ones are more practical, they allow you to change the actual installation height of a steel or cast-iron bathtub. The standard height is also one hundred and twenty millimeters. Not always such structures perform the functions of a necessary support for the bath.
A modern beautiful bathtub can become a home decoration by installing it on original legs, becoming a kind of design item. Special supports may be needed for proper functioning and stability of the tub.
A wide range of decorative and original modern legs are made from such high-quality metal as bronze. They can take the form of unusual mythical paws, charming flowers, images of elves and magical fairies. It looks very stylish and relevant both in modern design and in antique-style rooms.
What is required for installation
Before you begin installation, you will need to prepare the following:

Bath installation tools: chisel: hammer, screwdrivers, rag, sealant, cuffs, brick, cement, sand, corrugated drain.
- chisel;
- hammer;
- screwdrivers;
- rag;
- sealant;
- cuffs;
- brick;
- cement;
- sand;
- drain-corrugation.
Step 1: preparatory work
Scheme of connecting the bath to communications.
Before installing a new metal bath, you will need to dismantle the old one. First of all, you need to disconnect it from the drain. Here you will need to take a hammer and a chisel. Using such tools, disconnect the harness and sewer bed. However, if the drain is made of plastic, then you will need to disassemble it. Then the legs are detached from under the bath. After that, it will need to be tilted to its side and pulled out of its old place.
Now you need to take a clean rag and wipe the sewer socket with it.After that, a cuff is installed in it, and then a drain-corrugation. Next, a new bathroom is brought into the room, and legs are attached to it with their own hands. First you need to install the far ones, and then the front ones. Then you need to put it on a flat surface and make sure that it is stable. If it is noticed that the bath is staggering, then it is necessary to adjust it. In modern plumbing, all legs are equipped with a special mechanism. Therefore, leveling the bath will not be difficult.
Step 2: Do-It-Yourself Bath Installation
To properly install a metal bath with your own hands, you will need to create brickwork for it. It must be done using cement and sand (1: 3). These components will need to be mixed with a small amount of water so that the solution has a consistency like sour cream. Laying should be done along opposite walls. After it is completed, you can put the bath in the prepared place.
Bath installation diagram.
After that, it is necessary to tie it in accordance with the instructions attached to the plumbing, not forgetting to coat all joints with sealant. In this case, the strapping rings will need to be fixed on the front side of the bath with bolts. Then you will need to connect the corrugations. It is mounted with strapping using a cone-shaped gasket.
To find out if you succeeded correctly, you should lay a small sheet of paper under its bottom near the hoses. Then you need to close the drain hole with a stopper and fill the plumbing with water. If there are no leaks, then you can be calm, because you managed to install the bath with high quality. But you should not immediately remove all the tools and materials, as you will need to close the gaps that were formed during the installation of plumbing to the wall. Here it is desirable to use a sealant. It is better to choose not silicone, but polymer. Then the finished seam will be durable, and mold will not appear on it.