Content
Despite all the popularity of natural gas in the modern world, there are places where its use is still not available. In this situation, a stove stove in a wooden house, which is heated with wood fuel or coal, will help a person. You can buy such fuel at any time of the year.
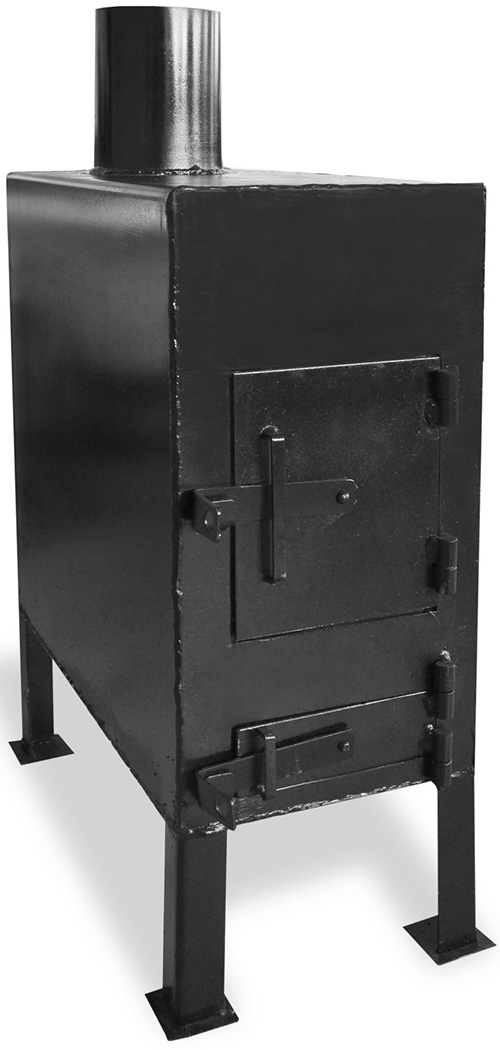
Classic potbelly stove design
In appearance, the potbelly stove resembles an ordinary rectangle with legs. It is completed with a door and a compartment for fuel, an ash box for combustion waste. In addition, any potbelly stove is equipped with a branch pipe, where an exhaust pipe with a length of 5 meters or more is placed. The traction and power of the device directly depend on the length of the pipe. The furnace body is made of steel or cast iron. We also recommend reading about the chimney for a potbelly stove in the garage on our portal.
Potbelly stoves are classified into two varieties:
- metal devices.
- Brick buildings.
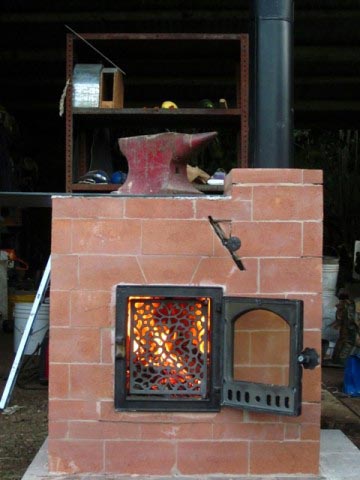
Brick models are perfectly combined with a small country house and are able to heat several rooms in it at once. The stove evenly heats the rooms and allows you to keep warm for a long time. The only drawback of a brick potbelly stove is a long heating process. But the brick adds more functionality to the device, for example, during masonry, you can build a place for cooking. Masters can equip a recess for the oven.
Models of cast iron stoves are compact and easy to install, because they can be placed in any suitable place. The main thing is to properly fold the chimney so that it can be easily moved thanks to the corrugated pipes.
Difficult climatic conditions are a factor that everyone living in the vast Russian territory has to take into account. With the onset of cold weather, houses, apartments, industrial buildings are connected to district heating systems that supply heat and create comfortable conditions for us throughout the entire heating period.
The process of building a brick potbelly stove
Installing a potbelly stove in a wooden house in the country requires the preparation of the following materials and tools:
- Ceramic brick.
- Furnace accessories.
- Plaster with lime and clay content.
- clay solution.
Read also how to install a potbelly stove in an apartment for heating on our website.
Stages of construction
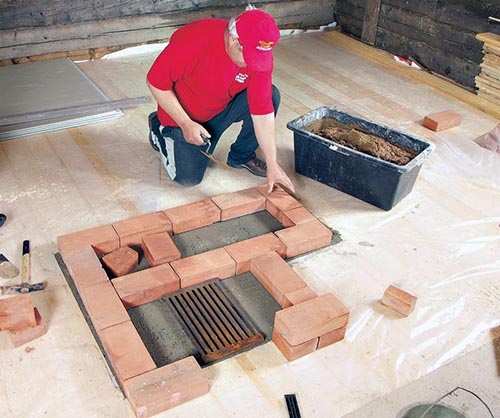
The first row of the furnace is laid out very accurately, because it affects the entire subsequent construction. Inexperienced beginners can lay 25 bricks a day, and then check the result the next day.
The first row of the oven is laid out very accurately using a level and corners.
- For the straightness of the structure, corners made of metal and wooden slats are located in the corners.
- When laying the second and subsequent rows, an opening should be left for the future door.
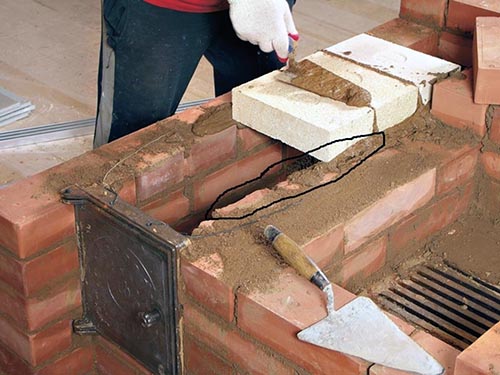
When laying subsequent rows, you need to leave an opening for the future door
- Starting from the 6th row, a refractory mixture is added to the masonry, replacing clay with it.
- At the end of the work, a pipe is attached to the top of the structure - smoke will come out of the potbelly stove through it.
A pipe is attached to the top of the structure - smoke will come out of the potbelly stove through it
Furnaces
Currently, there is a huge variety of types of furnaces. The main advantage of the change house, in terms of heating, is its limited area. With the correct design of the change house (insulated block container), it is possible to organize a full-fledged warm-up using low-power stoves.
In addition to power, the choice of the furnace is made based on criteria such as:
- The size;
- fuel type;
- Chimney placement;
- Price;
- Operating costs (maintenance costs).
According to these criteria, the best option is a conventional wood-burning stove, such as a potbelly stove.They cost a little, and fuel, with a good combination of circumstances, will be generally free. Operating costs are also minimal.
On the other hand, it is recommended to install such stoves in metal block containers, since an open fire in a wooden change house can become a source of serious problems.
Installation
When choosing a change house, give preference to standardized options. In this case, it will be much easier for you to install the oven.
So, installation begins with determining the location of the furnace. It is desirable that this be the corner of the change house, since the stove should not interfere with the movement of people. However, the distance from the oven to the wall must be at least 300 mm. In addition, you should not place it near sleeping places, if any.
The oven must be placed on a base. Its function can be performed by a steel sheet on which bricks are laid. Due to this, the bottom of the change house will not be subjected to excessive thermal effects, which will eliminate the risk of burnout.
The best option for a chimney is a vertical one that exits through the ceiling of the change house. However, you can also make it horizontal, if the design of the furnace implies it. In both cases, a hole will need to be cut under the chimney. It is recommended to protect the cut edges from external factors by edging with thin strips of stainless steel.
If the chimney has connections, then they must be sealed with special heat-resistant sealants.
Some Tips
To ensure that the oven is installed correctly, consider purchasing a container with the oven already installed. Excellent change houses of such a plan are offered by the Kraus company. Factory installation guarantees compliance with all technical standards, and relieves you of the risk of damaging the change house in the process of removing the chimney.
It is advisable to fix metal sheets with a reflective surface on the walls closest to the furnace - this will speed up the heating of the room.
It is impossible to leave a burning "potbelly stove" unattended, especially when burning "at night": either warm up the room in advance, or organize a watch.
Regularly check the condition of the chimney: it must be airtight and free of blockages.
Naturally, the change house should provide for the possibility of quick evacuation.
Heating stoves
Properties of talcomagnesite
Equipment characteristics
Recently, due to the variety of potbelly stove design, you can complement the overall style of the interior of the room. Thus, it is not only a device for heating, but also a kind of room decoration. The stove runs on wood no more than 25 cm long or on other solid fuels, it all depends on the preferences of the owners and their financial capabilities.
The main functions of a potbelly stove installed in the country:
- Heating.
- Possibility of cooking.
- Interior decoration.
Increasingly, a stylish potbelly stove is becoming a serious competitor for fireplaces, because, in addition to other positive qualities, the device is compact. It is easy to connect it, if necessary, transfer it to a new place or place it on the street for the purpose of frying meat in the fresh air.
A modern potbelly stove not only heats the room, but also decorates the room
If you need to frequently transport the stove from one place to another, then it is better to give preference to collapsible models. They, as a rule, easily remove the top cover, which often acts as a hob. This potbelly stove is also equipped with detachable legs and a chimney consisting of several sections. The stove does not take up much free space, is a mobile piece of furniture and is easily transported. The use of a potbelly stove completely eliminates the risk of carbon monoxide poisoning for people, because it leaves the room through a pipe. It turns out that the safety of the device and the power of operation depend on the installation of the pipe.

Collapsible model of a potbelly stove
Potbelly stove for giving long burning three simple options
-
Piston stove. Among the people, it is called the Bubafonya oven - most likely, this is the name of its creator. This is a top-burning stove, that is, firewood is not burned from the bottom up, but, on the contrary, from the top down. Imagine a gas cylinder with a cut top - firewood is loaded onto its bottom, which is pressed down by a piston from above. The piston has a hole for air flow - as the combustion progresses, the piston goes down. The chimney in such a furnace is located above the piston, and the wood gas released during the combustion of firewood is also burned above the piston. In general, the efficiency is very high, despite some inconveniences - it will not work to load more firewood into such a stove during operation. It should burn out completely, and only after that it is recharged.
- Rocket stove potbelly stove. A very complex oven, so I won’t even talk about its design. I can only say one thing - one load of such a furnace burns out within an hour. This is despite the fact that her swirling bunker has a size of 120 by 120 mm - in fact, she works on chips.
-
A potbelly stove at working out with your own hands. A very simple, but unsafe potbelly stove - if water accidentally gets into it, it can turn out to be a big bubukh. In addition, problems with fuel may arise - whatever one may say, but used oil does not just lie around, and such bourgeoisie have a rather big appetite. It is interesting in this potbelly stove that the oil is burned directly in the fuel tank. In addition, when burning oil, a specific, not very pleasant smell is released (firewood smells more pleasant).
This is how things stand with the solution of the question, how to make a potbelly stove with your own hands? As you can see, there is plenty to choose from, despite the fact that this choice is not always easy to manufacture. If this is your first potbelly stove, then, of course, it is better to start with something simple and work your way up. Ask which stove stove is best? In my opinion, the rocket stove is the most interesting and effective one - it is it that gives the maximum amount of heat with a minimum fuel load.
Stove potbelly stove from a gas cylinder vertical design
By and large, such a potbelly stove is not much different from the option described above - the difference lies only in the location of the cylinder, which gives its advantages.
- First of all, the potbelly stove is more compact and takes up less space in the room.
-
This design allows you to install convective pipes of greater length, which will have a better effect on the process of heat distribution in the house. In addition, with this design of the potbelly stove, convective pipes will not need to be bent.
The vertical potbelly stove also has its drawbacks - first of all, it is a short combustion chamber, limited by the diameter of the pipe used for its manufacture (or the diameter of the cylinder). At a minimum, this is a limitation on the length of firewood - they may have to be cut additionally. It is much more difficult to attach a burner to such a potbelly stove. And the third, most important point is the direct flow of the furnace. In fact, the flame in it is thrown directly into the chimney. It is possible to solve this problem, but it complicates the design. As a rule, the combustion chamber is attached to the side of such furnaces. In all other respects, it is still the same design and, accordingly, all of its component parts.
The furnace of the new furnace
In the morning after the installation of the furnace, it was decided to check its capacity. The entire firebox was not filled with firewood, small ¼ were laid. The logs were made of birch and aspen. After the firewood was in the firebox and set on fire, then smoke began to appear - probably, the paint burned through. All the time of burning, the work took place at the maximum of possibilities, later I wanted to ventilate the room. The entire incomplete bookmark burned out in 30 minutes.
What we have:
After some red coals remained in the stove, it was decided to throw in another portion of firewood.The floor under the stove became very hot, you can touch it, but you can’t hold it with your hand. The wall behind the stove, opposite the stove, is hot, but you can hold your hand for a couple of seconds.
Sandwich also - you can hold for a few seconds. Further, for one and a half hours, the firebox took place in the mode of long burning.
After the first furnace, the temperature was +22 degrees in the room, after the second +25.
Already after the first fire, it was possible to say that the stove works well and I like it very much, the power adjustments are simple, but at first it was not clear how the glass blowing works.
Glass after operation of a fire chamber remained pure. After the end of the furnace, after two hours the furnace was warm enough. I won’t argue about the heat capacity comparable to brick ovens, it is necessary to demand from each heating device what it can give, and receive from it what it is adapted for. It can be concluded that the Chinese-made cast iron stove is very functional in operation and gives an impressive result.
How to install a potbelly stove in the country
When installing a potbelly stove, it should be remembered that the metal case heats up quite quickly. Stainless steel ovens heat up less and cool faster. Potbelly stoves, which are made of cast iron, will store heat for much longer, therefore they must be installed in such a way that they are visible during operation and for some time after the flame has died out.
In the case of installing stoves on metal legs, it must be remembered that these auxiliary structures will also heat up. The heating temperature will be lower than that of the case, but still not too small. It will be necessary to carry out the installation of stoves in the country house on a fireproof base. In this case, you can use:
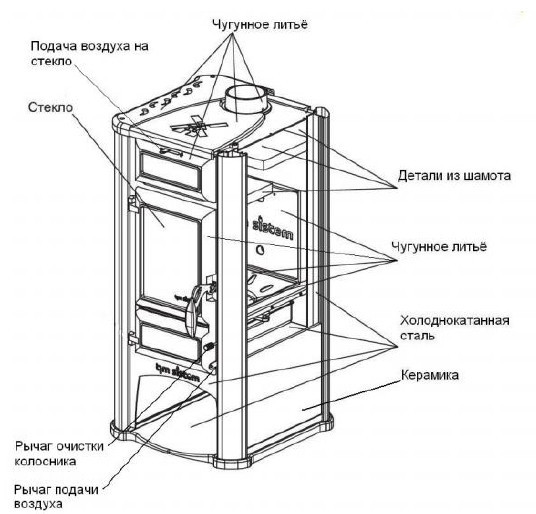
Scheme of the device stove potbelly stove.
- tin products;
- concrete structures;
- ceramic tiles;
- brickwork.
Fire hazards are:
- those made of plastic of any kind;
- plank or parquet floors;
- bases made of laminate;
- linoleum bases;
- Do not use carpet or other soft coverings.
If the house has wooden walls or panels, it is necessary to install a potbelly stove at a distance of 1 m from them. Chimney pipes in the room are installed from 1 section, without the use of joints. If for some reason this cannot be done, you need to make a tight connection, while one section must necessarily go into another. If the pipe passes through a wall, you will need to make a ceramic or brick thermal barrier. In this case, concrete can also be used, but with temperature changes it will crumble.
The fuel storage container will need to be placed next to the door so that sparks do not get into it.
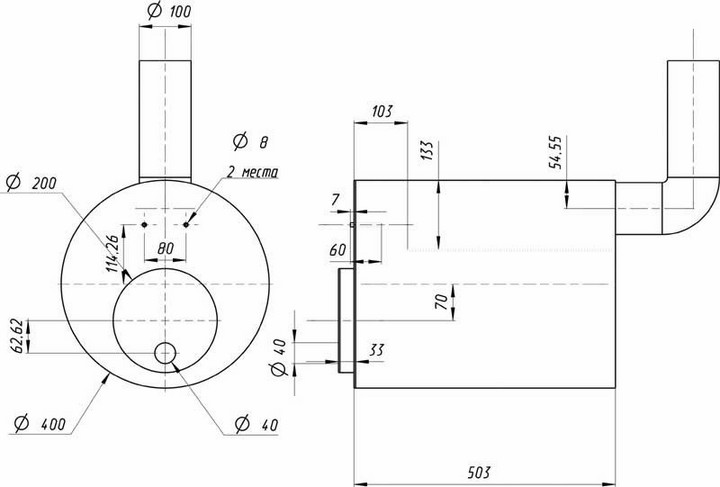
Diagram of a potbelly stove with dimensions.
Quite often, potbelly stoves in the country are used not only to provide heating. There are a large number of designs that combine several functions. Such designs include a heating potbelly stove with a cast iron stove. They can be used for cooking and at the same time for heating a country house. A cast iron household stove with 1 burner can easily replace a gas or electric stove in the country. If there is a need to feed several people at the same time, you should make or purchase a stove with a solid surface for cooking or with 2-4 burners.
Also popular are stoves that have a water tank. Their design is similar to a samovar. A water tank is mounted around a wood-burning cast-iron stove.
How to make a potbelly stove with your own hands
You can’t imagine it easier - this is how you can characterize a potbelly stove stove, the history of which goes back several centuries. If you exaggerate, then in order to independently build a primitive potbelly stove, you will need a metal box and a pipe. Cooked everything together, loaded firewood and enjoy the warmth. Yes, it's not safe.Yes, it is inconvenient and, most importantly, not very effective - that is why the modern potbelly stove has a number of additions.
- As in any other solid fuel stove, grates are mounted in it, under which an ash pan is made.
- Like all other stoves, the potbelly stove has doors for loading fuel and removing combustion products.
- A chimney, without which the stove turns into an ordinary fire pit.
- Bulkheads are also built inside, the task of which is to retain the maximum amount of heat inside the room.
You can see how home-made potbelly stoves look like in this short video.
In addition, many modern stoves for summer cottages are equipped with convective pipes (they are needed for more efficient heating of the air in the room) and various cooking appliances. Burners on which you can warm tea and, if necessary, fry potatoes with lard and onions.
General recommendations for installing a potbelly stove with your own hands
Scheme of installation of a chimney for a potbelly stove.
It is necessary to first familiarize yourself with some information about the installation of a similar design in order to know what nuances you will have to face.
You can install a potbelly stove if you have basic construction skills and learning abilities.
The main problem for heating equipment that runs on wood is the installation of a chimney system. The potbelly stove has simplified requirements when compared with a fireplace. In this case, it is not necessary to make a vertical chimney.
For fire safety purposes, a potbelly stove needs an insulation layer. To do this, you need to make a brick pad or use a stainless steel sheet. You can also use asbestos-cement sheet, which is covered with galvanization. This design is able to withstand temperatures up to +400°C.
It is allowed to use metal legs to install the furnace. This design can save building materials and own forces that can be spent on installing the furnace.
Scheme of a potbelly stove with a heat exchanger.
It is necessary to retreat 80 cm from the wall or add a thermal insulation layer to the wall. It is also recommended to arrange a protective coating around the perimeter of the furnace, which can prevent fire if sparks fall on the floor.
The chimney can be led out of the wall at an angle. In this case, it is necessary to take care of the hermetic connection of the sections of the chimney structure. In most cases, a sandwich construction is used, which has a high level of safety due to the fact that the chimney pipe is partially insulated in the structure. It is not allowed to use thin stainless steel for the chimney structure, because it will burn out quickly. The pipe must be led outside through a drilled hole in the wall or roof. At the end, the cracks formed must be covered with clay.
In order to be able to regulate the draft, it is necessary to purchase a gate valve, which is installed in the chimney structure and can block it completely or partially, if necessary. The gate will need a few mm less than the diameter of the pipe. Make 2 holes in the pipe. Next, you should thread a rod into them, to which the gate is fixed.
The walls next to the stove must be protected with a steel screen or lined with ceramic tiles. It is preferable to use the latter option.
At the end, cosmetic work is carried out, consisting in filling up the cracks and ennobling the site on which it is planned to place the potbelly stove.
How is the chimney installed?
To install a chimney, the following materials are needed:
- knee 1200x100 mm;
- 2 knees 1200x160 mm;
- 3 butt elbows;
- tee;
- plug;
- fungus.
For the device of the chimney, heat-insulating material and a passage glass can be useful. To seal the seams, a sealant or asbestos cord is used.
The chimney installation process is as follows:
- It is necessary to fix 1 piece of pipe on the chimney opening.
- Pipe elbows will need to be extended to the floor line.
- In the ceiling, you need to make a hole with a diameter of 170 mm or more. In places where the chimney must pass through the ceiling, it will be necessary to remove the heat-insulating layer. This is necessary in order to exclude the possibility of ignition of this layer.
- It is necessary to insert a passage glass into the hole that has been made, and then pass the chimney pipe through it.
- Next, the pipe is docked with the outer chimney structure.
- A layer of bitumen is applied to the outer part of the pipe. All this is wrapped in thermal insulation material.
https://youtube.com/watch?v=SMVD6li2QI4
Installing a potbelly stove is quite simple if you know all the nuances and have all the tools.
Self-installation of a potbelly stove
When choosing a stove option for a country house, it is important to carefully calculate the required power for heating the selected area. A potbelly stove with an area of 1 sq.m can heat a room with an area of 35 sq.m
When choosing a stove for a country house, it is important to carefully calculate the required power for heating the selected area.
An important factor in the operation of the device is the blowing of heat from the room and the influx of cold air there. For example, gaps in windows or floors that create a draft will noticeably disrupt the work of a potbelly stove. An excellent solution for a two-story country house is a two-story potbelly stove with a common chimney. Read more about installing a homemade potbelly stove in a country house on our website.
Video: installing a potbelly stove and chimney
If you want to reduce the cost of installing and purchasing the oven, you can try to make it yourself in accordance with the instructions.
Self-assembly of a potbelly stove
Fire safety standards for the installation and operation of the furnace
In order to secure your home in the presence of a potbelly stove, you should follow some fire safety rules:
- Use only dry wood or logs as fuel.
- To ignite the device, open the firebox damper and put the required amount of fuel there, and then set it on fire.
- When the fuel has flared up enough, the power of the potbelly stove can be set by opening and closing the ash drawer.
- To clean the potbelly stove from the ashes, you need to completely cool the body, remove the ash drawer and discard its contents.
To clean the potbelly stove from ashes, you need to cool the body, remove the ash drawer and throw out the garbage from it
At the first ignition, you can smell the burning paint, but subsequently this effect will not be repeated.
Any flammable items should be at least 80 cm away from the potbelly stove.
It is forbidden to put more than 3 kg of fuel into the furnace at one time
It is important to keep the firebox door closed at all times.
It is forbidden to use the ovens if there are malfunctions in the functioning of the exhaust pipe.
It is forbidden to leave the potbelly stove unattended for a long time and in the presence of small children.
When the oven is in operation, do not touch the body of the oven, as it heats up to a very high temperature.
It is forbidden to place combustible materials near the potbelly stove.
It is possible to install a potbelly stove only on a non-combustible base.
It is possible to install a potbelly stove in a wooden house only on a non-combustible base
Potbelly stove for giving horizontal version
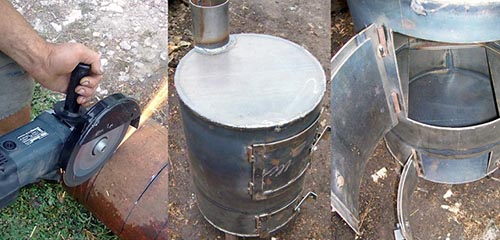
This is perhaps the easiest option for self-production. Like all stoves of this type, at home they are created either from a large diameter pipe or from a propane tank, which is much better. You can make such a potbelly stove as follows.
- First you need to open the cylinder - this is a dangerous business. First you need to unscrew or beat off the tap with a sledgehammer - first, the contents of the cylinder are bled to the maximum, and the condensate is drained.Then the balloon is filled with water and only after that it is possible to cut.
- First, one of its rounded parts is cut off (where the crane was). After it is cut off, the water can be drained and the balloon can be handled without fear.
- We attach legs to the balloon - we install it horizontally.
- From the deaf side (top), we cut a round hole with a diameter of 100 mm and weld a pipe of the same diameter to it - this is a chimney. The length of the pipe is about a meter - everything else is built up later.
- Now inside the balloon. Under the very top, you need to attach a strip of thick metal - this is a flame baffle that will protect the body of the potbelly stove from burning out. The plate, if it burns out, is easy to replace. By the way, it should not block the chimney.
- Grids. The easiest way to weld them is from thick reinforcement - such a lattice that is inserted into the lower part of the cylinder and fastened there by any available means. It is better, of course, if it is a removable product.
-
And the last moment is the door, or rather two doors: the ash pan and the firebox must open and close separately from each other. The ashpit, as in many stoves (or rather, its door), additionally works with air flow, with which it will be possible to regulate the rate of fuel combustion.
This design can be supplemented with convectors - pipes through which the air from the room will pass and heat up. They are simply welded on the side of the potbelly stove vertically - ideally, the pipes need to be bent so that they repeat the contours of the furnace. In addition, you can additionally weld a plate on top of the cylinder, which will serve as a kind of burner - as an option, you can cut another hole in the top of the cylinder itself and weld the plate on top of it. Such a burner will work much more efficiently.
Conclusion
How potbelly stoves are installed in houses depends on the type of house, the materials from which it was built, the number of storeys, and the dimensions of the free space.
It is important to determine the place, prepare the floor and walls, observing fire safety rules
Installing the potbelly stove is easy. The most time-consuming work is the preparation, assembly and fastening of the pipe. By following all the rules, you can create a useful and beautiful heating structure.
Table of contents
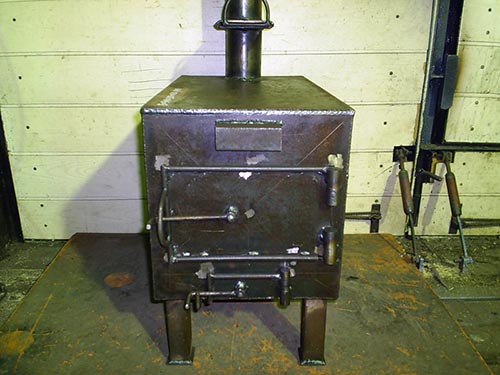
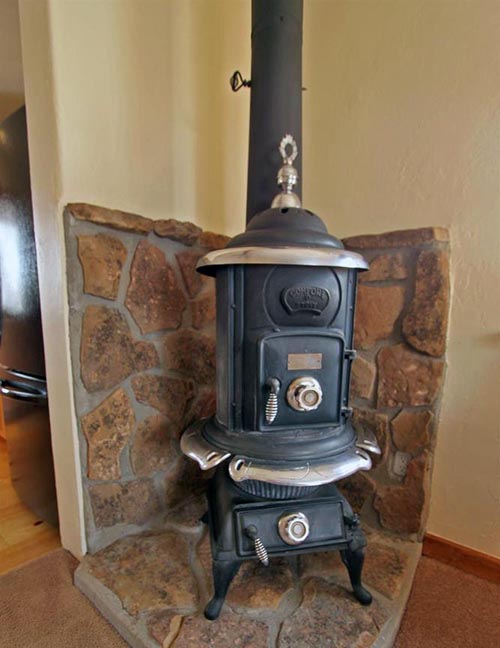
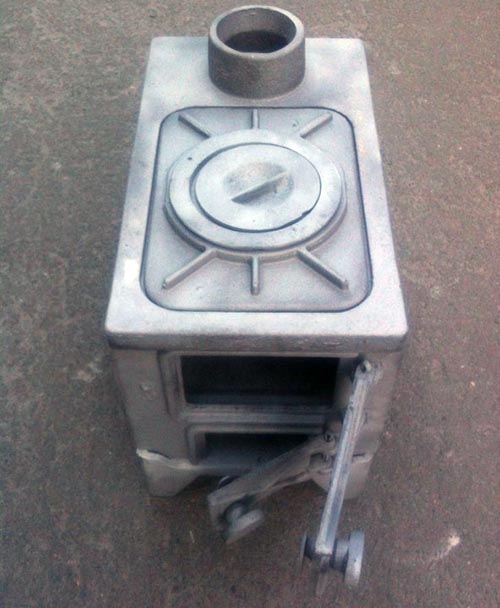
There is an Evergreen 147 stove, a cast-iron potbelly stove of small size (width 43 cm, depth 40 cm, height with legs 58 cm), the power according to the passport is 7 kW, the size of the firewood used is up to 30 cm. The country of origin of the stove is China. In appearance, the casting of the structure is very similar to the Invicta oven, the door, glass with seals, there are air distribution adjustments.
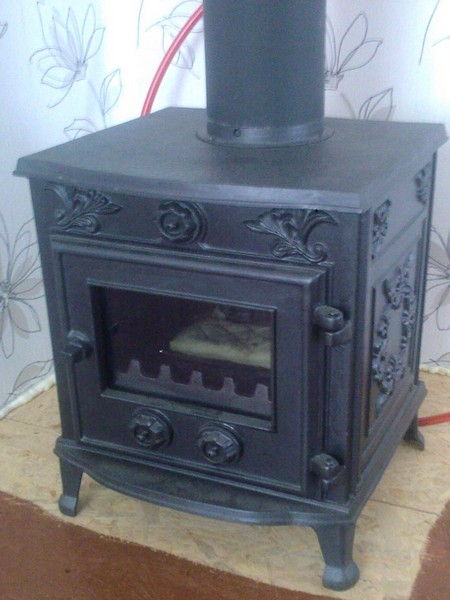
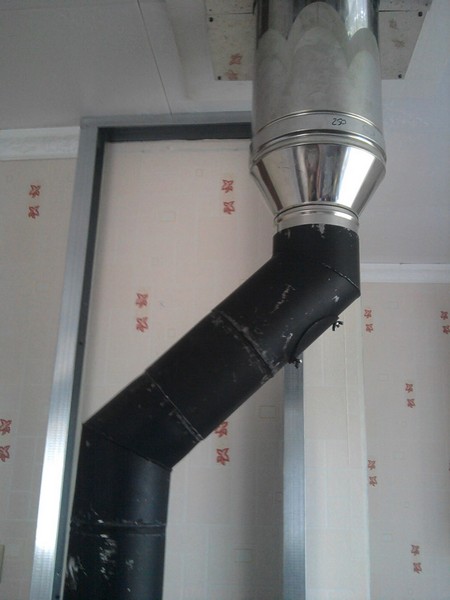
The chimney was purchased brand "BaltVent" 150/250 mm inner pipe acid-resistant stainless steel 1 mm thick steel 316, insulation 50 mm, outer - stainless steel 0.5 mm thick steel 304, the first 1.5 meters from the stove is a black single-layer chimney made of steel 2 meters.
The photographs immediately show what exactly happened - the result of the installation.
Immediately after the entire installation of the structure, two small logs were thrown inside the furnace, to check how it burns and in which direction the smoke spreads. The temperature was +34 degrees in the shade. As a result, the temperature throughout the day is 33-39 degrees. There is simply no need to heat harder and at full power.