Vapor barrier broken
The vapor barrier film is fixed with planks to the rafters. However, here we see that the slats are offset from each other by almost 4 cm.
It remains only to guess what the film is attached to. In addition, the panels sag, which means that after filing the ceiling, there will be no gap between the drywall and the vapor barrier, which will subsequently negatively affect the state of the finish. In addition, the junction of the vapor barrier to the wall is not sealed. If in the near future the joint is not glued with self-adhesive tape, then the insulation will fill with moisture and stop working.
Initial situation: roof-ondulin, under the crate and counter-crate (about 8 cm in total) Izospan AM is attached to the rafters 15 cm high. The roof has several small slopes and mainly a ceiling, above which there will be a cold attic. for more than a year and initially the roof was not insulated. Now I am starting the process of self-insulation (I will use Izover KL-37 for the pitched roof, Izover KT-40 Twin for the attic, vapor barrier - all this has already been purchased). A few questions: 1. Is it necessary to insulate the overhangs in the pitched and flat parts of the roof? (The overhangs are sheathed on the outside loosely (for ventilation) with clapboard, and between the last crown of the beam and Izospan AM there are now holes to the height of the rafters and the question is whether these holes need to be closed - for the slopes they will be closed automatically with insulation, you need whether to do this for the flat part of the roof, i.e. leave ventilation of the attic space or not?). 2. It so happened that in the flat part of the roof there are quite long and wide sections between the lags (boards 5 cm by 15 cm), where it is supposed to lay 15 cm. Isover KT-40. I am not sure that the vapor barrier film will hold all this without strong sagging. additional lag), so that the insulation lies horizontally, without sagging? (In particular, is it possible to sheathe the lags from below, for example, with hardboard (it is simply already available), put the insulation between the lags on the hardboard, and then when there will be a finish in about six months (in the house now no one lives, but there is heating) attach a vapor barrier film to the hardboard from below and then - through the gap, should the inner lining or vapor barrier come into contact only with the insulation?) Sincerely, Vladimir
We make a frame for fastening
So, once you have decided on the material of the ceiling sheathing, it's time to move on to making the frame for the filing.
Option #1 - metal slats
Attaching any facing material to such a frame is as easy as shelling pears: fireproof, lightweight, designed specifically for mounting. Today, metal slats for sheathing are made mainly from two types of metal - steel and aluminum, as well as a special “metal-like” alloy.
The rack structure is assembled easier than a children's toy, and in the end it turns out almost weightless:
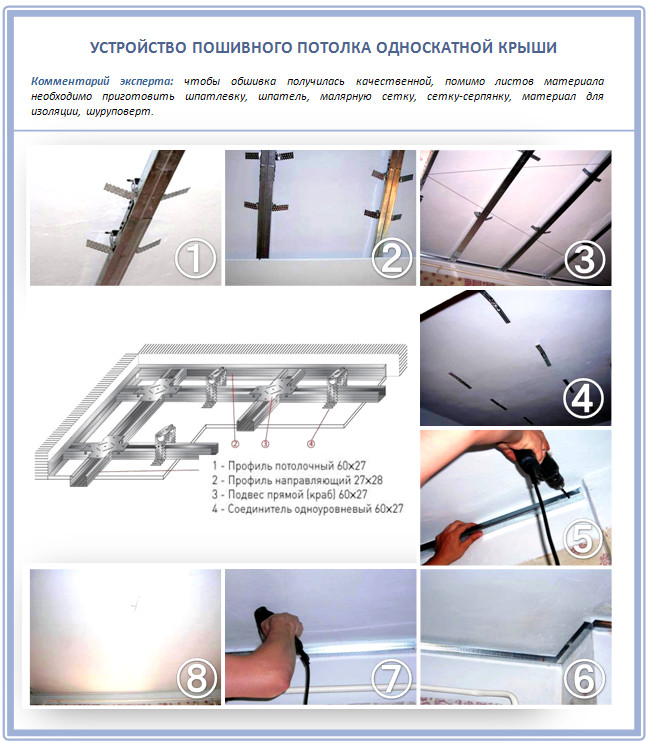
But there are also significant drawbacks: corrosion from the slightest scratches and a complete lack of sound and heat insulation. And also all the wooden elements that are located above such a frame quickly deteriorate.
Option #2 - wooden slats
In its design, the wooden crate for the ceiling of a shed roof is similar to metal. The only difference is that wood, as a living material, is able to expand and contract more intensively depending on humidity and air temperature. In addition, the wood is deformed from moisture. Be sure to treat the bars that you use for the installation of wooden slats with fire protection.
In general, there are no contraindications to the use of wood in the arrangement of the ceiling of such a roof.Is it better to give preference to metal structures if you are finishing a sauna or bath.
You will need bars with a section from 20x40 to 80x40. In addition, the wood must also be treated with an antiseptic and an antifungal agent.
The choice of material for insulation
The right choice of heat-insulating material will ensure optimal roof insulation with minimal dimensions and weight. The most used materials include: fiberglass (wool), mineral wool, basalt, polystyrene foam, polyurethane foam, expanded clay.
Mineral wool is one of the most common insulation materials. It has excellent thermal insulation properties. It is produced in the form of rolls and plates with a thickness of 5 to 20 cm. The main disadvantage is hygroscopicity, which requires careful protection against water penetration. The most famous domestic manufacturers: Thermosteps, AKSI, Izorok, Mineralnaya wool, as well as the companies Ragos (Finland), Rockwool (Denmark), Izomat (Slovakia).
Glass wool has increased durability and strength. Produced in the form of plates and mats. The most well-known materials are produced by the companies Flyder-Chudovo, URSA, Izover.
Expanded clay refers to bulk heat-insulating materials with very low thermal conductivity, good sound insulation, non-combustibility. Absolutely safe in terms of ecology. The substance has a very high frost resistance and resistance to temperature extremes.
Figure 3. Scheme of external thermal insulation of a flat roof.
Expanded polystyrene or polystyrene is widely popular due to its high thermal insulation characteristics and low specific gravity. Requires additional waterproofing.
Extruded polystyrene foam grades M35 and M50 from TIGI-Knauf are deprived of this drawback.
Good reviews are available for roof insulation with semi-rigid sheets such as Penoplex and Styrofoam.
Sprayed insulation made of polyurethane foam, polyisocyanurate foam is one of the most modern heat insulators. They have high water resistance.
So far, there is a main drawback - the high price and the need for special equipment for imposition.
General requirements and design features of pitched roof insulation
In Western countries, where the climate is similar to Russian, houses consume much less energy, because the thickness of the insulation of building envelopes is greater than that which is guided in our country.
Insulation thickness in Russia Insulation thickness in Sweden
Insulating buildings is a proven way to save energy. The use of insulation of the minimum possible thickness in order to save money leads to intensive heat exchange between the room and the external environment. This greatly increases the heat loss, and hence the cost of heating.
Roofing structures, in addition to roofing material, also include other elements and coatings, without which it is impossible to ensure the correct operation of the roofing system. Layers such as a vapor barrier, thermal insulation and ventilation are responsible for the practicality, durability and functionality of the structure.
Insulation cakes for different roofing materials are approximately the same. The differences are mainly in the size of the ventilation gap, but the principle is the same. There must be a ventilation gap to remove excess condensate, especially for pitched roofs. It is impossible to lay the insulation close to the finish coating, because the formation of condensate in such places is inevitable and it is impossible to make an absolutely hermetic system into which air does not penetrate, and, accordingly, moisture. And if it penetrates there, it must be removed, otherwise the insulation is oversaturated with moisture, while its thermophysical characteristics deteriorate, and processes of decay of the wooden elements of the truss structure occur. Ventilation of the system is provided with the help of air vents and spacer rails.Reiki set the height and number of air gaps above the insulation. They must be installed along the rafter legs so as not to interfere with air exchange and to exclude the formation of stagnant zones for drip water. In architecturally complex structures (the presence of attics, skylights, parapets, etc.), it is much more difficult to ensure air circulation. Therefore, in such roofs it is necessary to provide additional ventilation holes along the roof ridge and overhang, around the entire perimeter.
Considering the various time labor costs for the construction of a particular type of roof, it is necessary to take into account not only momentary needs, but also the time and money spent on its maintenance during operation. For example, if we compare a metal tile with a natural tile, then the following picture appears. Due to the lower weight of the metal tile, from the point of view of installation it is much more convenient and easier, but the low weight is also a disadvantage. Due to the lightness of the material and the large area, there is a problem with its high-quality fastening. If a piece tile does not require additional fasteners in its bulk, then a metal tile requires about 10 - 12 self-tapping screws per 1 m2 of coating, so the installation speed is naturally lost, despite the fact that laying large sheets is faster. In addition, the life of roofing from natural materials is longer than from metal. This is explained by the fact that, unfortunately, no one has canceled corrosion and any mechanical damage can lead to defects, which can only be eliminated by replacing part of the coating. You will have to remove the entire sheet, even if the area of the defect is negligible. Soft roof coverings have their advantages, one of them is that there are no restrictions on the shape and size of the roof itself.
Work procedure
The sequence of laying the layers depends on the method of insulation: external or internal.
Due to the low slope of the shed roof, it is advisable to insulate it from the outside, in this case, to lay the heat-insulating material, a crate is attached to the underside of the rafters, on which a vapor barrier is laid in a continuous layer (indoors).
After installing the insulation, it must be protected from moisture, rolled waterproofing or membrane films are used.
If the work is carried out indoors, first the waterproofing material is nailed, then the insulation is laid, the last layer is vapor protection.
Installation of each layer has its own nuances and requirements.
Waterproofing
Protecting the insulation from external moisture is a prerequisite, otherwise it will lose its insulating properties. A gap of 3-5 cm is provided between the roof and waterproofing.
The moisture-proof membrane sheet or film is laid with a slight deflection. For fasteners, a construction stapler is used, the places of fastenings and joints are glued with adhesive tape.
With internal insulation, the rafters remain unprotected from moisture, it is recommended that these structures be treated with antiseptics. See about the protection of wooden structures.
insulation
Before installation, fibrous materials such as glass or basalt wool are opened in advance so that they restore their shape.
The space between the rafters is filled with insulation. It is impossible to knock down and specially compact soft types of insulation, this worsens its thermal insulation properties.
Rigid slabs of extruded polystyrene foam are laid according to the same principle - in the gaps between the rafters, at least in two layers, for sealing all the gaps are filled with mounting foam.
vapor barrier
The main purpose of this layer is to prevent the insulation from getting wet under the influence of rising moist air.The exception of this stage is allowed only in the case of buying a heater with a special protective layer (for example, lavsan).
When choosing the right mounting side, the manufacturer's recommendations are taken into account, a mandatory overlap of 10-15 cm is provided. The material is attached to the rafters with brackets, the joints of the panels are treated with sealant tape.
1.
2.
3.
4.
An inevitable issue when building a house is the choice of the type of roof. Building a shed roof with your own hands is the easiest option for arranging a roof. For a design of this type, a minimum amount of materials and effort will be required. Let's understand how to do it.
Thermal insulation technology of a hipped roof
The process of warming a four-pitched hip roof or hipped roof does not differ in any way from the thermal insulation of a gable roof. These are all the same slopes, only there are not two, but four. It just increases the amount of work being done.
The only negative point regarding plate heat insulators is a large amount of their waste. It's all in the shape of the slopes. It is trapezoidal and triangular at the hip roof, and only triangular at the hip roof. This means that in places where the structure is narrowed, thermal insulation materials will have to be cut.
This does not apply to polyurethane foam and ecowool. Here, the flow rate does not change, and it corresponds to the area of the insulated pitched areas.
Roof overhangs classification and installation
A roof overhang is a structure that protrudes beyond the walls of the house. Another name for this structural element is a box. The main purpose of the roof overhang is to protect the walls from atmospheric precipitation.
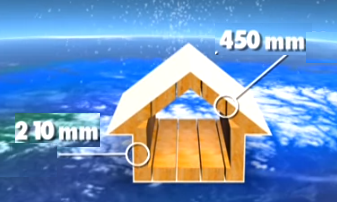
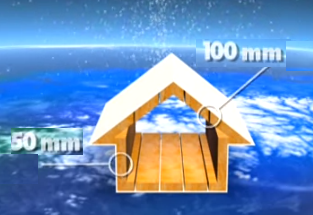
To ensure the greatest protection efficiency, the bases of the roof rafters are brought out beyond the walls. The segment of such a conclusion is 50-60 centimeters. This is the minimum roof overhang. However, this figure can be increased. The rafter system does not always provide for protrusions beyond the walls of the house. With this option, forced elongation of the rafters is used. For this, “fillies” are used (for more details: “Fire: roofing on their own.“)
Note that it is necessary to protect the frontal part of the walls of the building. This is especially true if the house is wooden. In such cases, you need to decide in advance how to sew up the pediment of a wooden house. The standard value of the roof overhang is 500 millimeters in length. At the same time, the roof edge contains a cornice-type board.
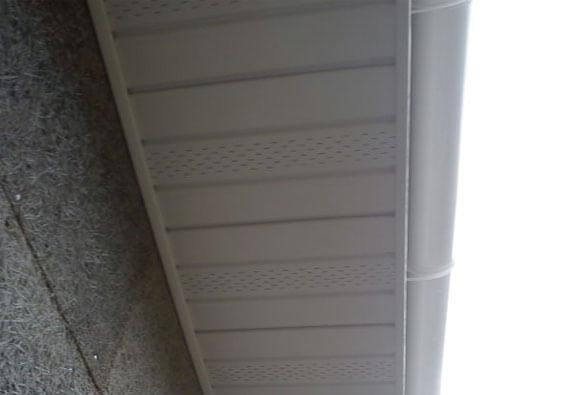
The lower part of the roof overhangs should be sheathed. The most common hemming material is tongue and groove board. It is worth saying that there is a difference between the design of a pitched overhang and the construction of a frontal overhang.
Do I need to insulate the roof
Mandatory, except for rare exceptions. But first, let's look at the issue of temperature fluctuations. The latter have a very noticeable effect on the roof of any type. If we take the lower section of the attic, which, in fact, is located under the roof structure, the temperature there is approximately the same as in the room itself.
From the outside, everything is completely different. Here the temperature varies, depending on the weather conditions. Insulation just solves the problem of temperature difference. What is it expressed in? Warm air masses do not seep out, while external ones, on the contrary, do not get inside.
The question of whether it is necessary to insulate the roof, as such, should not be. If you want to use the attic space and live in a comfortable home, insulation is a must. Moreover, take into account both the climatic conditions of the region and the features of insulating materials.
Ventilation device
The first thing to be done during installation was to ensure a constant ventilated gap between the roofing material and the membrane, which is 20 mm. The easiest way to maintain the accuracy of the gap is with 20 mm wide slats, which are nailed on the sides of the rafters close to the crate.
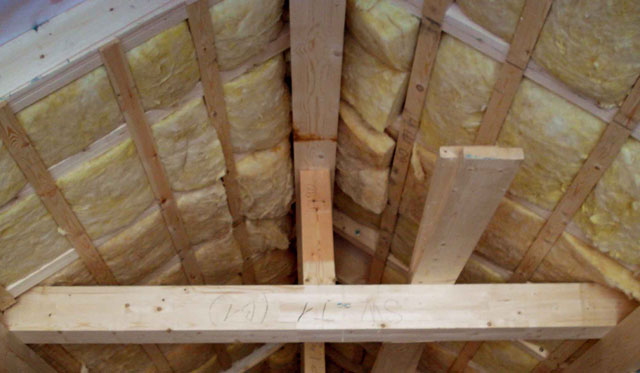
This is how the roof slope looked from the inside before the start of insulation work: Internal view of the roof slope before the start of insulation work
Reiki I sawed from scraps of boards left over from the construction site. The length turned out to be about 30-60 cm. I baited 2-3 nails 2x30 into each rail so that their sharp ends did not protrude from the back. And pretty quickly nailed the slats on the sides of the rafters.
Rail that determines the amount of ventilated gap: Rail that determines the amount of ventilated gap
Where the rafters were attached to the posts, it was not possible to nail the slats. So I:
- unfastened each rack from the rafters,
- shortened by about 45 mm from the crate parallel to the rafters,
- fixed the rack to its previous position with a clamp and attached it back to the rafter with a screw.
On the right, a strut is visible, installed by the builders and interfering with the attachment of the membrane. Left - post after shortening:
On the right, a strut is visible, installed by the builders and interfering with the attachment of the membrane. Left - post after shortening
Trimming the rack with a jigsaw:
Trimming the rack with a jigsaw
Fixing the position of the stand:
Fixing the position of the rack
Then I proceeded to the installation of a type A windproof vapor-permeable membrane:
- First, I cut out a piece of windproof membrane 50 mm wide more than the distance between the lags and 200 mm high.
- Then he attached the membrane with the same slats to the sides of the log, and below - to the wall beam. At the top, the membrane has not yet been fixed - it simply adjoined the longitudinal beam connecting the logs. So I nailed the slats to all the rafters on this side of the roof.
- Then he began to fix the membrane between the rafters. Since the distance between them is different, I measured the width of the canvas each time and cut off 50-60 mm more. The membrane was pressed with the same rails, but the driving step was reduced in order to tightly press the membrane to the rafters. I already hammered 3-4 nails into the rails for strength. The edge of the stretched web protrudes from the edge of the rail by the same amount.
- The next step is to increase the width of the rafters. This operation in my case turned out to be forced, because the initial width of the rafters was not enough to lay the required number of heat-insulating plates. I bought boards 140x20 mm 3 m long on the building materials market. I cut them in half lengthwise on a circular saw and got boards about 70 mm wide. I attached these boards with screws at the bottom to the rack, and at the top - to the ceiling board. Then these boards were additionally fixed with wooden overlays: at the bottom of the rafters and in two places between the rack and the ceiling board. Thus, I increased the width of all rafters.
Do-it-yourself shed roof step by step
In principle, a shed roof can be covered with any roofing material, but you should always pay attention to a few points:
- on the weight of the roofing material - not only the design of the foundation (its width and depth of laying), but also the pitch of the rafters depends on the weight with which your roof will press on the walls;
- on the recommended roof slope (for the roofing material you have chosen) - it also depends on the type of roofing material and its ability to withstand a snow load (in other words, to hold a certain amount of snow on itself without deforming at the same time);
- on the type of crate (solid or from individual elements).
Tip: If you can’t remember which crate should be laid under your chosen roofing material, look carefully at its wrong side:
- if it is smooth (like bituminous tiles), then this material requires a continuous crate (in the form of a continuous surface of boards, OSB or other similar materials);
- if it has protrusions and pits (like tiles or slate), then the crate will have a certain step (that is, you will lay boards or bars with a certain distance between them).
bias
If you do not go into special details, then only three characteristics of any roof depend on the slope:
- its ability to withstand the weight of snow (until the snowdrift accumulated on it slides down under the action of gravity);
- impermeability - all rainwater, or water formed when snow melts, should “roll off” from the surface of the roofing material, not remaining in its bumps, seams and attachment points;
- withstand wind load (the stronger the slope of the roof, the more pressure the wind will exert on it).
Most builders recommend the following values of the angle of inclination of the roof, at which a do-it-yourself shed roof will be strong, reliable and durable:
- ordinary slate - not less than 1:10;
- soft (flexible) tiles - at least 1:10;
- ceramic tiles - at least 1:5;
- metal tile - not less than 1:3;
- cement tiles - at least 1:5;
- ondulin - at least 1: 3.
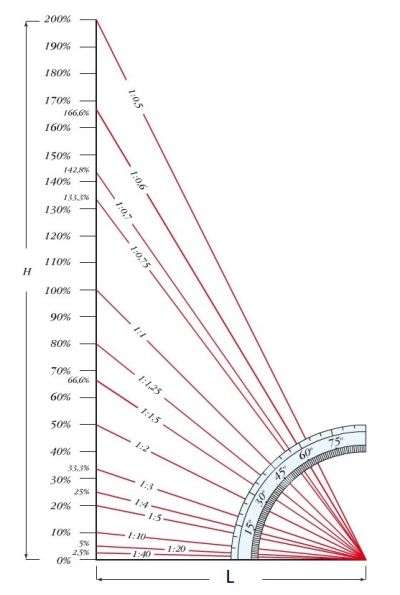
Roof slope calculation scheme
Tip: In order not to get confused in determining the correct dimensions (width and height of a pitched roof) for the selected slope, use the following calculation method:
- Measure the width of your building.
- Divide the resulting number (in centimeters) by the second digit of the roof slope (for example, if the recommended slope for your roofing material is 1:5, then you need to divide your number by 5).
- The result of dividing the numbers will be the height of the second edge of the shed roof (in centimeters).
rafters
However, no matter how attractive a shed roof is for those who like to do everything on their own, there is a certain limitation for such a roof: the length of the rafter leg should not exceed 6 meters. Where did this number come from? The fact is that when selling wood, it is customary to saw it into separate boards (or timber) 6 or 4 meters long. Therefore, if the width of your building does not allow you to use boards less than 6 meters long for rafters, then you will have to do one of the following methods:
- instead of a shed roof on your building, make a gable roof;
- replace a simple rafter leg with a more complex structure - a triangular truss;
- reinforce a long simple rafter leg in its central part by placing a column of timber or brick under it.
Tip: For any type of roof (including shed roofing), when choosing a rafter pitch, it is better to focus on the recommendations of the roofing material manufacturer.
How it all started
Two years ago, we inherited land and decided to build a house there for year-round use. We chose a project at the company and ordered the construction of a house from glued laminated timber.
This is our house
The house was built, and when they began to settle in, it turned out that it was too small even for a small family. Therefore, they decided to insulate the second floor and equip a bedroom in it. We studied the instructions of various companies for roof insulation, received an exhaustive consultation at the Rockwool Design Center and began to think over the insulation project and purchase material.
In order for the second floor to be warm, it was necessary to insulate two gables with windows and both roof slopes without removing the roof. It is about how to insulate the slopes that I am going to tell in detail.
The roof in our house consists of rafters of edged boards with a section of 100x20 mm, unevenly installed with a step of 550-620 mm. On the rafters there is a crate 80x20 mm with a step of 350 mm. Waterproofing was laid on top of the rafters, and metal tiles were laid along it.
A complete roof slope insulation system consists of the following layers (from top to bottom):
- roofing material,
- waterproofing,
- crate,
- ventilated gap to remove water vapor from the insulation,
- windproof membrane,
- insulation,
- vapor barrier membrane
- finishing layer for the interior.
We clarified with Rockwool specialists that the thickness of the roof insulation layer for the Moscow region, where we live, should be at least 200 mm. They also suggested a scheme for laying insulation with overlapping seams and installing the last layer that overlaps the rafters.
We bought Light Butts Scandic insulation, windproof and vapor barrier membranes, galvanized nails of various sizes (2x15, 2x30). And the work began.
Roof insulation algorithm - how to lay thermal insulation
Installation of a roof with insulation is reduced to the following sequence of actions:
First, the installation step of the rafter legs is measured. Plates of heat-insulating material are cut in accordance with the dimensions obtained, but 1 cm is added to them - this will enable the insulation to stay in place on its own. You can simplify this stage of work when arranging a new roof by calculating it so that the distance between the rafters corresponds to the width of the insulation boards.
A waterproofing layer must be installed in the space between the rafters and the finish coat. The membrane must be attached to the rafters so that it envelops them. For fixing, you can use a construction stapler, with which the waterproofing is attached to the rafter legs and the crate. Waterproofing material must be brought to the eaves so that the collected moisture goes beyond the roof. The described method of fastening does not allow to equip full ventilation, therefore, only a special waterproofing membrane should be used as a material.
If the waterproofing is already installed under the upper part of the roof, then nails are driven into the rafters every 10 cm so that the distance between them and the membrane is at least 3-5 cm. waterproofing and thermal insulation material. In the event that the insulation itself is fastened with a cord, then the nails will also need to be hammered along the outside of the rafters.
When using heaters released in the form of plates, installation comes down to inserting them into the space between the rafters (naturally, they will have to be squeezed a little so that they go into the gap). More rigid materials must be carefully adjusted to the gaps in the rafter system before properly insulating the roof. For maximum efficiency, it is worth installing a two-layer insulation.
When installing narrow fragments that require joining along one of the planes, you need to make sure that the joints of the first and second layers of thermal insulation do not coincide with each other. The layer of thermal insulation should not extend beyond the rafters, and if this happens, then additional timber will have to be filled on the rafters.
To fix the insulation, a cord stretched between the nails or a crate made of slats can be used. These slats need to be nailed to the rafters at a distance of 30-40 cm from each other. In this case, the vapor barrier layer must be fixed before the crate is installed - due to the thickness of the rails, an air gap is provided.
When installing a vapor barrier, you need to make sure that the material is installed tightly. To do this, the joints must be closed with two layers of adhesive tape.
Particular attention should be paid to the points where the material is connected to the wall and chimney. When all structural elements are installed, you can proceed to the final stage - the installation of the skin.
Conclusion
Roof insulation is a very important part of the structure, which allows you to increase the thermal efficiency of the roof. Knowing how to properly lay the insulation on the roof, and the high-quality performance of all work will allow you to create a reliable and high-quality structure that will perform its functions throughout the entire period of operation.
Roof insulation has been of concern to people since time immemorial. Even in the most primitive buildings, various tricks were used so that the heat from the fire did not leak out. With the development of construction technology has changed. Not so long ago, the upper sections of buildings were insulated with clay concrete or furnace slag, including ordinary shavings and cement. Today, such materials are gradually becoming a thing of the past. It was replaced by modern products and methods of isolation.
Technology
Contrary to popular belief, it is better not to engage in insulation during the construction process. After completion of the work, the house undergoes shrinkage, which can provoke a slight deformation of all structural elements. As a result, gaps appear on the surface of the heat-insulating cake, which negatively affects the quality of the work performed. Professional builders recommend waiting for about a year and only after that engage in insulation. The process can be divided into several stages, which require detailed consideration.
Training
Self-insulation of the roof of a wooden house begins with an inspection of all structural elements. This is especially true for old buildings where the roof was leaking.
During the inspection, it is necessary to pay attention to damp areas where traces of decay are visible or fungal spores are observed. Such elements are cleaned and treated with special compounds, if necessary, a complete replacement is carried out.
This rule cannot be ignored. With a lot of undeniable advantages, wood is very dependent on a humid environment, so if there are traces of rot on the surfaces, it makes no sense to engage in thermal insulation until such phenomena are completely eliminated. Dampness will gradually destroy the rafters and ceilings, which will at least lead to a violation of the thermal insulation layer.
About the benefits of hydro and vapor barrier
It is no secret that high-quality thermal insulation is a multi-layer cake, where each element performs a strictly defined function. In the standard version, it looks like this:
- waterproofing;
- crate (if necessary);
- insulation;
- vapor barrier;
- finishing.
The first layer is waterproofing. Here you can use an ordinary plastic film, which will perfectly cope with its task - it will protect the insulation from the effects of dampness.
Supersaturation leads to the separation of the compressed granules, followed by the destruction of the insulation board. They fix the waterproofing directly to the base, fixing it to the rafters with staples of a construction stapler. If the budget allows, you can purchase a superdiffusion membrane with a reflective layer. This is an expensive material, but it solves 3 problems at once: it protects against moisture, reflects thermal energy, and creates additional insulation and sound insulation.
Then the insulation is laid. The recommended thickness of the insulating layer varies between 10–25 mm, depending on the climatic features of the region. Ideally, the insulation fills the free space between the rafters with a dense layer. A small ventilation gap is usually left at the top of the roof, which will allow air to circulate and prevent condensation from forming inside the heat-insulating pie. We add that if mineral wool is used as a roof insulation, it cannot be used to close the electrical wiring.
The final layer is the vapor barrier. This is a film that is designed to retain warm, moisture-saturated air rising from living quarters. Here you can also use polyethylene, the joints of which are glued with construction tape. If the work is done correctly, the insulation is in a kind of waterproof cocoon, while the ventilation holes left do not interfere with the natural circulation of air. A topcoat is laid on top of the vapor barrier.
Final stage
If the attic will be used as a residential or utility room, it is recommended to perform floor insulation. The work is carried out according to the following scheme:
- all gaps between the beams are sealed;
- vapor barrier is laid;
- insulation is being installed, usually mineral wool or polystyrene;
- a layer of expanded clay is poured;
- screed is poured.
A floor covering, such as linoleum, boards or laminate, is laid on top of the base.