Accessories for dry floor heating systems
To get uniform heating of the room, you need to purchase additional equipment. The device of a dry warm floor should include such products as:
- pumping unit;
- collector;
- thermostat;
- temperature sensor.
For the installation of a dry floor, the following materials will be required:
- polyethylene waterproofing film;
- damper tape;
- construction tape;
- GVL boards.
It should be noted that the polystyrene and wooden systems differ not only in the products used, but also in the installation work. Therefore, before proceeding with the installation of underfloor heating elements, you should carefully read the attached instructions, where you can familiarize yourself with each installation step in detail.
Is it possible to make a water floor without a screed
Relatively recently, it became possible to lay a warm water floor without a screed, using a traditional mortar with additives.
What are the benefits of dry mounting?
- Smaller layer thickness. Compared to wet screed, dry formulations take up less space. For example, one of the popular Oventrop mixtures acquires good strength characteristics already at a thickness of 25 mm.
- Fast installation speed. Water heated floors without screed are installed in 1-2 days, and laying and connecting the water circuit to the heating system takes more time. The composition used does not need drying and heating.
- High heat dissipation. The system of dry laying of a water heated floor uses special heat-conducting plates to increase the heating efficiency and increase heat dissipation.
- Easy installation. If necessary, dry backfill or lay mats, you can do everything yourself, without the involvement of specialists.
There are several ways to dry lay pipes. When choosing, it should be borne in mind that not all floors can be laid by hand, without special tools and technical skills.

How long does a cement screed dry
The cement base is usually laid in several layers. It, in turn, is located on a special vapor barrier coating, such as roofing material. The coating is not applied randomly. It prevents the concrete from absorbing moisture from the soil surface. The base of the floor remains solid, dries evenly and does not crack.
There are several important factors that affect the drying rate: temperature and humidity, floor height, mortar fillers and material at the base. The optimum temperature for drying the screed is 20°-26°. When it is raised or lowered, the concrete will begin to crack, air pockets will appear in the structure, and the drying time will increase. The desired humidity level should be at least 60%. Dry or vice versa too humid air will lead to the same disastrous results. In this regard, maintaining these parameters is mandatory.
The higher the base, the longer it will dry. You can determine the period of time for drying based on a simple formula. The usual height of the screed is 4 cm, the drying period, subject to the parameters, will be 28 days.
1 cm/7 days 4×7=28 days
The calculation formula is based on the drying time of 1 cm of cement. It is equal to one week, respectively, a normal floor layer will take about a month to dry, subject to all conditions. In order for the cement-sand mortar to dry in due time, the quality of the material laid under it should be monitored. A vapor barrier coating under a poor quality screed can significantly increase the life of the base.
The fact is that such material does not adequately protect concrete from moisture coming from the surface of the earth. Quality material will not allow this. Consider this nuance when buying a vapor barrier for a screed.Additional fillers will help speed up the drying period of the floor. They are added to cement and serve precisely for these purposes. Moisture is quickly absorbed by fillers, drying of the screed is much faster. Many call this method "dry".
Pouring technology
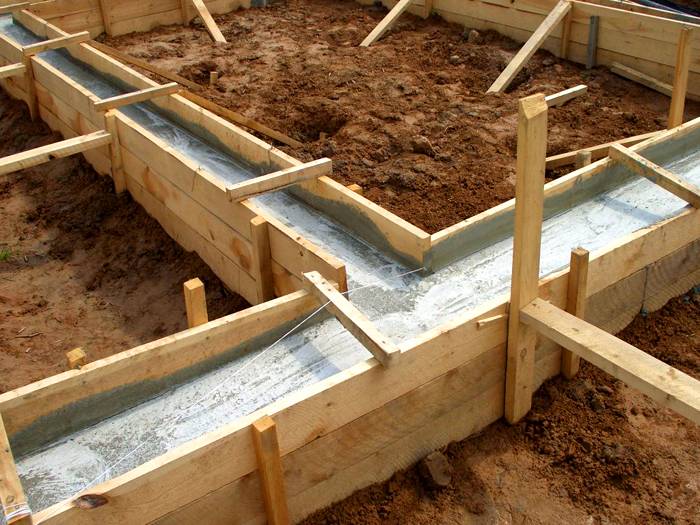
Regardless of the season, there are general rules for pouring the foundation. The work takes place in several stages, at which it is necessary to observe all technological subtleties, taking into account the characteristics of the mixture.
Table 2. Pouring sequence
Work description
Photo example
Before starting work, it is necessary to mark the area for the foundation and remove the topsoil. For marking around the perimeter, pegs are driven in and the tape is pulled. And removing the top layer of soil in winter is a laborious task.
Digging a trench. The minimum level of digging is 20–30 cm from the level of soil freezing. Then, you need to make a sand cushion at the bottom and spill it with water for tamping. Before pouring, it is also necessary to lay a layer of waterproofing material.
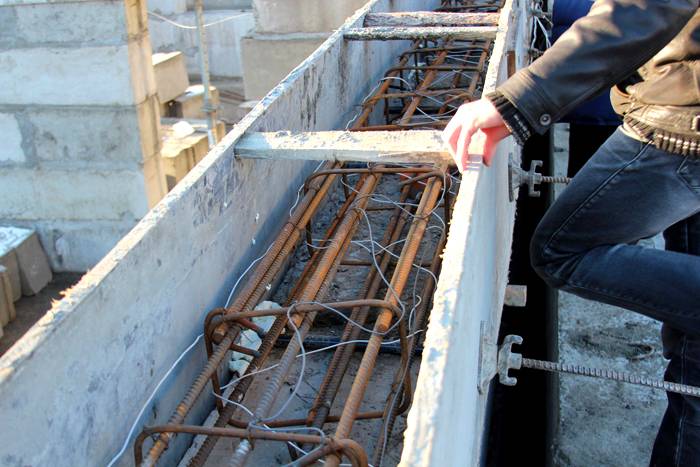
The next step is reinforcement. A simple pouring of even the highest quality concrete will not provide the proper strength of the foundation. Therefore, it is necessary to reinforce the structure with metal rods. The distance between parallel rods should not exceed 400 mm.
Fill. The solution is prepared only before use or brought in a concrete mixer. Filling must be carried out evenly around the entire perimeter
It is important to monitor the absence of voids. For compaction, it is best to use vibrating plates or other special units.
After completing all the steps, it is necessary to give the mixture time to dry and achieve the required strength. It is during this period that you should monitor the amount of precipitation and frost. So that you have a clear idea of \u200b\u200bfilling the strip foundation, watch the video on the topic.
Video: how to fill the foundation in winter
When planning the construction of a house, think about the correct laying of the foundation. Not a single structure will last long without a foundation.
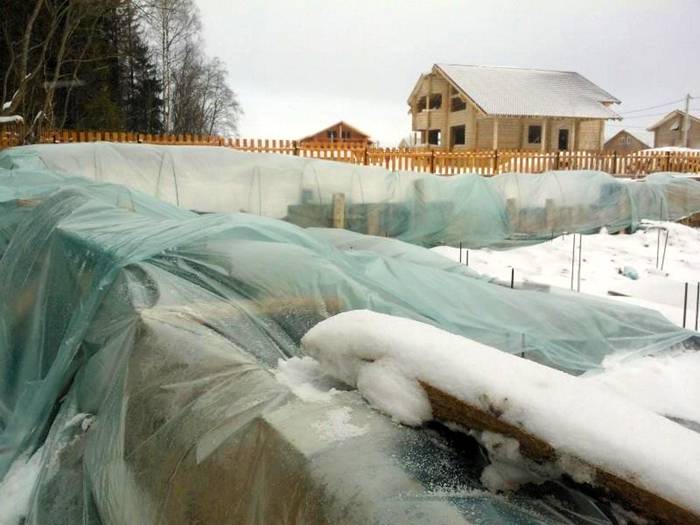
If the time of work falls on frosty days, it is imperative to use special mixtures or antifreeze, as well as additional insulation. In autumn, pick up those moments when there are no frosts and rains. In summer, there should be no heat during pouring and drying of the mixture.
If you cannot cope with the preparation of the foundation of the structure on your own, contact construction organizations that will perform all turnkey work and calculate the most suitable conditions for construction themselves.
Tricks
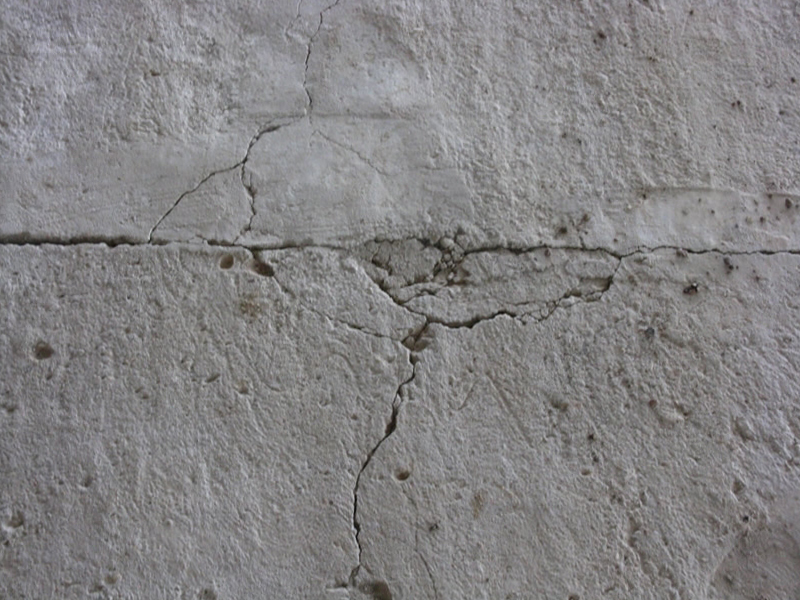
If a thick layer of cement screed is expected, it should be laid in several stages. First you need to fill in rough irregularities in the form of pits, deep breakthroughs. Then you need to wait for this layer to dry. After waiting for the required amount of time, proceed to the next. So the screed is brought to the desired zero level. This method will ensure thorough drying and prevent further cracking. Very often, an impressive layer of screed does not really dry out, this causes swelling of the floor covering.
In order to check the degree of readiness of the floor, you should put a napkin or other paper material under the film and wait a day. If the material is not damp, then the screed is ready for further use. However, in our time, there are special devices that help track the degree of drying of cement. About what indicators it should demonstrate when completely dry, it is described in detail in the instructions for the device. It is very convenient and takes a few seconds to check. However, experienced builders advise the good old way with paper.

If, when planning a floor repair, there is no time to wait for the screed to harden, special fillers should be added to the solution. Many people use expanded clay, the screed hardens faster with its use. It perfectly absorbs moisture.If it so happens that the floor has to be poured in late autumn and there is a possibility of a drop in temperature, special fillers are used. They make the composition of the screed resistant to frost. The addition of this material to the composition does not mean that the screed will harden faster.
Plan any construction or repair not only based on the technological process, but also taking into account the drying time of the cement layers. Maintain optimal temperature and humidity levels. Consider all the nuances. Also, do not mistake the simple setting of the cement for complete drying. If you can walk on a flooded floor, this does not mean at all that it is ready for further use.
Impatience can lead to damage to the flooring. Especially when it comes to parquet or any other wood flooring. The material will begin to dampen and “writhe”. In this case, you will have to redo everything. This process as a result will take much more time than it would take for the complete solidification of the rough screed. The best option for laying the floor will be early summer. Thus, by the end of the summer period, the floor will be completely ready.
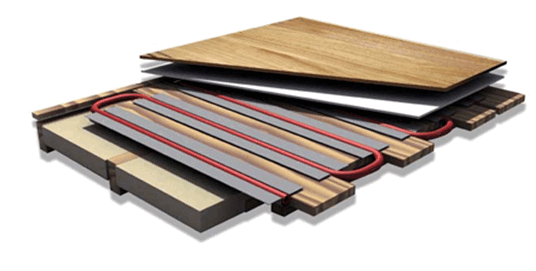
The essence of technology dry screed on a warm water floor
Already in the name lies the essence of technology. "Dry" means light, a system equipped without the addition of water and plasticizers. A water heated floor is traditionally a rather massive and bulky structure.
As a result of the installation of a wet screed, the level of the floor rises significantly. Not every living space has a sufficient margin of ceiling height to compensate for the lost centimeters. In addition, the load on the floors of the structure increases significantly. The weight of 1 m2 of underfloor heating with concrete screed is 200-300 kg. How much will the whole structure weigh, for example, in a room of 15 sq. m.? It's easy to calculate. Are city apartments designed for such a reconstruction, can a wooden structure withstand such a load? The answer in this case is obvious, use the "dry" technology of laying heating floors.
Dry screed for your warm water floor can be made in two versions:
- wooden;
- polystyrene.
Depending on the materials used, the name and method of laying is determined. Unlike a concrete pie, the main support in this case is strips or boards made of OSB, GVL and chipboard. You can use any other tile material. For the polystyrene system, the support layer is made of polystyrene boards. Already on this base, insulating layers are laid, in which there are grooves for mounting pipes of the water circuit. The final coating in this case will not be a monolithic concrete slab, but a stacked structure of GVL sheets.
At first glance, everything is simple and clear. Before proceeding directly to the installation of a dry screed under the water heating circuits of the heating system, study the pros and cons of this technology.
How to pour concrete at low temperatures in winter
To carry out the correct pouring of the foundation in winter, many nuances should be taken into account. The main thing is to prevent freezing of the solution. To do this, use several heating options:
- electric heating;
- adding antifreeze to the solution;
- use of heat guns;
- application of additional material for closing concrete.
More often, antifreeze is used or the purchase of a special concrete composition that can be used in winter.
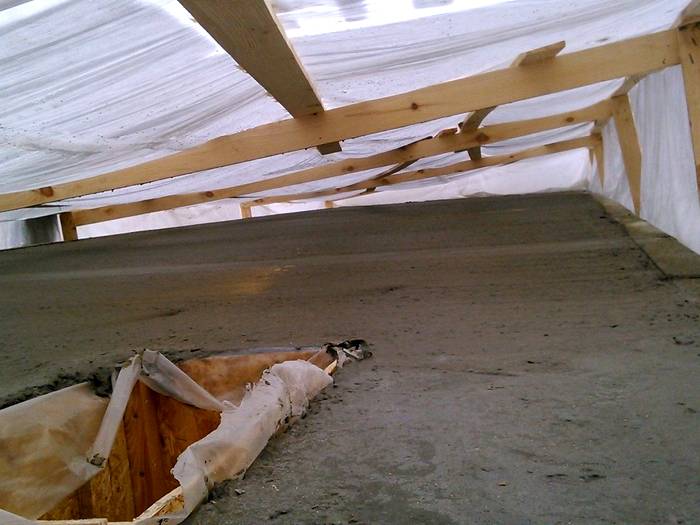
If the construction area is impressive, electric heating is installed, which requires special equipment. For private construction, the option of sheltering the material is suitable, where insulation or PVC film is used.
The main task is to prevent the temperature of the solution from dropping below 3 ⁰С.
Answering the question whether it is possible to pour the foundation for the house in winter, we answer - it is possible, but it is worth considering the options for heating or buying a special mixture.
Related article:
What keeps the mixture from freezing
If the foundation is poured in winter without heating and using antifreeze, the foundation may be completely destroyed due to freezing, so professional builders do not resort to such methods.
There are some secrets of working with concrete in winter using heating methods:
- During frosts, most often only the top layer freezes, and the array itself remains intact and does not lose its functions.
- The internal part of the foundation is saved by the processes that occur during hardening, that is, chemical reactions between water and cement.
At the same time, in winter, there should still be a sufficient amount of liquid in the solution to get a good lasting result.
Possible mistakes
At first glance, it seems that a dry screed under a warm water floor is very simple and no difficulties can arise.  But novice performers may encounter certain errors that will lead to inefficient operation of a water-heated floor. To avoid this, you should first calculate the underfloor heating, both before the start of work and after installation. The measurements taken can indicate possible errors, which would be better to eliminate in advance than to spend more effort and money later. It also calculates the pressure on the base of the floor.
Ideally, the screed should not heat up above the temperature of the human body. There are maximum temperatures that normal piping can withstand, depending on the material chosen. But it is recommended to create a working temperature of no more than 55 degrees.
Another possible mistake is to install temperature sensors deep in the structure. They cannot serve for a long time and periodically fail, requiring replacement. It will be very difficult to get them and check for performance.
In no case should you rush into the installation of a warm floor. It is better to check the completed each stage and in the future for a long time to use the high-quality work of the system. Experts recommend even a few days after the end of work to leave the system alone. That is, it should not be included. When all the elements grab onto each other, especially if glue was used during installation, you can start using it.
You can not save on the purchase of materials, as the system will serve for a very long time. It is unlikely that anyone will want to lay a floor covering and, a year later, already dismantle it to repair a water-heated floor.
Video: Underfloor heating in a wooden house, aluminum plates AL 20088
Video: Dry floor heating system - Joco Klimaboden TOP 2000.
Video: warm floor dry (light, flat) system
Video: Warm floor. Installation of a light, floor heating system. Heat distribution plate VT.FP.SZ
Video: Dry floor heating in a SIP-panel house
Recommendations for laying screed under underfloor heating
In order for the underfloor heating screed to be of high quality, certain properties and laying rules should be taken into account:
- When installing the heating system, before pouring the solution, first of all, it is necessary to clean the surface from debris caused by construction work, dirt and dust, otherwise the solution, having hardened, may peel off completely from the base.
- The screed laying starts from the walls, different to the entrance. Small holes (4-5 cm) are made in the screed. This will give a high-quality connection of the new screed with the lower base, as well as a quick drying of the surface.
-
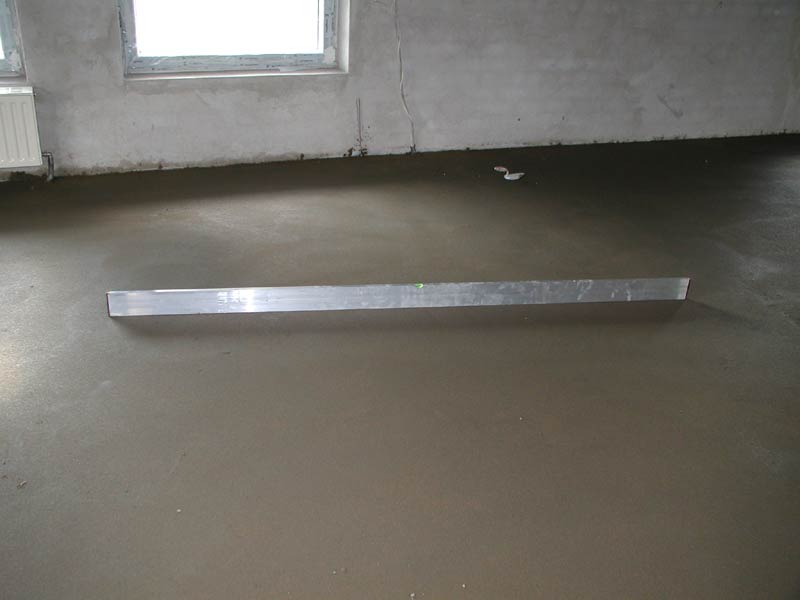
A good thickness of concrete screed is 3-5 cm.
A good thickness of the screed under the heated floor is from 3 to five centimeters
If you make a layer thicker than 5 cm, then the floor will warm up slowly, and if it is thinner than 3 cm, the coating may overheat and crack. When thinner is needed coupler, say 2 cm, it is necessary to add an aqueous inhibitor to the solution or use self-leveling mixtures.
Screed from a mixture that levels itself
- So that the floor does not change and does not crack under the influence of thermal expansion, it is recommended to use expansion joints under the walls and near the doors by laying a compensatory strip of artificial latex.
- When installing a dry screed, the backfill must be completely dry. To ensure a dense consistency of the screed, the particle size should not be more than 5 mm. There should be no free space between the drywall sheets and the applied backfill.
Must be remembered! In order to prevent overly rapid drying, after the completion of the pouring of the solution, the screed is covered with a film of polyethylene, or its surface is sprayed a couple of times a day with water from a spray bottle. At a temperature of 20 degrees coupler it is maintained until complete drying for at least 30 days, then it will not crack even at the beginning of operation.
The first start-up of the heating system (a month later from the day of screed pouring) is made in 2 stages:
- the first step is to gradually increase the temperature in the system from a very small value to a very high one (during the first 7 days);
- the second stage is a gradual decrease in the temperature in the heating system from the highest to the lowest (over the next 7 days).
Compliance with the above recommendations for laying the screed, correct testing and a good start-up of the underfloor heating system will allow you to use an even and warm floor covering for several years.
gypsum mortar base

The drying time of the screed depends on its type. The cement base is the most reliable and dries longer than the rest. However, the base of the solution can also be gypsum. Such a screed does not require a huge amount of time. The conditions for achieving its readiness do not differ from the basic ones required for drying a cement screed. The general time formula is calculated as follows:
1cm/42 hours 4cm×42=7 days (+3 days)
Spare three days are given taking into account the height of the screed more than four standard centimeters. Each extra 20 mm requires an additional three days, they are added to the general formula. For example, for a 6 cm screed, it will take three days more than the formula provides.
1cm/42 hours 6cm×42=10 days + 6 days (16)
A screed made on the basis of gypsum dries faster. However, do not forget about the standard conditions for drying the coating.
conclusions
Dry screed for warm water floors is a convenient alternative to concrete flooring. In terms of their effectiveness, such heating floors are not much inferior to concrete analogues. True, the heat transfer of a concrete monolith is higher than that of stacked structures, however, from a technological point of view, wooden and polystyrene structures are more convenient and practical. What is the installation of the structure and the dismantling of the dry screed in case of damage to the water circuit. In addition, such a warm floor can be quickly dismantled if you decide to make renovations or repairs in the house.
Floor structures play the role of a good sound insulator. By following the laying technology, using high-quality materials, you can create your own heating system that can work for a long time, efficiently and efficiently. For residential premises, underfloor heating is very convenient, but for technological rooms and bathrooms, this method of installing a warm floor is of little use.