The nuances of replacing the radiator
If the battery has leaked, does not give off heat well enough, or is simply obsolete and does not fit into the design, it becomes necessary to change the radiator to a new one.
In the event that a battery replacement is planned in an apartment building, it is worth talking to the neighbors about replacing the entire pipe: from where the upstairs neighbor's battery connects to the pipe to where it enters the downstairs neighbor's battery. So it will be possible to avoid welding work in the apartment and unnecessary pipe cuts.
Otherwise, do-it-yourself re-installation of heating radiators is similar to the initial installation: the water supply is shut off in the system, the water from the batteries is pumped out, the old radiator is removed, and a new one is installed in its place.
As a rule, batteries are sold in a minimum configuration and you will additionally need to purchase plugs (through and deaf, for the Mayevsky crane), pipes for connection, gaskets for all plugs, connecting elements for pipes.
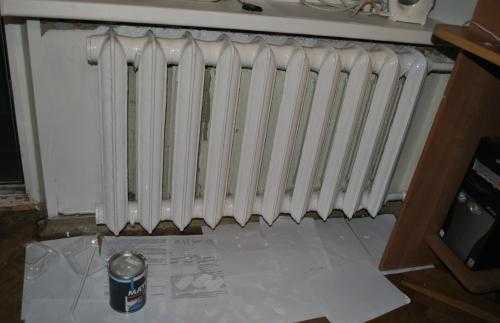
When the radiator is selected, purchased and understaffed, you can dismantle the old one. Batteries are attached to the pipeline by means of clamps. Sgon is a carving. A coupling and a lock nut are screwed onto this thread. The locknut must be twisted on the upper and lower connections. The pipe is then cut off, using a level and plumb line to make a clean cut, leaving a couple of centimeters of thread. When the battery is cut off from the pipe and removed from the brackets, the old fasteners are pulled out of the wall. If the new radiator differs from the old one in dimensions, and the dimensions of the pipe run do not match, the pipe is cut, or vice versa, welded on, and then a new thread is made on it. On old pipes, it is better to use welding, because. when cutting, such a pipe may burst.
Then mark the place where the battery will be attached. Using the location instructions above, install each radiator bracket.
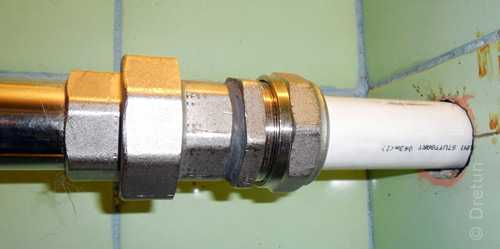
The thread of the supply pipe is painted with paint and tow is wound on top. Tow is wound with all his might in a clockwise direction. When the winding is completed, re-paint with paint. An “American” is installed on the thread processed with tow. Twist it so that almost the entire thread is hidden. Each battery inlet has an internal thread. On both sides, futor nuts are screwed into the threads.
It is important not to confuse right and left. To insure against mistakes, you can buy through nuts, which are universal
The nuts are placed on a rubber seal. When the nuts are screwed in, additional equipment is installed: the mating parts of the “American” crane, the Mayevsky crane.
Then the battery is put in place and the "American" connection is made. During the installation process, it is better to put something under the battery so that it does not fall.
https://youtube.com/watch?v=3BaaUUG4JZE
WATCH VIDEO
Self-installation of heating radiators or calling a master - everyone decides for himself. The heating system in a private house does not include elements that are difficult to install, and anyone who wishes, after preliminary preparation, will cope with the canopy of radiators and connecting them to the pipes on their own. The main thing to remember is proper marking, tightness and installation steps in the right order. If you approach the process wisely, the installation of radiators in the apartment will pass without problems and leaks.
connection on the sgons and Americans. Installation procedure for replacement R A D I A T O R A heating
What fittings are needed to connect a heating radiator made of cast iron or aluminum? Is it necessary to complete the heater with any shut-off or control valves? In our article, we will try to give the reader advice on choosing the optimal set of equipment and on its installation.
Sgons and Americans
What it is
Let's start with a little excursion into history.
More recently, by historical standards - some twenty to twenty-five years ago - only three types of heating devices were massively sold and used in our country:
Convectors, which were with steel plates pressed onto it to increase heat transfer.
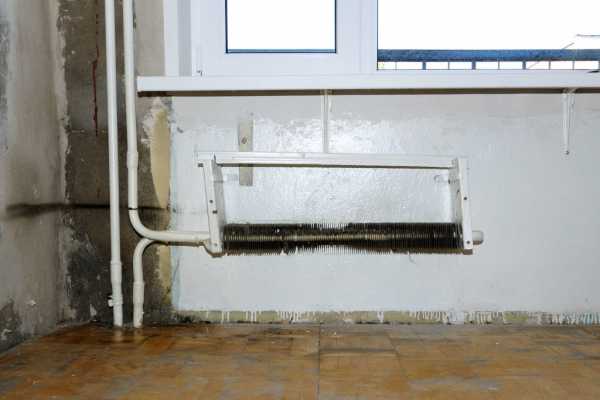
- Lamellar radiators - two stamped steel plates, welded around the perimeter. The coolant moved along the labyrinth of grooves between them.
- Cast iron sectional radiators. They, I think, do not need to be introduced, since they are now installed in most apartments.
There were only two mounting methods:
- Welding. Only convectors were welded to the liners: their mechanical strength and service life, at least not inferior to the operation time of the risers and lines, did not imply dismantling for repair or replacement.
- Drives. The coupling (in the case of a convector or plate device) or the radiator plug (in the case of a sectional radiator) was driven along a long thread on the liner, while screwing onto or screwing into the thread of the device. Then the connection was sealed with a wound locknut.
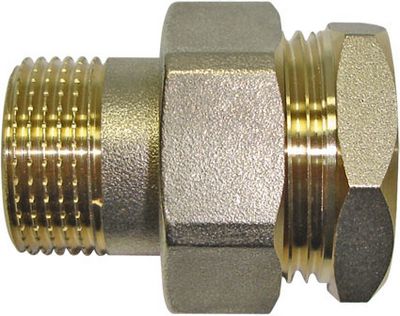
The first aluminum radiators were mounted in the old fashioned way - on sleds. However, after a few years, unpretentious fittings - Americans - were massively distributed, including detachable connections with a union nut and a rubber seal. Their main advantage was the simple and quick dismantling of the device: the operation, which previously took up to half an hour, now took no more than a minute and did not require much effort.
Does the American have flaws? In essence, there is only one drawback: the strength of the connection is limited by the quality of the rubber seal and the density of its clamping. With high pressure in the circuit (for example, during a water hammer), it is the sealant and the relatively thin American union nut that turn out to be the weak link.
In central heating systems with a high probability of exceeding the standard pressure, which is characteristic of them, it is better to use the usual threaded drives.
It is desirable to use Americans in autonomous systems.
Fitting set
Now let's find out what the set of fittings for radiators will be in both cases.
Connecting on the slopes
For a classic lateral connection in an apartment building, the radiator is equipped with the following set:
On the upper floors of houses with a lower bottling, the equipment is supplemented by a Mayevsky crane, which is installed in the upper blind plug bored under it. The dimensions of fittings for radiators are determined by the diameter of the connections; as a rule, it corresponds to DN20 (3/4 inch). Drives (long threads) are usually cut directly on the eyeliner.
Radiator material
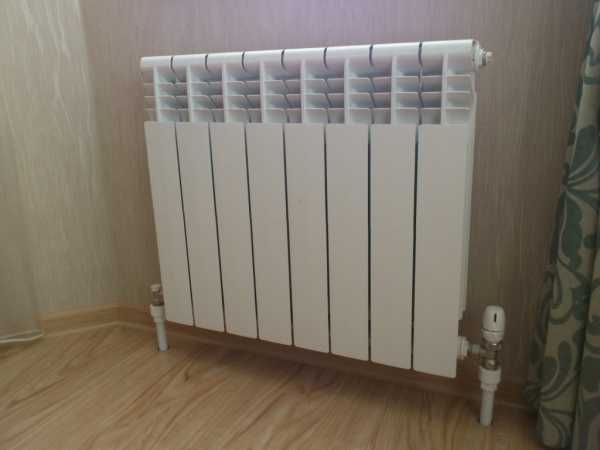
Today's range of heating batteries offers a wide choice to the buyer. You can buy light, both in weight and visually, aluminum batteries or install radiators made of bimetallic alloys. And you can remain faithful to cast iron, which has been on the market for a long time. Cast iron batteries, although heavy and not very aesthetic, retain heat well, gradually giving it away to the surrounding space.
In addition to the appearance and heat transfer, when choosing a radiator, the material of the walls is also taken into account: if brick or concrete can withstand a cast-iron battery, then installing bimetallic radiators is better suited for a wooden wall. Cast iron is too heavy for her. If you want to put cast-iron heaters in a wooden house, then for this they buy floor stands for batteries, additionally attaching the batteries to the walls with special holders.
The choice is influenced by the conditions in which the battery will operate. If this is a private house, then the aluminum radiator will abundantly give off heat to the room and easily withstand the pressure of the coolant. But in a high-rise building with powerful pumps, the higher the floor, the stronger the pressure in the pipe. Installing cast iron radiators in an apartment in this case is much more appropriate.
Assembling a cast iron radiator
It is carried out in the reverse order, the only difference is in changing the direction of rotation of the key.Do not forget about replacing gaskets, it is best to buy paronite gaskets in the store, they are stronger, more durable and can withstand aggressive coolants (antifreeze).
Suddenly you will not find such gaskets, you can use sanitary flax. It is wound on the right thread clockwise, and vice versa on the left - counterclockwise. Even for reliability, a sealant can be applied to the thread of the nipple nut (for example, Unilock). If you plan to use antifreeze in the system, then paint cannot be applied to the winding - it will corrode very quickly and you will have to repack everything. And this is the draining of the system, flushing it, disassembling it, then assembling all the sections ... a lot of work. So under the system with antifreeze, use a chemical resistant sealant and paronite gaskets.
Assembly and disassembly of radiators from any material occurs according to one scenario. Only the weight can be different, and even some specific characteristics of metals (the brittleness of cast iron, for example).
Detachable connections in plumbing. American, what is it and how to use it.
What is an American in plumbing and why is it needed?
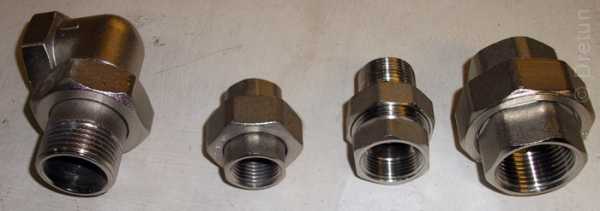
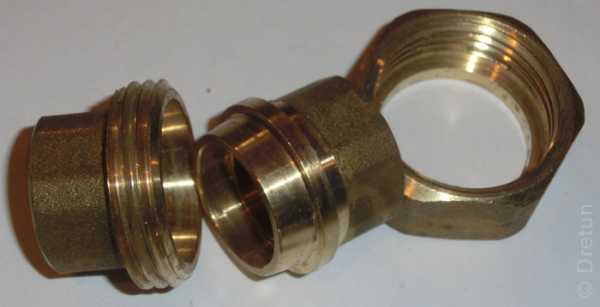
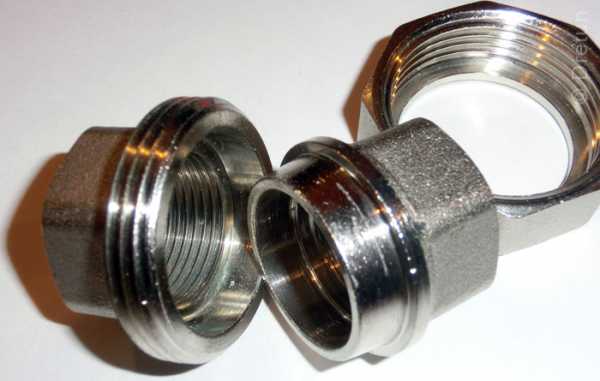
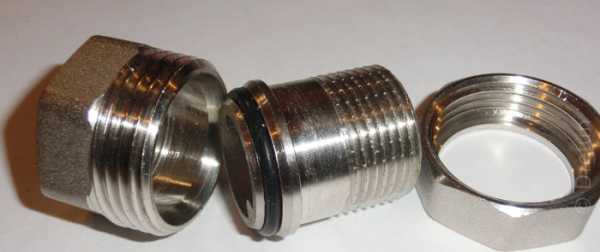
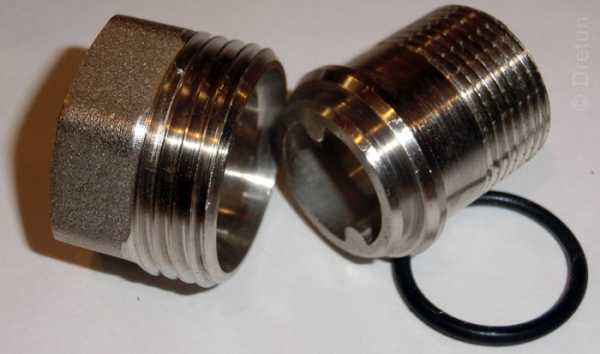
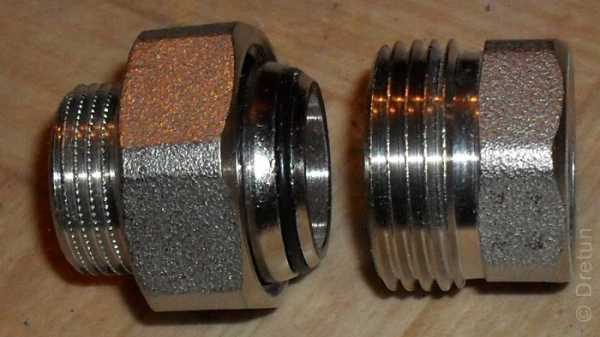
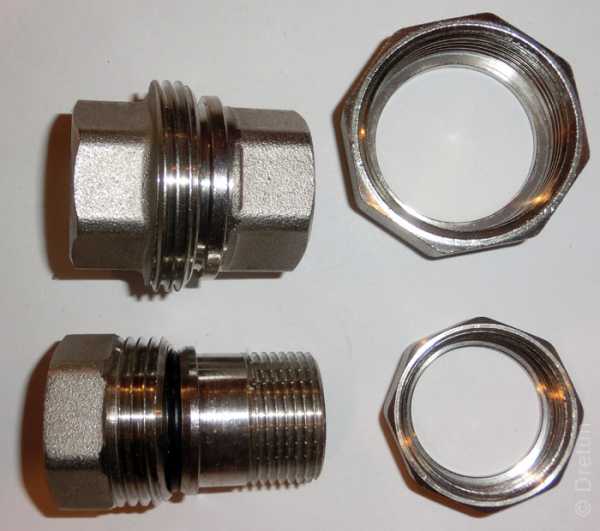
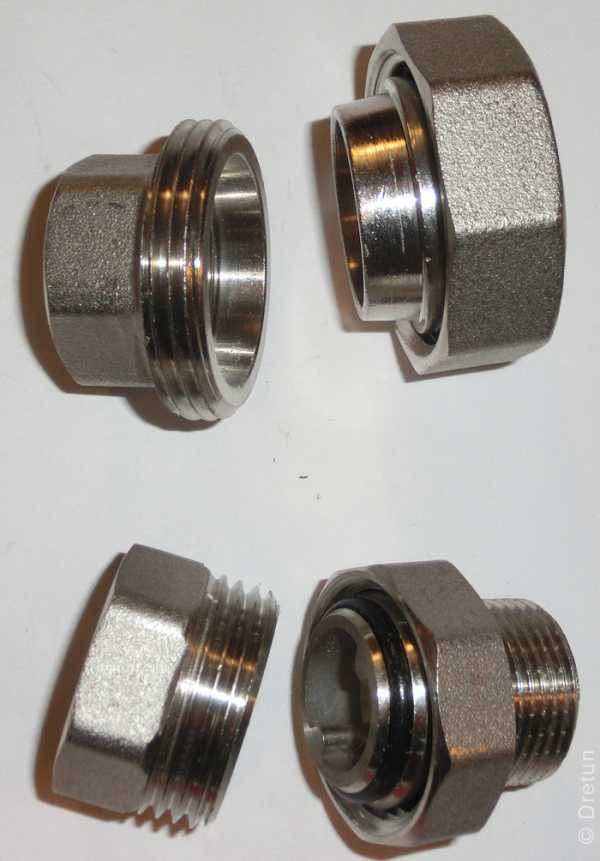
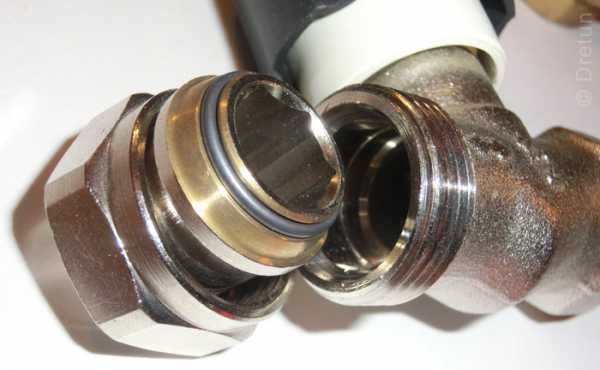
The quick-release threaded American is available with a flat or conical connection of structural parts. Usually, the simplest American consists of four parts: two threaded fittings, a gasket (but not always) and a union nut. The tightness between the fittings occurs due to the conical surfaces of the edges of the parts and a rubber gasket, or for flat ones - only with a gasket, for example, paronite.
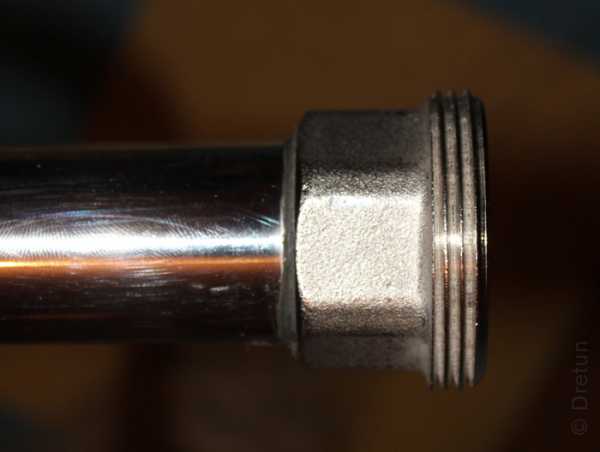
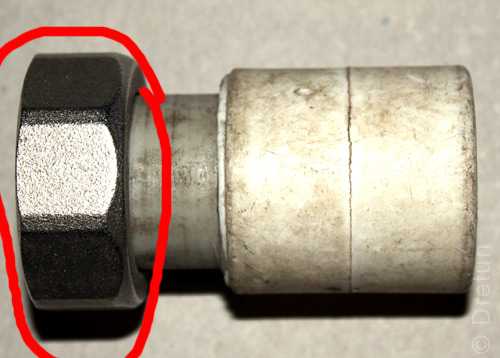
Americans are designed for convenient quick connection or disconnection of pipes and various shut-off and control elements of heating and plumbing systems in the house. Connection (connector) of pipelines is carried out due to only one union nut. Please note that an American detachable connection in plumbing is designed for repeated use with the replacement, if necessary, of a “squeezed out” gasket and has an undeniable advantage over a conventional drive with a coupling and a lock nut. Such connections come with a coupling threaded connection (Photo 1)
or for soldering polypropylene pipes (Photo 4).
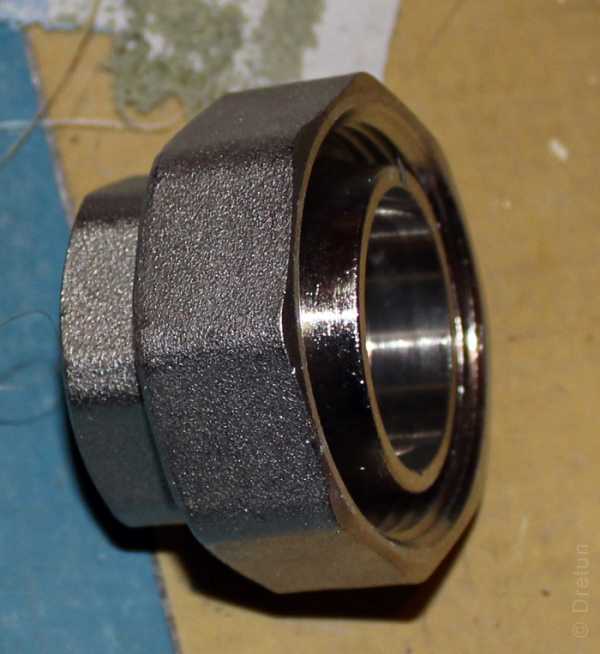
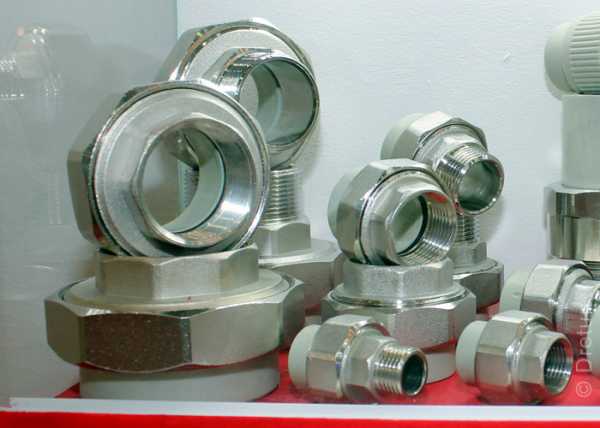
Americans for plumbing are made from different materials: cast iron (Photo 3),
brass plated with chrome or nickel (and without),

stainless steel and combined, with individual polypropylene parts. They can be bought in the distribution network of various sizes (diameters) and designs (straight, angular (Photo 2),
designed for different pressures of the medium in the pipeline.
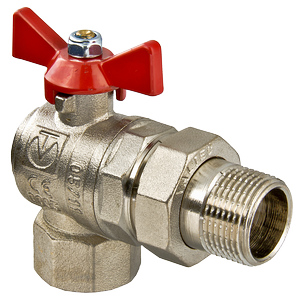
Widespread cranes with an American.
By design, an American ball valve can be straight or angled and is designed to work in a system of cold and hot non-aggressive environments.
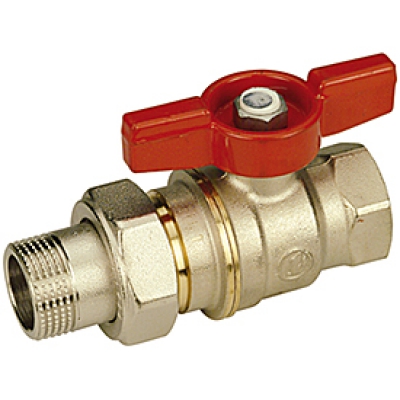
Available in bore sizes 15 (1/2″), 20 (3/4″) … and up to 50 (2″). The temperature limit for a plastic tap is plus 90 degrees. And a ball valve with an American made of brass, for example, Bugatti (Bugatti) can withstand temperature conditions, according to the manufacturer, from minus 20 to plus 120 degrees.
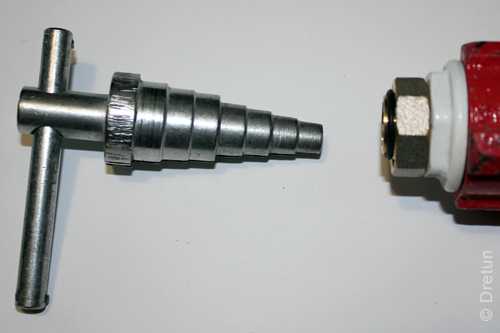
Key for Americans
In order to install or dismantle plug-in connections, you need a wrench for American women. In plumbing practice, more often you have to deal with American women 1/2 ″ and 3/4 ″, with two internal protrusions, less often for a hexagon. I make such a “L” shaped double-sided key myself, from cutting construction profile 14 fittings, using the method of heating and flattening to a square. Then I give a small conical shape and harden. It is made under a cone because different manufacturers have slightly different sizes of internal protrusions.
The universal mutual “L” shaped key for American women has the following approximate dimensions (diagram in Fig 1):
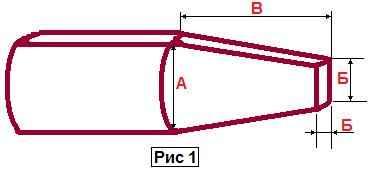
handle length 150 mm; edge under 1/2 "- A = 12, B = 10, B = 32; edge under 3/4" - A = 16, B = 13, C = 35
Such a homemade key is also suitable for detachable connections for a hexagon.
Tip: if you only need to work with one or two ... 1/2 ″ metal American women, you can use ordinary pliers, which will work quite well as a key (Photo 5).
An American in plumbing is a universal connection, without which not a single piping system in a house can usually do today.
material taken from sewerage-house.ru
Do not forget to subscribe to the email newsletter and you will always receive the latest publications.
Comments: 3
American connection. Good-Natured Plumber
An American in plumbing is not an American citizen. American, this is a detachable threaded connection.
Before the advent of this compound, they used spurs for a long time. Yes, in attics and basements to this day it is the squeegee that reigns, because they are much cheaper than detachable connections such as an American.
Where is used:
What spurs that Americans are used in cases where it is necessary to connect two sections of threads without rotating them. For example, when it is necessary to connect a soldered wiring to a shut-off valve. Not a tap, not pipes, it is no longer possible to twist or when a filter or corner cannot be screwed onto the thread, because the thread is too close to the wall. It is in such a situation that this invention comes to our aid.
Only now the American is more compact compared to the drive, it looks more aesthetic, but more expensive.
Consider:
What individual Americans look like:
Or American women with valves: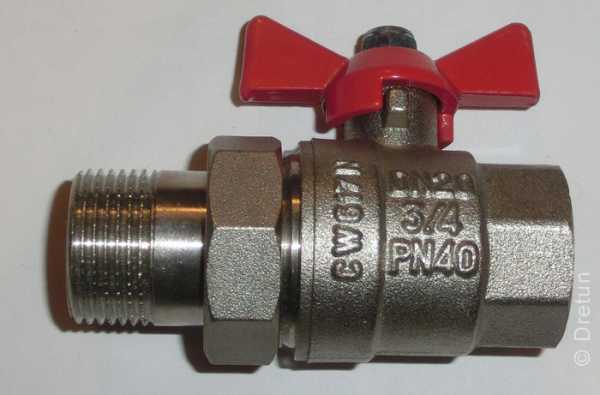
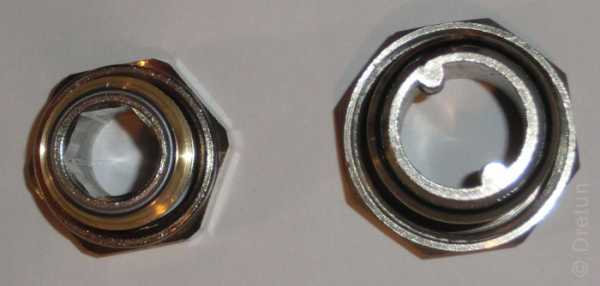
Americans come with and without gaskets. Without gaskets - cone type, and I recommend installing them, despite the fact that they are much more expensive than their counterparts with a rubber or flat gasket.
Here is an example of a conical American where there are no seals:
Installing such an American on a heated towel rail:
Conical American women are placed on good thermostats instead of American women with a rubber seal.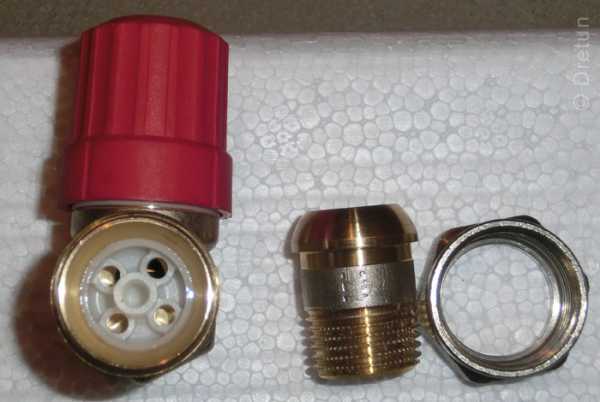
Now let's look at an American with a rubber seal: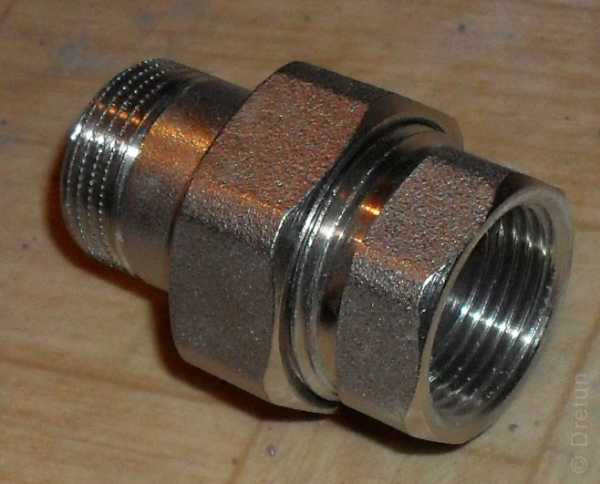
Combinations of threads can be absolutely any now we are talking only about the type of connection: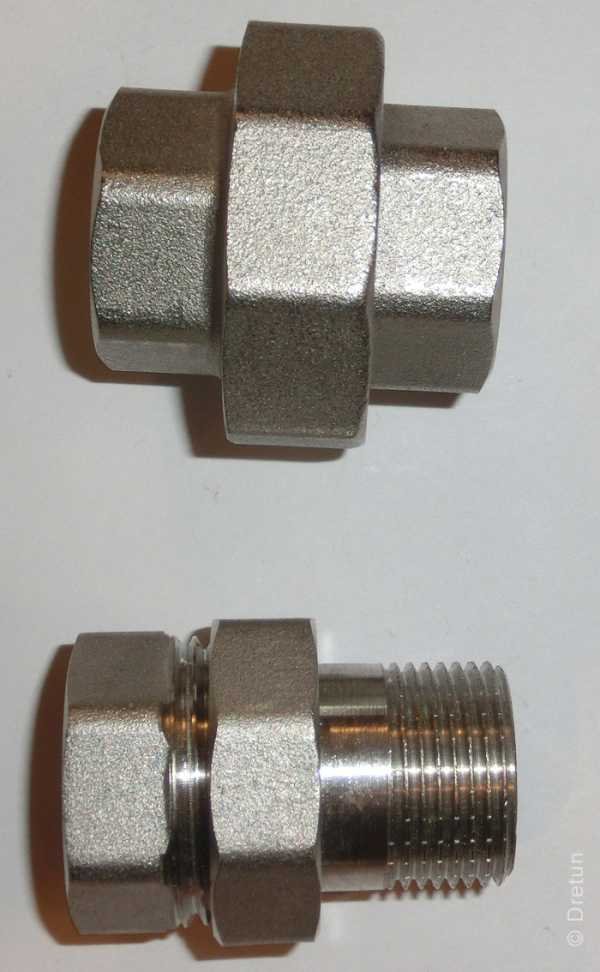
To twist American women, you need special keys or a hexagon:
There are Americans with a flat gasket, more often they are used with polypropylene pipes.
It may turn out that in heating or hot water with pipe diameters of more than 3/4 inches - the nuts of such American women will have to be periodically tightened. Don't hide them in walls.
And here is the same flat gasket, which sometimes has the ability to let water through. Many do not know, and some do not even want to know that this gasket is not the same on both sides. Outwardly, of course, it looks the same, except that one of the sides are slightly darker and more contrasting.
The more contrasting side is smeared with some kind of grease. And if you put the smeared side to the polypropylene, then when you tighten the nut, the floor will not scroll along with the nut.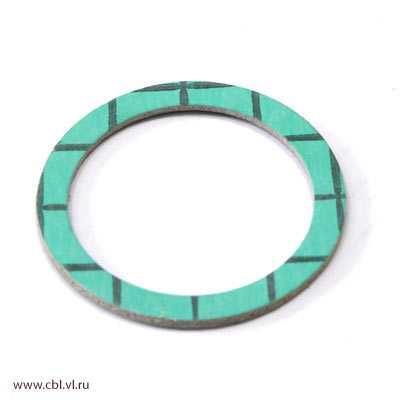
If there is no special key for twisting American women, then you can use an improvised tool: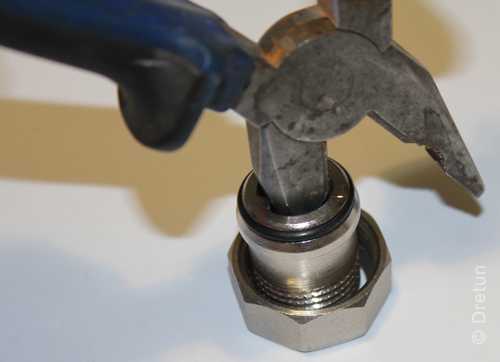 But this method is suitable only as a last resort. For it is very easy to damage an American in this way. You will deform it and it will become unusable. There must be a special round key.
1. An American cone without a gasket is more reliable. The main thing is to take quality. 2. Americans with flat gasket, may require tightening3. Americans with a rubber gasket, require replacement of the gasket when dismantling and reassembling. 4. You will definitely need a special key for such connections.
To facilitate the repair of some nodes in the systems, separate them with Americans.
For example, meters, boilers, circulation pumps, gas water heaters….
Location
Pipes that bring the coolant to the heating devices are placed with a slight slope towards the movement of the coolant. If you do not pay attention to this, air will accumulate in the pipes, which will lead to a deterioration in heat transfer and a decrease in the temperature in the room.
The correct installation consists in observing all horizontals and verticals, double-checking them with a level. This is the only way to ensure uninterrupted operation of the radiator.
The central axis of the radiator must coincide with the central axis of the window opening. Errors within a couple of centimeters are allowed. Pipes are mounted with a slope of 0.5 cm for each meter of length. Accordingly, the slope of each specific segment is calculated based on its length, based on this figure.
A special shield made of heat-reflecting material will improve the quality of space heating if you install it on the wall behind the battery. You can also treat the wall behind the radiator with a heat-reflecting compound.
Procedure for replacing heating radiators
Correct and incorrect installation of radiators. Click on the photo to enlarge.
If it is necessary to replace central heating heaters, it is necessary to coordinate the upcoming work with the Housing Office. It is necessary to shut off the system and drain the coolant (in a private house this is also relevant).
We inform and negotiate with neighbors from below and above about the replacement of risers below and above the ceilings on the floor. We dismantle old pipes and radiators. If there are no special threaded connections in the old heating system, we use a gas cutter or a grinder.
We prepare and install new radiators. It is better to replace old batteries with any new type of radiators, as long as the design is securely fixed.
We cut new threads on the risers. Currently, welding is not used when connecting the pipeline. Radiators are connected to pipes by means of threaded connections. This simplifies installation, they are reliable and practical in operation. We assemble the piping system and connect heating devices.
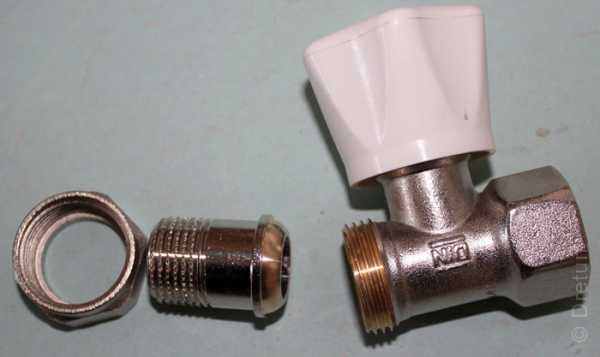
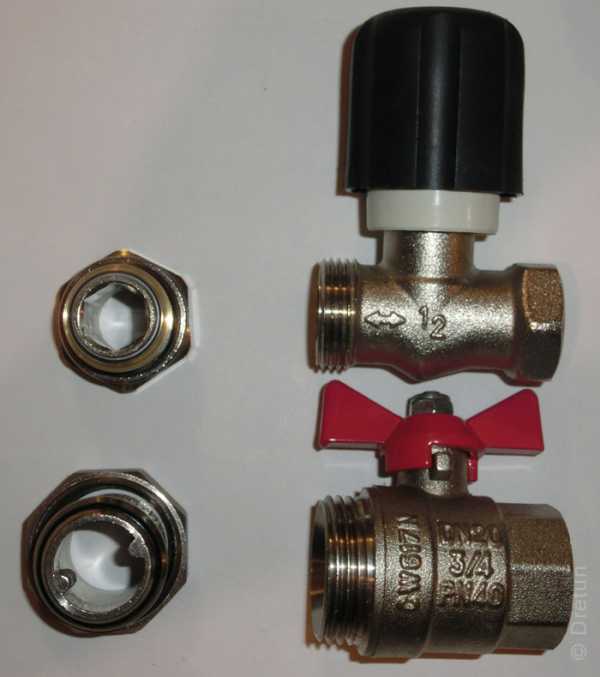
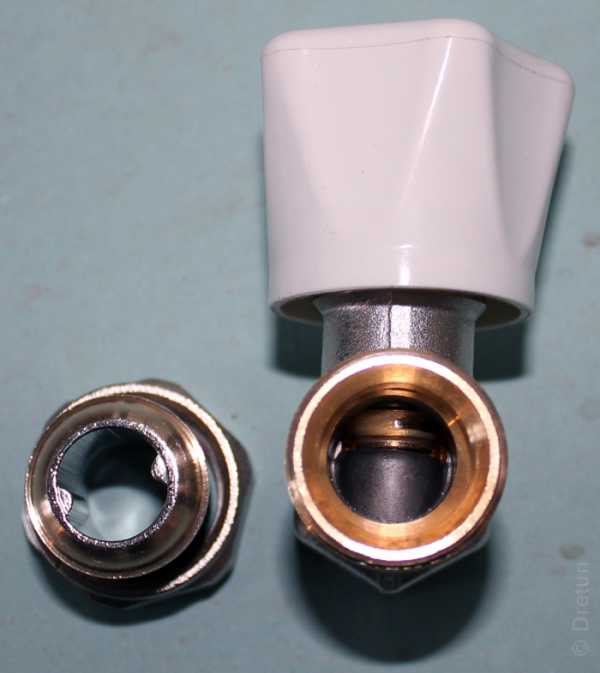
Installation of taps on radiators
The next step in the installation of the heating system is the installation of shut-off and control valves in the plugs. Radiators are equipped with "full-bore" ball valves or valves in which manual adjustment of the movement of the coolant works. Thermal heads are now being produced that have automatic flow control.
Taps for heating systems can have a different design, but taps with an “American” connection with union nuts are considered the most practical. The advantage of taps with an "American" connection lies in their design, which allows you to remove any type of radiator without turning off the heating system. The flow of coolant with the help of such a tap is quickly blocked, and to remove the battery, you only need to unscrew the threaded connection.
The use of "American" taps is especially in demand when the heating system is forced to start, when the heaters are installed on the draft wall. Their use allows you to easily remove the radiator and finish the finishing work of the wall section without turning off the heating system (make strobes, putty or plaster walls, glue wallpaper, and so on). Most importantly, taps with a detachable "American" connection can be used repeatedly, regardless of the type of gaskets (rubber or paranitic) or the option when sealing is carried out only with stainless alloy cones.
Valves with union nuts can be straight or angled. They are selected depending on the pipeline supply system to the radiator (from the wall or niche slopes).
The tap is screwed into a plug with an “American” connection using a special key that is inserted inside the pipe. The cross section of the key can be of various shapes. It is easier if a hexagon is used, it is enough to choose the right size for work. It is more difficult when two protrusions are made in the “American” connection, you have to look for a suitable profile for a reliable hook.
Sponges of an adjustable wrench or pliers are sometimes used in work, but more often craftsmen make an L-shaped key with a square section.Its ends are slightly tapered. This allows you to work with different manufacturers of taps with an American connection.
The connection of the through plug is sealed with the “American” branch pipe by means of winding. Plumbers use imported flax and packing paste (like UNIPAK) for this purpose. FUM tape is used when the thread profile does not have sharp corners. Also, the thread must have a special notch that prevents the sealing material from scrolling.
Two parts must be checked for thread compatibility by connecting them without tow. The degree of density of the assembled connection shows how much tow must be used. With a large layer of winding, cracks may form or thin-walled parts may be deformed. And an insufficient layer often causes a connection to leak.
The winding must be assembled into a thin bundle and wound in the direction opposite to the direction of the pipe thread. It is necessary to start from the edge of the thread that comes out. It is necessary to fill the entire depth of the thread with flax fibers, pressing the previous one with each new turn and preventing the winding from scrolling. Next, the part is lubricated with UNIPAK paste, which is then screwed into place.
If the heating system is mounted using metal ball valves, threaded couplings are screwed onto them using winding, which are necessary for switching to polypropylene pipes. The Mayevsky crane included in the radiator fittings kit comes with a rubber gasket, so it does not need winding.
The radiators prepared for work are installed in their place, after which the installation of pipes can begin. After the installation of the heating system is completed, you need to start it, having previously filled the riser from the bottom up with coolant and bled the air. It is necessary to open the supply valve and check the connections for leaks.
Proper replacement of radiators is a good way to increase the efficiency of heating in your home or apartment and reduce the cost of paying bills. This work can be done quickly and easily with your own hands, but if you are not familiar with the intricacies of the process, it is better to turn to professionals.
Disassembly of cast iron radiators
Dismantling cast-iron radiators sometimes becomes a very time-consuming process, but necessary.
Scheme of disassembling cast-iron heating radiators: a - capturing the threads of sections by 2-3 threads with nipples; b - turning the nipples and joining the sections; c - connection of the third section; g - grouping of two radiators; 1 - section; 2 - nipple; 3 - gasket; 4 - short radiator key; 5 - crowbar; 6 - a long radiator key.
A new or old radiator is placed on a level place. At least on one side, you need to remove the usual futors or deaf ones - plugs. On different sections of radiators, they can be left-handed or right-handed. Usually, cast iron fittings have a right-hand thread, and plugs have a left-hand thread. If there are no disassembly skills, and there is a free section, it is better to find out what kind of thread this is and in which direction the key should be rotated before applying force. If the thread is left-handed, when disassembling cast-iron batteries, turn the key clockwise.
As with unscrewing any nuts, you first need to “break” the futors from their place, i.e. turn them a quarter of a turn on both sides of the battery. Then the futors are unscrewed so that a gap of several millimeters is formed between the sections. If you release the futorki more, the whole structure will begin to bend under its own weight and due to the applied efforts. In this case, the thread may jam. To prevent this from happening, an assistant must stand on the disassembled battery, which will prevent bending with its weight.
Usually, dismantling of old heating radiators is difficult because the fittings and sections are “boiled”. In order to disassemble such a battery, you will have to use an autogen or a blowtorch. The junction is heated in a circular motion.As soon as it is warm enough, the futorki are twisted out. If it was not possible to unscrew the first time, the actions are repeated.
If there is not enough strength to disassemble the battery, you need to increase the length of the key. An ordinary pipe is used, which serves as a lever.
Similarly, built-in nipples for airing cast-iron radiators are unscrewed.
If it was not possible to disassemble the cast-iron battery using the considered methods, it remains to cut it with a grinder or autogenous or smash it in a supine position with a sledgehammer. You need to carefully break or cut one section. After this operation, the adhesion between the sections may loosen, the battery can be disassembled, the remaining sections can be saved.
The use of a “liquid key” or WD liquid does not give an effect, since in old cast-iron batteries the futors were sealed with linen and paint, and liquids would not get on the threads.
Installation of radiators
Let's figure out how to properly hang the battery with your own hands. Regardless of the type of radiators chosen, before installing them, carefully prepare the installation site. Very often, batteries are installed under windows to provide the necessary air convection.
When making a major overhaul of a private house or apartment, the outer walls are often insulated, and the inner walls are sheathed with drywall. Before insulation, metal frames are mounted. In this case, before installing new batteries, it is necessary to solve two problems: determine at what distance the radiator will be located from the supporting base, and install fasteners in advance (a radiator cannot be fixed on drywall, especially cast iron).
To do this, the wall on which the battery will be attached must first be sheathed with a frame. If the alignment or plastering of the walls is done from scratch, special beacons are installed. In the case when the frame is mounted, inserts 25 mm thick are made at the installation sites of the fasteners. The material used is OSB or plywood. Inserts should rest with their bottom on the floor and go into the UD profile. Each heater needs two or three inserts, depending on the number of brackets planned (4 or 6).
After preparing the base, marking the location of the fasteners is done. On temporary stands, the battery is set to the design position using a level. If the radiator is installed near the window, it is done in the center of the opening at a distance of 100 - 150 mm from the floor and about 100 mm from the window sill. After marking, the battery is removed and the holes for the brackets are made with a puncher. They need to be screwed in so that a distance of 30-40 mm remains from the back of the radiator to the wall.
Heavy cast iron radiators with more than ten sections should preferably be fixed with at least six brackets. For other types of batteries, four is enough.
Why do I need a set of plugs for tying radiators?
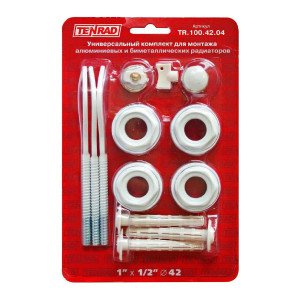
Set of plugs for tying radiators. Click on the photo to enlarge.
Each radiator has four open inputs (two on each side). This is done in order to avoid problems when connecting heaters, because the connection can be different: one-sided, cross, lower, one-pipe. Before installation, depending on the connection option, the radiators are prepared accordingly. Some entrances are closed with blind plugs, others are made through with ½ or ¾ inch threaded connections.
The procedure in which plugs and shut-off and control equipment are installed is called “packing” of threaded connections and is the most critical stage in the installation of a heating system. The reason is that after piping the radiators and starting the heating system, leaks can most often appear in these places.
The most common and effective type of battery connection in an apartment is considered to be a one-way connection, in which the supply is connected at the top left or right side of the radiator, and the “return” is connected from the same end of the battery from the bottom. To vent air from above, a Mayevsky valve is installed on the opposite side of the radiator, and the lower entrance is closed with a plug-plug.
Each heater must be equipped with a set of four plugs, three of which are through, and one is deaf. We determine the thread (right or left) at the entrances to the extreme sections of the radiator.Select plugs accordingly. The threads on the plugs can be half inch or ¾ inch diameter. We choose the diameter depending on the supply pipe. When connecting the twentieth pipe (outer diameter - 20 mm), a plug with a passage of ½ inch is selected. If the twenty-fifth pipe is connected, we take a ¾ inch plug. Such pipes are installed in a vertical single-pipe system when the battery is part of the riser.
It should be noted that the plugs have sealing gaskets, so there is no need to apply any windings. When screwing in the plugs, it is necessary to apply a noticeable effort, having previously cleaned the base with the help of a knife, to which the plug gasket is adjacent. This operation is best done even with new heaters.