Types of passage nodes through the ceiling
When crossing the ceiling, it is necessary to protect the materials of the “pie” from heat, and also somehow fix the pipe in a certain position. The ceiling cutting or, as it is also called the "passage node", copes with this task.
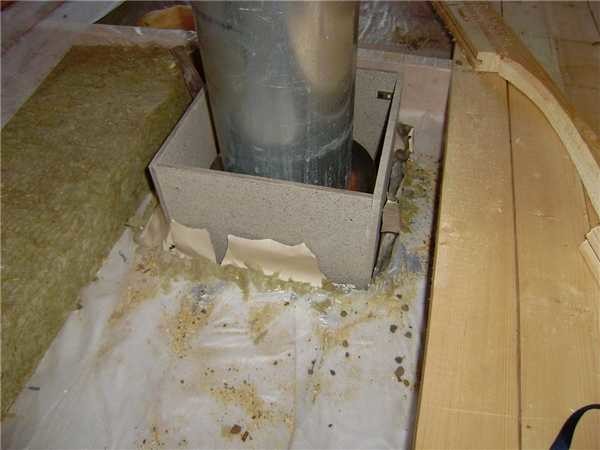
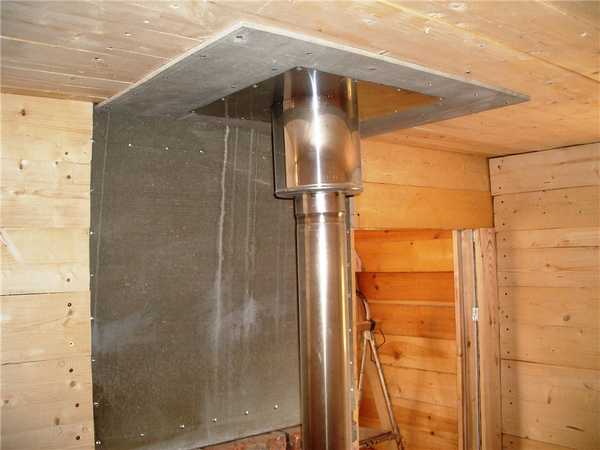
Passing nodes are industrial production. They are a box made of metal or mineralite, to which a plate of stainless or galvanized steel is attached on one side. A hole is made in the middle of this knot, which a sandwich is inserted into. The plate from the side of the room closes the hole in the ceiling, decorating it. It also serves as a support for a heat insulator, which, for better thermal insulation, fills the gap between the pipe and the floor beams.
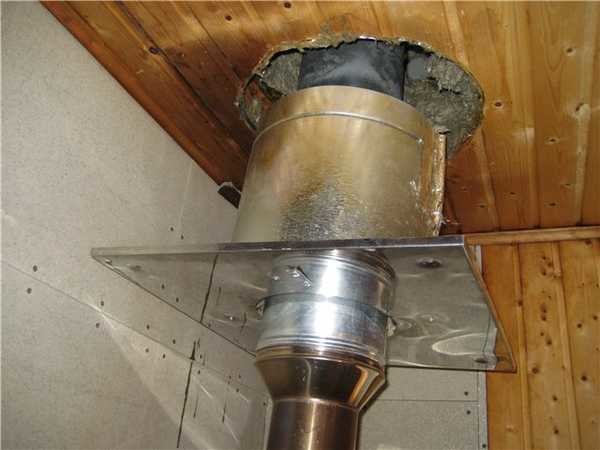
This is a minerite ceiling penetration. View from the attic
Regarding what material to use penetrations in the bath, there is no disagreement: only stainless steel. The fact is that at temperatures that are typical for steam rooms, galvanizing emits far from the most useful substances. Therefore, there is only one option: stainless steel.
Everything is easy to install. If the ceiling was made without taking into account the passage of the pipe, a square hole is cut out in the right place (between the beams), which is 1-2 cm smaller than the size of the decorative panel. Beams and boards are covered with a layer of heat insulator. If there is, you can nail strips of mineralite, basalt or asbestos-cement cardboard (asbestos is harmful, so use it only as a last resort), just a strip of stone wool insulation. In some cases, padding of the insulation with strips of metal is required (when it is needed, see below).
You can’t do this - you had to cut a square hole. And so the lining on the ceiling near the pipe was already charred ...
When installing the pipe on the furnace, the device is put on a straight section that will cross the ceiling. The passage node simply rises to the desired level. Under its edges, which touch the ceiling boards, a strip of heat insulator is placed, then everything is fixed with self-tapping screws. In many nodes, manufacturers even make perforations for self-tapping screws, so even this is not a problem.
The configuration of these products is different. Sometimes a metal cylinder is made around the hole for the pipe. The edges of the decorative plate protrude significantly beyond this cylinder. When installing a pass-through assembly of this type, the hole is still cut out in a square shape. A circle is also possible, but there must be a distance of at least 130 mm from the pipe to its edge if the pipe is insulated, and 250 mm if it is not insulated
With this option, please note: the size of the plate should be enough to mask the hole. In addition, with this form of passage through the ceiling, it is imperative to protect the wood of the ceiling not only with heat insulators, but also upholster it with metal strips
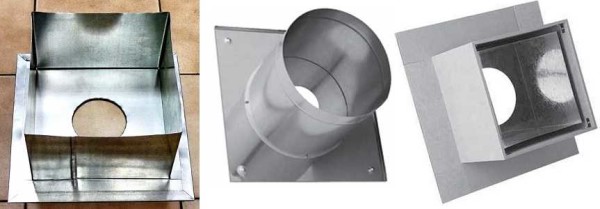
Passing nodes through the ceiling come in different configurations
There are passage nodes in which there is no cylinder around the pipe, but external boards are made around the perimeter. They are made of metal, and may be of mineralite. If the sides are made of metal, the edges of the cutout in the ceiling must be upholstered with a heat insulator (for example, basalt cardboard or the same mineralite). If the sides are made of mineralite, then they themselves are a good heat insulator. So additional thermal insulation of the cutout edges is not necessary (but you can play it safe).
Removing the pipe through the roof
When equipping the passage of a pipe through the roof, care must be taken to ensure that two conditions are met:
- passages through the roofing pie must be fireproof;
- the under-roof space should be protected from moisture penetration as much as possible.
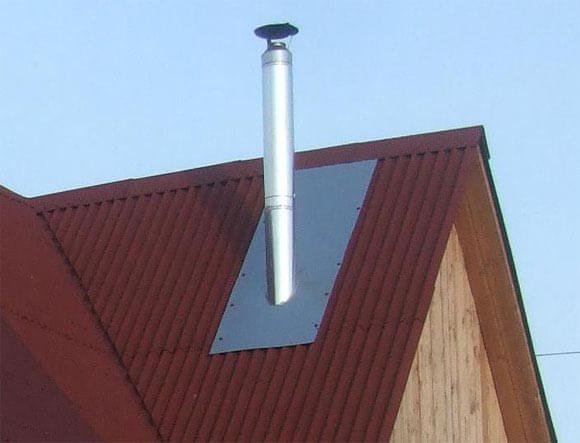
The conclusion of the chimney through the ridge allows you to carry out all the work quite simply.Due to the fact that the formation of snow pockets is impossible on the ridge, it is possible to achieve better protection against leaks. But at the same time, this method of installing the passage through the roof implies that the ridge beam will not have load-bearing functions in the construction of the rafter system. And this requires additional strengthening of the rafters themselves. In the presence of an attic, the installation of additional truss supports may be undesirable or simply impossible.
That is why developers prefer to install a chimney passage on a slope, directly at the ridge. In this place, a snow pocket also does not form, and besides, the truss system does not need additional reinforcement. But besides this, the location of the heating equipment also affects the choice of the place for the passage of the roof chimney. It should be remembered that the horizontal sections of the chimney should not have a length of more than 1 meter. In some cases, it is the location of the boiler that becomes the reason for choosing the method of passing the chimney through the ridge.
Professionals recommend avoiding the installation of a passage element in the valley (the place where two slopes converge with an internal angle), since it is especially difficult to install a roof passage at this point. As a result of rains and snowfalls, the junction may not be able to cope with moisture and as a result, the roof will leak.
It is important to keep the distance between the rafters and the roof in the range of 25-30 cm. If the roof is made of combustible materials (various types of roofing material, soft roof), then a gap of 13-25 cm must be observed between the material and the chimney wall
If the material is resistant to high temperatures, then this gap can be left minimal, and the pipe on the roof of the house is removed only from the crate.
If the roof is a “pie” consisting of hydro, steam and thermal insulation, then during the installation of the passage element, some difficulties may arise associated with a violation of the integrity of this layer. As a result of an error, the protective properties of the roof can be significantly reduced. In this case, the chimney can be installed in a separate box, which will isolate the roofing materials from the hot walls. The distance between the inner wall of the box and the chimney should be about 15 cm, while the free space is filled with non-combustible heat-insulating material. It is recommended to use mineral or basalt wool, as it is resistant to moisture.
Hydro and vapor barrier is brought to the box according to the standard method: the “pie” is cut in the shape of an envelope. The sheet of films is brought to the rafters and cross beams, where they are fixed with nails or staples. Then the waterproofing layer is pressed on top with bars, and the vapor barrier is pressed with a base frame for finishing materials of the attic or attic. After that, the joints of the films and the box are treated with a sealant and glued with a special tape.
How to install a chimney through a wall
The algorithm for installing a chimney through a wall is simpler than an outlet through a roof. However, there are certain installation requirements that you should be aware of when planning a sauna:
- A technological hole for the outlet of the pipe in the wall of the bath is made at a height of at least 1.2-1.5 m.
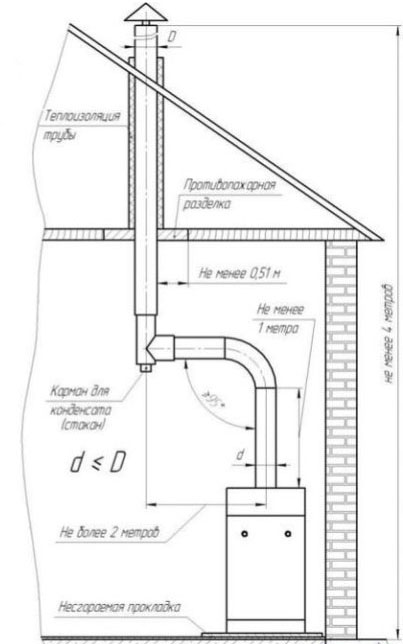
- The horizontal section of the pipe (from the furnace to the external turn to the vertical) should not exceed 1 m. The large length of this section leads to a significant reduction in draft, and a rapid clogging of the chimney with combustion products.
- The vertical section of the pipe running along the outer wall of the bath should not adjoin it by more than 1.5 m. The same distance is left when bending around the roofing influx.
- The distance to neighboring buildings when the pipe is led down the street through the wall is forbidden to be less than 1.5 m to your own building, less than 3 m to a neighboring building.
- For effective smoke removal, it is forbidden to make more than 3 turns of the pipe from horizontal to vertical position.
- The total length of the vertical section must be at least 5 meters to ensure effective traction.
- The pipe has no thermal insulation in the room. After passing through the wall, an insulated sandwich is taken out.
Installation chimney in the bath through the wall is carried out as follows:
- A segment with a damper (shaver) is connected to the furnace through a special adapter. The damper, as in a classic stove, regulates the level of draft. Its complete overlap prevents heat from escaping into the atmosphere after the furnace has gone out. Each joint is treated with a fire-resistant sealant and tightened with special clamps.
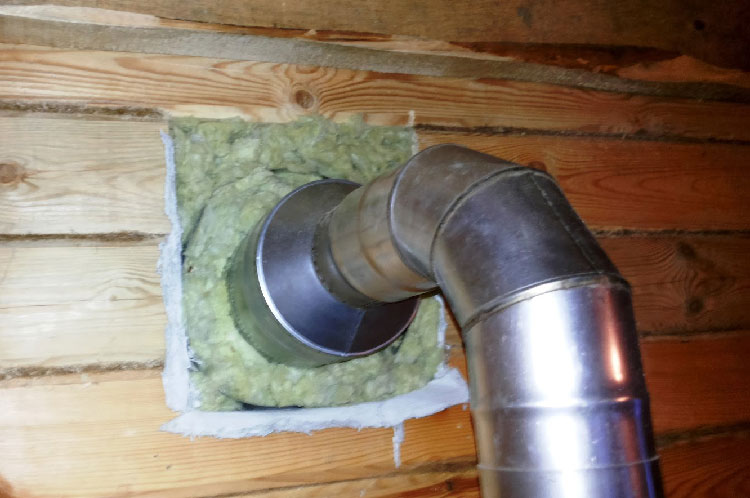
- A heat shield-reflector is installed on the wall, in the zone of the technological opening. The diameter of the hole is calculated so that the pipe wall does not reach the wall of the bath 45 cm.
- The pipe is brought out, closing the free space of the box in the wall with thermal insulation. Mineral wool is placed in a special metal mesh, which serves as a mechanical limiter.
- When withdrawing, the construction is continued with a tee. The lower opening of which has a plug, forming a container for collecting resin and condensate. Through this hole, the chimney is periodically cleaned.
- The vertical section leads directly to the roof peak. It is bent around the corners at 45 or 90 degrees. It is preferable to mount sharp corners for a smooth bend.
- The top of the chimney is decorated with a protective umbrella.
To hold the weight of the pipe from the outside, special supports are installed. In addition, after 50 cm, special brackets are installed on the wall of the house to hold the vertical structure in an immovable, fixed position.
We recommend that you read: Is it possible to pour polypropylene pipes into the screed?
The lower supports on the outside of the bath hold the weight of not only the vertical section of the structure, but also fix the horizontal knee, holding the guide axle away from the stove.
Passage through the roof of a brick chimney
The passage of the chimney through the roof must simultaneously solve two difficult tasks: to ensure fire safety and tightness. According to fire safety rules, in places where the chimney comes into contact with combustible materials, the temperature of the chimney walls should not exceed 50 ° C. For brick chimneys, this is solved by increasing the wall thickness. For this, the stove-makers lay out a special penetration. There is no single solution here, since a lot depends on the angle of the roof. Therefore, this option is not very popular today - it is difficult to find a person who can competently and safely make such penetration through the roof.
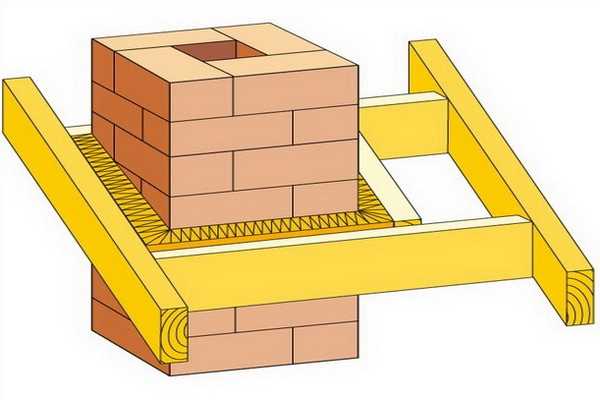
When a brick pipe passes through the roof, it is surrounded on all sides by a box of additional rafters and transverse beams
How is the issue then resolved? They simply make a square or rectangular pipe, which is brought out between the rafter legs, transverse beams are installed above and below the pipe. The distance between the pipe and wooden structural elements is 13-25 cm. If the distance between the rafters is greater, additional ones are installed. Thus, the damage that we will definitely cause to the hydro- and vapor barrier of the roof is minimized: in order to remove the pipe, it will be necessary to violate the integrity of the films and membranes. When installing the chimney, it turns out to be in a separate box. Films and membranes inside this box are carefully cut. The geometry of the cut is similar to the geometry of the pipe or box, but smaller than the dimensions of the box of rafters. In the corners, the films are cut at an angle (envelope), the edges of the films are folded and fixed with staples or clamping strips to the elements of the truss system. The edges and entry points of fasteners are sealed with adhesive tapes or sealants. This operation should be carried out carefully - the durability and reliability of the roof depends on it.
There is one more option. It is possible if the temperature of the pipe in the roof area is not higher than 50 ° C.In this case, the edges of the films can be glued to the pipe with sealants or the same adhesive tapes (trying to seal everything as best as possible). Now there is free space between the rafters and the brick pipe. It is laid with a heat-resistant heat insulator.
Drainage of water from joints
The most difficult thing is to seal the junction of a brick pipe and a roof if a hard roofing material is used.
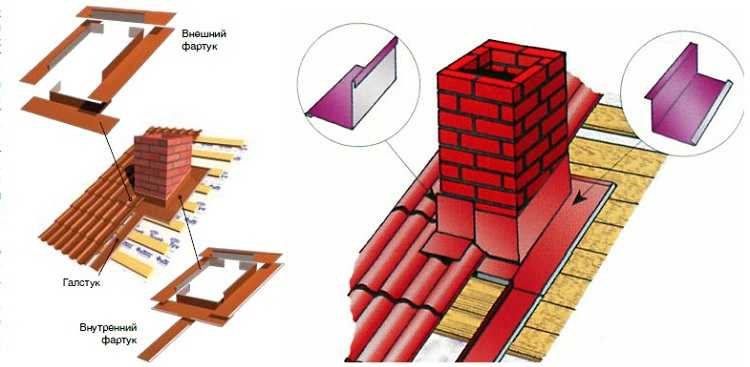
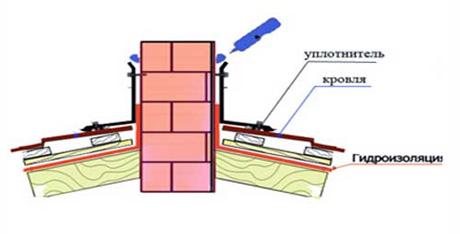
When removing the chimney through the roof, you need to solve the problem of waterproofing. To do this, use a system of two aprons: lower and decorative
First, a lower apron is installed around the pipe. It is usually made of tin and consists of four elements: two side, upper and lower parts. How to do it, see the next video. Everything is told in detail.
Under the lower apron, the so-called “tie” must be laid. This is a section of roofing material, a sheet of tin or galvanized metal that will drain water to the drain (the tie should be that long - go into the drain a little) if the chimney is low or into the valley if it is closer. The following video demonstrates once again the technique of installing the inner apron for a brick pipe, and also shows how the tie and outer decorative apron are installed.
In general, how many materials, so many ways to mount the pass-through node. Another video demonstrating another brick pipe waterproofing technique. Here they use modern materials that are produced by the manufacturers of Ondulin.
It is much easier to waterproof the joint between the chimney pipe and the roof if soft tiles or other soft flexible roofing material is used. On a plastered pipe, coated with impregnation for better adhesion, this material is simply bent and trimmed. It is possible to apply a layer of sealant along the curved roofing material and fix everything with a clamping bar. The place where the roofing material is connected, the pipe and the plank are also treated with a sealant. This video demonstrates the technique for sealing a chimney using soft tiles.
The concept of traction
Do not allow dripping condensate to form in the chimney, which gradually destroys the inner surface of the channel. This especially happens in the cold season, when there is a significant decrease in the temperature of the outside air. The process of precipitation of moisture droplets in the chimney also causes a violation of normal draft. A decrease in the rate of passage of gases from combustion products occurs not only with the internal formation of condensate, the traction force is affected by the humidity of the outside air, which can have different values depending on the weather. A deflector installed above the chimney will help to ignore this indicator.
Is it possible to make a chimney in a small bath without holes in the roof
Hello! I want to make a small steam room, 4-5 squares. I don't want to make holes in the roof. Is it possible to bring the chimney immediately into the wall, and then up? Oleg
Expert answer
Hello Oleg!
The chimney you are interested in is called external (or side) and is widely used by European and American builders. In Russia, they prefer internal chimneys - they allow you to increase the heat transfer of the furnace and correspond to domestic architectural traditions.
To lead the pipe through the wall, special elbows are used, or, in other words, bends with a bend at various angles, which allows for installation in the most convenient way. From the outside, a tee is installed on a horizontal or inclined section, to one outlet of which the vertical part is connected, and the second is closed with a plug and subsequently used to clean the channel from soot and carbon deposits. To fix the chimney in a vertical position, special clamp holders are used.
For the proper arrangement of the attached chimney, we recommend that you listen to the recommendations of experienced stove-makers:
- to avoid a drop in thrust, as well as to reduce soot formation, the length of the horizontal section should not exceed 1 m;
- the upper cut of the pipe must be protected with a cap, which will protect the flue from precipitation;
- the outer part of the chimney must be insulated - this will prevent the formation of condensate and normalize draft in the winter;
- the use of round pipes is preferable to rectangular ones, due to the fact that the former create less resistance to the movement of heated gases;
- the cross-sectional area of the chimney must correspond to the power of the thermal unit;
- at the place where the pipe passes through the wall, it is necessary to install a fireproof cut. Joints within sections are not allowed.
We, in turn, recommend equipping a horizontal section under the ceiling. Thus, the most heated part of the chimney will be inside the room, giving off additional heat. In addition, a water heat exchanger is often installed in this area, with the help of which hot water is obtained.
As you can see, a properly designed outdoor chimney allows you to reap the same benefits as an indoor chimney, and at the same time does not require, as you say, "hole through the roof", although it has a slight complication in terms of configuration.
stroy-banya.com>
Other articles
Passing a pipe through a chimney without a factory outlet
It is possible to remove the chimney without a passage device. In this case, the edges of the hole in the ceiling are also sealed with a fire-resistant heat insulator, and metal strips are stuffed on top of it. A protective plate made of non-combustible material is put on the sandwich coming from the oven, in which a hole of a suitable diameter is cut, and holes for fasteners are drilled along the edges. Traditionally, this is a sheet of metal. Next, the sandwich is passed into the hole in the ceiling, fixed there with the help of any non-combustible guides. For example, you can use drywall profiles or something similar. The main thing is to securely fix the pipe and observe the basic fire safety rule: there must be a distance of at least 36 cm from the edge of the pipe to combustible material.

You can make a passage through the ceiling with your own hands
Important! When installing and fixing the chimney, keep in mind that the pipe changes its dimensions due to thermal expansion. It must be fixed so that it can move relative to the roof
Then from below (from the ceiling) the pipe is hemmed with non-combustible material. From the side of the attic or the second floor, the voids formed in the cutting are filled with a heat insulator. The requirements for it are the same: tolerance to high temperatures. Expanded clay may be the most budgetary. Actually, this is the end of the chimney pipe through the ceiling.
You can make a passage through the ceiling with your own hands
Chimney installation
Here is information on how to bring the chimney through the wall with your own hands. Installing the chimney through the wall is easy to do with your own hands.
General points
To prevent the insulation from melting, the first part of the chimney must be made in the form of a pipe segment without a heat-saving layer. Fasteners are installed at a height protected from overheating. From here you can mount a sandwich pipe.
Installation is carried out in two ways:
- Raise the pipe system in the room closer to the ceiling, then bring them out.
- The pipes are led out through the wall at the level of the smoke outlet exiting the boiler. In this embodiment, only one connecting elbow is formed. Therefore, traction will be better.
Fastening the sandwich pipe closer to the ridge.
The boiler or furnace is installed on a non-combustible base. The surface of the wall in contact with the boiler must also be insulated. Most often, a sheet of metal is attached to the wall and floor as a base.
How to bring a pipe through the roof
To organize a hermetic junction of the roof to the chimney, an internal apron is created at this point. To create it, use the lower junction bars. The strips are applied to the walls of the chimney, where its upper part is marked. On this line, a grinder makes a strobe. Then dust is carefully removed from the formed border. This is done so that small particles of sand and cement do not get on the surface of the waterproofing or roofing. In some cases, fine grains of sand will turn into an abrasive over time, which can seriously damage the roofing material.
The lower apron begins to be installed from the bottom wall, while only one part of the apron is inserted into the strobe. Similarly, this element is attached around the entire perimeter of the chimney. Separate elements must be overlapped with an overlap of 15 cm. The joints are sealed.
For chimneys with a circular cross section, you can purchase special passage elements in hardware stores, consisting of a steel sheet and an apron cap. Their use allows you to significantly speed up the work on the equipment for the passage of the chimney pipe through the roof. A purchased or manufactured apron should be securely fixed to the roof. At the same time, it is not rigidly fixed with the chimney, since the expansion of the material or the shrinkage of the truss system can cause damage to the chimney with an apron (be sure to read: “ Roof penetration - device“).
The passage of the chimney pipe through the roof, detailed video instruction:
At the junction of the pipe and the apron, a skirt is installed - a steel clamp, which is fixed using a heat-resistant gasket. This approach allows you to significantly improve the waterproofing of the roof in this place. Upon completion of the installation of the apron, it is necessary to apply sealant to all junctions of the element and the chimney. This contributes to obtaining a reliable connection that does not leak.
Features of the chimney
The removal of gases through the channel will be effective only if the pipe is built according to standard sizes from the correct material. These characteristics of the pipe are selected depending on the type of fuel, the material for the chimney is:
- refractory ceramic bricks;
- asbestos pipes;
- stainless steel;
- sandwich pipes with an inner layer of insulation.
Brick channels are made in the case of a stationary chimney, which provides the removal of gases when heated with wood and coal
To determine the diameter and internal size, the power of the boiler and the dimensions of the furnace are taken into account. If the calculation is incorrect, reverse thrust is obtained or the efficiency of the furnace is significantly reduced
For gas boilers, it is effective to use pipes with two walls, between which insulation is laid. The disease of the chimney for a gas-fired boiler is internal condensate, so insulation will help to avoid a significant temperature difference.
It is allowed to arrange one chimney for two operating heating units, if the internal size of the chimney, raised to the required height above the roof ridge, allows you to freely remove combustion products from both furnaces. The pipe of the cutting section is made with a height of about 0.8 m.
Dependence of thrust on pipe height
The importance of a chimney in a heating system cannot be overestimated. Attempts to save on an extra meter of pipe will lead to cold walls during the heating season and excessive fuel consumption.
The danger of carbon monoxide is that it is invisible and odorless, but can be fatal.
A narrow chimney of great height relative to the ridge will accelerate the smoke masses, thus reducing heat transfer. To maintain the desired temperature in the room, you will have to add fuel in excess of the norm. A wide channel of small height will allow the smoke and gases in the pipe to randomly rotate, their movement will slow down, most likely, a reverse flow of gases will result.Most often this happens in autumn or spring, when the temperature difference between outside and inside decreases and the smoke, without overcoming resistance, is drawn into the room through the firebox.
Location and height of the chimney
In order to correctly choose the height of the chimney relative to the roof ridge, it is necessary to take into account the location of nearby structures. For an outdoor house, the draft performance will be good, as there is a constant blowing and pickup of smoke masses. If we talk about a small building surrounded by high-rise buildings, then the length of the pipe should be increased. The height of the chimney depends on several factors:
- slope of the roof plane;
- the location of the channel on the roof plan relative to the ridge;
- location of surrounding buildings and trees;
- the estimated thickness of the snow cover in a particular area.
When installing a chimney, you should determine:
-
elevation of the pipe relative to the roof ridge;
- the total length of the smoke channel from the stove;
- type and dimensions of the head;
- the height of the chimney relative to ventilation, windows of neighboring buildings.
Pipe length selection rules
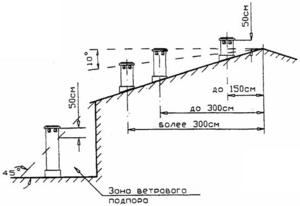
If the pipe exits the roof at a distance of 0.5 m to 1.5 m from the roof ridge, then according to the norms, it should rise 0.5 above it. This saves chimney material and provides the most efficient heating. In this place, during the snowfall, the least amount of snow accumulates, which eliminates leaks during melting. The standards stipulate that the calculated length obtained should not be less than 5 meters, if measured from the surface of the grate to the upper edge of the pipe.
When the chimney exits to the surface more than 3 meters from the ridge, a horizontal line should be drawn from the highest point, and lower it by 10º relative to the horizon. Above it, the head of the pipe ends. If other buildings are built nearby, then the height of the chimney is taken higher than the neighboring roofs. For very high neighboring houses, the 45º rule is applied, that is, a straight line is drawn under this degree from the neighboring roof to the one where the chimney is made, and the head is arranged a little higher than the mental line.
Types of chimneys for a bath
There are two fundamentally different types of chimney:
- Internal (classic). The pipe is led out through the ceiling of the room and the roof.
- External, which in our country has become widespread not too long ago. When arranging this type of chimney, the pipe is led out through the wall, its main part is led along the street.

Internal chimney
The internal chimney device in the bath is traditionally used for brick ovens. In this case, the pipe is also folded out of brick. Install a classic draft control damper. The channel is led vertically from the furnace through the ceiling, then to the street through the roof.
We recommend that you read: How to properly replace pipes in the sewer system
This type of smoke extraction device involves two technological openings that need thermal insulation and high-quality waterproofing. Not every lover of his own steam room can do difficult work on his own. The disadvantages of a budget bath include the bulkiness of a brick oven and pipe construction. In small steam rooms, such a structure can occupy up to half the area.
An internal chimney with wells and a stove bench can also be made in the bath. A warm wall will allow you to keep maximum heat, which will not be out of place in the northern latitudes. Here it is better to hire a professional and arrange the transitions according to the requirements. At the same time, the internal chimney in the bath will save money on heating.
It is much easier to install a ready-made solid fuel stove in the bathhouse and bring the pipe through the wall in the bathhouse with your own hands.
Chimney Requirements
There are two main requirements for a chimney:
- It must work effectively, removing combustion products quickly and completely. To do this, calculate the diameter and length of the pipe for a particular furnace.The stove in the bath has a simple device with a direct output of combustion products (unlike a room stove, where the chimney has winding passages - wells) for maximum heat transfer. An inefficient chimney threatens with the accumulation of carbon monoxide, which is deadly to humans.
- It must be safe. All sections of the pipe are isolated from the walls, ceiling, roof, depending on how the smoke exhaust is mounted. Fire safety requirements include strict standards for the distance from flammable structures, neighboring buildings.
Additional requirements are high-quality hydro and thermal insulation of the pipe from temperature changes and environmental influences. To comply with all the above requirements for chimneys, installation standards and rules have been developed, which indicate the exact dimensions and distances that are observed at the stage of manufacturing a chimney project.
Conclusion of the smoke channel to the roof
Before you bring the pipe in the bath through the roof, you need to take care of two factors necessary for the operation:
- choose the location of the output;
- purchase the necessary items.
Place to withdraw
The output of the pipe through the roof of the bath can be done:
on the ridge of the roof. This arrangement of the chimney is considered the most optimal, since snow and other precipitation do not accumulate in this place and good draft is provided. However, this is not always feasible in practice;
Chimney located on the ridge
close to the horse. The location must be based on the rules shown in the figure:
Rules for the location of the chimney channel on the roof of the bath
In no case should a chimney be located in a valley (a recess on the roof resulting from several slopes).
Required Items
Installing a pipe in a bath through the roof is impossible without the following elements:
- cutting, similar to the passage through the ceiling;
- insulating material (compliance with safety rules);
- a special apron that protects the chimney from precipitation.
Cutting can be used both ready-made and equipped independently.
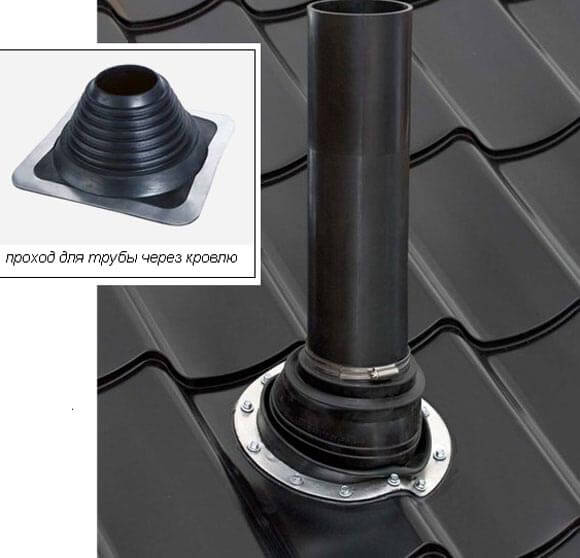
Aprons can be:
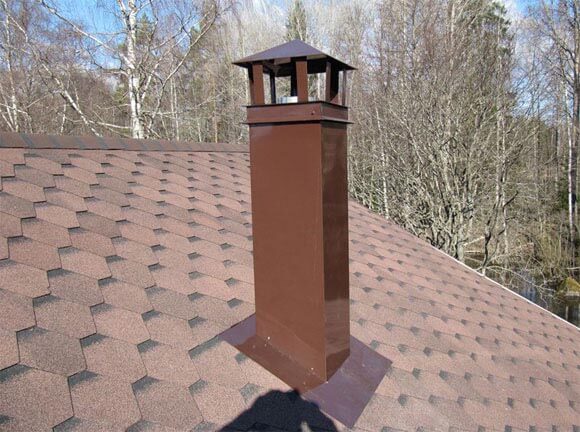
metal, providing a rigid abutment of the structure to the roof surface;
metal apron
flexible, made of rubber or silicone;
flexible apron
embedded in a sheet of roofing material.
Sheet with built-in apron
The size of the apron is determined based on the diameter of the chimney pipe.
Pipe withdrawal instructions
How to bring the pipe in the bath through the roof? For this you need:
- make a hole of a suitable size in the selected place on the roof (slightly larger than the output pipe);
- around the hole to carry out strengthening work on the floor beams;
- from the inside of the roof, install the cutting, as when crossing the ceiling;
- remove the pipe of the desired size;
- install an apron in the outer part of the roof.
The scheme of arrangement of the passage through the roof
Thus, knowing the fire safety rules and instructions for arranging the main components, the chimney for the bath can be mounted independently. To do this, you must purchase all the materials and basic elements of the system. Before the first flooding of the furnace, it takes time to dry the sealants used (approximately 1 day) and check the tightness of all joints of the chimney channel.