Making a solar collector alternative heating in your home
 Recently, the interest of ordinary people in renewable energy sources has increased. In view of this, many homeowners are looking to buy a solar collector for home heating, which converts the energy of the Sun to heat water. But the decision to buy a solar collector for heating in a store is not always rational. The cost of the finished device is far from budgetary, so such a purchase can hit the family budget hard.
To avoid spending, you can make a solar vacuum collector for heating yourself. Various solar collectors for home heating, reviews of which are positive, have the following design details:
- container for accumulating heated water;
- heat exchanger;
- device for collecting solar energy;
- insulating layer.
 The materials from which the collector can be made are very diverse. Known technologies for self-production of solar collectors from polypropylene, ordinary garden hoses, window frames, plastic bottles, old refrigeration units and other improvised materials. The collector assembly scheme directly depends on the type of material chosen, so it should be studied after the owner has decided on the concept of the collector.
Self-made vacuum solar collectors for home heating, which cost $ 200 or more in the store, can be used as full-fledged sources of heating.
Vacuum solar collectors have several advantages: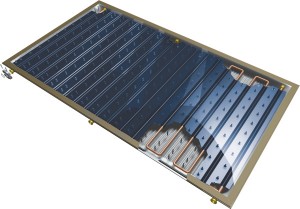
- energy efficiency;
- environmental friendliness;
- autonomy;
- availability.
 It is not difficult to make traditional distribution or solar collectors for home heating with your own hands. This does not require large material costs, the availability of complex technological equipment and solid experience. However, these homemade devices will greatly optimize the heating system of the house and help the owner to create a reliable, efficient and uniform source of heating for his home.
What is it needed for
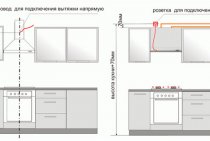
When installing water pressure systems, there is a rule: the total diameter of all branches should not exceed the diameter of the supply pipe. With regard to heating equipment, this rule looks like this: if the diameter of the boiler outlet fitting is 1 inch, then two circuits with a pipe diameter of ½ inch are allowed in the system. For a small house, heated only with radiators, such a system will work efficiently.
In fact, there are more heating circuits in a private house or cottage: warm floors. heating of several floors, utility rooms, garage. When they are connected through a tapping system, the pressure in each circuit will be insufficient to effectively heat the radiators, and the temperature in the house will not be comfortable.
Therefore, branched heating systems are performed by collectors, this technique allows you to adjust each circuit separately and set the desired temperature in each room. So, for a garage, plus 10-15ºС is enough, and for a nursery, a temperature of about plus 23-25ºС is required. In addition, warm floors should not heat up more than 35-37 degrees, otherwise it will be unpleasant to walk on them, and the floor covering may be deformed. With the help of a collector and a shut-off temperature, this problem can also be solved.
Video: using a collector system for heating a house.
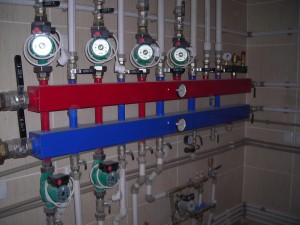
Collector groups for heating systems are sold ready-made, while they may have different configurations and the number of taps.You can choose a suitable collector assembly and install it yourself or with the help of specialists.
However, most industrial models are universal and do not always fit the needs of a particular home. Their alteration or refinement can significantly increase costs. Therefore, in most cases it is easier to assemble it from separate blocks with your own hands, taking into account the features of a particular heating system.
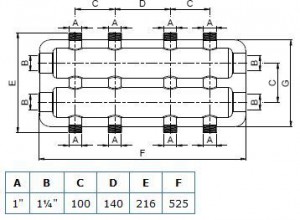
Collector group for heating system assy
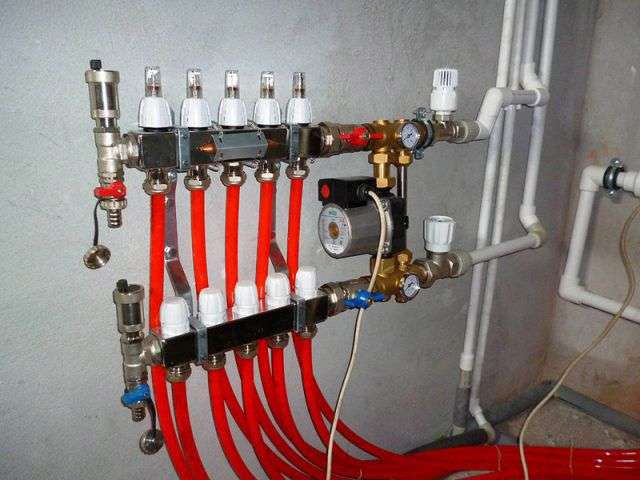
The design of the universal manifold group is shown in the figure. It consists of two blocks for direct and reverse flow of the coolant, equipped with the required number of taps. Flowmeters are installed on the supply (direct) manifold, and thermal heads are located on the return manifold to control the temperature of the return water in each circuit. With their help, you can set the required flow rate of the coolant, which will determine the temperature in the heating radiators.

The manifold distribution unit is equipped with a pressure gauge, circulation pump and air valves. The supply and return manifolds are combined into one unit with brackets, which also serve to fix the unit to a wall or cabinet. The price of such a block is from 15 to 20 thousand rubles. and if some of the taps are not involved, installing it will be clearly inappropriate.
The rules for mounting the finished block are shown in the video.
Comb - manifold assembly
The most expensive elements in the manifold distribution block are flow meters and thermal heads. To avoid overpaying for extra elements, you can buy a collector assembly, the so-called "comb", and install the necessary control devices with your own hands only where necessary.
The comb is a brass tube with a diameter of 1 or ¾ inches with a certain number of branches with a diameter for heating pipes ½ inch. They are also connected to each other by a bracket. The outlets on the return manifold are equipped with plugs that allow you to install thermal heads on all or part of the circuits.
 Some models can be equipped with taps, with their help you can adjust the flow manually. Such combs have a cast body and are equipped with a fitting / nut thread at the ends, which allows you to quickly and easily assemble a manifold from the required number of taps.
In order to save money, the collector for heating systems can be assembled from individual elements on your own or completely done by yourself.
Preparatory work
Before you make a distribution heating manifold with your own hands, you need to stock up on tools and perform a series of calculations - determine the length of the comb, the number of heat supply circuits and the internal section of the connected pipes
It is important that the hydraulic balance is observed in the design. To do this, make sure that the throughput of the collector nozzles corresponds to the sum of the same characteristics of the connected circuits
This is the key to the reliability and durability of the collector.
 The correct calculation of the heating collector can be carried out independently using special programs, or using the services of heat engineers. It is worth taking the calculations scrupulously, since their correctness will determine the correct assembly of the collector.
After making the calculations, the owner of the house should prepare the following components:
- stem valves;
- flow meters;
- shut-off and control valves;
- pipes with different diameters.
Also, the process of self-manufacturing of the collector provides for the presence of a certain tool for work:
- building level;
- welding machine;
- Bulgarian;
- consumables for soldering;
- protective equipment (glasses, gloves, overalls).
Collector device and principle of operation
The node is an element in the form of a comb, from which conclusions for connecting heating devices extend. The number of withdrawals may vary.If necessary, the element can be extended with additional taps. Drainage and air outlet valves, as well as heat meters can be installed on the collector. The outputs can be equipped with regulating or shut-off valves, which makes it possible to regulate or turn off the coolant flow. The device is installed in the heating system in the form of a collector block, which includes a return and supply comb, equipped with exhaust valves and corresponding taps.
The collector heating system functions quite simply. The coolant, heated by the boiler to the desired temperature, enters the supply comb. Here it is distributed between heating devices. A pipeline is laid to each of them, through which the coolant is directed. In the radiator, which has given up part of its heat, the liquid is partially cooled, and through another pipe it enters the return comb and from there to the boiler. This distribution contributes to the uniform heating of the radiators, since each of them has a separate supply pipe.
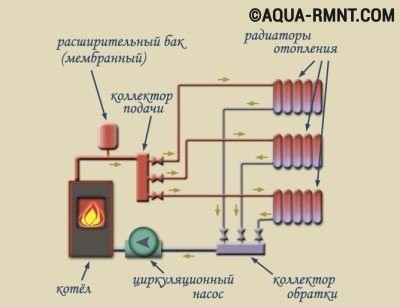 The coolant heated in the boiler goes to the supply manifold, where it is distributed through pipes suitable for each radiator. The cooled liquid through the return manifold is sent back to the boiler
Note! The distribution comb of the heating system, installed on each floor of the heated building, allows you to get floor-by-floor separate heating circuits with autonomous control. If necessary, you can turn off the heating of the entire floor or only a few devices, which greatly facilitates the maintenance and repair of the system
This will not affect the functioning of the entire structure at all. The use of a collector increases the efficiency of the equipment, since devices that regulate the temperature and pressure of the coolant, as well as flow meters can be installed on its outputs.
Classification
Since the device of the distributing unit is not too complicated, it will not be possible to single out any fundamentally different types of it. Although manufacturers offer to classify hydraulic valves according to their purpose: for installation in a boiler room, for underfloor heating or for connecting radiators. In fact, the principle of operation of the collector does not change, and the difference can only be in the number of "teeth" of the comb (2-12), as well as the features of the material of its manufacture:
1. Steel is a common option that can withstand pressure up to 10 atm. It has a democratic price and an abundance of fakes on the market, especially among stainless steels.
2. Copper - calmly holds up to 30 atm with crazy heating at +600 ° C, but not every heating system can “make friends” with it. If there are aluminum elements in the circuit, such a collector will have to be abandoned.
3. Polymers - the cheapest and weakest type of combs, which is made from polypropylene. They work in piping with a pressure not exceeding 6 atm, and are only suitable for underfloor heating.
4. Brass is an expensive and reliable metal for heating equipment. It is not afraid of corrosion and withstands pressure up to 14 atm.
Additional auxiliary devices slightly expand the range of combs, increasing their functionality. These can be control elements, valves, mixers, built-in sensors and automatic control systems. The more complex the heating distribution manifold, the higher its price. On the other hand, all this equipment, one way or another, will have to be bought separately, and it is better that it is already supplied as a kit - adjusted to size and does not require self-installation.
Pipe selection
Before starting work directly related to the creation of a heat supply system, it is required to coordinate the main parameters of pipelines.First of all, the source of thermal energy, the inlets and outlets to the collector, as well as the pipeline must be of the same diameter. Otherwise, when using pipes of different diameters, adapters are used. Their installation requires additional material costs and time for installation.
The supply and return pipes, through which the coolant moves, are made of different materials, but experts recommend using polypropylene pipes (for more details: “Do-it-yourself installation of a heating system from polypropylene pipes“).
Their advantage lies in the availability, practicality and ease of use during installation work. The selection of polypropylene pipes should be based on hydraulic calculations.
Failure to comply with the required diameters for pipes leads to such negative consequences as:
- violation of the circulation of the coolant;
- airing the heating circuit;
- uneven heating.
Purpose of the heating collector
In any heating system, one important rule must be observed - the diameter of the pipe leaving the boiler must match or be slightly less than the total diameter of all circuits connected to this boiler. Failure to comply with this rule consistently leads to uneven distribution of the coolant
For example, consider a system to which three isolated circuits are connected:
- Radiator heating;
- Warm floor;
- Indirect heating boiler providing hot water supply.
The diameters of the nozzles at the outlet of the boiler and at the inlet of each of these consumers can be the same, only the total value of the latter will be an order of magnitude larger. As a result, a very simple phenomenon arises - the boiler, even if it operates at full capacity, is simply not able to simultaneously ensure the operation of all the circuits connected to it. Because of this, the temperature in the house decreases.
Of course, you can try to use all the circuits in turn so that they do not load the boiler at the same time. In theory, such measures seem possible, but in practice they turn out to be nothing more than half-measures - after all, the constant “juggling” of contours cannot be called an attribute of comfortable living in a house.
To get rid of such problems, a distribution manifold must be installed in the system. Typically, stainless steel pipes are used to make such collectors, but other options can be used - for example, polypropylene collectors for heating are often found.
The design itself is a device with a set of nozzles for the inlet and outlet of the coolant, as well as its separation into separate circuits. Adjustment of all operating parameters is carried out using shut-off valves, which are equipped with any collector.
The main function of the distribution manifold is reflected in its name - it distributes the coolant over separate circuits, and the intensity of its supply can be adjusted on each branch pipe. The result is several circuits that are completely independent of each other, each of which operates in its own temperature regime.
Of course, there is always the opportunity to simplify your work and purchase a ready-made collector, but such a solution has drawbacks.
So, the production of heating collectors at the factory simply cannot take into account the features of each heating system, so you will have to compensate for the characteristics of the collector with additional elements - and these are extra costs. Homemade devices may lose in versatility to factory ones, but they are much better suited for arranging individual projects.
Functional purpose
Let's start with the fact that there is one very important rule, and if you do not strictly adhere to it, then the heating system at home will not work well.This rule states that the diameter of the outlet pipe of the heating boiler must always be equal to or slightly less than the total diameter of all circuits consuming the coolant
The best option if it is more.
For comparison, we give an example of a wall-mounted unit in which the diameter of the outlet pipe is ¾ inch. Imagine that three separate circuits will be heated due to this boiler:
- The main heating is a radiator system.
- Warm floor.
- Indirect heating boiler, which will use water intended for household needs.
Now imagine that the diameter of each circuit is at least ¾ inch, like the boiler. But the total figure will be three times higher. That is, no matter how you want, it will be simply impossible to give out the required amount of coolant through the diameter of the heating boiler nozzle so that it is enough for all three circuits. Here you have a decrease in heat transfer over the entire area of \u200b\u200bthe house.
Of course, individually, all circuits will work fine. For example, the main circuit (radiator) without the inclusion of underfloor heating will completely overpower the heated space. But as soon as you turn on the underfloor heating system, everything, neither here nor there, will not be enough coolant. The coolant has enough temperature, but its volume is not enough.
This rather serious problem is solved by installing a distribution manifold in the heating system. In fact, this is a structure made of stainless metal pipes, in the device of which devices are installed for the input and output of the coolant distributed along the circuits. To control the temperature, pressure, flow volume and speed, shut-off valves are installed along the outlets, which performs all the necessary functions.
Most importantly, with the help of a distribution manifold, you can control the temperature in a single room. And it will not affect the neighboring rooms and the temperature of the house as a whole.
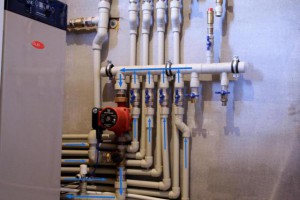
Collector device
The collector consists of two pipes:
- Connects the supply pipe from the boiler to the supply circuits of heating systems. This compartment helps the distribution of hot water. His device is especially helpful when there is a question of repairing one or another branch. At the same time, on a certain circuit, where it is necessary to carry out repair work, the shut-off valve closes. It simply shuts off the coolant supply.
- The return compartment regulates the pressure inside each circuit, which is how the quality of the coolant movement is achieved. And, therefore, the quality of heat transfer of heating systems.
Anyone who does not understand what the essence of the installation of a distribution manifold is, begins to build various additional installations into the heating system: a circulation pump, valves for various purposes, and so on. Let's face it, this will not help, with their help it is impossible to increase the volume of the coolant. You will simply make unnecessary expenses that will be in vain.
Attention! If you are the owner of a large multi-storey building, it is recommended to install a separate distribution manifold for each floor
Types of collectors in the heating system.
The collector for heating systems can be of the following types:
- Distribution - it is a pipe of round or square section with bends. Branches have different thread diameters. A boiler is connected to the outlets of a larger diameter, and heating devices are connected to the outlets of a smaller diameter. One such collector is installed on the supply pipe, the second on the return pipe. We look at the photo:
- Balancing - combines two distribution manifolds and a hydraulic arrow (hydraulic divider). This is a product that is already ready for installation in the system, to which it remains only to attach all the other equipment. It all looks like this:
Now let's take a closer look at their internal structure.
Where is the best place to install the equipment
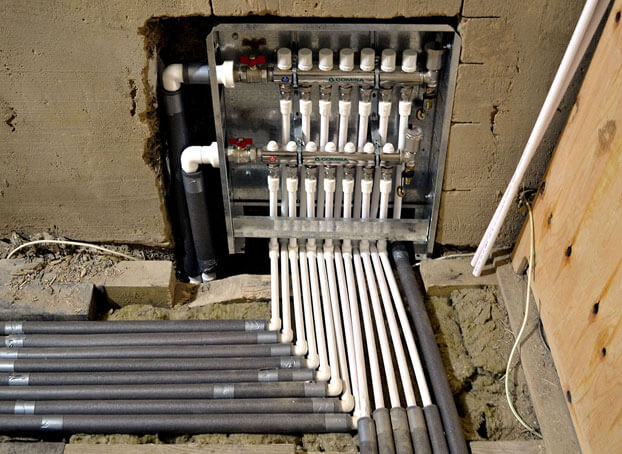
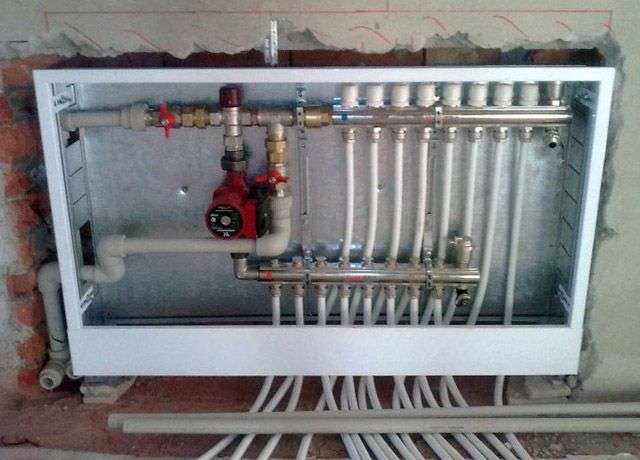
The ideal option would be to choose a place to install the collector during the design of the heating system. If the building has several floors, each has space for a collector block. Most often, a niche is arranged under it in the wall, located at a small height from the floor. It should be kept in a room protected from excessive moisture. It can be a pantry, a corridor, etc.
The device can be mounted directly on the wall if it is installed in a utility room, or placed in a special manifold cabinet. The cabinet is a metal box with a door and stamping for pipes in the side walls. Inside the equipment, special fastenings for the manifold block may be provided. You can find an overhead or built-in cabinet option.
Properly installed collector distribution of water heating guarantees the reliability and efficiency of the system. The possibility of leaks, due to the small number of connections and tees, is minimized. Hidden wiring is also possible, which does not violate the aesthetics of the room. And besides, you will agree that it is very convenient to regulate the heating temperature of each radiator and the entire room as a whole. A reliable system will be a real boon for those who appreciate their own comfort.
Accessories and rules for soldering polypropylene pipes
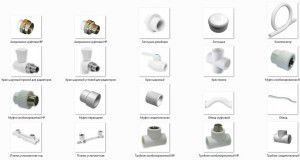
Types of fittings for polypropylene pipes
The connection of polymer pipes can be performed in several ways - soldering, detachable or one-piece fittings, gluing. Diffusion welding is best for installing water heating with your own hands from polypropylene. The main connecting element in this case are the fittings.
It is important that the quality of the purchased components is not inferior to the pipes. All fittings for pipes made of polypropylene for heating do not have reinforcement
This is compensated by a thicker wall. They differ in appearance and scope:
- Couplings. Designed to connect individual pipes into a single line. They can be both of the same diameter, and transitional for joining pipelines with a spill section;
- corners. Scope - production of corner sections of highways;
- Tees and crosses. Necessary for dividing the highway into several separate circuits. With their help, a collector for heating is made of polypropylene;
- Compensators. Hot water provokes thermal expansion of pipelines. Therefore, before soldering heating from polypropylene, compensation loops should be installed that prevent surface tension from appearing in the line.
Before starting the soldering process, it is recommended to calculate the amount of all consumables: pipes, fittings and valves. For this, a heat supply scheme is drawn up indicating the configuration of each node.
During the installation of polypropylene heating, it is necessary to use a special type of shut-off valves designed for soldering.
Self-brazing polypropylene pipes
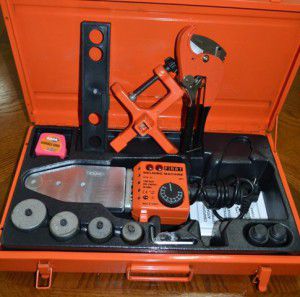
A set of tools for soldering polypropylene pipes
In order to make heating from polypropylene, you should purchase a minimum set of tools. It includes a soldering iron for pipes, special scissors and a trimmer. The latter is necessary for stripping the pipes from the reinforcing layer in the soldering area.
Before soldering heating from polypropylene, the required pipe size should be cut off. For this, special scissors with a base for the nozzle are designed. They will provide an even cut without distortion.
For self-installation of heating from polypropylene, you will need to perform the following steps:
- Degrease the soldering point on the nozzles.
- Using a trimmer, remove the reinforcing layer from the heating zone.
- Turn on the soldering iron and set it to a certain temperature.
- After heating the mirror, install the nozzle and the coupling into the nozzles. It is impossible to make axial rotations during heating of polypropylene.
- After a certain period of time, dock the branch pipe and the coupling with each other.
- Wait for the final cooling.

The procedure for soldering polypropylene pipes
Using this technology, you can make a reliable heating system from polypropylene with your own hands. The advantage of this method lies in the possibility of soldering on already mounted sections of the trunk. In this way, you can quickly repair the heating of a private house with your own hands from polypropylene.
An important point during the self-soldering of water heating from polypropylene is the heating time of the workpieces. It depends on the pipe diameter and wall thickness. With insufficient melting of the material, the diffusion process will be low, which will eventually lead to delamination of the joint. If the pipe and the coupling are overheated, a part of the material will evaporate, and as a result, a strong decrease in the external dimensions will occur. Therefore, for the installation of heating from polypropylene, one should adhere to the recommended heating time for plastic, depending on its diameter and wall thickness.
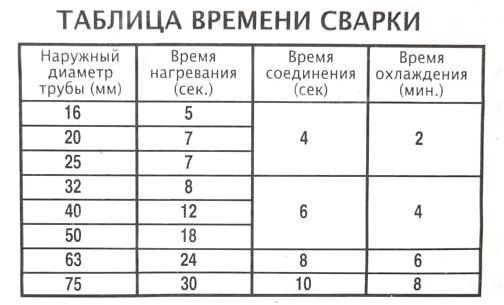
Table for soldering polypropylene pipes
During self-installation of polypropylene with your own hands, good ventilation in the room is necessary. When plastic evaporates, its volatile components can enter the respiratory system.
For a small amount of work, you can purchase a non-professional soldering iron worth up to 600 rubles. With it, you can solder a polypropylene heating system for a small house or apartment.
Homemade collector
It is important to follow the direction
Making a homemade distribution manifold must begin with planning. You need to determine for yourself some components of the heating network at home.
- The number of circuits where the coolant will be directed.
- Number of heating equipment. Do not forget to decide on its power, water temperature and so on. That is, you will need its technical characteristics.
- If in the future you plan to integrate additional heating elements into the heating system, for example, a heat pump or solar panels, then it is best to take them into account in advance.
- Number of additional equipment (pumps, valves, fittings, storage tanks, thermometers, pressure gauges, etc.).
Now the design of the device is being determined, it is especially necessary to take into account how each circuit will fit and from which side (bottom, top, side)
We draw your attention to some of the nuances of connection
- Gas or electric boilers are connected to the collector either from below or from above. If a circulation pump is installed in the heating system, then the connection is made only from the end of the comb.
- Boilers of indirect heating and solid fuel units crash into the collector only from the end.
- The supply circuits of heating systems cut either from above or from below.
It is good if a small drawing of the collector design is transferred to paper. This will give a visual picture, according to which it will be easier to manufacture the device. In addition, it can accurately indicate the dimensional characteristics that will have to be maintained during the manufacturing process. For example, the distance between the nozzles of the supply and return circuits should be within 10-20 cm. You should not do more or less, it will simply be inconvenient in terms of maintenance. The distance between the two compartments (supply and return) should be in the same range.
Make the device compact and beautiful. We recommend that you mark all threaded connections in the figure, indicating the dimensions of the thread, do not forget to sign all the necessary contours. This will ensure that you do not make a mistake when connecting.Now it becomes clear from the sketch how much and what materials you will need to make a homemade distribution manifold.
Manufacturing process
Please note that the supply and return compartments can be made from round or square pipes. Many masters prefer the latter option
They claim that it is easier to work with him.
So, here is the production sequence:
- For all dimensions that were indicated on the sketch, it is necessary to prepare the appropriate materials. It's almost all pipes.
- They are connected according to the design of the drawing in accordance with the purpose of each.
- The connection is made using a welding machine.
- Places of welding must be cleaned with an iron brush, if necessary, degreased.
- The finished device must be tested for leaks. Therefore, all pipes will have to be closed tightly, leaving only one. Hot water is poured into it. If none of the joints dripped, then the work was carried out at a high level.
- The collector must be painted and dried.
- It is possible to carry out installation and connection of all pipe systems with the installation of stop valves.
An easier option
Now to the question, isn't it better to buy a ready-made version? There is one "BUT" here. The finished distribution manifold may not exactly fit your heating system; you will have to align the thermal performance in other ways. For example, installing an additional comb. And this is an extra cost and an extra amount of ongoing installation work. And a home-made comb, in which you took into account all the design features of the heating of your home, will definitely fit it and will work efficiently and rationally.
So it’s worth thinking about the question that was posed at the beginning of the article, how to make a distribution manifold with your own hands? Let's just say that this is a simple process that you will spend one day on. But you simply must have the skills to work with a welding machine and other plumbing tools. Without this, it will be impossible to guarantee the quality of the device.
Beam scheme and warm floor
The beam scheme allows you to combine a home-made collector for heating and a "warm floor" system. But this design has a number of features.
Before you start working on its creation, you need to familiarize yourself with them:
- installation of a heating collector must be carried out on the condition that it is equipped with control valves and thermostatic valves on absolutely all circuits;
- when laying pipes for a “warm floor” heat supply system, electrothermal drives and thermostatic heads are certainly used. Thanks to these devices, "warm floors" will be able to quickly respond to changes in temperature and maintain the necessary microclimate in each of the rooms;
- the option for arranging the distribution system is different - typical (performed according to the standard scheme) and individual. The last method deserves special attention. In this case, the boiler operates in normal mode without significant temperature fluctuations, and fuel is consumed sparingly.
Solar collector saving opportunity
It is possible to connect several heat carrier heating sources to the heating circuit. Often solid fuel boilers operate in parallel with electric ones. this allows you to maintain the mode of operation of the heating system at night or in the absence of the owners for several days.
But such a regime cannot be called economical - electricity is one of the most expensive resources. Modern developments make it possible to use solar energy for heating the coolant by installing a solar collector.
A solar collector is an installation that can be used all year round even at cloudy temperatures.On sunny days, it is most efficient and heats up to the temperature of the boiler supply circuit - up to 70-90 degrees.
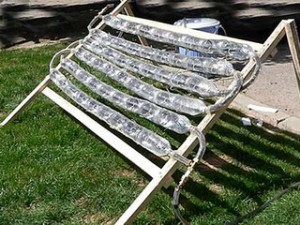
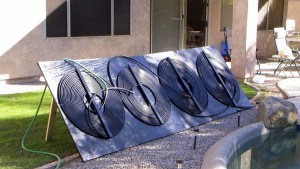
Homemade solar collector
The solar collector is a fairly simple device, it is not difficult to make it yourself. In terms of efficiency, a home-made solar water heater may be inferior to industrial models, but given their price - from 10 to 150 thousand rubles, a do-it-yourself solar collector will very quickly justify itself.
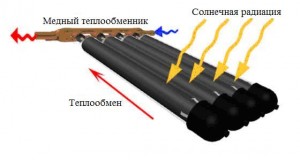
For its manufacture you need:
- a coil made of a metal tube, usually copper, you can take a suitable one from an old refrigerator;
- cuttings of a copper pipe with a thread of 16 mm on one side;
- plugs and valves;
- pipes for connection to the collector node;
- storage tank with a volume of 50 to 80 liters;
- wooden planks for the manufacture of the frame;
- expanded polystyrene sheet 30-40 mm thick;
- glass, you can take window glass;
- aluminum thick foil.
The coil is freed from freon residues by washing it with a stream of running water. From a wooden slat or bar, a frame is made with a size slightly larger than the coil. Holes are drilled in the lower part of the frame for the output of the coil tubes.
On the reverse side, a sheet of polystyrene foam is attached to it with glue or screws - this will be the bottom of the collector. This material has excellent thermal insulation characteristics, which will help reduce heat loss.
 From the inside, the foil is laid so that it completely covers the bottom and walls of the frame. The foil is attached to the brackets with a stapler. A coil is placed in the frame, its ends are threaded into the hole.
The top of the solar collector is covered with glass, fixing it on glazing beads or rails. Pipes are attached to the ends of the coil for connection to the heating manifold assembly. This can be done using adapters or flexible piping.
The collector is placed on the southern slope of the roof. Pipes lead to a storage tank equipped with an air valve, and from there to a heating distribution manifold.
Video: how to make a solar heater yourself
A collector heating system is the most efficient way to connect various heaters to one or more heating sources. With it, you can ensure a stable temperature and comfort in the house, as well as uninterrupted and coordinated operation of all elements of the system.