Completing of the work
Before you install a mixer that you recently purchased from a hardware store, you will need to dismantle the old, outdated mixing mechanism. To avoid leaks, it is necessary to temporarily block the riser with water. If you have inlet taps in your apartment, then by turning on the valve, you thereby block the water. But sometimes there are situations when the house of an old building and the inlet taps do not completely shut off or cannot shut off the water due to their wear and tear. In this case, it would be reasonable to notify the management company in advance and ask her to block the entire riser while the installation of new equipment is in progress.
So, all the subtleties of installing a new mixer are as follows:
Bathroom faucet assembly diagram.
- Dismantle the old mixer. To do this, the union nuts on the pipeline are unscrewed in turn on cold and hot water. You need to unscrew it counterclockwise with an adjustable wrench.
- After the old mixer is removed, carefully inspect the pipes. The fact is that sometimes a filter material is installed between the mixer and the supply pipe. After some time, it becomes clogged with rust, dirt and other small elements, reducing the throughput of water. Therefore, it will be useful to remove all foreign elements from the pipes.
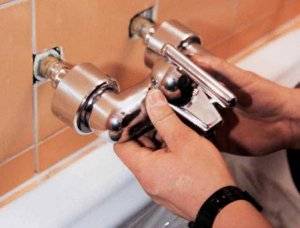
- Install a new mixer instead of the old one. Eccentrics are screwed onto the end fittings of the water supply. These parts are always included with the mixer. The need for their use arises if a small error was made in the positioning of the inlet fittings. In order for the faucet to be installed, the center distance between the inlets of the fittings must be 150 mm. The sealing material is wound around the threads of the eccentrics and screwed into the inlet fitting of the water supply. By rotating the eccentrics, it is necessary to achieve a distance between them of 150 mm.
- Using the level, check the horizontal position of the installation.
- Screw the mixer body. This will be a test setup. Once again check the horizontal position of its position. If done correctly, the flare nuts will easily be screwed all the way in by hand, without the use of any tool. If the nuts are difficult to tighten, adjust by slightly tightening the eccentrics.
- After making sure that the mixer is level, it is removed and the decorative cups of the mixer are screwed on. They will allow you to hide the presence of eccentrics and the connection point itself.
- Now insert the gaskets and put the mixer body in its place.
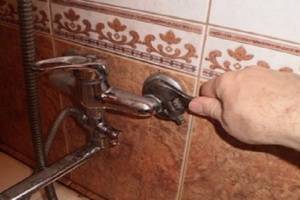
- The fixing nut must be tightened with an adjustable wrench. And so that it does not scratch the surface of the mixer, a soft cloth is placed under the lips of the key. It is not worth tightening the nuts too much, as the seal is due to the rubber gasket.
- Install the gander. Having previously covered with a soft cloth, put the nut on the gander and tighten it with a wrench.
- After inserting the gasket into the hose of the watering can, screw it to the mixer body. Now screw the watering can itself to the hose. Don't forget to insert the rubber gasket.
- Mark on the wall a place for a shower head holder. Drill holes for screws and attach a bracket that will hold the shower head.
Important! If you independently supply water pipes, then before you install the mixer, you should know that the center distance between the hot and cold water fittings must be exactly 150 mm. The location of the cold water supply should be on the left, and hot on the right
The maximum comfortable height of the faucet above the bath is 150-200 mm, and the ideal height from the floor to the faucet itself varies between 600-800 mm.
As you can see, the mixer is easy to install. The main thing is to strictly follow the recommendations during the installation process and follow all the installation rules.
Choosing a new faucet in the bath
To replace the old faucet, you need to buy a new faucet.
Parameters by which mixers should be evaluated:
Weight. The quality of the mixer is indicated by its mass. A good faucet cannot be too light. Long-term service is determined by the thickness of the material. Weight is the key to metal.
Manufacturing material. Cranes are made of 2 materials: brass or silumin. Silumin faucets are much cheaper than brass ones. However, silumin metal is not durable. In such mixers, clamping nuts often burst or handles break off. Their only advantage is their low price.
Brass taps have a large mass with an increased viscosity of the alloy. Due to the viscosity of the alloy, clamping nuts with pipes do not burst from minor deformations that cannot be avoided when using a crane. Brass alloy faucets have an impressive appearance and do not corrode.
Installation instructions
- We shut off the water.
- We screw the eccentrics.
- We put on decorative shades.
- We fasten the mixer body.
- We mount the goose.
- We install the transition under the shower hose.
- We fasten the shower hose and watering can.
- If required, we mount a shower fixture on the wall.
And now we will consider each step of installing a faucet in the bathroom with our own hands in detail.
Most people have the most problems with the first point. It’s good if you previously had a mixer that was out of order and you just change it. Then you are all set, you just need to screw the mixer body and that's it.
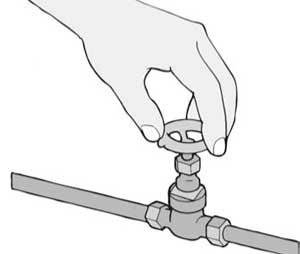
If the installation of eccentrics is required, then we wind the half-inch thread with a fum tape, we wind the seal strictly clockwise and make 4-10 turns, it all depends on the thickness of the fum you purchased.
After that, we screw an inch corner into the floor, which is hidden in the wall. Twisting it with a gas or adjustable wrench, eccentrics are installed so that the distance between the centers is strictly 15 cm, so that the mixer is easily screwed.
If your nuts are easily screwed during installation, then you did everything well. If the nuts are tightened with an interference fit, then this promises big problems in the future. At some point, the nut or brass bushing that holds the nut will burst, so it's better to fix the eccentrics.
Further, decorative shades are wound onto the eccentrics, which close the holes in the wall.
After installing the shades, we fasten the mixer body. To do this, gaskets are inserted in the nut on the mixer body, and we fasten the nuts to the eccentrics.
 First, we tighten the nuts as much as possible by hand, only then we tighten the nuts with an adjustable wrench, making literally 1-2 turns. You should not tighten it too much, otherwise you can cut off the gaskets and then you will need to install new ones.
Now we fasten the gander to the body. It is screwed only by hand and the keys are not used. To do this, we press the gander with force into the hole intended for it, and then the nut will be easily screwed.
If it leaks from under the gander, it makes no sense to tighten it with a wrench or gas wrench, it is necessary to replace the gander with a new one.
Next, we install the transition under the shower hose, which also serves as a mount for it. It is screwed with a three-quarter nut to the hole on top of the mixer. Having previously inserted a gasket into the nut, we wind it and tighten it tightly by hand.
Lever faucets, some older models, may have a special transition tee (moon) for connecting shower hoses. It is mounted between the gander and the mixer body.
We fasten the shower hose to the transition to the shower.To do this, put half an inch spacers in the nut on the hose and tighten by hand. If necessary, you can tighten it up a little with a wrench.
 We fasten the watering can to the hose, not forgetting to install the gasket in the nut on the hose. We twist strictly by hand.
On the shower hose, the nuts come in different shapes - elongated, conical, and the other is standard. The flare nut is screwed to the watering can, and the usual one to the mixer.
And the last - we install a wall mount wall. It is completed with fastening only lever cranes. In valve mixers, the watering can is located on the mixer.
Take a look at the process of installing a faucet in the bathroom with your own hands in this video:
https://youtube.com/watch?v=-wfy1e6wm0A
Video on how to install a shower faucet
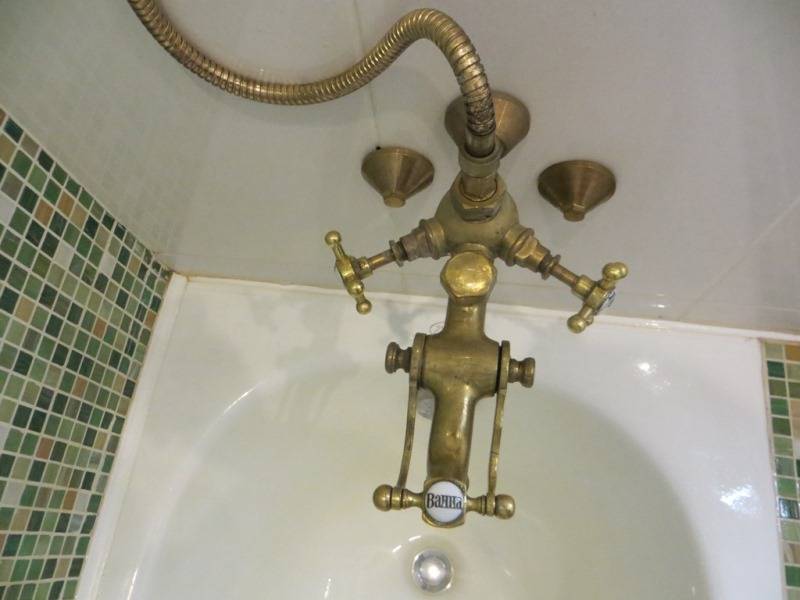
Shower and bath are the main assistants in taking water procedures and caring for the cleanliness of the body. The shower is especially often used, because if taking a bath takes some time, then a few minutes are enough for a quick rinse. Several types of shower faucet designs have been developed. Relatively recently, concealed shower faucets have appeared that save space.
Other designs are also used, for example, a faucet for a summer shower in a country house or a faucet with a hygienic shower. Each of them has its own device, but the common thing is mixing and supplying water with a comfortable temperature.
Steps for installing a faucet in the bathroom
When the model is assembled, you can begin to install it. It includes the following steps:
- Wrap the eccentrics with FUM tape, then carefully insert them into the wall fittings left over from the old faucet. If there is no tape, then take a winding tow and add Unipack brand paste to it.
- Screw in the eccentrics, keeping the distance between the inlets on the mixer 150 mm using the building level.
- Screw the main block onto the eccentrics. They are installed correctly if the block is screwed on both sides without problems. Then it is removed and a decorative ceiling is screwed onto the eccentrics, which should fit snugly against the wall and hide the places where the mixer taps into the wire.
- We fasten the block back, using winding for this.
- To make the shrinkage dense, use the gaskets that are in the clamping nuts.
- Tighten the nuts with a wrench not much so that it creaks slightly.
- Open the main tap and the source of hot water to check the mixer for its operation.
Insulation and tools
Before installing the faucet in the bathroom, you need to prepare some tools and supplies. In order for the work to be done quickly and efficiently, you will need the following:
- pliers;
- wrench;
- masking tape;
- teflon sealing tape.
Masking tape is used to wrap around the mounting nuts to avoid damage to the nickel finish during installation or removal. The key will be needed for the dismantling of the old mixer. In most cases, a Teflon tape called fumka (FUM) is used for waterproofing. Despite the availability of modern materials, some plumbers use a cable in the old fashioned way, but still a fumka is preferable.
Insulation is wrapped around the thread clockwise in several layers. When screwing on the nut, the tape will be pressed in, sealing the connection
It is important to remember in which direction to wind the insulation. Otherwise, it will slip and you will have to rewind - the old tape is removed and a new one is wound in the right direction.
In most cases, the listed tools and materials are enough to replace or install a faucet in the bathroom.
Installation methods and preparation for installation
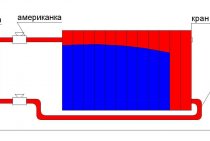
The location of the new product will depend on its installation. For example, it is possible to embed the mixer or mount it on the wall.If we consider the first option, then it is built directly into the wall or mounted on board the bath. You can mount the mixer on the rack. Such an installation is possible if there is free space in the bathroom or when pipes are laid through the floor. The most expensive products today include rack-mounted mixers, the choice of which is very diverse.
Mounting the faucet on the wall is carried out when the washbasin and bath are located side by side. This option allows, if necessary, dismantling without much difficulty, for example, to replace the mixer. The advantage of mounting in a wall is a more attractive appearance, but there will be no access to the connecting hoses. It is worth noting that if the sink or sink is easily removed, then the faucet is attached first, and only then the plumbing fixture.
Before installing the faucet in the bathroom, it is necessary to prepare the device itself, as will be discussed below, as well as water outlets in case of wall mounting. Basically, the fittings for mounting the mixer are already present. In the event that they are not there or old pipes are being replaced, then when summing up new pipes, the following important points must be taken into account:
- hot water is supplied on the left, cold on the right;
- the distance between the axes of the fittings should be 150 mm;
- if the bathroom faucet is installed on the side, then the optimal height will be 150-200 mm;
- in order to mask the tap connection area, the fittings should be recessed into the wall.
Next, you can proceed to the assembly of the mixer for subsequent installation.
Dismantling the old and assembling the new mixer
Dismantling the old faucet in the bathroom should not cause problems. The main thing is to shut off the supply of cold and hot water to the mixer. Next, you need to drain the water remaining in the tap, and you can begin to remove it. When dismantling, it is not necessary to exert great effort so as not to damage the threaded connection on the fitting located on the wall.
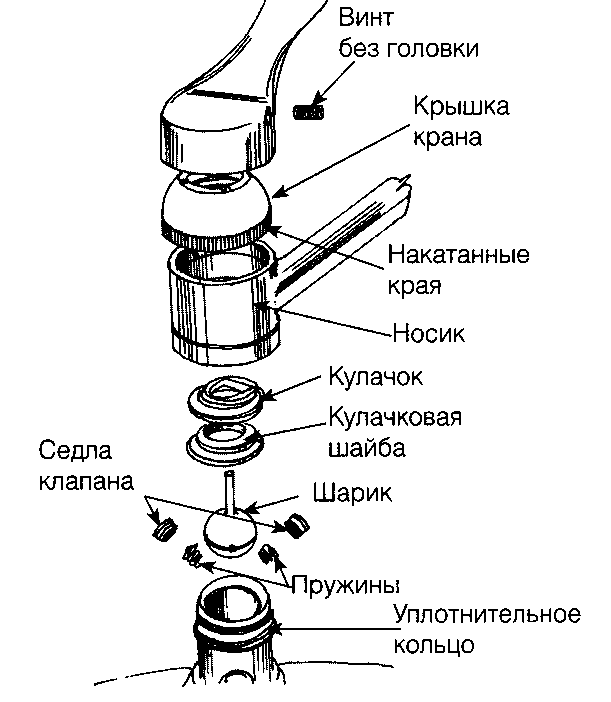
In most cases, products are sold unassembled, so after purchase, assembly of the bathroom faucet will be required. At the time of purchase, you need to check the completeness. All items must be wrapped in cellophane. The complete kit should consist of the following parts:
- main block;
- gander;
- gaskets;
- decorative cups;
- eccentrics;
- shower heads;
- hose.
The nuts may need to be tightened during assembly. In order not to damage the surface, the sponges of the key or the nut itself are wrapped with electrical tape or masking tape in several layers. If the part is damaged, then its replacement will be problematic.
Preparing for installation
Preparatory work for installing a faucet in the bathroom consists in preparing the device and water outlets, if a wall-mounted model is to be installed. Most often, end fittings with threaded female threads for connecting a faucet are already present in the bathroom.
If they are not there or it is planned to replace the old pipeline, some points should be taken into account when laying new pipes:
- Hot water supply is on the left, and cold water is on the right.
- A center distance of 150 mm is maintained between the fittings.
- The optimal position of the faucet above the edge of the bathtub is at a height of 150-200 mm. For the sink, the height will be different, it depends on the type of faucet.
- Fittings of water lines are recessed into the wall in such a way that when installing the tiles, their ends are flush with the front side of the cladding. This makes it possible to mask the connection area with decorative overlays.
The mixer also needs to be prepared for installation, since they are most often sold in disassembled form. First of all, it is worth checking the equipment of the device again.
It depends on the model, but most often it includes: the main unit, spout, shower head and hose, gaskets, eccentrics and decorative overlays.
The thread on the fastening nuts and eccentrics must be of high quality. Be sure to study the assembly instructions that the manufacturer puts in the packaging with the device, and assemble the device, following all its points. The mixer is ready for installation.
The sequence of work on installing the mixer
Before installing a new faucet, you must first remove the old one. For this and subsequent work, you will need the following tools:
- hexagons:
- large pliers;
- Phillips and flat screwdriver;
- gas and open-end wrenches;
- wrenches;
- FUM tape.
How to remove an old mixer with your own hands
 Ridding a bathtub of an old faucet on your own will not be a difficult task, but before doing this, do not forget to turn off the water supply.
It is necessary not only to block the main highway, but also hot water, which in some apartments and houses is supplied through a geyser or boiler. Replacement is made in the bathroom itself, where the walls are tiled with tiles.
First, drain the water from the tap, and then unscrew it from the wall, but very carefully so as not to damage the threads on the fitting, which are located on the wall itself. If it is damaged, then you will have to do a major overhaul in the room in order to change the fitting.
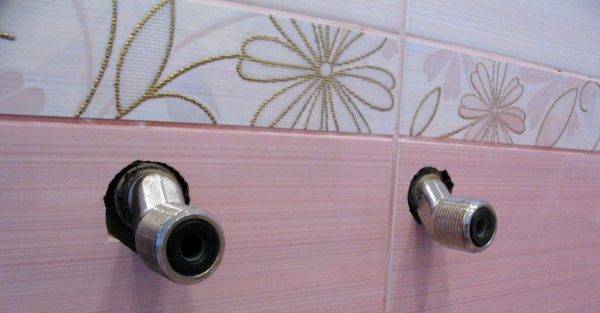
After you remove the old faucet, gently clean the fitting in the wall to remove any paint residue and old tape.
How to assemble a collapsible structure with your own hands
Most faucets are sold disassembled, so they must be assembled before installation.
When purchasing a design, please note that all its details are present in the box:
- Shower Heads;
- gander;
- shower hose;
- main block;
- ceiling lamps are decorative;
- rubber gaskets;
- eccentrics.
Each item must be packed separately in small bags - fabric or cellophane. Also, be sure to check the quality of the fastening eccentrics, in particular, for the integrity of their threads.
To assemble the structure, attach a gander to the main unit, as well as a hose with a watering can, such work should not be difficult. However, do not use wrenches or tighten the nuts when assembling.
Types and brief characteristics of mixers
This information must be owned in order to select exactly the device that meets the operating conditions and preferences of the owners.
Bathroom faucets
They differ in the place of installation and engineering design, they can be fixed on walls, sides and racks.
| Illustration | Description |
|---|---|
| Installed in bathrooms and showers, they can have a long, medium or short spout. | |
| They are mounted on wide sides of bathtubs, have a small spout. | |
| An exclusive option, the leg may have additional decorative elements. They are rarely used and only during the creation of prestigious interiors. |
According to the principle device, they can be single-lever and two-valve.
| Illustration | Description |
|---|---|
| Modern models, with one lever to set the pressure and temperature of the water. They have a spherical control mechanism. | |
| classic models. Differ in high reliability and maintainability. |
Modern innovative faucets can automatically maintain the water temperature within the specified limits - saving hot water consumption, increasing the comfort of taking water procedures.
Another type of faucet - the inclusion of water is performed by sensors. Advantages - increased hygiene and ease of use. Disadvantages - high cost, difficulty in connecting.
Shower mixers
There are no fundamental differences. The only feature is the small linear dimensions. In some models there is no spout, only a flexible shower is installed.
Basin faucets
Distinctive features - a short spout, mounted only on the sides. According to the method of mixing and adjusting the pressure, it is allowed to choose any options.
After choosing a specific model, you can proceed with the installation of devices. We will not dwell on specific types of mixers according to the principle of operation, for installation it does not matter. We will only talk about the stages of installation on the walls and sides.
Installation process
Let's figure out how to install a faucet in the bathroom? First you need to screw the eccentrics. A distance of 150 mm is left between the centers of the inlet fittings. When performing installation with an error, it will be necessary to install transitional eccentrics. A sealant is wound around the threaded connection, screwed into the fittings.
Next, the crane body is fastened, while it is necessary to control the horizontal position. To make the junction with the water main hidden, decorative cups are used. When connecting the faucet in the bathroom, be sure to insert sealing gum to prevent water from flowing. Then you can proceed to the final installation of the valve body, which comes down to tightening the nuts, which ensures a reliable connection.
After the mixer is installed in the bath, it will be necessary to check the correct installation, for which cold and hot water is supplied. If a leak is observed, then the nuts need to be tightened more, but the main thing is not to overdo it. The goose is attached next. Water will flow through it. It is attached from below to the installed mixer body using a threaded connection with a nut.

From above, the hose and watering can are fixed. The shower hose is attached to the faucet with a standard nut. To assemble it with a watering can, a cone-shaped connection is used. When assembling, do not forget to install the sealing ring. Next, choose a place where the watering can holder will be attached to the wall, and drill holes. Screws are used for fixing. This was the final stage in the installation of the mixer.
How to install the mixer on the side?
In addition to the above, it is possible to install the faucet on a bathtub or sink. This is done, as a rule, on board the indicated plumbing fixtures. Installation can be carried out by such types of pipes as:
- Metal. Provides a high quality connection. Installation is possible in a wall or concrete. The installation is notable for its laboriousness and complexity.
- Heat-resistant metal-plastic. Used for a reliable connection, but rarely used.
- Flexible hose. Refers to a simple and inexpensive option for connecting a water main to a mixer. The connection is characterized by reliability and flexibility. But such a hose should not be placed in concrete or a wall because of the relatively quick failure.
How to install a faucet on a sink or bathtub? First you need to find out and determine the length of the supply pipes. To do this, the tap must be temporarily attached to the sink or bath. After that, they measure the distance between the inlets of the mixer, to which water will be supplied, while taking into account corners and bends. Basically, a flexible hose is used for the supply. It is necessary to avoid a tense state, but too much length is useless
Attention should be paid not only to the dimensions, but also to the quality of the parts.
Next, you need to install the device in the following sequence:
- Rubber seals are mounted in their place, supply hoses are attached to the faucet with nuts.
- A rubber insert for sealing is placed in a special recess in the mixer body.
- The supply hoses are passed into the hole on the bowl, a gasket is placed between the bowl and the mixer. After the device is mounted in place.
- The device is fixed with a bolt and nut. You need to make sure that the installation is solid. Next, tighten the nuts, but the applied efforts should be controlled so as not to overtighten.
The following steps are similar to mounting the device on a wall. Installing a faucet in a bathroom is not a difficult procedure.The main thing is to follow the recommendations described above. Also, before assembling the mixer, you need to read the attached instructions for the device. This will avoid unforeseen situations and damage to the product.
Conclusion
The installation of the shower faucet is carried out in such a way as not to damage the baths, the surface of the faucet itself and to prevent leaks. We hope that by following the instructions and advice, you will not encounter difficulties and will be satisfied with the result.
Compared to previous years, the bathroom now looks different. Separate lush, complex elements are gradually being replaced by strict and concise forms that properly organize the interior. This way of saving space fills the room with ergonomics, and built-in furniture and plumbing become the main attributes of this room. The presence of pipes makes you want to hide them from prying eyes. To tidy up the room, the owners use the latest invention - flush mounting.
The popularity of this attribute of the interior is not accidental, it causes a person's desire to decorate and simplify the interior of the room. A device with a depth of 10–15 cm is implanted into a wall, on the surface of which there are control elements and a decorative panel. Such a hidden mechanism is used only in bathrooms, it is not suitable for the kitchen. This device does not have a rotary pouring device, so this option is excluded.