Window sill in private houses

Private houses can be located in different parts of the country, so there are a lot of window placement options. Nowadays, some people get rid of the walls altogether and install windows instead, while getting a stunning view.
If the structure of the house or finances do not allow this idea to be formalized, you can try to place the window sill on the same level as the floor.
A good idea for private houses would be to install windows that will be located on two floors at once. If your house is located in places with a cold climate, building a balcony or veranda would be a good way out. For information on how to set the window sill to the desired height, see this video:
For an attic or second floor, the landing should be about 90-100 cm. This height will provide a good view from the window and will keep the heat in the room.
The optimal location dimensions are presented in the following table:
In general, there are no standards for window placement. The location of the window sill board largely depends on the type of room and its functions.
Proper installation of window sills
Installation of window sills during the overhaul of an apartment is an inevitable operation. Even if window sills from the developer are installed in your new apartment, then with a high degree of probability these window sills will still have to be replaced: careless installation, the window sill itself is of poor quality, damage during the delivery of the apartment.
In most cases, the customer prefers inexpensive PVC (plastic) window sills in white matte color, which are unpretentious in operation. This option is acceptable for budget repairs, if your windows do not face the sunny side or blind curtains are planned. Otherwise, under the influence of sunlight, a budget window sill will quickly lose its presentation: temperature deformations, fading of plastic (yellowing, etc.). Such an installation of a window sill is not always financially justified.
With a high-quality repair of an apartment for yourself in the long term, it is better to give your preference to higher-quality window sills (Moeller, Danke, Werzalit). This is no longer just mass-dyed plastic, but window sills made on the basis of wood-polymer mass from environmentally friendly materials with various acrylic coatings that imitate wood or marble textures of various colors, allowing you to please the refined tastes of any client for the implementation of his design project. In addition to decorative qualities, such a window sill has high torsion rigidity, durability and wear resistance, high-quality geometry. When installing a window sill, certain technologies must be followed.
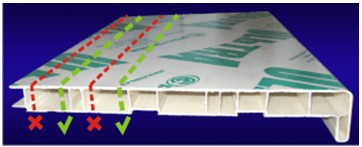
When purchasing a window sill, you need to take measurements in advance and understand how it will be located for you. Since in the store you will be cut to the required length for ease of transportation, and the width of the window sills is available with a multiple of 5 cm (20,25,30 cm, etc.). The “flush” option (flush with the wall) is shown in Fig. 1, this window sill installation option is preferred by those who plan to hang curtains and tulle to the floor so that the protruding window sill does not interfere. Those who plan the functional use of the window sill (storage of decorative things, flower pots or the manufacture of a window sill-countertop) prefer a large window sill overhang (Fig. 2).
It should be borne in mind that a large protrusion of the window sill in further operation will interfere with the convection of hot air from the heating radiator upwards in order to create a barrier to cold air that enters the apartment through double-glazed windows.To improve convection in the protruding part of the window sill, it is necessary to make ventilation holes or install a ventilation grill (Fig. 3), which will not prevent hot air from rising.
For the correct installation of the window sill, it is necessary to make a groove in the slope (if it has already been made), where the ends of the window sill will be placed to create additional structural rigidity in the hitch. On the side edges of the part that will go into the groove of the slope, cut off the window sill (Fig. 4). on the remaining part of the end at the end of the installation, special end caps will be mounted (sold separately from the window sill).
The window sill can be installed on mounting or plaster mortar. For better adhesion to the adhesive composition, in the smooth back side of the window sill (not the front), it is necessary to wrap (by 1/3 of the length) self-tapping screws of small length (25 mm) in a checkerboard pattern (Figure 5.6), which, after the solution (or foam) has solidified, will provide reliable fastening.
Blowing out the mounting foam of the window sill during installation should be done with good foam, giving preference to proven brands. In this case, you can be sure that the foam will not inflate and will not make your newly installed window sill “humped”. Using a professional foam gun will allow you to spend 2-3 bottles on installing window sills in the entire apartment.
Window sill installation
Prior to installation of the window sill, it is necessary to carry out point 14. Installing the vapor barrier sealing tape.
When installing the window sill, you must perform the following steps:
1. Check the window sill for conformity to size, color and the absence of scratches or other damage, after removing the protective film. In the case when trimming of the window sill is required, depending on the size of the opening, the marking is done first, and then the window sill is trimmed. Marking is done with a construction pencil relative to the center of the structure. Trimming is done with an electric jigsaw or a hacksaw for plastic, which are part of the assembly tool kit. 2. Check that the junction of the window sill to the box of the window block is tight, tight and resistant to deformation. 3. The gap between the end of the window sill and the bearing walls on the sides should not exceed 3-4 mm.
Additionally, it is recommended to install a spring clip for a tighter fit of the window sill to the frame profile. The bracket is attached to the stand profile with a self-tapping screw. The brackets are installed by attaching them to the stand profile at a distance of 20-25 cm from each other, after which the window sill simply snaps into the brackets and does not require additional installation.
The recommended overhang of the window sill beyond the inner surface of the wall should be ½ of the width of the heating radiator, but not more than 100mm (without brackets). When the outreach exceeds the specified value, it is necessary to use standard brackets, the distance between which should not be more than 500 mm, the indents from the edge of the window sill should be no more than 250 mm. Check the accuracy of the installation of the window sill using a level in the longitudinal and transverse directions. Be sure to foam the support pads for fixation. It is recommended to apply a strip of white silicone or glue for PVC along the entire length of the window sill, where there will be contact with the frame. carried out in the same way as the installation of the window sill. The departure of the threshold for the inner plane of the wall is from 30 to 40 mm.
. NO GAP BETWEEN THE BOX AND THE WINDOW SILL IS ALLOWED.
In order to avoid scratches on the surface and chips at the cutting site, it is necessary to be careful and cut without much pressure on the window sill.
Based on thermal expansion, the maximum length of the installed PVC window sill is limited to 3000 mm.
When installing a window sill from the inside and outside under the window of the balcony block, the window sill must go beyond the frame of the balcony door and at the same time block the corner of the lower quarter (wall panel) and protrude no more than 15 mm, unless otherwise agreed with the Customer.
The window sill should go under the bottom surface of the box by at least 5 mm and be pressed against it tightly along the entire length of the junction.
If the distance from the stand profile to the edge of the wall under the window sill is more than 150 mm, it is necessary to provide measures to prevent the window sill from deflecting under load in the area adjacent to the frame and along the plane of the window sill (threshold). For these purposes, additional support pads and fragmentary foaming are used.
If the opening under the window sill is small, then it foams. Structurally, a new window sill is always higher than the old one by about 2-4 cm, so it is usually impossible to keep the wallpaper under the window sill. Sealing under the window sill is made with a building mixture, for further pasting with wallpaper or
Window sills made of chipboard or wooden are installed in the same way.
It is also possible to install using retaining brackets: using fasteners (two - one after the other, retaining brackets are screwed in with cylindrical screws measuring 3.9 * 16 or screws with a half head 4.5 * 16) in a mortar layer of 2 pcs. at a distance of 60 cm - for window sills with a maximum length of up to 2 m.
What is the standard distance between the window sill and the floor
The size of windows in high-rise buildings corresponds to the size of the room and the location itself. Naturally, the project is not able to consider all aspects of life. It is best to use some standards.
So, what is the standard window sill height?
- If the ceilings in the apartment are standard in height, then the windows are located, focusing on the upper part of the inner doorway with a height of 2 meters. Thanks to this, a convenient gap remains between the ceiling and the window, allowing it to be used for attaching curtains and curtains. With high ceilings, the windows will also be higher so that the space is filled proportionally.
- The window opening starts from 90 cm in height. It is this distance that allows you to conveniently arrange furniture, correctly perceive the horizon in the room, especially since heating batteries are located under the window opening.

Ventilation grill installation
You will need:
- ventilation grates
- silicone
- milling machine
- construction tape measure
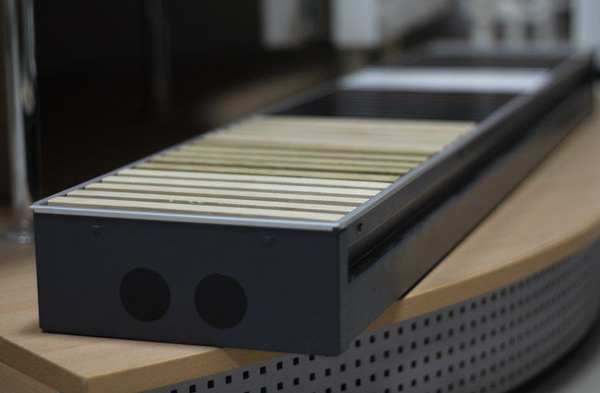
Window sills with ventilation grilles are glued with silicone. You will need a milling machine to make the grating to your size. During installation, it is necessary to take into account the distance between the installation of consoles - in the area of \u200b\u200bthe grille, consoles should be installed up to 30 mm to the edge of the window sill.
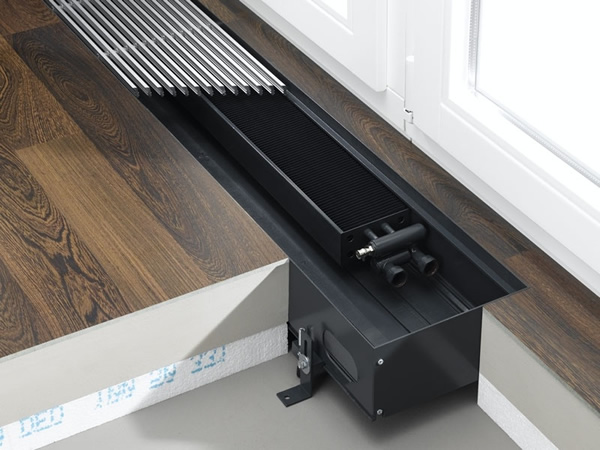
Before you mount the grate, you need to choose a color. Ventilation grilles installed in the window sill (can be made of stainless steel, brass or plastic) may well merge with it, or vice versa, stand out strongly. Clients sometimes like this contrast more than the usual color combination, and it fits perfectly into the interior of the room.
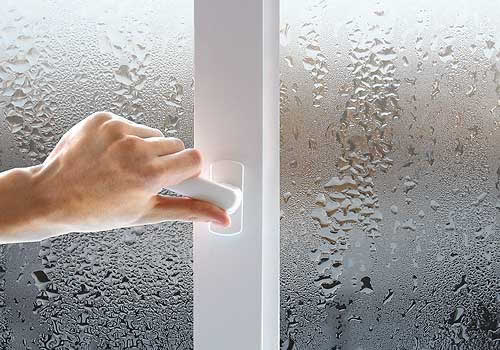
Why windows fog up and how to fix it
Usually, the owners face the problem of condensation on the inner glass of a metal-plastic window in the early morning. The problem occurs in cold weather (in winter and autumn), at the same time water accumulates on the windowsill. The explanation for this process is as follows: after installing windows, the ventilation mode in the room changes, air exchange is disturbed (earlier, air passed through the slots and frames), there are fewer drafts and the humidity in the room increases.
When the microclimate changes dramatically, the temperature outside becomes low, and the temperature in the room is high, and the likelihood of condensation increases.In order to avoid such drops, in order to cope with the ventilation process, an additional detail of the window structure is installed. Such an anti-condensate grille is a series of straight fixed flaps that redirect air flows.
Important Tips
- If the window sill is too wide, when it completely covers the battery, the heat exchange in the room is disturbed. Try to install the window sill so that it covers only half of your battery. If you want to leave wide window sills, be sure to install decorative grilles.
- If windows fog up in the presence of a single-chamber double-glazed window, then it is better for you to call the master who will eliminate the violations that occurred during the installation of the window structure.
- You will also encounter condensation if there is poor air circulation in the room. The solution is to clean or replace the ventilation grilles.
- Flowers may also be involved in the condensation. With constant watering, these processes are inevitable. Alternatively, you can leave just a few flower pots on your windowsill and air out the room more often.
- Problems can also arise due to improper installation of windows. It is better to plaster the cracks yourself or, in case of large deviations from the correct position, reinstall the double-glazed window.
- If the windows are sweating in the kitchen due to frequent cooking, then the masters will advise you to ventilate the room more often.
- Troubleshooting will help: a working hood, good thermal insulation of the house, no leaks from the roof of the house, elimination of the source of dampness and more frequent ventilation.
- We wish good luck to those who decide to start the process of installation and manufacturing of the grating on their own. If you are not confident in your abilities, then it is better to contact the masters in this profile, who are engaged in the installation of ventilation grilles. Because by incorrectly calculating your strengths or the dimensions of the product, you risk being left without window sills.
Happy repair!
You may be interested in: Ventilation ceiling grids eksno.ru/reshetki-vent.
Window sill location
The window sill is one of the functional parts of the window design. It is placed under the window frame or flush with its lower part. The task of the window sill is to increase the layer of warm air in the space around the window and near the adjacent wall.
When condensation occurs, it removes moisture from the window and protects the wall below it from moisture. In addition, it serves as a decorative element that allows you to connect the space outside the window with the interior of the room.
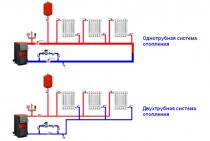
According to SNiP, the height of the window sill depends on the location of the heating devices. The distance from the floor to the battery must be at least 10 cm, the standard battery - about 50 cm, from the battery to the window sill - at least 8 cm.
Thus, its height will be approximately 70-80 cm. In this case, it is necessary to observe the inclination of the window sill at least 1 °, directed towards the room.
Since central heating radiators are not located on balconies, when choosing an installation height, safety standards should be followed, observing a height of at least a meter. On the underside, it must be insulated so that the cold cannot penetrate the room.
The window sill on the balcony can perform various functions. Quite often, pots with plants are placed on it, creating an atmosphere of a winter garden. It can play the role of the top of the cabinets located against the wall.
On it, as on a shelf, decorative items or books can be placed. On the balcony, a relaxation area can be organized, where the window sill acts as a coffee table. Depending on the goals, choose the required width and strength of the material.
Normalized distances for installing heating appliances
SNiP number 3.05.01-85 says at what height from the floor to hang heating radiators in a private house, and also lists other standards for installing heaters.
When installing the heater, observe the following standards:
All heating devices are mounted strictly under the window opening in the room
It is important to install the radiator exactly in the center of the existing window in the room, that is, so that both central axes coincide.
It is important to consider the dimensions of the window opening and battery. The width of the device should be 70% of the same window size.
The regulatory documents indicate that the height of the battery from the floor is 100-120 mm
When installed at a greater distance, the lower part of the room warms up poorly. And when mounted below, a lot of dust accumulates under the device.
The minimum distance from the window sill to the radiator is 50 mm. If this gap is smaller, then warm air masses will not be able to circulate normally due to a barrier from above.
As for the distance from the battery to the wall, it is 2-5 cm. If it is made smaller, the battery will heat the wall, and not the air in the room. It no longer makes sense to make a gap, because the heater will strongly protrude from the wall to the center of the room and spoil the interior.

When choosing the optimal gap between the radiator and the wall surface, the material of the walls and the dimensions of the window sill are taken into account. So, if the window sill board is short, then it is not necessary to install the unit from the wall at a distance of more than 20 mm, otherwise it will protrude strongly. But even less gap is not made due to the deterioration of heat transfer.
The reflective screen is attached to the wall so that the foil surface is turned inside the room. In this case, the width of the screen should be 5 cm on each side more than the width of the battery. Insulation with foil is attached to the wall from the bottom of the window sill to the floor.
Finishing slopes and window sills without plastic is it possible
Good day! We reinstalled windows in our new building, where renovations are in full swing. Now we need to finish the slopes, but I really don’t want to make plastic sandwich panels with terrible plastic corners. I spoke with the workers, for plastering, you need to cut a lot on the sides of window openings (laying walls from foam blocks from the developer, uneven, with protruding fittings and, most importantly, with cracks! It blows from there!). Is it possible to plaster the slopes with a thin layer on your own, so that at the same time it stops blowing from the cracks between the blocks? How to do this, will you have to smear with silicone sealant? and the second question follows from the first - is it possible to make window sills flush with the wall, without protruding the window sill by the required 5 cm? I don't like it visually. I remember about the battery and the movement of air masses, but how critical is this? I really want to put something inexpensive on the windowsill and a mosaic on top, it’s such a dream)) but at the same time I want the window sill to stick out. Are these 5 cm worth such torment or is there a technological need to bulge the window sill?
best answer
There are many window sill technologies without bulging. Starting from banal cementing and ending with more modern materials. For example, you can use an aquapanel, building boards based on extruded polystyrene foam (for example, Ruspanel), artificial stone, etc. However, the end, that is, a certain joint with wallpaper, you still have to somehow close it, whether it will be a plastic corner or something else not the point.
As for the slopes, everything is doable, there would be a desire. If it blows from aerated concrete blocks, then you need to foam the cracks and cover (plaster it) with a rotband from above. Forget about silicone, this is not the case.
"It blows from the cracks between the foam blocks." Plastering the wall solves this problem, as already mentioned here.
“... sealing tape (some kind of super-duper, as the installers said)” is PSUL (pre-compressed self-expanding sealing tape). Outwardly, the structure is similar to foam rubber. In new buildings, sometimes developers use some kind of fake. A sign of falsification - crumbles with a slight mechanical impact. I advise you to check - slightly scratch with a nail or screwdriver. Normal material will stand it. If it crumbles, then something is wrong.
“According to the neighbors, if you don’t put sandwich panels on slopes, then in winter it’s cold from the window - it’s from the foam blocks.” There is no “technological necessity” in installing sandwich panels on slopes. If the window is correctly selected according to the parameters of thermal protection and installed in accordance with GOST 30971-2002 “Mounting seams for adjoining window blocks to wall openings”, it will not pull any cold from the slopes. And if the requirements of GOST are not met, then an attempt to “protect” from cold slopes with the help of sandwich panels or other materials with low thermal conductivity (for example, drywall) can lead to moisture accumulating under the outer layer, which contributes to the appearance of fungus and mold. In general, slope protection with sandwich panels is an illiterate solution to the issue. But many do not know about it, and therefore have problems.