Single pipe layout
This option is also easy to assemble and install, so you can mount it yourself. It largely repeats the gravity system, but differs from it in the presence of a circulation pump - there is also a pipe (but already equipped with heating radiators), a boiler and a pump, which can be either separate or integrated into the boiler. It is the pump that is responsible for the water cycle in the system.
Optimum is a closed system, the design of which is devoid of an expansion tank (separate), which is facilitated by the presence on the market of boilers with integrated tanks. This solution makes it possible to prevent the formation of corrosion centers, which is very important if there is no anti-corrosion coating on the metal.
Boiler room
Not enough air to sustain combustion
At the boiler equipped with atmospheric burners, the combustion air is taken directly from the boiler room.
The boiler will start to work poorly, with interruptions, fluctuations, go out, sometimes pops are heard (not always, sometimes the boiler “pops” if air gets into the gas pipeline for some reason), etc. if the air supply is insufficient.
This situation is not so rare - often calling the masters with the question "why does the boiler go out?
» We forget about oxygen for combustion.
It is easy to fix the situation with your own hands - install ventilators, or ventilation in the wall of the boiler room, and in its door.
How to fix: Installation of ventilation in the boiler room, holes in the boiler room door.
The boiler was installed in a damp room.
If a boiler (either liquid fuel or gas) is installed in a room with high humidity, it will wear out and break many times faster - this is an axiom. It is clear that this situation can be corrected only by installing a boiler room in a dry and ventilated place. Also take note of the fact that in a room where a solid fuel boiler and a gas or liquid fuel boiler are installed together, the latter will also break faster due to dirt and work worse.
How to fix it: Plan in advance the installation of a boiler room in a suitable room. Do not install a solid fuel boiler and gas or liquid fuel.
If the chimney is too low
The chimney must be made in such a way that it has a so-called "effective height" (i.e. the distance from the outlet to the firebox) that allows you to freely remove combustion products.
For a liquid fuel boiler, the effective height is 5 meters, for a gas boiler at least 4 meters.
If the chimney is of a shorter length-height, then the draft will not be enough. If the boilers of old designs work even if thinly, but “refreshing” the air in the boiler room with the products of fuel combustion, then the boilers of the new design with draft sensors in the chimney will simply turn off.
In lower chimneys, the chimney draft will be insufficient. Modern boilers equipped with chimney draft sensors will turn off in this case, and in old boilers, combustion products can penetrate from the furnace into the room.
How to fix it: Make a chimney of the required height in advance, as a rule, it is provided for in the project of a house under construction.
Installation of a shut-off valve in the heating system
Based on safety precautions, there should not be shut-off or shut-off valves in the heating system. Many make them in order, for example, to start heating in a “small circle” and not to warm up the whole house. This is dangerous because if you accidentally close the shut-off valve, it will not be able to get into the expansion tank, and if so, it will have nowhere to expand, and when the temperature rises, the heating system can simply break, and no modern automation installed in the boiler cannot guarantee you the opposite.
Fix: Don't install faucets at all...
If the boiler was bought too powerful
“You can’t spoil porridge with butter” is not about heating ...
Often we buy boilers with the expectation of a hypothetical "growth" of the house - extensions, attics, etc. Then we take root in the house and the desire to make an extension disappears.
You shouldn’t buy a boiler exceeding the capacity laid down in the project of a new house - you’re going to decide whether to build a house or not is still unknown, but it’s not clear why it will be spent on a more powerful, and therefore more expensive boiler, right now.
After all, the required thermal energy and the need for it are calculated based on the most unfavorable conditions, for a temperature of -6 to -25 degrees, and there are few such days during the heating season, and during them the boiler operates at full capacity. That is, roughly speaking, in the boiler calculated in the project, there is already a certain power reserve “for the future”.
How to fix it: Do not buy a more powerful boiler than is necessary in this house, or buy and be sure that you will definitely build after all - otherwise money is wasted and heating bills will increase.
Planning
Not every person can use computer programs for modeling in 3D projection of his house, which, of course, would be very convenient. Given this nuance, consider how to make a plan manually by writing everything on a piece of paper.
- When making a drawing, you need to take into account that the line must be laid with a slight slope - at least 0.5 cm per 1 linear meter of pipe, otherwise it will not work without a pump.
- Determine the location of the boiler.
- If for some reason the pipes cannot be hidden in the floor, then it will be necessary to perform external installation or partially hide the pipes in the floor - in the place of the greatest reduction.
- On the diagram, we mark the installation locations of the batteries, noting what power they should be.
- If taps, a heat regulator, etc. are installed, then this should also be reflected in the diagram.
- Having a complete picture, you can calculate how many pipes, fittings and those elements that are planned for completion will be required.
Traditionally used heating schemes
-
Single pipe
. The circulation of the heat carrier is carried out through one pipe without the use of pumps. Radiator batteries are connected in series on the main line, from the last one the cooled carrier returns to the boiler through the pipe (“return”). The system is simple to implement and economical due to the need for fewer pipes. But the parallel movement of flows leads to a gradual cooling of the water, as a result, the carrier arrives at the radiators located at the end of the series chain significantly cooled. This effect increases with an increase in the number of radiator sections. Therefore, in rooms located near the boiler, it will be excessively hot, and in remote ones it will be cold. To increase heat transfer, the number of sections in the batteries is increased, different pipe diameters are installed, additional control valves are installed, and each radiator is equipped with bypasses. -
Two-pipe
. Each radiator battery is connected in parallel to the pipes for the direct supply of hot coolant and the “return”. That is, each device is equipped with an individual output to the “return”. With the simultaneous discharge of cooled water into the common circuit, the coolant returns to the boiler for heating. But at the same time, the heating of heating devices also gradually decreases as they move away from heat sources. The radiator located first in the network receives the hottest water and is the first to give the carrier to the “return”, and the radiator located at the end receives the coolant last with a lower heating temperature and also the last to give water to the return circuit. In practice, in the first device, the circulation of hot water is the best, and in the last, the worst. It is worth noting the increased price of such systems compared to single-pipe ones.
Both schemes are justified for small areas, but are inefficient for extended networks.
An improved two-pipe is the Tichelman heating scheme. When choosing a specific system, the availability of financial opportunities and the ability to provide the heating system with equipment that has the optimal required characteristics is decisive.
Gravity option
Gravity heating scheme. Click on the photo to enlarge.
It is the most simple and primitive. Therefore, such a system is cheap and not too difficult to implement, as it is carried out depending on the layout of the housing. But this is where its shortcomings lie. It is a large metal pipe connected to the boiler and passing throughout the house (this is a prerequisite), through which the coolant flows.
The disadvantage of such a scheme is the need for massive pipes with a large cross-section in diameter, since the installation of thinner ones or the addition of batteries to the system leads to a drop in heating efficiency due to a decrease in the water flow rate. In order to increase the efficiency of this heating system, not one, but two pipes are installed in the house, which causes even greater inconvenience to residents.
Do-it-yourself heating installation tips for the master
- A tap must not be mounted on the pipe connecting the expansion tank to the boiler. Accidental overlap can lead to the destruction of the system.
- The chimney of an attic boiler may be too short. For installation in such a place, a boiler with a closed combustion chamber is more suitable. The air supply to it and the removal of combustion products will be carried out through a coaxial channel of the “pipe in pipe” type, brought out through a wall or roof.
- One of the conditions for the correct operation of the boiler is the supply of sufficient air for combustion. To do this, an inlet hole can be made in the outer foam. On the side of the boiler room, this hole should be approximately 30 cm above the floor.
- A gas boiler, especially a modern one, will only work well in a clean, dry and well-ventilated area.
- It is desirable that the entire system be made of the same material. But some boiler manufacturers recommend installing a section next to the boiler from copper or steel pipes in plastic systems.
- Steel pipes, in comparison with plastic ones, have a significantly lower coefficient of linear thermal expansion.
- Laying plastic pipes in the floor, given their high coefficient of linear thermal expansion, is only necessary in protective pipes.
- For the installation of a central heating system, only pipes designed for this purpose should be used. Pipes must be marked accordingly.
- To ensure that the system laid in the floor does not leak during operation, the connection from the collector to the radiator must be made in one piece and a pressure test must be carried out after installation.
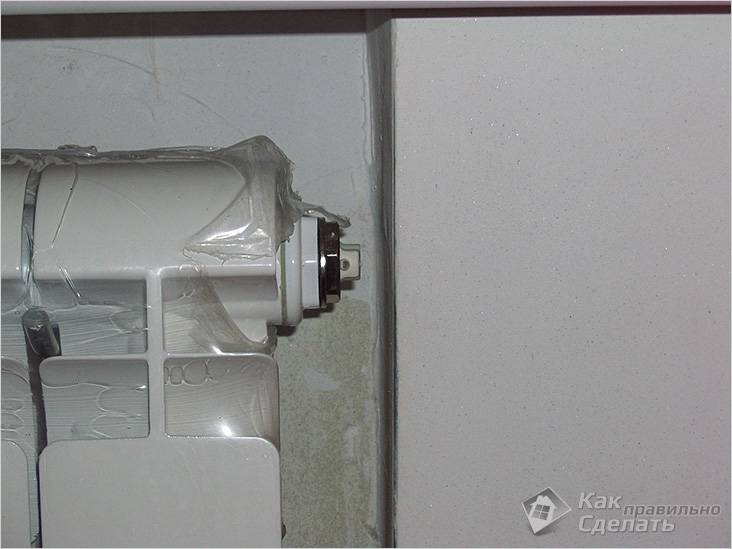
- The pipe section between the floor and the radiator must be laid in the wall or covered with protective sleeves.
- Manual air valves are standard on new radiators. In addition, automatic air valves are used to remove air from the system.
- For fastening pipes to the floor, special brackets are used. In places where pipes pass through the expansion gap, they are laid in special sleeves (top photo), which protect against possible damage.
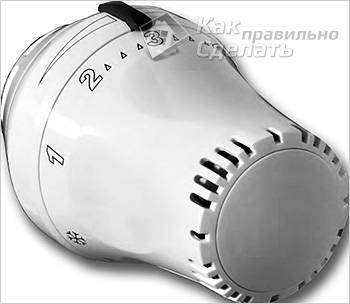
- If you really want to close the radiator, it is better to use an openwork screen for this. The thermostatic valve head must also be left open.
- A vertically mounted head will reduce the flow of hot water to the radiator more than it would if it were installed correctly. As a result, the room will receive less heat than necessary.
- Head with remote (remote) thermal sensor.The length of the capillary connecting the sensor to the head is 2 m.
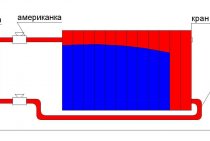
- For panel radiators with a bottom connection, the supply pipe must be connected to the inner (closer to the center) branch pipe, and the return pipe to the outer one. Reverse connection will reduce the power of the radiator by almost half.
Installation procedure
The work consists of the following operations:
- Boiler installation. The required minimum room height for its placement is 2.5 m, the allowable volume of the room is 8 cubic meters. m. The required power of the equipment is determined by calculation (examples are given in special reference publications). Approximately for heating 10 sq. m requires a power of 1 kW.
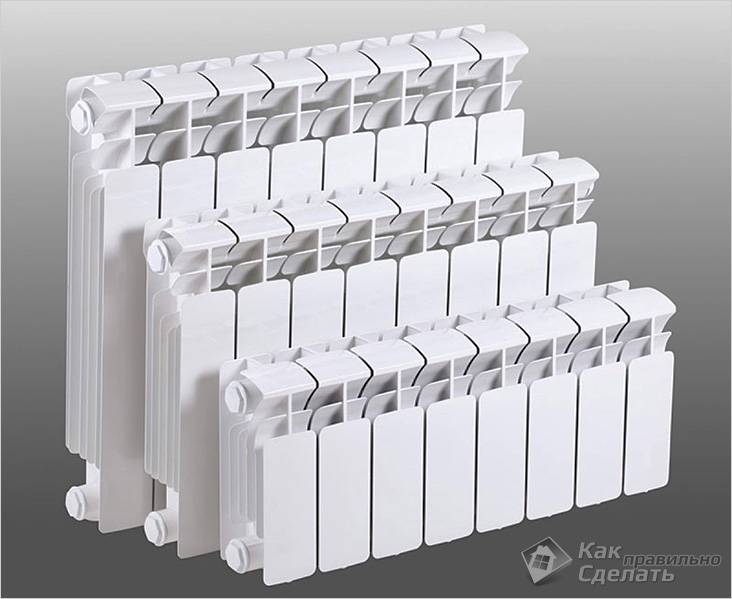
- Mounting of radiator sections. The use of biometric products in private homes is recommended. After selecting the required number of radiators, their location is marked (usually under window openings) and fastened with special brackets.
- Pulling the pipeline of the associated heating system. The use of metal-plastic pipes is optimal, which successfully withstand high temperature conditions, are distinguished by durability and ease of installation. The main pipelines (supply and “return”) from 20 to 26 mm and 16 mm for connecting radiators.
- Installation of a circulation pump. Mounted on the return pipe near the boiler. Tapping is done through a bypass with 3 taps. A special filter must be installed before the pump, which will significantly increase the life of the device.
- Installation of an expansion tank and elements ensuring the safety of the equipment. For a heating system with a passing movement of the coolant, only membrane expansion tanks are selected. Elements of the safety group are supplied with the boiler.
For tracing doorways in back rooms and utility rooms, it is allowed to mount pipes directly above the door. In this place, to prevent air accumulation, automatic air vents must be installed. In residential areas, pipes can be laid under the door in the body of the floor or bypassing the obstacle using a third pipe.
The Tichelman scheme for two-story houses provides for a certain technology. Piping is carried out with tying the entire building as a whole, and not each floor separately. It is recommended to install one circulation pump on each floor while maintaining equal lengths of return and supply pipelines for each radiator separately in accordance with the basic conditions of an associated two-pipe heating system. If you install one pump, which is quite acceptable, then if it fails, the heating system will turn off in the entire building.
Many experts consider it expedient to arrange a common riser on two floors with a separate piping on each floor. This will allow taking into account the difference in heat losses on each floor with the selection of pipe diameters and the number of required sections in radiator batteries.
A separate associated heating circuit on the floors will greatly simplify the system setup and allow for optimal balancing of the heating of the entire building. But to obtain the desired effect, it is necessary to insert a balancing crane into the trailing circuit for each of the two floors. Cranes can be placed side by side directly next to the boiler.
Tichelman heating feature
The idea of changing the principle of operation of the "return" was justified in 1901 by the German engineer Albert Tichelman, after whom it got its name - the "Tichelmann loop". The second name is “reverse type return system”. Since the movement of the coolant in both circuits, supply and return, is carried out in the same direction, a third name is often used - “scheme with the associated movement of heat carriers”.
The essence of the idea is the presence of the same length of straight and reverse pipe sections connecting all radiator batteries with a boiler and a pump, which creates the same hydraulic conditions in all heating devices. Circulation circuits of equal length create conditions for the hot coolant to pass the same path to the first and last radiators with the same heat energy being received by them.
Tichelman loop diagram:
Errors connecting radiators and fittings
During the installation of heating, they mixed up the "supply" and "return" in the radiators.
The vast majority of bottom-connected radiators have such a device in which the supply pipe of the heating system must be connected to the branch pipe that is closer to the center (i.e. internal), and the opposite, on the contrary, to the extreme.
If the panel radiator is connected incorrectly and vice versa (supply to the extreme, external, and return to the internal), then heat transfer can decrease by 50%, sometimes even more.
Connection of a panel radiator with a top connection to the system inside the floor.
It cannot be said that this is a mistake - masters sometimes resort to this method of connection if necessary, but in any case, this is fraught with a decrease in power and the formation of an air plug in the panel radiator.
Installation of decorative screens on radiators
Also, in principle, by and large, this cannot be called a mistake, especially in houses with old batteries, which are easier to “completely paint over than tear off” ...
It's all about the circulation of hot air and heat transfer - it can drop to 20% when installing a blank screen, especially if the gap between the battery and the floor from below and the window sill and radiator from above is small.
Solution: Do not install protective screens at all or install screens in the form of a grid.
Installing a screen next to a thermostatic valve.
If you install a screen next to a thermostatic valve, it will not respond to the readings correctly, as it will be in hotter air than the rest of the living space and will stubbornly turn off the heating in the radiator when the room is still cold.
How to fix: Output 2 - do not install screens nearby or install a thermostatic valve with a remote sensor installed in the right part of the room, away from the radiator.
Installing the thermostatic head vertically
Warm air from the radiator, the battery will rise vertically, in an ascending manner, “enveloping” the head sensor, as a result of which the sensor head will contact not with the bulk of the air in the room, but with the heated air from the battery - the readings will be incorrect, and the thermostatic sensor will work incorrectly.
How does a thermostatic valve work?
The thermostatic valve (thermostat) consists of a valve and a thermostatic head. The principle of its operation is simple. Under the influence of temperature, the substance that is in the bellows of the head increases its volume. This causes pressure on the stem and closes the valve. The flow of hot water through the radiator stops. Conversely, if the room temperature decreases, the bellows contracts and the valve opens the hot water flow through the radiator. By means of the rotary regulator with a scale it is possible to establish the desirable temperature in the room. It can usually be set in the range of 6-28°C. The minimum temperature - 6-8 ° C - is the so-called duty. If the room temperature drops below this value, the valve opens automatically; this prevents the water in the system from freezing, as well as excessive cooling of the room.
Tichelman's scheme for piping radiators of three floors
We look at the picture:
Here, too, not each floor has its own piping, but one piping, made according to the Tichelman scheme for all three floors at the same time.The risers are made, for example, with a metal-plastic pipe with a diameter of 26 mm, the supply and return on the floors with a diameter of 20 mm, and the outlets to the radiators with a pipe of 16 mm.
But still! If possible, it is better to connect each floor separately and with its own pump, otherwise, if there is one pump for all floors, then if the pump fails, there will be no heating on all floors at once.
So, let's draw conclusions.
The Tichelman scheme has advantages over other radiator piping schemes: 1) versatility (suitable for any premises, layouts, etc., including large areas); 2) all radiators are heated evenly. Despite the external complexity, mastering the installation of heating according to this scheme is quite affordable. Just read again about the diameters of the pipes with such a wiring. And - use it. Good luck.
Tichelman scheme
A lot of factors influence the organization of heating of one-story houses, which makes it possible to implement various heating systems that are optimal in specific conditions. The main thing is the purpose of housing (permanent residence or only seasonal vacation)
In addition, the materials from which the structure was built, its parameters, terrain, etc. are taken into account.
In small summer houses, stove or electric heating is installed, and in large country cottages, which are far from settlements, liquid-solar heating is installed.
Of great importance is the autonomy of the heating system from external energy sources (electricity, gas, etc.).
There are several types of heating for a private one-story house:
- Gravity flow;
- Single pipe;
- Two-pipe.
The device and features of a single-pipe system
Such heating systems can be:
- horizontal (flow-through);
- with top wiring (vertical).
Both systems can be either closed or open.
 The classic (most commonly used) is horizontal piping. To complete any battery, you can purchase:
- radiator regulator;
- Ball Valves;
- thermostatic valve, etc.
As mentioned at the beginning of the article, one of the advantages of a one-pipe system is the ability to hide communications in the floor. This is an important factor, because now few people hide heating radiators behind curtains, and this is not practical, since air circulation near the batteries is disturbed, as a result of which it is necessary to raise the temperature on the boiler, and this leads to unnecessary fuel consumption.
Advantages
- Installation of a single-pipe system is carried out with a smaller number of pipes (30–40%).
- A simple wiring diagram, the installation of which can be performed by a non-specialist.
- Compared to a two-pipe heating system, installation of a single-pipe heating system is faster.
- The system can be installed both in a one-story house and in a house with several floors.
- There are no problems about how to bypass the doorway when installing pipes.
Flaws
Having talked about the advantages, it is necessary to mention the disadvantages.
- Each battery must be equipped with a Mayevsky crane or an automatic bleed system from the air system.
- Uneven distribution of the coolant - more chilled water comes to each next battery, so the efficiency of the last radiator will be low. The situation can be improved by installing a circulation pump in the system.
Installation
For the installation of the heating system considered in the article, not so many tools are required. This:
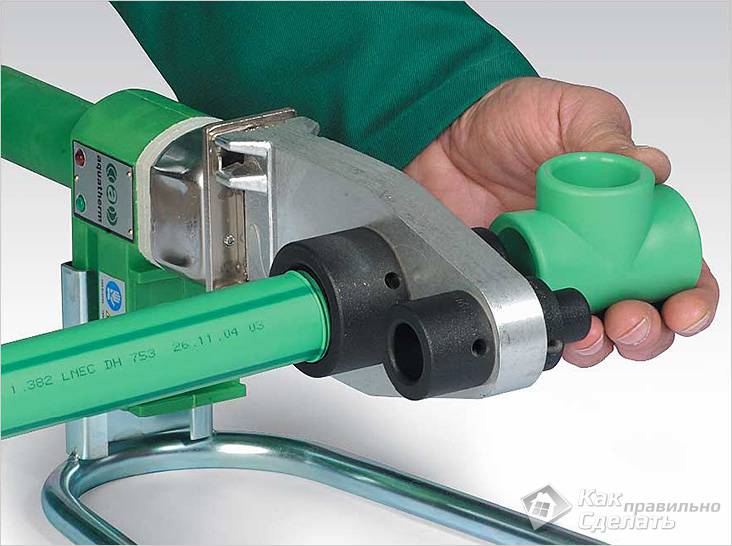
- soldering iron for mounting plastic pipes;
- scissors for cutting plastic pipes;
- shaver (if pipes with external reinforcement are purchased).
The first step is marking on the walls for each battery. They need to be installed under each window - this will prevent cold air from draining to the floor. In order for the battery to fully fulfill its role, its length must be at least 70% of the width of the window opening
It is also important to maintain a distance:
- From the windowsill - 10-12 cm.
- From the wall - 3-5 cm.
- From the floor - 8-12 cm.
When purchasing batteries, these requirements must be taken into account. Using horizontal markings, it is necessary to mark the places where the fasteners will be installed with such a distance that the installed fasteners are between the sections of the installed battery
Using horizontal markings, it is necessary to mark the places where the fasteners will be installed with such a distance that the installed fasteners are between the sections of the installed battery.
Holes are drilled in the wall with a puncher, into which we install fasteners.
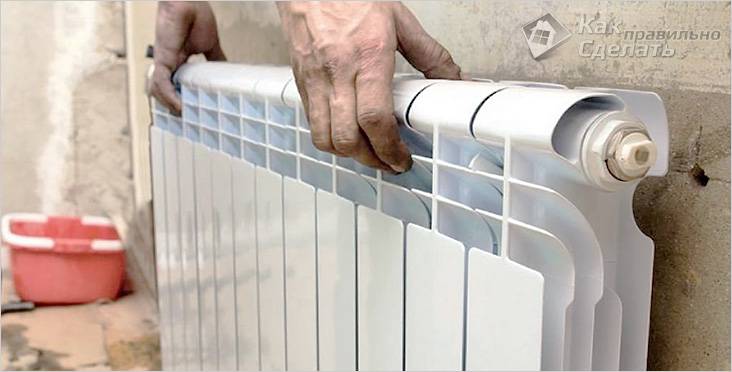
Now we need to prepare the batteries. If they are covered with a film from the factory, then it does not need to be removed yet.
Adhering to the plan, we install air vents, thermostats and ball valves.
We hang the batteries in their places and use the building level to check the horizontal position of their position.
The next step is soldering the pipes.
It is important not to forget that it is necessary to observe the slope of the main highway.
It is better to install a bypass with a pump on the return line in front of the boiler.
It is mandatory to install an expansion tank and a block with elements of the safety group.
It is not necessary to fill a single-pipe heating system with water from the bottom point, since all the same, each radiator will be with air that needs to be bled. If an automatic air vent system is installed, then they themselves will cope with this task.
It remains to start the boiler and check the performance of the self-assembled single-pipe system.