Helpful Hints
When you put the oven with your own hands, you must take into account and take into account the rules used by experienced stove-makers
- Before you start work, carefully sort the bricks so that when laying it is easy to match them to each other. All necessary bricks are bought in one batch.
The density and amount of the mortar must be such that it completely fills the seams between the bricks, both horizontal and vertical.
In addition to the fact that the seams of the masonry must be uniform, they must also be thin, no more than 0.5 cm, and even less for fireclay (refractory).
If the brick was laid unevenly, it cannot be moved, it must be removed, the mortar removed, lubricated with a new one, and only then, put back in place.
When you lay the chimney, and fireboxes: parts that require perfect smoothness and evenness, the solution will have to be leveled by hand, this will help to feel the bumps and remove solid particles.

Depending on the design, the seams can be straight, convex or concave. Convexity and concavity are attached with special tools.
Sometimes, the design requires plastering. If plastering of the array is planned in the future, the seams are not leveled, leaving them as they are - unfilled.
In modern rural life, the stove has retained its functions, it serves for heating and cooking, and it has also retained its functions in summer cottages where there is no centralized heating. Fireplaces, in modern cottages where there is central heating, are rather interior details and are the center of the recreation area in the house. Tiled structures are suitable for some interiors, but tiles are quite expensive and only a highly qualified master can lay a stove with tiles.
If you decide to build a heating unit with your own hands, it is better to thoroughly study all the little things and nuances of this work. You will have to learn how to read the diagrams that show the serial laying of the furnace. If earlier buildings were built with a channel system of gas outlets, then modern masters prefer to install more efficient bell structures, in which smoke is removed a little differently. Many owners prefer to install combined designs with a fireplace and a cooking part. This is required by fashion trends and the great functionality of such hybrids.
Many sites have appeared on the Internet where visitors are offered the ordering of the furnace. Since some of them are not trustworthy, let a qualified person give useful advice on installing the furnace and calculate the dimensions.
Only after serious preparation, you will be able to build a heating device that will delight you for many years.
Brick laying process
To get even rows, pull the thread from one edge to the other, you can also control the brick row with a long level. Clay or special oven mortar is placed with a trowel, although some experienced stove-makers carry out such an operation simply with their hands. The solution is taken with the right hand, a wet brick is held in the left hand, the place prepared for the brick is smeared with the solution. The brick itself is also completely covered with mortar, except for the upper "bed". A solution is also applied to the edge of an adjacent brick, and the inserted brick is pressed into the masonry with the right hand. Excess mortar can be trimmed with a trowel. (See also: What is the oven temperature)
Furnace masonry technique
The technical requirements for the construction of furnaces differ significantly from the brickwork of building elements, therefore, even the most skilled stove-makers, before starting to lay a brick furnace, lay the first row dry, without mortar. If necessary, bricks are hewn, achieving maximum density. (See also: Do-it-yourself stove plastering)
This bookmark allows you to:
- check the equality of the diagonals of the base of the future heating agent. A similar measurement is done every 3-4 rows;
correct dimensions, seams are also taken into account here;
the evenness of the arrangement of bricks horizontally.
It is the first row that is the basis and prerequisite for correctness when laying subsequent rows, so there is no need to save time on aligning small errors in the first row. This will save you from the difficulties that may arise if you do not take this process seriously.
Dry brick is a porous material, so it can absorb a lot of moisture from the mortar. This negatively affects the setting properties of the solution. Therefore, experienced craftsmen who value their name, before starting laying the furnace, soak the bricks for a short time. Fireclay brick does not have a highly porous structure, so it is wetted only to remove dust. (See also: How to tile a stove)
When preparing materials for the construction of the furnace, it is necessary to buy several types of bricks. Bricklaying also plays an important role. If a brick has a protective edge with a high density, then during laying this edge is directed inside the firebox. There is a high temperature, and the dense side is more durable and can come into contact with fire. If the outer side is ugly, then it is processed and given an attractive appearance. If there is no desire to process bricks, cover the firebox with fireclay bricks, all its faces have the same density.
Since most often the stove is laid from different bricks, different solutions are also used. Refractory bricks, which are laid around the firebox, are in no case tied up with ceramic red or any other brick, which is used to lay the structure itself. Between them there is a dry seam of a few mm. This is necessary, because different bricks have a different coefficient of expansion under the influence of thermal energy.
How to install a fireplace stove, safety rules
If you decide not to use a safer method in the form of installing an electric fireplace, then you need to clearly understand that installing a real fireplace stove is responsible for the fire safety of the facility. Therefore, you must always remember about safety at all stages of choosing a place and installing a fireplace stove.
To do this, you need to know how to install a fireplace, what fire safety standards and requirements to take into account during installation and installation. All this is necessary in order to avoid problems with security and use in the future.
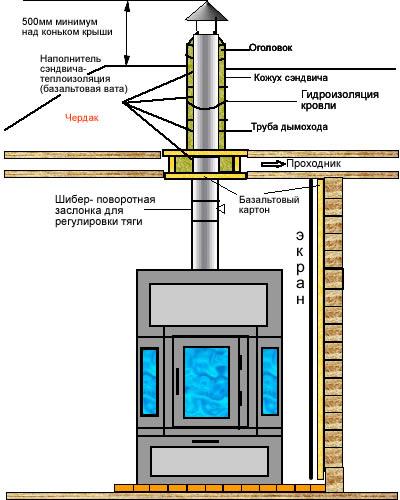 Typical scheme of the chimney of a fireplace stove
Below, a video story is presented for viewing on how to install a fireplace stove according to the above diagram:
How to install a fireplace stove according to the scheme
In the diagram below, you can see what kind of mistake is usually made when installing a fireplace stove. These omissions can lead to disastrous consequences related to fire safety and proper operation of the furnace.
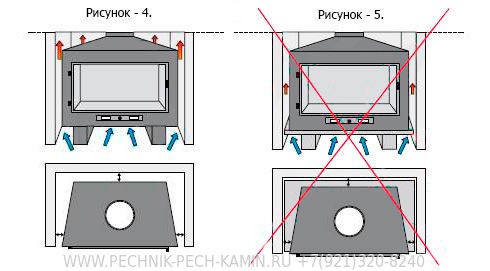 Scheme of correct and incorrect installation of a fireplace stove
The following image shows clearly how the fireplace stove installation diagram should look like in order to avoid inaccuracies in installation.
 Scheme of the correct installation of the fireplace stove
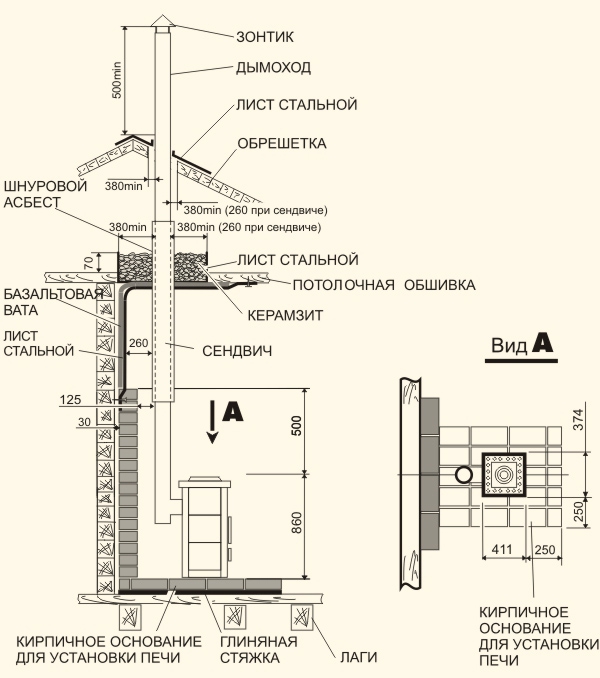
Let's try to figure out the diagram for a better understanding of how to install the fireplace stove correctly:
- The fireplace stove is installed only on a pre-prepared brick base using a clay screed and a log. The distance from the brickwork to the fireplace should not be less than 125 mm. See clearly View A, in the diagram;
- The corner from the wall to the ceiling, to which the fireplace stove will be installed, must be sheathed with basalt wool to prevent fire;
- On top of the basalt wool, on the wall and ceiling to which the fireplace will be installed, we sew a steel sheet at a distance of 260 mm to the chimney;
- On the ceiling, in the place where the chimney is led out, we fill up the corded asbestos. In this case, the thickness of the ceiling sheathing should not be less than 70 mm. And the width of the box for corded asbestos should be 380 mm from each edge of the chimney;
- The length of the chimney from the roof to the chimney umbrella is 500 mm;
- The roofing at the exit of the chimney must also be sheathed with sheathing and steel sheet.
How to install a fireplace stove - installation errors
 All errors when installing stove-fireplaces in the diagram
From the proposed scheme, we can clearly see all the main mistakes that should not be made during the installation and installation of the fireplace stove. Let's take a closer look at the most important ones:
- Lack of holes for air circulation in the fireplace insert;
- Lack of reinforcement of the chimney floor;
- Lack of air flow at the base of the fireplace;
- No condensate drain;
- Unreliable connection between the fireplace inlet and the chimney;
- Lack of ventilation of the fireplace channel at the exit;
- There is no air passage under the beam and insulation from the side of the fireplace insert;
- Lack of a decompression chamber;
- The roof covering is not insulated against overheating.
How to install a fireplace stove - installation process
When starting to install a fireplace stove, carefully read the previous chapter, which lists the main installation errors. Having eliminated all the shortcomings and carried out work to prevent their occurrence, you can easily cope with the installation of a fireplace stove with your own hands.
Follow the instructions clearly and then the installation of the fireplace stove will take place, as they say, without a hitch.
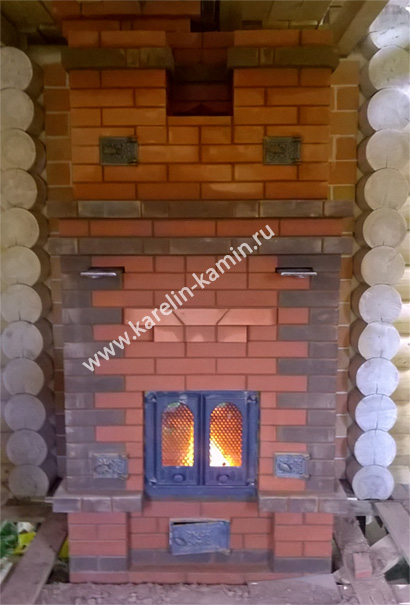
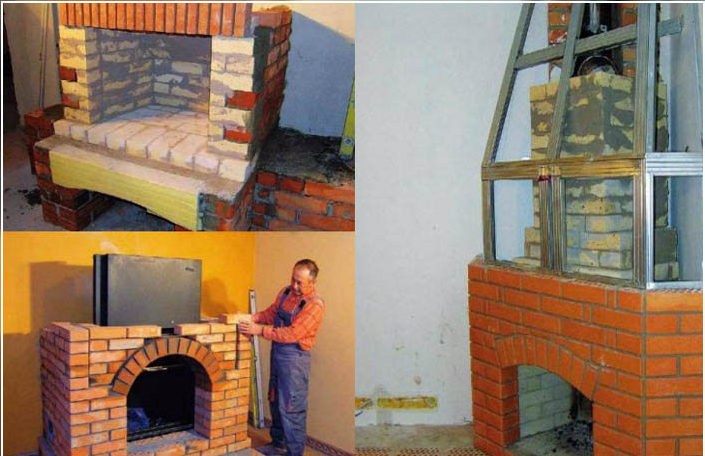 We install a fireplace stove in the country with our own hands
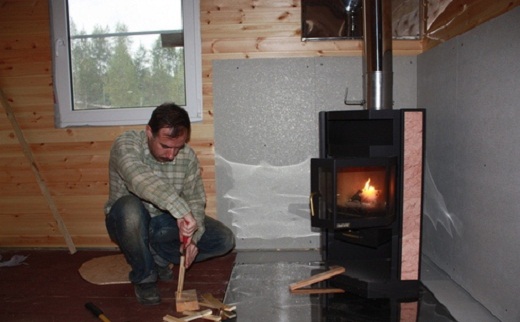 Completion of the installation of the fireplace stove in the house
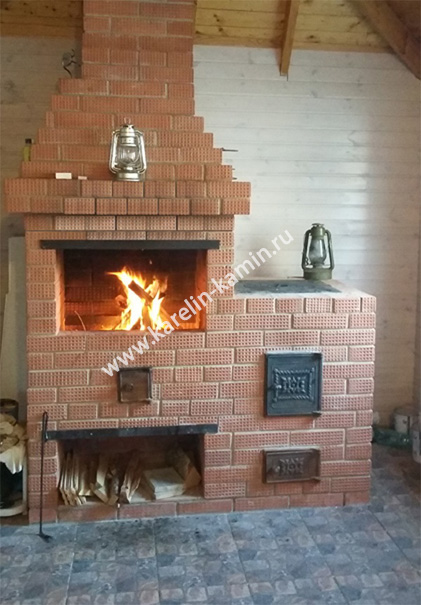
Wall fireplace with podium
The peculiarity of this fireplace is the absence of an ash pan and a straight chimney of a simple shape. In the lower part of the fireplace there is a semicircular podium placed forward. It serves not only for decorative purposes, but also for safety: the firebox of this fireplace is shallow, and sparks are possible. The firebox is lined with refractory bricks.
The narrowing of the firebox in the rear part forms a ledge - a gas tooth. The mantelpiece is made of wood and rests on a semi-circular log. The simple shape of this fireplace will fit perfectly into a hunting-style house.
Example of a wall fireplace with a podium
As you can see from the article, it’s not difficult to lay stoves and fireplaces with your own hands, drawings and diagrams will help you understand the intricacies of the stove craft. You can also learn how to properly make a foundation for a fireplace, knead the masonry mortar and lay bricks from the article on laying a fireplace with your own hands.
Throughout time, the main place in the house was given to the hearth. Recently, fireplaces in houses and cottages have gained great popularity, and the question of how to fold a fireplace with your own hands is quite relevant.
Any stove - fireplace must meet the following requirements:
- No smoke. Room heating. Beautiful appearance.
To achieve these goals, it is necessary to comply with all stages of construction.
Laboratory and practical work
The oven training program includes laying models of stoves, fireplaces and barbecues according to the drawings attached to this manual. When laying exact copies of furnaces, knowledge of the whole complex of furnace works is acquired. The mock-ups of all the studied distance learning furnaces must be folded several times according to the drawing, until it becomes possible to fold them without a drawing in several versions - with a change in the location of the firebox, the cooking floor, the pipe channel, etc. During the period of training in the stove business, such a number of different types of stoves and fireplaces are mastered that it will take many years for novice stove-makers-practitioners, with the inevitable commission of various kinds of mistakes, often leading to shifting their work.
| Masonry layout according to project No. 155 Fireplace stove - 3000 | Laying a fireplace stove according to project No. 155 |
 |
 |
| Masonry layout according to project No. 226 (A) Barbecue fireplace | Masonry barbecue fireplace according to project No. 226 (A) |
 |
 |
| Masonry layout according to project No. 202 POV - 2200 barbecue | Furnace laying according to project No. 202 |
 |
 |
Classification of brick kilns
Brick heating units are classified into:
- heating;
heating and cooking;
Russians;
bath;
fireplaces;
combined.
Heating stoves are used only for space heating purposes. These are the notorious "Dutch". They came to Russia in the 17th century, they looked rich, because they were lined with tiles. "Dutch" is a rectangle built of bricks and does not have wide functionality.
Heating and cooking stoves are distinguished by great functionality and are used both for space heating and for cooking. A brick oven with a stove and an oven is commonly called a "Swede". There is an opinion that heating and cooking brick structures began to be called this way, after the Swedish craftsmen under Peter I created a manufactory that produces tiles that were used to line these heating units.
Russian - they call wind ovens, which are not fundamentally different from heating and cooking, but more functional. If we consider the possibilities of the Russian stove, we can see that this is a truly unique folk invention that allows not only to heat the room and cook food. It helps dry and heal. At the same time, occupying a large area, it is also a piece of furniture. The best option for a rural resident is such a unit with lower heating. (See also: Do-it-yourself adobe oven)
Sauna stoves are an integral part of both the Russian banya and the Finnish sauna. Such stoves have another name - heaters. They have a place on which stones are laid, red-hot. This effect can only be achieved when the fire passes through the stones. Heaters have to work in high humidity and extremely high thermal conditions. Therefore, they are complex and expensive products.
Fireplaces are probably the most popular brick heating units. Despite the ultra-high popularity, fireplaces are the heating unit with the lowest efficiency. The popularity of fireplaces has become a prerequisite for the emergence of imitations, which are just a detail of the interior and nothing more. A real fireplace is only an open hearth made of brick, even if it is not finished. The fireplace should burn and, albeit a little, but give off heat. However, fashion trends have turned it into expensive consumer goods.