Types of furnaces with a built-in boiler
The design can be made of metal or brick with different placement of the heater, with a boiler for heating water for washing, if we are talking about a bath. Dimensions are not limited: the choice of parameters is determined taking into account the dimensions of the room, the building materials of the building, as well as the local climate.

Consideration should be given to the design features of two types of furnaces with heating boilers:
- The boiler is built into the chimney. This model has a long service life, the walls of the stove completely receive heat from the furnace, the heat transfer indicators are unchanged. Disadvantage: can not heat a large area.
- The boiler is located directly in the furnace. You can heat a large area of the room. It is possible to use different types of heat exchanger. Disadvantages: metal parts are in direct contact with fire, as a result of which they are destroyed. Due to the low temperature of the heat exchanger, condensate is generated, which later causes a lot of soot to adhere to the surface, as a result of which the efficiency decreases.
Masonry and brick
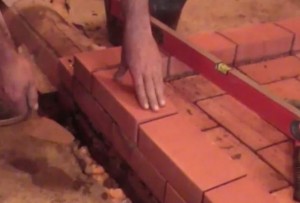
The principle of bricklaying
Stove-makers have enjoyed well-deserved respect for a long time. Masters of their craft create stoves with a heating boiler, which always have good “draft” and a uniformly heated surface.
There are several general rules that all experts without exception follow:
- The combustion chambers are made of refractory materials. Open fire can easily damage ordinary brick and even stone.
- You should not save on materials by laying the walls in a quarter of a brick. This reduces the reliability and stability of the entire structure.
- It is necessary to carefully monitor the tightness of the seams. Any gap will subsequently let carbon monoxide through, which is dangerous for the life of the inhabitants of the house.
Sometimes homeowners resort to a little trick by equipping separate chambers for heating and cooking in the summer. This is a completely justified solution that allows you to save fuel in the warm season.
Boiler laying and installation of a horizontal heat exchanger
A do-it-yourself heat exchanger according to any of the options is installed in a brick boiler. The latter is laid on the same principle as a brick oven.
The dimensions of a solid fuel boiler must be proportional to the volume of the premises to be heated by it. The values available in the article are given per house with an area of 90-100 square meters. m. with 6 cast iron radiators and wiring from 2 pipes (25-50 mm).
The choice and design of the boiler piping should be based on many factors:
- How many circuits in the system.
- How complex is the system.
- Is there any other equipment.
 The entire boiler must stand on a solid reinforced concrete base. The size of the foundation is selected based on the dimensions of the furnace. When laying a solid fuel boiler, the heat exchanger must be positioned so that the outlet pipe is the highest point. The height difference must be at least 10 mm. This is necessary so that a plug of air does not form in the boiler during filling with water. Also, this slope will improve the circulation of fluid.
Brickwork is carried out with their own hands, observing the rules for dressing the seams. The pipes should be about 2-3 cm lower than the brick wall itself. To prevent a decrease in efficiency, it is necessary that there is a removable cast-iron plate on top of the boiler for easier cleaning. The smoke is removed into a separate or root pipe. The pipe can be brick or metal.
Assembly of radiators
Assembling radiators is a simple process, because it completely repeats the process of disassembling them. Sections are connected by nipples, which have left and right threads on both sides. Thus, the sections from above and below will be attracted tightly to one another when the nipple is scrolled.When the gap becomes 2 cm wide, you should wind the asbestos impregnated cord and only then tighten the nipples to the end.
When the whole structure is assembled, you should wait until the drying oil dries, and then check the joints for leaks. that is, to supply water under high pressure to the radiator. This will secure the subsequent use of the radiator, and there will be no leaks.
It is necessary to connect the return and supply pipes of the coolant diagonally to the radiators. Holes that remain open must be closed with plugs. It is better to take inch pipes. There will be a right-hand thread on one of the sides on the radiator, so there will be no difficulties with the connection. On the opposite side, use a sleeve with a squeegee and a nipple.
What dimensions should the chimney have?
Chimney options.
Draft in the chimney channel will occur due to differences in the height of the inlet and outlet, as well as due to temperature differences. To ensure the continuous operation of any device for heating, you will need to make a strong thrust
Before starting masonry, it is important to decide what type of device for heating will be used, what dimensions it has and how many channels are planned to be made
The number of channels can be determined according to the appliance's output for heating, fuel and the specific requirements of the appliance manufacturer.
If the diameter of the chimney channel significantly exceeds the calculated value, the draft in such a channel will greatly decrease. As a result, there will be frequent interruptions in the operation of a gas boiler or other heating device. If the diameter of the channel is smaller, then this may prevent the removal of combustion products. It is for this reason that in most cases the operation of boilers stops.
To make brick channels, you will need to use ceramic bricks of the M50-75 brand. You can also use concrete blocks that have channels with a square section.
If you plan to use ceramic bricks for the manufacture of the chimney, then you should know that its minimum cross section is 14x14 cm. If you plan to purchase a material with a round cross section, then the allowable diameter is 15 cm or more.
In a brick chimney with a height of less than 5 m, the dimensions of the channels must be increased to 14x20 cm or up to 18 cm in diameter. Similar structures should be made in the walls between the rooms that are planned to be heated. In this way, it will be possible to create a certain protection of the supporting structures from cooling, which in most cases leads to a weakening of traction.
It is necessary to try to group the chimney channels so that in the device that will be displayed above the roof, their number is maximum. Thus, it will be possible to reduce the financial costs of manufacturing work and significantly improve the performance of the chimney device.
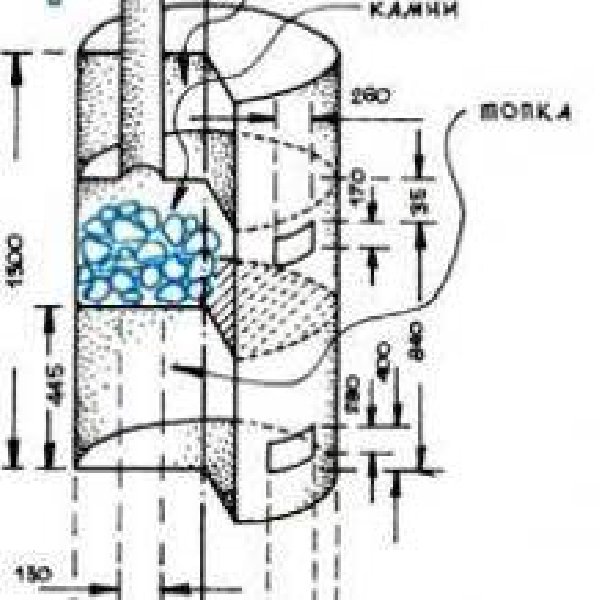
Masonry brick oven with a water boiler
Scheme of the device of a solid fuel boiler.
The laying of a brick oven with a water boiler is carried out in the following sequence:
- The foundation is poured under the location of the furnace.
- While the foundation dries, a solution of clay and sand is mixed in a ratio of 1: 2. Depending on the fat content of the clay, this proportion can be changed. Prior to the preparation of the mixture, the clay is soaked in water for 10-12 hours (large lumps of clay must be kneaded by hand). Before laying, sand and clay are thoroughly mixed.
- Waterproofing is laid out on the dried foundation - usually roofing material with the size of the future furnace.
- A layer of mortar is applied over the waterproofing, the first layer of bricks is leveled and laid. It should be noted that it is better to use a beautiful brick for the outer layer, it will look more aesthetically pleasing. The inner layers can be formed from defective or broken bricks.
- Each layer of brick is carefully covered with mortar.
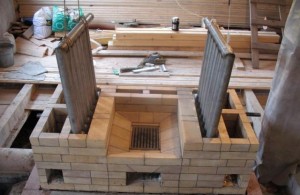
- At the required height, a compartment for ash is made and the firebox itself.
- A sheet of metal is placed in the ash compartment, in order to further conveniently remove the ash residues. Here the blower door is installed.
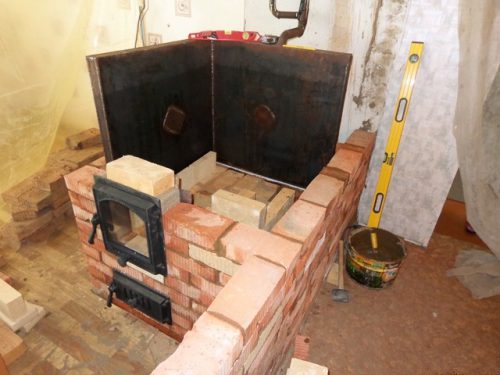
- Behind the firebox, in front of the chimney, a water boiler is installed. For him, brick ledges with metal corners are being built. A level must be used to prevent air pockets from forming. A door for loading fuel is fixed in the furnace itself.
- A metal plate is placed on top of the boiler, a chimney and a cleaning system are formed. It would be useful to make a separate door for cleaning the boiler from soot.
- A metal sheet is fixed on the floor in front of the firebox in order to comply with fire safety rules.
Diagram of the boiler device.
At the first kindling of the furnace made, it is necessary to monitor the health of the system and the absence of leaks. The room must be ventilated, as often during the first heating there are unpleasant odors of burnable industrial lubricants and heating clay. It is produced for at least an hour with the maximum possible amount of fuel.
A brick oven with a homemade boiler is one of the best ways to heat small country houses, which will allow you to enjoy the warmth on cold winter evenings and save your budget.
Cast iron radiators as a boiler
You can build old radiators into a brick oven, and they will serve as a boiler. Cast iron built-in water heating elements have their own characteristics, for example, cast iron does not respond very well to open fire. Nevertheless, this method is used, and quite widely. You can use the M-140 radiator, which can be easily found at the demolition sites of five-story houses. If you weld a dozen sections, you will get a heater with an area of 3 square meters and 18 liters of capacity. A flat boiler with the same characteristics would require a lot of space. Such boilers can heat large areas.
Before the radiators are welded together, they must be disassembled, cleaned of dirt and thoroughly washed with hot 6% hydrochloric acid solution. Then rinse again with water. Then change the cardboard pads between the sections, as they simply burn out. Instead, use an asbestos cord impregnated with graphite powder and natural drying oil.
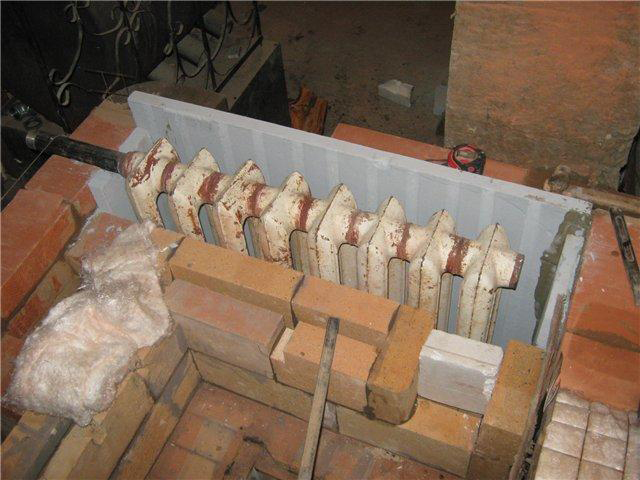
The elements of the radiator should be assembled in a certain sequence. Screw the nipples with their right and left threads into the connected sections, then wind the impregnated asbestos cord around them and tighten both nipples with a wrench, make sure that the sections are not skewed. After connecting the two sections, you can attach the third, then compress the radiator to check the quality of the assembly. Now you can mount the risers.
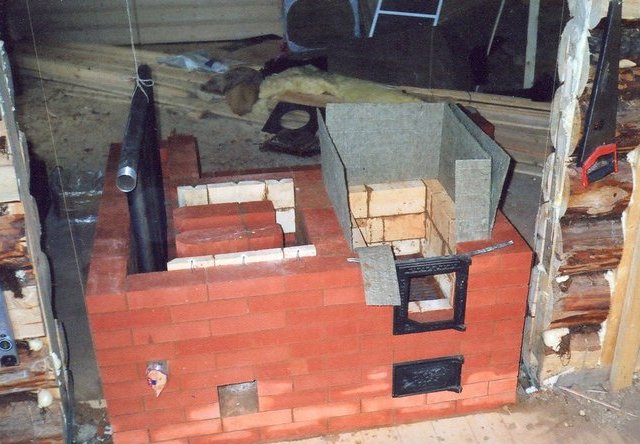
Diagonally, you can arrange the inlet of cold and outlet of hot water. The other two holes can be plugged to allow water to circulate through the entire volume. The radiator must be mounted in the smoke channel located behind the firebox. This will help to avoid contact of cast iron with open fire: the boiler will be heated by hot gases.
An increase in the natural circulation of water in such furnaces can be achieved if the return line pipe is passed through its foundation and the space under the floor, thereby increasing the temperature difference between the return and the hot line. The battery in the furnace is installed with a slight slope for air to escape and enter the system. For cleaning, an additional door can be built into the smoke channel itself.
Boiler installation
During the implementation of plans to create a combined heating system, it is important to pay attention to some features. Brick ovens with water heating have many options, each of which differs in material, type of main element and other nuances. Ignoring the technical and construction requirements will necessarily lead to the rejection of all work.
Ignoring the technical and construction requirements will necessarily lead to the rejection of the entire work.
The boiler must be completely placed in the furnace. However, in practice there are incidental situations when part of the heat exchanger is located outside the stove. This is unacceptable, because the main task of the node is to heat the coolant. The boiler is made with the letter "P" from pipes or sheet iron. All its elements are hollow and designed for heat extraction.
Pipes are preferred. It has a larger convection area and allows the flame to reach the hob to cook food. In addition, attention should be paid to:
Dimensions. It would seem that a massive product is needed that can heat a lot of water and provide heat to a decent-sized building. But it's not. The boiler itself is made in very modest dimensions - 75 * 50 * 30 cm (length, width, height). The convection surface of such a device is enough to heat a house up to 200 square meters. Installing a pump for forced circulation of the coolant increases productivity up to 50%.
Boiler. Its shape is designed in such a way that the heated surface area is as large as possible.
It is very important to install it in the center of the combustion chamber. This is the only way to get high efficiency of water heating.
Peculiarities
A small gap must be left between the walls of the furnace and the surface of the boiler. The optimal distance is considered to be 5 millimeters. It is quite enough to level the free movement of the metal during thermal expansion.
The outlet and inlet heat supply lines are carried out in strict accordance with the laws of physics. From the school bench it is known that hot streams tend to go up, and cold ones always go down. Therefore, the pipe supplying hot water to the house always adjoins the boiler at the top point, and the channel with the "return" - at the lowest point. This arrangement eliminates the accumulation of hot steam, which poses a serious threat to the integrity of the system.
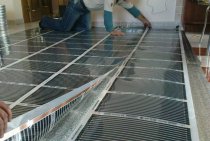
Flat heat exchanger
A popular variant that is used as for sauna stovesas well as for the home. The most simple to manufacture, the surface is easily cleaned from soot accumulations, installation is possible both vertically and horizontally, the efficiency is relatively high.
A flat boiler can have a high volume, so you can take hot water for washing directly from the heating system. An expansion tank with an increased linear size is being installed, where water constantly flows after the level drops below the critical one. This option is quite convenient and helps to solve several problems at once, but there is also a condition - the temperature of the room in winter should not drop to minus.
Key disadvantage: a sharp decrease in heat transfer from the furnace walls. This type of heat exchanger is made in the shape of the letter "P" and is installed around the perimeter of the furnace, bypassing the door. As a result, it turns out that the temperature of the outer walls is rather low, as a result, the heating of the room takes much longer. This is critical only if the stove is installed in a bathhouse, for residential buildings where the stove is constantly heated, increasing the warm-up time by several hours does not play any role.
Thus, when choosing a flat boiler, think about how you can increase the heating rate. One option is to increase the heater and place it directly above the firebox. The second option: using a metal chimney for heating, increasing its length.
Simple rules for an efficient heat exchanger
The principle of operation of furnace heating.
If the house has a ready-made brick oven, then organizing water heating with your own hands is a fairly simple task. To do this, it is enough to place a home-made boiler in the form of a coil or any other form in the furnace. The main thing to consider in this case:
- Height difference between the liquid outlet from the heat exchanger and the entrance to it;
- It is necessary to ensure the maximum possible surface area;
- The heat exchanger should not interfere with the loading and combustion of fuel.
If you are building a stove with your own hands, then the boiler for a brick oven can be made as efficient as possible. To do this, several important conditions must be met:
- Combustion products should exit the chimney as cold as possible;
- The large heat transfer of furnace gases inside the furnace increases its efficiency;
- The heat exchanger is best placed in the chimney, not in the firebox.
Perhaps these rules will seem somewhat strange, because logically, the heat exchanger should be best heated on the open flame of the firebox. However, it is necessary to take into account other processes occurring in the furnace. From the point of view of physics, the flame is the burning particles of fuel. And if we take away heat from these particles, then they will not burn out completely, which will reduce the usefulness of the furnace.
Scheme of connecting the boiler to the heating system.
In addition, for better heating, the coolant must move towards the heat flow. Only in this way is the temperature difference between different parts of the coolant maintained, increasing the heating efficiency and ensuring its better circulation within the system.
Another advantage of this arrangement of the heating tank is that less condensation forms on it, which contributes to the absence of corrosion.
Masonry stove with boiler
If you decide to delve into the topic, then perhaps you decide to equip the Kuznetsov bell-type furnace, the principle of operation of which is the free flow of gases, which does not require additional energy from the outside. The drawings are on the Internet. Here we will talk about a simpler design. So, first you need to fill in the foundation, the depth of which is 50 - 70 cm. Sand should be covered with a layer of 10-15 cm on the base, crushed stone, gravel or construction debris should be laid on top, and a space of 25-30 cm should be kept for pouring cement. It is best to prepare a solution for the foundation without the use of sand, replacing it with screenings, the ratio will be approximately 1:6. Under the screed and on top of it, roofing material should be laid for waterproofing.
Then a solution of clay + sand should be made in a ratio of 1: 2.5, however, the proportions may vary depending on the level of fat content of the material
It is important not to leave lumps, and therefore the clay must be soaked in the evening. If the mixture slides off the trowel, leaving small streaks on it, then the concentration is appropriate
Before laying, it is necessary to lay the roofing material over the area of the poured foundation and cover it with mortar. The first row is laid out with a pallet completely made of bricks, where the furnace will then be laid. Then the first row of the furnace circuit is laid out, then the next, and so on. During laying, you will need ordering.
Now a firebox, an ash compartment and a blower are being made. Doors are fastened with galvanized wire or a strip of galvanized sheet. It is necessary to cut the brick above the doors with a grinder, but it is best to make one of them with a wedge, so that the masonry does not crack. Make protrusions for the boiler in advance on the brick, which can also be cut with a grinder. Do not forget that the instructions require an even installation, and therefore you should use the level. Then the installation of the firebox and the back of the structure, where the chimney is located with cleaning, is carried out. The pipe must protrude at least 50 cm above the roof.
You can make do-it-yourself stoves for heating your home without being a pro in this business. They are versatile and have a high heat transfer coefficient. A big advantage is their autonomy, since they do not depend on external energy sources. Such boilers can be of any size depending on the area of the heated room.
Water boiler from cast iron radiators
For this type of boiler, M-140 radiators are suitable.They are very easy to find, as they are scrapped in large quantities when radiators are replaced with more modern ones or old buildings are demolished. Each of the sections of such a radiator has a capacity of 1.5 liters, and their area is 0.254 squares. That is, if you combine 12 sections, then the volume of the heat exchanger will be 18 liters, and the area will be 3 squares. Such a boiler has a capacity of up to 100 square meters. So it's enough for a residential building.
In order to use the radiator, you need to redo it a little. Initially, you should remove the cardboard gaskets located between the sections with your own hands. The best replacement for them will be an asbestos cord, which must be impregnated with drying oil with the addition of graphite. Thus, the gaskets will be protected from burning at high temperatures.
In addition, before starting the assembly, the sections should be washed from the inside with a 6% hydrochloric acid solution, and then washed with water as well. This will clean the pipes of dirt and rust that has accumulated there during operation.
Heat exchanger construction
Scheme of installation of the heat exchanger and storage tank.
You can easily build an efficient boiler with your own hands. If it is made in the form of a tank, then high-quality steel is needed, which tolerates heat loads and corrosion due to the coolant well. In addition, the material of manufacture must have a high thermal conductivity in order to increase the efficiency of the system.
The wall thickness of the tank should be within 4-5 mm, which ensures its strength with simultaneous rapid heating. There are no standard sizes for such a heat exchanger, it all depends on the configuration of the existing or planned furnace. The main thing is that the height of the tank is at least 500 mm for better circulation.
If the heat exchanger is a coil or other pipe circuit, then there are also some nuances. Pipes for the manufacture of such structures must be thick-walled and not have seams. If it is difficult to find a seamless pipe, then it is necessary to weld the existing seams to prevent possible leakage of the coolant.
The inlet pipe is best located at the top of the structure, and the return pipe is located in any convenient place. Pipes are not welded end-to-end, but with chamfers to avoid unwelded sections that will flow in the future. The minimum distance between the knees of the structure is 5-6 cm, so that the heating of each knee is maximum. Before placing such a boiler directly into the furnace, it is necessary to fill it with water and check for leaks, which are promptly eliminated.
When placing the boiler directly into the furnace, it is necessary to adhere to the level, however, minor deviations are allowed.
Brick chimney construction
Scheme of laying a chimney made of bricks.
Laying must begin with a tube. It should be laid out in compliance with the brick dressing. After that, a cutting (fluff) is formed. It must be laid out from 5 bricks. The channel will have dimensions of 270x140 mm. The external dimensions of the cutting are 450x590 mm. This can be achieved by inserting brick halves. To comply with the dimensions of the channel, you will need to insert brick plates inside. In this case, the channel will not change.
The next row will have dimensions of 650x510 mm. Brick plates 6 cm thick are mounted inside. At this stage, the cutting will begin to take its shape. In the next row, the external dimensions will be 710x570 mm. Inside you will need to install a material with a thickness of 9-10 cm.
After that, the fluff ends. In the next row, be sure to observe the dressing. If you need to make a cut of a greater height, you can install another row, the dressing should be done under the bottom row.
To exit the riser to the outside, you will need to prepare a hole in the roof. Next, the riser should be carried through the roof.The rest of the work is done on the roof.
At the next stage, the riser is laid out. You need to carefully monitor the dressing of brickwork. The riser must be brought out several rows above the roof. After that, the otter is laid out. The inner plates are selected so that the channel does not expand.
After that, you need to form a neck and a head. The actions will be the same as in the case of the construction of the cutting.
Benefits of combining the two systems
A traditional stove-heater consists of a combustion chamber, grates, an ash pan and channels for removing smoke. All the attributes of a familiar Russian stove are known to every villager. Modern furnaces-boilers visually practically do not differ.
But they have different characteristics:
- An ordinary rural stove in one hour of full-fledged work can produce a little more than 6500 kcal of heat. This energy is enough to create a comfortable microclimate in a small house. For example, this method of heating is suitable for giving.
- If you install a water boiler, then its performance will be 2.5 times greater. Naturally, the area of \u200b\u200bthe heated room will also increase proportionally. The amount of fuel burned is the same. And savings are achieved by improving the selection of heat. That is, less warm gases are emitted into the atmosphere.
- What follows is a very important nuance. If you combine a convection (furnace) and a water (boiler) heating system, then the efficiency increases many times over. The fact is that when both systems are running, their performance is summed up. In other words, a tandem of two heating methods produces about 21,000 kcal per hour of work. This is quite enough to heat about 300 square meters of living space.
- The positive aspect of this method of heat supply is the availability of energy carriers. In most cases, firewood or a combination of them with coal is used. The cost of these types of fuel is low, and acquiring them is not particularly difficult.
- The oven does not need to be heated all the time. Fuel is laid 2 times a day. A comfortable microclimate is created in the house, regardless of the temperature outside the window.
- If the efficiency of a traditional stove did not even reach 50%, then the combined version reaches 85%. And for wood heating, this is almost an ideal indicator.
- The price of materials is low. The cost is usually formed due to installation work.
Rules to know when building a chimney
Diagram of a brick chimney.
The design for solid fuel boilers is made together with the walls of a private house. These elements are constructed according to a single principle, and it does not matter whether the channels will be used as ventilation or smoke channels. Under the chimney, you will definitely need to build a base. The base device can be made of brick or concrete.
In all cases, a draft foundation is prepared. During the design process, it must be taken into account that its height should be at least 30 cm, and the width should be such that the base structure extends beyond the chimney device by 15 cm or more. If the chimney is made as an element of the outer wall, then you need to know that the lower part of the chimney base must be placed at the lower level of the wall base.
Particular attention in the process of constructing chimney structures should be paid to the quality of tightness. To make a durable brick chimney, you will need to follow the rules
Laying the material should be done so that the seams overlap with the elements of the next row. In most cases, the same mixture is used as for the construction of the load-bearing walls of the structure.
In the process of manufacturing a chimney for a solid fuel boiler, it must be taken into account that its inner base must be smooth.
Therefore, when performing construction work, you need to use a template.The walls between the elements should be at least half a brick thick. For ventilation elements, the thickness of the partition should be 2 times less.
At the end, you need to make a headband. The extreme parts of the element should protrude beyond the structure by 10 cm or more. Ventilation duct outlets must be created under the head, in most cases 2 walls are used, which are placed one opposite the other. This method of placement will prevent air from blowing out.
How to make a brick chimney for a boiler
- Requirements for the construction of chimneys
- What dimensions should the chimney have?
- Rules to know when building a chimney
- Brick chimney construction
A brick chimney for a boiler must be provided for by the project even before work is carried out on the construction of a private house. The choice of chimney will depend on what type of heating equipment is planned to be used. Therefore, even at the stage of drafting the project, it will be necessary to determine the type of boiler to be installed. A brick chimney is cheaper than structures made of other materials. Such a device can easily withstand high temperatures of combustion products.
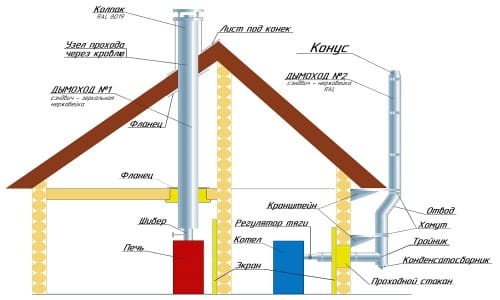
Options for the location of the chimney in the house.
Making a design requires some skills. You should be aware that the roughness of the walls will contribute to the accumulation of soot. Therefore, all elements must be smooth. It is not recommended to make a rectangular device, as this will make it difficult to clean the chimney structure from deposits.
First of all, in the project, and then during the installation of the chimney, regardless of the type of boiler used, it will be necessary to take into account the ratio of heat loss and heat generation. It will also be necessary to determine the purity of the air in the rooms.
Elements that will be needed for the construction of the structure: