Why is it worth insulating the floor of the loggia with Penoplex
The floor of the loggia requires heat-saving insulation that provides suitable temperature conditions for human life. This is exactly what Penoplex is - extruded tiled polystyrene foam, which has a number of other advantages:
- It has high compressive strength - no matter what Penoplex is filled with and covered from above, it will not lose its shape, the floor will withstand any load.
- Penoplex is resistant to burning and biological decomposition.
- It is environmentally friendly - therefore, a loggia insulated with Penoplex is safe and does not adversely affect health.
- It has low water absorption and vapor permeability.
- Minimum layer thickness (20 mm) compared to other insulation with the same heat transfer resistance.
Description of Penoplex
Specifications:
| Name | Units | Indicator |
| Soundproofing | dB | 41 |
| Operating temperature | °С | -50 … +75 |
| Water absorption per day | % by volume | 0,5 |
| Density | kg/m³ | 25,0 – 47,0 |
| Bending strength | MPa | 0,25 – 0,7 |
Insulation of the loggia floor with Penoplex
You can insulate the floor yourself within one to two days. The technology of work provides for glazing the loggia if necessary, cleaning, sealing cracks with foam, processing and leveling the rough surface, laying waterproofing and vapor barrier. After that, the method of mounting Penoplex plates is selected:
- Fastening with dowels-fungi.
- Finish with Penoplex sheathing using an adhesive base.
- Lay it under metal profiles or wooden logs.
The screed is perfect for the tiled floor of the loggia. When the insulation panels are fixed on the floor, you can either install a crate on them or pour a cement-sand mortar.
If preference is given to wooden slats, then it is better to finish the finish with tongue and groove boards, laminate or parquet. An electric heater will serve as a good addition to the finished floor heating. The ability to quickly sheathe the floor of the loggia with Penoplex with your own hands is its main advantage.
For a long service life, it is possible to insulate with Penoplex not only the floor, but also the walls, the ceiling of the loggia.

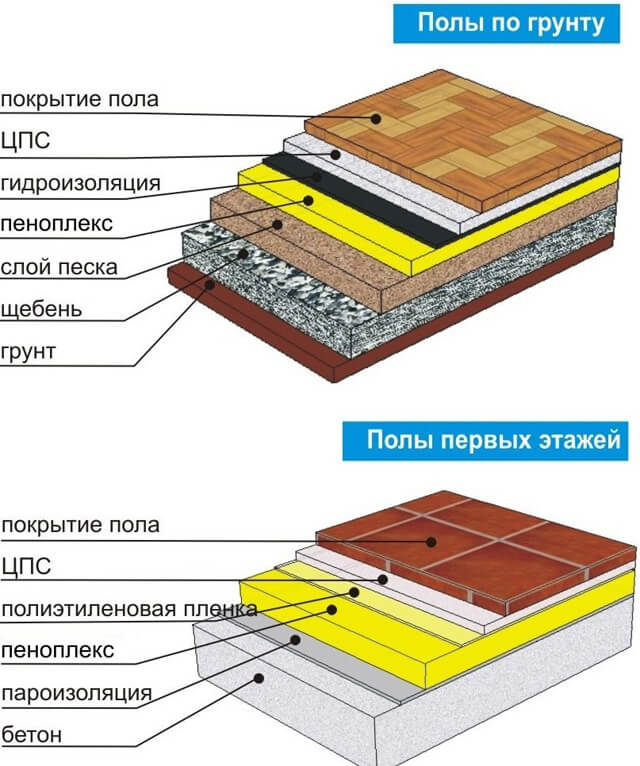
Warming over the ground
To carry out the work we need:
- gravel or small gravel;
- sand and cement;
- building level and rule;
- ramming device;
- reinforcing mesh;
- metallized tape;
- moisture insulating material;
- metal beacons;
- alabaster;
- penoplex.
Work is performed in the following sequence:
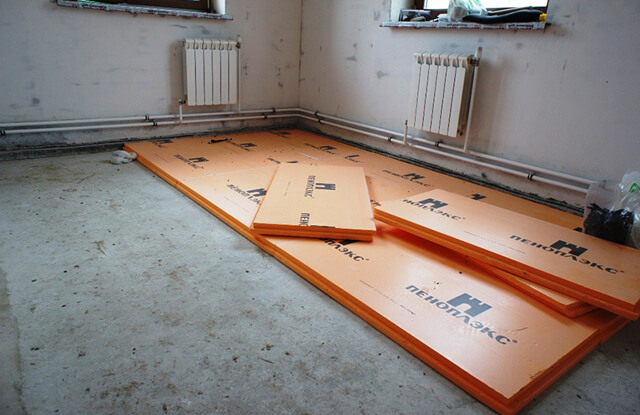
If you plan to insulate the floor in a garage or other similar room that experiences heavy loads on the floor, a water-repellent material is laid on a sand cushion, a mesh of reinforcement and a concrete screed is made. In this case, the thickness of the screed will be greater and usually equals 5-10 cm. Then the foam is laid, but only after the concrete base has completely dried. Therefore, a foam screed with a device technology similar to that for residential premises will differ only in the thickness of the layer.
How to insulate a wooden floor
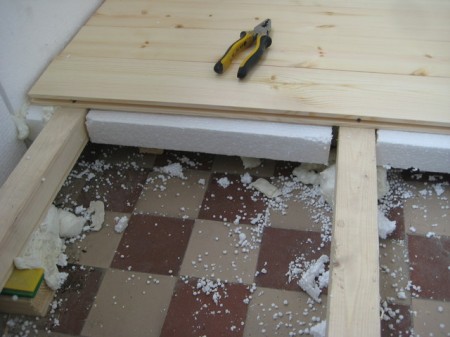
You can lay a layer of foam directly on top of the plank base, if it is in good condition.
The sequence of actions for warming the floor from the boards:
- We remove skirting boards and topcoat. Subsequent insulation should be carried out only after checking the quality of the lag. To do this, you need to remove a couple of boards and assess their condition. All damaged areas with mold, black spots or eaten by insects must be replaced. If the logs are well preserved, you can nail the boards into place, and then check the horizontal position from the location.
- The leveling of the wooden base is carried out with a grinding wheel, and the cracks and recesses are filled with wood putty.
- Next, the boards are treated with antiseptic primer and allowed to dry well. Very porous wood is covered with 2 or 3 layers of primer.
- Penoplex can be laid on a dry base. The laying method is similar to the previous one - the plates are put on glue, placing them apart. If there are gaps between the plates, they should be foamed. The composition of the foam should not include toluene, which destroys the foam.
- A vapor barrier is laid over the insulation. The canvases are overlapped by 10 cm, and the edges should overlap the walls a little. Subsequently, all excess will be removed.
- Next, a layer of plywood or chipboard is laid, placing them apart at half the width of the canvas so that the seams do not converge in one place. During the laying process, it is necessary to control the level relative to the horizon. The surface to be laid must be completely flat.
- At the finishing stage, you can lay the final coating.
That is, floor insulation with penoplex along the lags is simply not advisable. Therefore, we recommend using cheaper materials for such a base, for example, mineral wool or foam.
Floor insulation with foam. General information
In general, to implement the technology of floor insulation with foam plastic, you will need: floor screed, profiles for screed beacons, polyethylene film (waterproofing) with a density of at least 200 microns
At the same time, it is important to observe the proportions of the screed - 1: 4 (one part of cement M400-M500 and four parts of sifted sand), as well as to purchase foam with a density of at least 35 kg / m3
Styrofoam floor insulation technology
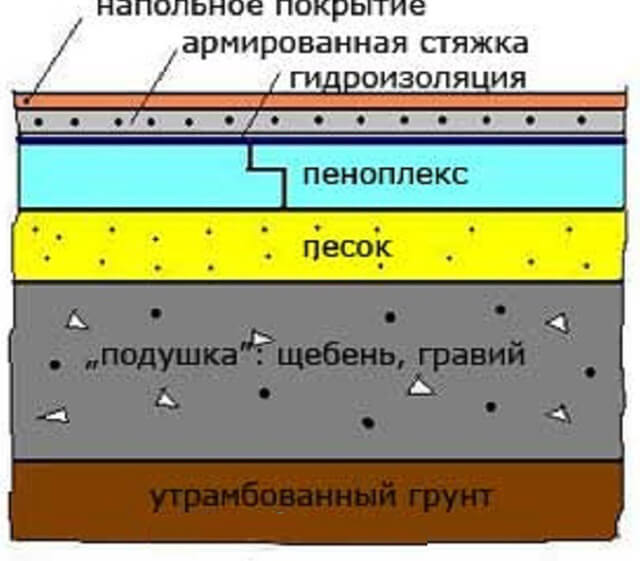
Before pouring the cement-sand screed, excavation or backfilling of the soil is carried out approximately 150-170 mm "from" or "to" the intended zero floor mark. At the same time, make sure that the surface after excavation or sprinkling is even, without bumps and depressions.
The next operation is the laying of waterproofing (polyethylene film). Laying waterproofing is carried out with an overlap on the walls, to a height of 200 mm. A layer of screed 40 mm thick is poured over the waterproofing, after which sheets of foam plastic (expanded polystyrene or foam plastic) are laid directly on the solution, in a checkerboard pattern.
The solution is allowed to dry for two days and proceed to laying the final screed. Special beacons are attached directly to the surface of the foam, and a layer of screed 60-70 mm thick is poured.
A reinforcing construction mesh is laid on top of the screed, which will prevent the monolith from cracking. After drying, the screed is cleaned of sagging and leveled in one way or another.
If everything is done correctly, then the insulation layer plays the role of a thermos - sheets of foam (polystyrene or foam) located in the thickness of the solution do not allow warm air to escape and at the same time prevent the penetration of cold from the street through the foundation or basement.
Floor insulation with expanded clay technology
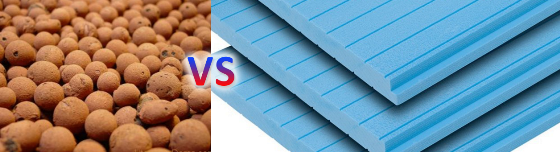
Expanded clay (expanded clay) is a worthy alternative to foam plastic and its analogues. Expanded clay is much cheaper, all other things being equal, and as a heater it was successfully used in the construction of multi-storey buildings back in Soviet times.
Expanded clay is a bulk building material in the form of balls of baked clay of various fractions, inside of which there is air (the best heat insulator in the world).
As in the previous case, a layer of expanded clay is poured onto the excavated and leveled ground surface, onto a layer of waterproofing and a rough screed. After that, beacons are strengthened on the surface of expanded clay, and a finishing screed is poured.
The optimal thickness of expanded clay is 100 mm. Falling asleep expanded clay, monitor the quality of the surface - it should be as perfectly smooth as possible. To do this, with a special template, control measurements of the thickness are carried out in different places of the room. As in the previous case, a reinforcing mesh is laid on the finishing screed, which should be in the thickness of the screed.
Important! Walking on insulated floors can be done approximately 7 days after pouring. However, the final strength of the screed solution acquires within one month.
The strength of the solution is checked in the following way. They take a glass jar of any capacity, put it neck down on the floor - if after a while condensation appears on the inner surface of the jar, the floor is still damp and it is better not to walk on it and move heavy objects.
After final drying, anything can be laid on the surface of the insulated floor: floorboard, parquet, laminate, carpet, lenolium, etc. Thus, the technology described above can also be used as a technology for insulating a wooden floor.
Installation of insulated concrete floor
For high-quality floor insulation, preliminary preparation is necessary:
- The floor surface is thoroughly cleaned of dirt and dust;
- All cracks and chips are eliminated;
- The floor is leveled if there is an urgent need for this;
- A primer is being produced.
Penoplex is laid under the floor screed in several stages. After the base of the floor is completely dry, you can proceed to the flooring of the plastic film. It is better to cover the floor with a film with an overlap of 10 cm, and carefully glue the joints for additional vapor barrier.
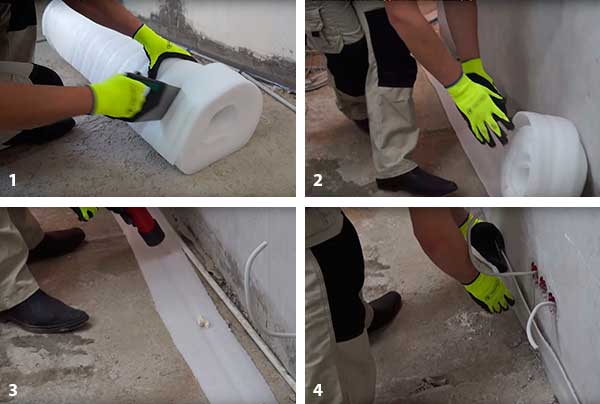
The damper tape is cut and laid around the entire perimeter of the room. For better fixation, the adhesive is applied pointwise to the tape, and the tape itself is strongly pressed against the floor. The place between the wall and the floor is better primed. The damper tape plays a huge role in the operation of the floor. In addition to enhancing thermal insulation, the tape, due to its elasticity, prevents the formation of cracks in the screed during its expansion due to changes in temperature and humidity.
In the laying of foam plastic, usually there are no difficulties.
It is important that the sheets lie evenly and neatly, and it is recommended that the joints be treated with a sealant. Even tape will work for this.
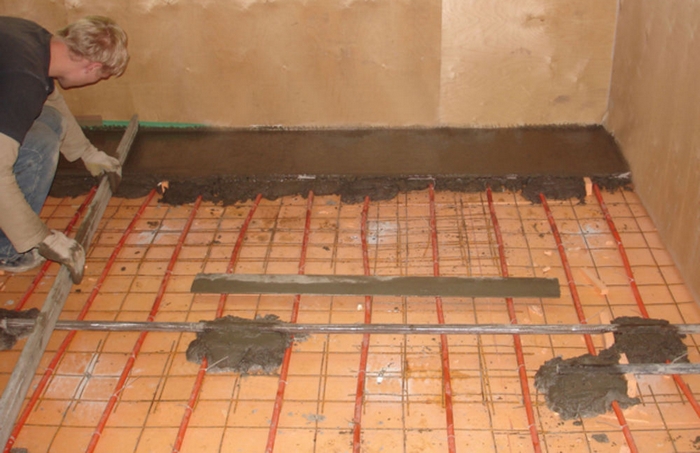
After that, a layer of vapor barrier film is laid on the foam, a metal mesh is placed on top and fixed with concrete mortar. It is better to pour the solution in parts.

Screed concrete is prepared from cement and sand in a ratio of 1:3. The most convenient and optimal option for work looks like this: half a liter of water, 1 kg of cement, 3 kg of sand. The container is better to use more than 20 liters.
Then everything is thoroughly mixed. After the resulting homogeneous mass is mixed with a construction mixer for another five minutes.
The finished solution can be safely poured starting from the far corner opposite the floor. The mass is thrown up to the level of the guide beacons, distributed with a trowel, the excess is removed by the rule, leveling the surface. After filling the first strip, you can proceed to the next.
 Filling the screed on the foam
At the stage when it is already possible to walk on the screed (usually on the second day), the guides are carefully removed, and the resulting empty spaces are sealed with concrete mortar.
Despite the simplicity of the foam insulation process, it is better to do it together. Ideally, when one person is engaged in mixing the solution, and the second is laying.
The final drying of the screed will be no earlier than three weeks. And only then you can place furniture.
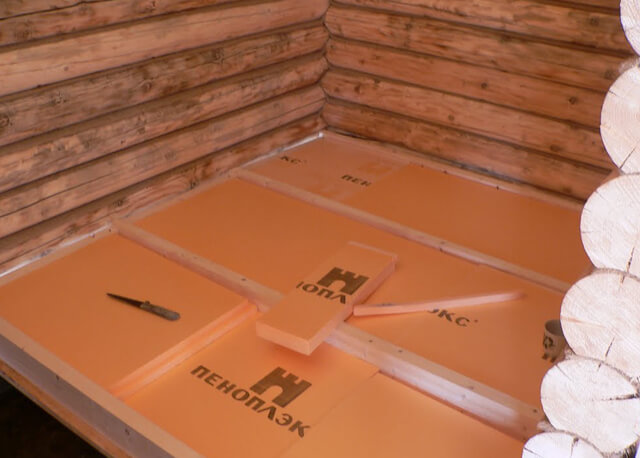
If we are talking about a wooden house, then it is more correct to do the laying along the logs. The technology is about the same. Insulation plates are laid between the lags with gaps. Also, laying along the logs is often used to warm the floor on the balcony.
It is worth taking seriously the issue of warming the room. Before choosing an insulating material, it is necessary to take into account all the features of the place where the insulation will be used. For example, if there is a high probability of fire, then for such cases it is better to purchase penoplex with the least flammability. Also, do not forget about your own preferences.Do-it-yourself floor insulation with foam plastic under a screed does not require special equipment and professional skills. But still, at each stage, quality work should be carried out. This is the only way to get perfect thermal insulation that will last for many years.
Leave your comments on the article, share your experience and your building secrets!
How to insulate the floor with foam plastic under the screed with your own hands - the technology of work first appeared Floors and floor coverings.
Insulation on floor slabs
You will need to acquire the following tools and materials:
- building level;
- polymer putty;
- primer;
- moisture-repellent film;
- insulation;
- polyurethane adhesive;
- self leveling compound.
The sequence of work is as follows:
- First of all, the floor slabs are checked for flaws. Any protrusions, cracks, depressions must be eliminated. The protrusions can be knocked down with a puncher, and the cracks and pits are covered with polymer putty. If there are a lot of flaws, the base will have to be leveled with a self-leveling mixture. If the plates are in a normal condition, devoid of damage, you can limit yourself to garbage collection and dust removal.
- If the ceiling is not lower than the second floor, then the penoplex is laid directly on the ceiling, which is pre-treated with a primer mixture. If the ceiling is part of the basement or first floor, then it is advisable to lay the floor with a hydro-repellent film. It turns out that, based on the location of the overlap, it is either primed or covered with a protective layer of moisture insulation. In the latter case, the joints of the film must be glued with adhesive tape.
- On the wrong side of the insulation you need to apply a layer of glue, then attach it to the floor and press it down well. The position of each individual plate is checked with a building level, while simultaneously controlling the horizontality of adjacent pieces of insulation so that the surface is perfectly flat. The laying of each subsequent row of slabs is carried out with an offset of half the width of the segment so that the seams do not coincide.
- A layer of polyethylene film for waterproofing is laid on top of the insulation.
- On the waterproofing layer, you can pour a classic cement screed up to 5 cm thick, or a self-leveling compound. As soon as the screed is completely dry, you can start laying the final floor.
The method of warming the base under underfloor heating
To put penoplex under a warm floor, you will need to go through a series of steps:
- The concrete base is pre-cleaned, dedusted and primed. On the walls mark the zero level of flooring. If necessary, the floor surface is additionally leveled with a cement screed. If the surface is perfectly flat, then you can start warming the concrete floor with foam plastic without a screed.
- Penoplex plates, lubricated with glue, are laid on the prepared surface and pressed. After that, the horizontality of the slab, and the slabs adjacent to it, is checked with a level. Laying is carried out apart, the seams are spaced from each other by half the width of the insulation plate.
- Moisture protection is provided by a layer of film, the joints of which are sealed with adhesive tape. The edges of the waterproofing lead to the walls, where a damper tape is attached.
- Equipment for underfloor heating is placed on top of the film, after which the screed is poured to the marking line. As soon as the subfloor dries, you can start laying the final coating.
About expanded clay
These are granules of small size and low weight, which is achieved due to the presence of characteristic pores. Voids occur during the firing process. As a result of such processing, the output is a material that has a number of positive characteristics, including:
- good sound insulation;
- reliable insulation of buildings;
- high resistance to low temperatures;
- strength;
- durability.
The products are environmentally friendly, as the main material for manufacturing is clay.Expanded clay retains its quality indicators for a long time. For 50 years, this material will maintain comfort and warmth in the house.
It has a high resistance to chemicals. Therefore, it is used in a variety of cases. The main advantages of expanded clay include its low cost, which is beneficial for customers.
But for such a favorable price, the rollers of the premises will have to pay with a precious area of the backyard territory. In the process of insulation, it is necessary to build a structure 50 cm wide around the entire perimeter of the wall to be insulated.
In addition, expanded clay is not suitable for rooms with high dampness. After all, it absorbs moisture well and, upon contact with it, loses its operational properties. In such cases, the use of expanded clay is impractical.
The material has a narrower range of applications. It is used to insulate floors, ceilings and roofs.
What is the volume of a bag of expanded clay
We supply porous material, which is widely demanded in construction, in bulk and in bags. Sale of packaged expanded clay is carried out in bags of 50 liters. We remind you that when ordering goods from 100 m3 there are discounts. The cost of bulk and packaged material also differs slightly.
In order to live in the house was cozy and comfortable, you need to make a lot of effort. Indeed, in this case, it is necessary to provide not only the creation of a beautiful interior in the room and the installation of heating equipment. In order for the operation of the devices to be more efficient and less expensive, you need to take care of the thermal insulation of the building in time.
The market offers a large selection of materials for insulation, which differ from each other in the way of installation, price and appearance.
Despite the great variety, experts are increasingly focusing on extruded polystyrene foam and expanded clay. But which of these materials is better?