Ceiling height in a private house
The height determines the convenience of the room in a private house and the way it is operated. The volume of circulating air depends on it.
Minimum Height

Safety standards provide for a minimum ceiling height of 2.4 m for a private house. In this case, it is allowed to install gas appliances: stove, boiler and column
This is also important from a practical point of view. Chandeliers are installed on the ceiling, and at a lower height, it is uncomfortable for a person with a height above 1.7 m to move around
The psychological factor is taken into account: low height depresses, and causes panic in people with a fear of confined spaces. It introduces a restriction on the use of suspended structures and finishes.
Optimal ceiling height in a private house

The optimal height for a ceiling in a private house is considered to be 2.5-2.7 m with a decorative finish. There are no restrictions on choosing a larger indicator, since a small area in this case looks more profitable. This takes into account:
- service method;
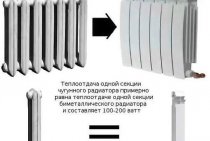
- space heating;
- harmony.
Floor cleaning will require a stable ladder. Replacing lamps in spotlights will be difficult. A large height negatively affects the comfort of the room, which is taken into account when choosing the finish and how the room is used. Heating costs will increase. To maintain a comfortable temperature of 22 ° under the ceiling, the air will have to be heated to 30 ° and above. Heat losses through the ceiling increase, which leads to icing of the roof, the appearance of rot and fungus on the rafter system.
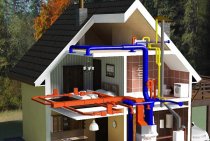
If necessary, a ceiling of 3 m and above, the issue of heating is solved by installing a warm water or electric floor. In this case, the surface is heated evenly and the air, rising, warms the entire volume of the room. In private houses with a second light, where the ceiling is at roof level, convection heaters are not used. They are replaced by infrared or the above option with the floor.
Important! For private houses with convection water or electric heating, ceilings are not made higher than 2.7 m
How to strengthen wooden floors
Unfortunately, wooden floors do not last as long as possible, since the material is natural, and accordingly, two questions arise: how to make the service life of wooden floors the longest? How to strengthen wooden floor beams in order to build a reliable structure?
In fact, it is possible to significantly improve the quality of floor beams with your own hands, but this must be done before the construction process begins. It is about the careful processing of wood.
If the beams were not processed at all or processed, but poorly, then you should not expect a high service life from such a material.
It is also important to pay attention to the level of drying of wood from moisture, to the presence of existing distortions, as well as to the load that it can endure.
Wooden beams need to be strengthened not only because of their not very good condition, their quality is also affected by gradually increasing loads associated, for example, with the reconstruction of some part of the house.
It is worth noting that there is no universal way to strengthen the tree, since the ceiling beams may not be exclusively new, but may undergo partial reconstruction during the repair process.
Installation of a wooden ceiling, preparation for work
Installation of ceiling slabs begins with the preparation of beams (they must be up to 20% moisture). They must be cleaned from the bark and treated with a special antiseptic and fire impregnation, or you can buy ready-made material that has gone through all the technical processing. What you need to have available from the tools:
For interfloor installation
Installation of the supporting structure, flooring and hemming
Experts recommend using glued beams for installation work, up to 12 m long. They are considered the most reliable, in addition, they are made to order, so that there will be no possibility to file parts at the construction site. So:
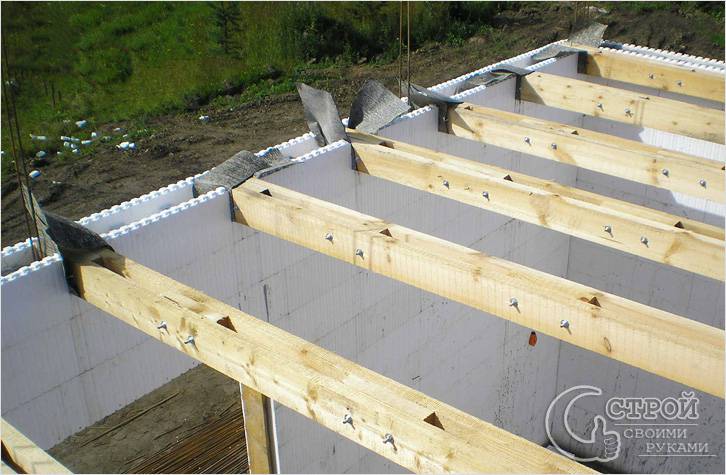
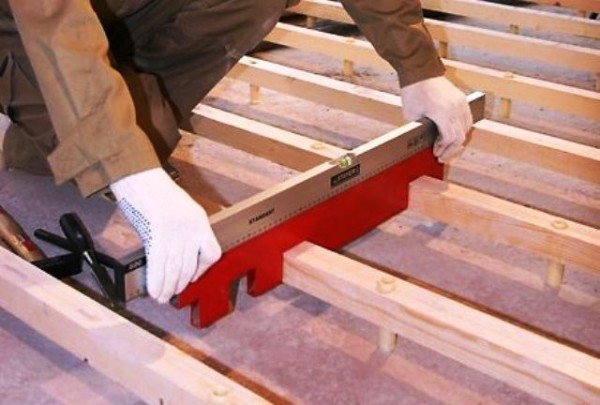
Installation begins with the laying of the supporting beams from the edges to the center, at the same time controlling with a special device the observance of the exact distance and even laying.
Tip: It is mandatory to check the horizontalness of the beams, if necessary, under their ends for alignment, it is necessary to substitute boards pre-tarred and covered with waterproofing mastic.
- Nests 15-20 cm deep are specially left in the outer walls of the building, and beams are laid there. The supporting part of the element should be from 120-180 mm. o calculate so that the distance between the beam and the wall in the niche remains 2-3 cm of the gap. When installed in a wall, every 3rd floor beam is fixed with anchors. Before laying, the ends of wooden floors are wrapped with several layers of roofing material and covered with bituminous mastic, then the likelihood of decay will decrease. The niche is filled with additional insulation (polystyrene, mineral wool (see Insulation of the ceiling with mineral wool - how to do it right?)).
- The space between the beams is made of 2 layers: flooring and soundproof and heat-insulating materials that are laid on the reel. The first layer is made of wooden shields (this is a board 5 cm thick and 15 cm wide). For these purposes, hollow panels are suitable. For interfloor overlapping from below, boards sewn from below (chipboard or plasterboard) are suitable.
- On top of the flooring (rolling), slabs of mineral wool, polystyrene, extruded polystyrene foam, perlite, expanded clay concrete are installed. Insulation plates are stacked tightly to each other. In the attic, you can cover the flooring with clay-sand grease (2-3 cm) for thermal insulation.
- After the filling is completed, a reinforcing mesh is unwound on top of it and poured with a cement screed, it will serve as a subfloor under the floor covering. For the attic, you can nail logs across the beams, and install tongue-and-groove boards on them.
Tip: Between the beams and joists, it is recommended to lay pieces of hardboard or tarred pieces of cardboard or boards.
Heat insulator on the ceiling
Amplification methods

Beams can be reinforced with steel plates
Steel Auxiliary Materials
Strengthen the wooden beams will help steel plates, fixed on different sides of the bar. Steel tools must be treated with a solution that prevents the appearance of corrosion, otherwise they will be short-lived.
CFRP
The material, which is also called carbon fiber, is a modern technology in the construction world and is actively used during beam ceiling reconstructions. It comes in the form of plates, ribbons or threads.
This plastic material is applied in several layers on the wood surface, providing ease of work and reliable quality, which makes it quite popular.
Prostheses made of wood or metal in the butt areas
Due to fluctuating temperatures, beams in the area of \u200b\u200bthe load-bearing wall are significantly weakened. It is necessary to make the main timber beam stronger in order to prevent negative consequences in the future, as well as to avoid re-reconstruction in the near future.
To do this, additional prostheses made of metal or wood are attached to the edges of the wooden base, which are placed in the brick recess of the wall, thereby providing reliable protection for the central beam.
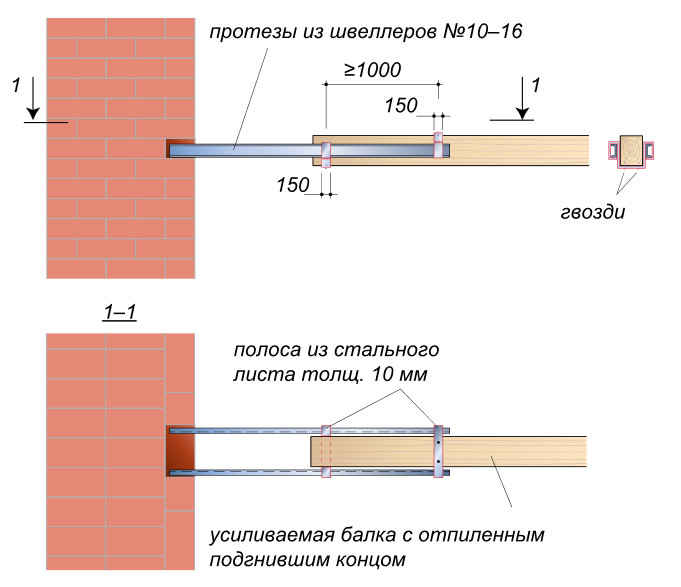
Installation of prostheses for a rotten floor beam
Supports for load-bearing beams
This method involves placing additional support structures under the ceiling beams to distribute the load evenly.
Additional beams
If the work is done, and the weight is distributed incorrectly, then the finished structure must be covered with additional beams that will take on the excess weight.
It is quite possible to bring ceilings to life with your own hands, but for this you need to familiarize yourself with the necessary information in order to minimize unpleasant moments during work, as well as build a high-quality model that will last for many years.
Prefabricated monolithic options
The installation process does not require special equipment to lift the structural elements due to their low weight.
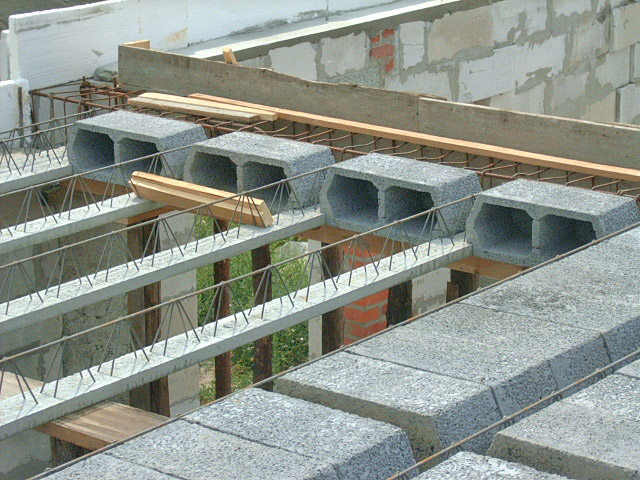
There are two traditional options: a prefabricated hollow core slab or a monolithic slab.
The algorithm of events provides for:
- Placement of support beams with an interval of 60-80 cm.
- Installation on the shelves of beams of polystyrene concrete or expanded clay blocks that form the formwork.
- Reinforcing mesh installation.
- Pouring with concrete mortar.
- Solidification of the monolithic base.
- Warming using expanded clay, basalt wool and other materials for thermal insulation.
Where would you prefer to live: in a private house or apartment?
Definitely an apartment! Comfort, coziness and warmth, around people and infrastructure
754 ( 7.48 % )
Only a private house! Around the silence, peace, a lot of space and few people!
4588 ( 45.52 % )
Why choose just one? An apartment in the city, and a private house outside the city.
4307 ( 42.73 % )
I am a free Citizen of Planet Earth! I don't need a man-made cage!
431 ( 4.28 % )
Back
Design advantages:
- increased steam and sound insulation;
- increased strength;
- the ability to perform installation work without the involvement of special equipment.
Wood floor device
A wooden floor is a beam closed from below and from above with molded or sheet material. As filings are used: boards, plywood, OSB, chipboard, fiberboard and other materials. Between the filings, and in the attic floor sometimes on the filing, there are layers of heat and vapor barrier.
Repeatedly watching a boiling kettle, many people have a stereotype that the steam only rises. This is not true. Rather, seeing the steam from the kettle, we observe another physical phenomenon. Water vapor contained in the air in a "dissolved" state always moves towards the lowest temperatures. Almost throughout the year, steam moves from a warm room to the street, and only on rare summer days, when the temperature "overboard" is higher than in the house, in the opposite direction. The vapor barrier should be the first structural layer encountered in the steam path. In the attic floor - from below, in the basement - from above. It is not necessary to put it between floors, since the difference in air temperatures in rooms spaced apart by floors is zero or close to this figure - there is no vapor exchange between these rooms or it is negligible. A vapor barrier is installed to protect the heat-insulating material from steam dampening. This is her only purpose. If the walls of a log house are painted with oil paints from the inside, or the sheathing is made and pasted over with a vapor-proof material, then it is imperative to calculate and make a supply and exhaust ventilation in the house. Otherwise, the humidity of the air inside the room will go off scale for the maximum allowable - the house will turn into a steam bath.
Sheathing of interfloor and attic floors can be done by hemming it to the beams from below. But you can do it in another way: on " turtles". Basement ceilings are made according to this type. Quarters are cut in the beams on both sides and they become like a skull with their profile, hence the name. Quarters can not be cut down, but made with a stripe of longitudinal bars. Boards are laid on the “cranial” protrusions or “cranial” bars, getting the lower part of the floor, which is also the ceiling of the interfloor or attic floor. Boards laid on the "skulls" can not be fastened with anything and make the ceiling nail-free.
Insulation and vapor barrier are laid on the ceiling, after which the floor of the room is laid. Previously, the vegetative layer of the earth was used as thermal insulation, and greasy clay was used as a vapor barrier. The use of earth made the overlap heat inert.It warmed up for a long time and cooled down slowly. The thermal inertness of the ceiling was especially pronounced in summer: heating up during the day, it cooled down all night. Thanks to this, it was not hot in the hut during the day, and not cold at night. Modern heaters, unfortunately, do not give such an effect.
You can read about the properties of modern thermal insulation on another page of the site. The table shown below characterizes the properties of natural heat insulators, it is taken from A. M. Shepelev's book “How to build a rural house” and is given “as is”.
beam ceiling
 Beam processing
This type of overlap is very popular in individual construction. When building your home, learn the method of building a wooden beam ceiling well.
Wooden beams resting on the load-bearing walls of the building form the basis of the beam ceiling. Calculate their cross section depending on the step length between them and the distance between the load-bearing walls covered by the beams and, of course, on the expected load on the ceiling.
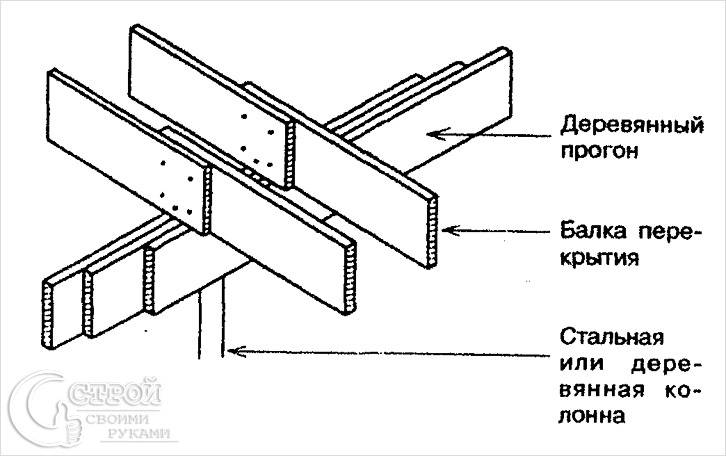 Supporting beams on a wooden run
Take seriously the choice of wood for beams. When building a ceiling, remember that beams can be made from various types of trees. The main thing is that they are well dried for 100 days. This largely determines their quality. Before starting work on the construction of the floor, check the beams. Check for rot, cracks, or other wood damage. Do not use rejected beams in construction.
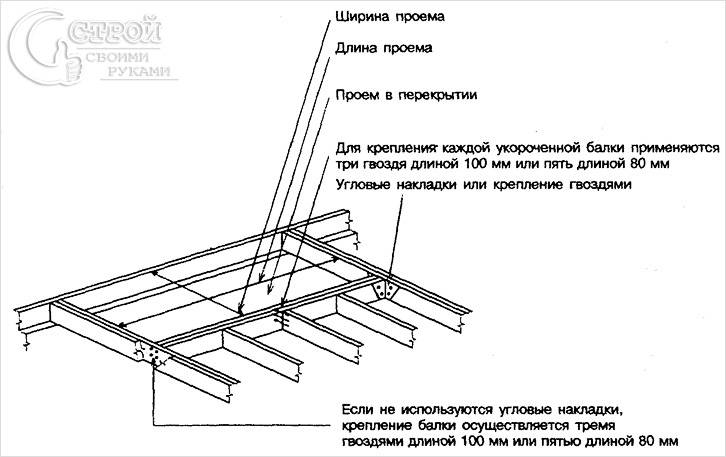 Scheme of the opening in the ceiling
- Lay the beams on the walls and align them on the plane. Do this with tarred board pads of various thicknesses. Never use wedges made from unfinished wood for this job.
- To strengthen the joints of the beams on the internal walls, fix them with metal brackets and clamps. Instead, you can use wooden linings made of boards with a thickness of at least 40 mm.
- According to fire safety rules, floor beams cannot be located closer than 400 mm to the chimney.
- Be sure to treat the ends of the beams that are embedded in the load-bearing walls with an antiseptic, tar and wrap with roofing material. These measures will protect the wooden beams from the occurrence and development of rot.
- To give the ceiling rigidity, fasten every second beam to a metal mount embedded in the masonry.
- To make a draft ceiling, prepare the cranial bars, then fasten them to the side faces of the beams. Attach the material of your choice to form the draft ceiling to the bars.
The device of the attic floor with a false ceiling
When constructing roofs from trusses, cranial bars are nailed to the lower chords of the truss, and floor panels are laid on them or false ceilings are made.
Scheme of the attic floor with a false ceiling: 1 top trim, 2 frontal board, 3 asbestos-cement corrugated sheets, 4 lathing, 5 truss, 6 mineral wool insulation, 7 plastic film, 8 ceiling filing boards, 9 solid wood fiber boards, 10 rail, 11 outer wall panel, 12 window unit.
The ceilings of houses after the installation of attic floors are lined with hard fiberboards or plasterboard sheets.
When installing an attic floor from panels, they are laid on the upper wall trim and fastened to each other and to the trim with nails.
The joints between the panels are carefully insulated and covered with flashings. The panels are brought into the design position by a crane, and it must be strictly observed that the ends of the panels rest on the strapping equally on both sides of the walls. From the side of the ceiling between adjacent panels there should not be ledges larger than 1 mm.
Peeling and dilapidation of the plaster layer
The first thing to do when planning to repair a wooden ceiling is to inspect and tap the entire ceiling in order to reveal all the voids and density of the ceiling.If the ceiling is strong, then the old plaster can simply be soaked with a paint roller and scraped off with a spatula.

But the most common problem in old Stalinist houses is the peeling and destruction of the old layer of plaster. 30-40 years ago, builders used clay for this job, which is very cracking and crumbling, so if this process has already begun, in order to make a quality repair, removing the entire layer is necessary. This can be most easily done with a hammer drill or drill with a percussion function.
In this case, the plaster is removed to a layer of shingles - lathing of thin laths, which served as the basis for plaster in Stalin-style houses. Before this, it is necessary to take care of the protection of the eyes and respiratory organs - in the process of this business, the room is filled with dust. To do this, you can use goggles and a respirator.
After removing the plaster, the shingles are removed using a crowbar, mount and other improvised tools.
The next step is to level the ceiling and seal the cracks. Cracks are expanded with a spatula, and then coated inside with a deep penetration primer or PVA glue. After sealing the cracks, before the next stage of work, it is necessary to wait until the primer is completely dry.
Before puttying, you can use a reinforcing metal plaster mesh to prevent cracks.
Next, carefully putty the ceiling, and apply the last leveling layer, after which the rough work can be considered completed, and proceed with the finishing with the selected materials.
Types of floors for ceilings
- Installation of a monolithic slab
- slab floor
- wooden floor
Every person who has ever encountered the construction of buildings or structures with their own hands knows that one of the most difficult elements is the ceiling.
You can do without a foundation when building a house, a bathhouse, a gazebo can be without impenetrable walls, but the ceiling device must always be of high quality.
The ceiling covering is divided into three types of slabs, monolith and wood. Each of them has its own advantages and disadvantages, and the installation process varies fundamentally.
There are three types of ceiling slabs, monolith and wood. Each has its own advantages and disadvantages, and the installation process is fundamentally different. There are a number of other features that should be considered before installing the ceiling, because not everyone can be suitable for a particular case.
Installation of a monolithic slab
A monolithic ceiling is the most durable, but also the most expensive and time-consuming. And also not suitable for all building structures.
Design requirements
The overlap is a structure designed to separate the height of adjacent rooms. In other words, the ceiling forms the floors and helps separate the rooms from the basement or attic.
Scheme of the ceiling device.
The design of the ceiling must meet certain requirements. So, without fail, it must be durable, because a load in the form of furniture and people will be placed on it. There are certain payload limits: for attic floors, it should not exceed 105 kg / sq.m, interfloor and basement floors must withstand a load of up to 210 kg / sq.m.
Among other things, one of the mandatory qualities of the overlap is rigidity; during the impact of loads, the slightest deflection should not occur.
During the installation work on installing the ceiling with your own hands, you need to take care of its sound insulation in accordance with the standards. The level of sound absorption can be increased by sealing all possible gaps at the joints of the material.
Ceilings designed to separate rooms with different temperatures (basement and room, room and attic) need an additional layer of thermal insulation.
Design features of floors
Any wooden ceiling ceilings are laid on the frame and frame-panel construction of the house, since its walls are not designed for heavy loads.
Here the ceiling is a horizontal fence, a kind of wall, but the installation of this ceiling is different from the construction of walls.

Sections of ceiling beams
- The supporting base of the ceiling made of wood is beams, the size of which is calculated in the scheme of the load-bearing frame of the house.
- Beams are obtained from round timber, processed to timber, edging or boards with a thickness of at least 60 mm, which are installed on the edge. You can use 50 mm thick boards paired with nails or staples. But it is better to construct a box from the boards.

On large spans, the beam is also supported on internal walls, and even on intermediate pillars.
- Prostyling flooring is made in non-residential premises due to its low sound-absorbing and heat-insulating qualities.
The essence of the overlap: a boardwalk is stuffed onto the load-bearing beams - the floor of the attic. - Hemmed ceilings are made in a summer cottage, attic house, since the thermal insulation properties of such a ceiling are sufficient only for seasonal operation of the premises.
To do this, we fill the grooved boards from 2 sides of the beams. - We put sound-absorbing material on the bottom lining. The insulating backfill on the boards of the lower floor should be light so as not to tear the boards from the beam. Sawdust or husks will do. This is the ceiling of the lower floor.
- The top deck is the floor of the attic.
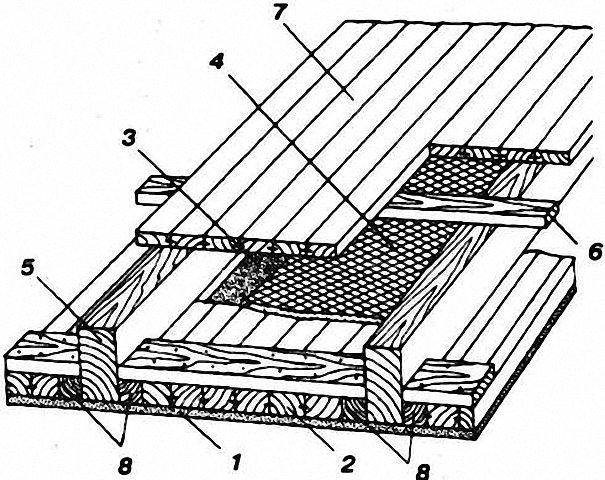
1 - drywall sheets; 2 - grooved boards - floor shield; 3 - waterproofing; 4 - sound insulation; 5 - floor beam; 6 - lag; 7 - floor boards; 8 - cranial beam bars

Attic wooden floor with shield roll
Technology of installation of wooden floors
To perform the work, you will need the following tools:
- axe;
- a circular saw;
- hacksaw;
- hammer;
- screwdriver;
- screws and nails;
- plane;
- waterproofing and heat-insulating materials;
- building level at least 80 cm long.
- When walls are erected, special openings or recesses for beams are formed in their upper part. Before starting work, these nests are cleaned of dust and debris and waterproofing material is laid in them. The most commonly used ruberoid. If the walls are made of brick, the nests can be treated with bitumen or mastics based on it.
- The ends of the beams are coated with bitumen.
- Lay supports in pre-prepared openings.
If the structure is built of wood, the beams are cut into the upper crown. There is such a way of attaching the supporting elements to the wall, like a dovetail. It is used in houses built of logs or timber. This connection method is simple and reliable. To fix the beams, metal brackets are needed.
 Insulation of interfloor ceilings from an array
Wooden floors in the house are mounted according to the following rules:
- the timber laid in the nest must be at least 4 cm from the walls of the recess;
- beams should be located at a distance of 40-50 cm from the chimney;
- each 3-4 beam is attached to the wall with anchors;
- the space between the beam and the walls of the nest is filled with tow or glass wool.
The scheme of installation of interfloor ceilings provides for the installation of heat and sound insulation. Therefore, the gaps remaining after laying the beams are filled with mounting foam.
Flooring technology
Depending on the location of the observer, the wooden floors between floors can be either the floor or the ceiling of the room. There are special requirements for floor installation. Before proceeding with the installation of the flooring, each beam is hemmed on both sides with cranial bars with a section of 40x40 cm or 50x50 cm.
They will serve as a support for the subfloor. You can do the same with the flooring device that forms the ceiling.But the installation technology of this structural element does not have special requirements for performing such work.
 Roofing device on wooden beams
The device for overlapping on wooden beams begins with fastening to the bottom of the supports of unplaned boards with a thickness of 15 mm or more. They will subsequently serve as a rough ceiling. A waterproofing material is laid on top of the flooring obtained during the filing process: roofing material, a special membrane or dense polyethylene. It has a heater on it.
Mount the sheathing of the upper part of the ceiling on wooden beams. Boards are fixed with nails or screws. Knowing the sequence of work, it is easy to do it yourself. The overlap of the house should be a sealed, durable, high-quality insulated structure. This element of the building experiences the greatest weight loads, therefore only high-quality materials are chosen for its construction.
Selection of wooden floor beams
The materials for such ceilings are lumber, glued wood or plywood, special prefabricated structures, beams, boards, and beam shoes as fasteners.
Material characteristics
- The load on wooden floors is their own weight plus temporary operational loads.
The own weight of interfloor wooden ceilings reaches 230 kg/m2, and their temporary loads - up to 200 kg/m2. - The mass of attic floors depends on the weight of the insulation and reaches 300 kg / m2 with an accepted temporary load of 100 kg / m2.
- Taking into account the bearing characteristics of the wooden beams on the ceiling, the length of their span, the magnitude of the loads, we determine the distance between the beams, but, as a rule, no more than 1 m.
- Beams with a thickness of 5 and a height of 18 cm are optimal, if they are laid every 50 cm using mineral wool insulation. This will prevent the deflection of the beams and the destruction of the ceiling.

The choice of beams depends on the subsequent magnitude of the possible load on them
Types of floors
First of all, it does not hurt to figure out what the ceiling ceiling is like - both by type and by purpose.
So, according to the constructive solution, the bearing part of the ceiling partitions is:
- beamless, consisting of a homogeneous material (panels or slabs as flooring);
- beam, involving the use of beams in the form of a bearing surface, as well as filling of a certain type (depending on the circumstances).
According to the purpose of the overlap are divided into the following groups:
- attic, separating the living area and the unheated upper part of the house (attic);
- basement, as opposed to attic, separating the heated space from the cold underground;
- basement, separating the house and the cellar;
- interfloor - a buffer between residential floors, including the attic.
Reliable overlap - a guarantee of your comfortable stay in a new home