How to properly connect a double-circuit gas boiler
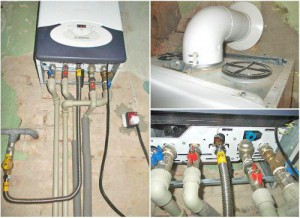
Installing a double-circuit gas boiler allows you to kill two birds with one stone - to provide a heating system for the house with a coolant and organize hot water supply for domestic needs. That is, one boiler solves two fairly serious problems. That is why such units have recently been so popular among residents of suburban villages.
Connecting a double-circuit gas boiler is not an easy task, but if you figure it out, you can do the installation process yourself.
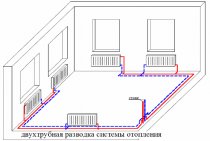
The bulk of models of boilers of this type operate in the mode - 6 liters of hot water in one minute. A good indicator, but it is possible only with the correct installation and connection of the unit. The principle of operation of this heater is based on the existence of two circuits, each of which works separately, that is, independently. One of them provides the heating system with coolant, and the second - the hot water supply system.
Where to install the balloon
The main generalized requirement for the use of gas-cylinder equipment can be called ensuring the safety of people. For this reason, gas cylinders are not recommended to be installed in habitable rooms and technical rooms connected with a residential building directly or through ventilation.
A distinctive feature of propane gas is its high density. Bottled gas is heavier than air and can accumulate in the lower floors of buildings. Therefore, it is strictly not allowed to install cylinders in the underground or technical rooms below ground level. If in the usual case small leaks do not pose a danger due to constant air exchange, then in the lowlands the gas can accumulate for a long time to explosive concentrations. It is possible to install gas cylinders in accordance with SNIP 42-01-2002 only inside buildings no higher than 2 floors, in the amount of no more than one and at a distance of 0.5 m from gas stoves and 1 m from heating appliances.

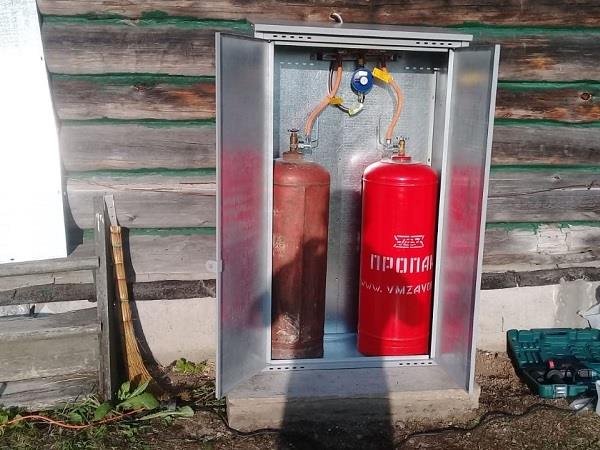
To make the installation safer and exclude unauthorized persons from accessing gas equipment, cylinders are placed either in a room with a separate entrance or in an outdoor metal cabinet.
It is especially important for outdoor installations to take into account the temperature regime of operation. Bottled gas consists of a mixture of propane and butane, each with a different boiling point
When the cylinder is cooled below 0 °C, only propane will evaporate from the mixture, while the remaining butane in the cylinder cannot be rationally used. At lower temperatures, it is possible to completely stop the flow of gas to the stove.

The main way to achieve normal operation at low temperatures is the use of so-called winter gas mixtures that can evaporate at temperatures down to -40 ° C. However, the problem is that such gas may be in seasonal shortage, moreover, the possibility of refueling a mixture of mediocre quality cannot be ruled out. There are two ways to resolve the issue with the guarantee: either insulate the attached metal cabinet, counting on the penetration of heat from the building, or additionally heat the cylinders using a self-regulating cable.

The height of the cabinet should be at least 20-30 cm higher than the height of the cylinders so that they are not installed on the floor, but with a gap, for example, on two metal rails or a high pallet. At the same time, the cabinet must be protected from the penetration of melt, rain water and heating from sunlight above 40 ° C.
Which gearbox to choose
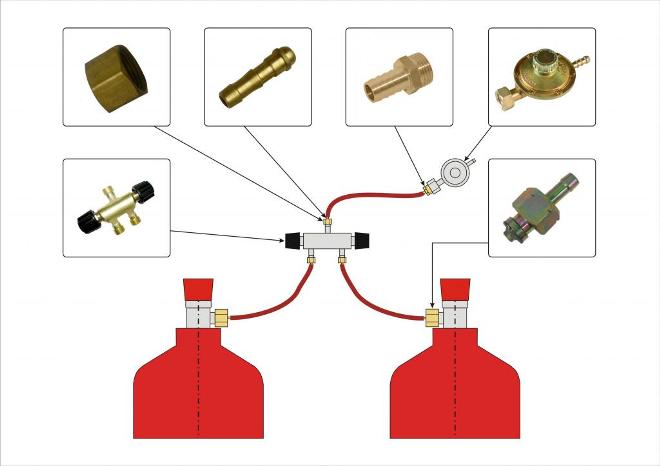
Gas stoves have built-in jets designed for a constant gas pressure, while the pressure in the cylinder decreases with consumption.To normalize combustion, the cylinder is connected to the stove not directly, but through a gearbox. Reducers for liquefied domestic gas are called propane and, as a rule, have a red or metallic body color.

The main characteristics of the reducer - outlet pressure and throughput - must be selected for the parameters of a single plate. If it is not possible to set the passport pressure value, you should purchase an adjustable type reducer and manually adjust it. Also, adjustable reducers are directly shown when using cylinders with a capacity of 20 liters or more, where the pressure drop is more pronounced.
For domestic use of propane, reverse gears are recommended. Due to the low pressure values of liquefied gas and the low difference between the inlet and outlet, the use of multistage gearboxes is not economically justified. The only requirement is to use the reducers specified in their technical standard in conjunction with composite cylinders.

A separate nuance in the choice of the gearbox may be the temperature regime of operation of the cylinders. The fact is that during the evaporation of liquid gas, an intensive decrease in its temperature is observed. So, if initially the propane-butane mixture is at a temperature of -5 ... -10 ° C, in the gearbox itself its temperature can drop to the condensation mark, due to which the gas becomes liquid again, and the gearbox stops working. One way out of such a specific situation is to use gearboxes with a built-in heating system.
Commissioning of the plant
The entire installation of the gas pipeline is carried out without connecting it to the cylinder. When the tubes or hoses are connected to the plate and interconnected, the reducer nut is screwed onto the cylinder valve and tightened. Then, if a flexible hose is used, it is put on the fitting and crimped with a clamp. If bellows tubes are selected, the nipple must be unscrewed from the gearbox housing and screwed into it with a threaded adapter of the appropriate size.

When the unit is assembled, you need to open the valve on the cylinder and, by turning the reducer regulator, set the required outlet pressure. When the gas has entered the pipe and hose system, each connection is thickly coated with soapy foam and checked for leaks. After the integrity of the gas pipeline is confirmed, you can open the stove tap and try to sequentially ignite the burners.

If each of them smokes or the flame burns in a color other than blue or greenish, it is necessary to reduce the pressure with a valve on the reducer. If the malfunction is typical only for some burners, then the jets for them are selected incorrectly. If the burner goes out in the minimum fire position, adjust the low flow screw on the stove tap or try to slightly increase the pressure with the reducer screw.
CONNECTING THE BURNER TO THE GAS CYLINDER
1.
Hold the burner control valve and apply
it to the threads of the bottle and screw the bottle tightly counterclockwise. Tighten it by hand only and be careful not to damage the threads.
2.
Always keep the gas bottle straight
vertical position by connecting it to the burner.
Drawing
3.
make sure that the burner and cylinder are stable
stood on the ground without the risk of overturning.
4.
Leave enough free space around
burners - at least 1.25 m on each side and 1.5 m on top.
5.
Always install a windscreen before
how to light the burner (see section 3 “Using the burner for cooking”).
ATTENTION
Risk of fire or serious injury from gas leakage.Never light the burner if you notice a hissing sound or smell of gas after you have connected the cylinder to the burner. The gas contains impurities with an unpleasant odor. Never use a burner that smells of gas.Do not use the burner if it is damaged or
out of order.
When connecting the gas bottle to the burner, never
don't twist it too hard. This could damage the burner or cylinder and cause fuel to leak.
Be careful when using the burner
negative temperature. O-rings can harden in cold weather and leak fuel (see "General Safety Rules").
Features of connecting the stove to a gas cylinder
Connecting a gas stove to a cylinder should begin with choosing a place to store a container with fuel and organizing its supply through a pipe or flexible hose to the place of consumption. It is necessary to determine in advance which gas is supposed to be used - bottled or natural.
Location selection
Connecting a gas cylinder to the stove in the country is allowed both inside the residential building and outside. But, according to fire regulations, it is recommended to choose a place for storing gas on the street, and not in the kitchen or in the utility room. When placed outdoors, it is required to attach a long pipe or hose, but this significantly reduces the likelihood of a fire, in the event of a leak, the gas will not be able to accumulate in the basement to a dangerous concentration.
When placed outdoors, balloon gas is placed in a special metal box, which serves as a convenient storage place and at the same time protects the gas container from all types of solar radiation, is an additional level of protection against theft, protects against possible consequences of an explosion - both from an open flame and from splinters, saves gas-cylinder equipment from mechanical damage.
Preparation of tools and consumables
To properly connect the gas pipe, you should prepare the room and the necessary set of tools and consumables. Exhaust ventilation is required.
To carry out the work, it is necessary to prepare the following tools:
- wrench (gas wrench or 22x24 mm);
- gas valve according to GOST R 52057-2003;
- sleeve for gas supply;
- fluoroplastic tape (FUM) or plumbing thread.
Dismantling the old plate
To install a new plate, the old one must be dismantled, the shutdown is carried out in the following order:
- close the shut-off valve at the inlet;
- unscrew the old supply hose from the shut-off valve and from the stove.
Faucet replacement
Work on replacing the crane is carried out according to the following connection scheme:
- ventilation is turned on or a window is opened;
- prepare a new crane for installation, having previously wound a FUM tape on it;
- unscrew the old tap, clean the threads on the supply pipe and install a new one in its place;
- tightness after installation is checked by washing the junction.
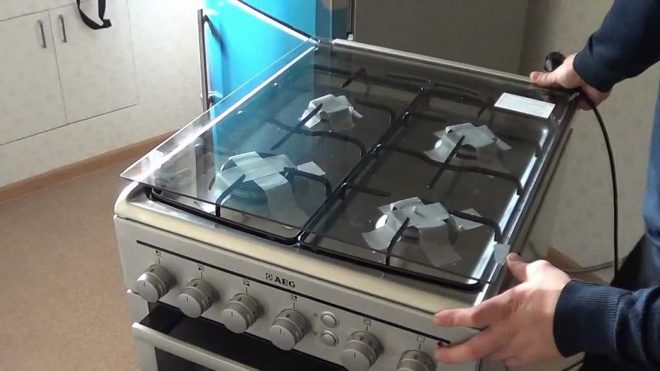
Installing a new stove
Before starting work on installing a gas stove at a permanent location, the floor surface is prepared, then using the legs below, the hob is set to a horizontal position, alternately unscrewing and twisting them. To check, use the building level.
Cooker connection
The procedure for connecting a new plate is as follows:
- check the inlet hose connections for gaskets;
- make sure that the thread of the hose matches the thread on the plate;
- connect the gas hose to the outlet of the stove, turning the nut with a little effort, sufficient to ensure tightness;
- make sure that there are no kinks, twists or creases in the supply hose during installation.
Electric ignition connection
To connect a stove with electric ignition, electricity is required. A socket with a current strength of 6A with grounding is enough.
Checking for correct connection
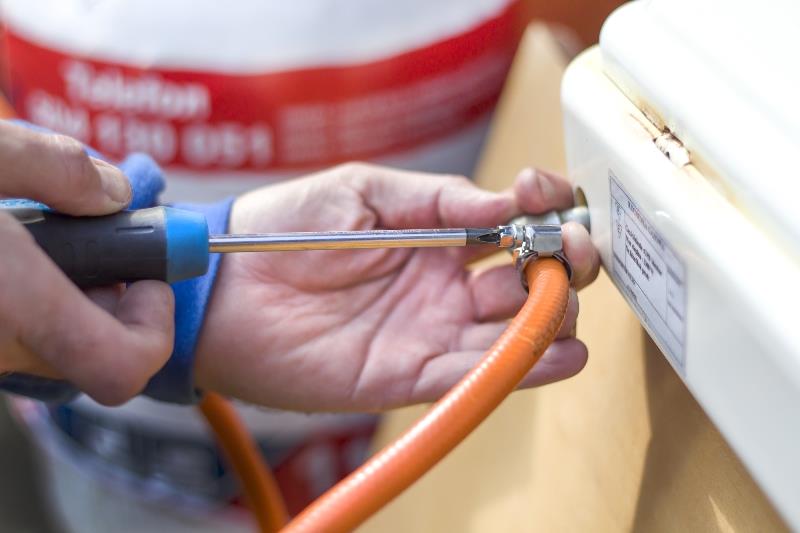
After carrying out all the work, in order to check the correctness of the connection, it is necessary to make sure that all connections provide the required tightness parameters.To do this, it is necessary to apply the method of soaping all compounds. A soapy solution is prepared, which is sprayed or coated with all joints. After that, open the gas supply valve. In the event that bubbles appear in the treated areas, repeat the steps for connecting the hose. The absence of bubbles indicates the correct and reliable connection of all nodes.
https://youtube.com/watch?v=1f4gMU1rqII
Gasification of the garden partnership where to start
If it is necessary to gasify the entire garden partnership, then at the general meeting of the owners of the plots, it is necessary by a majority of votes to decide on the laying of a gas pipeline, indicating the size of the target contribution. It is possible that two groups are formed within the SNT: representatives of the first want to gasify their homes immediately and are financially ready for this, the second - for various reasons, refuse to connect cottages to the gas network.
In the event that not all members of the SNT are going to participate in the construction, a new legal entity should be established. In accordance with paragraph 2 of Art. 4 of the Federal Law "On horticultural, horticultural and dacha non-profit associations of citizens" dated 15.04.98 FZ-66, public property acquired or created by a partnership at the expense of earmarked contributions is the joint property of its members. This means that all gardeners, even those who did not take part in the construction of the gas system, will have equal rights to it. If in the future it is planned to connect new participants to the facility and make a profit, it is advisable to organize a consumer cooperative. And when an independent non-profit organization is created only for the construction of a gas pipeline, it is worth establishing a non-profit partnership.
The owner of the gas pipeline will be a non-profit partnership or a consumer cooperative. He will have the following responsibilities:
- maintain security zones of gas supply system facilities in a fireproof condition;
- carry out the planned work, cut down trees (shrubs) in protected areas and beyond them in the manner prescribed by the forestry legislation of the Russian Federation;
- establish an emergency rescue service or engage specialized organizations on the terms of contracts;
- develop plans for localization of potential accidents, disasters, liquidation of their consequences;
- organize engineering systems for monitoring and preventing accidents, as well as warning, communication and protection systems;
- create stocks of material, technical and other means;
- prepare employees of the gas supply system for actions to localize potential accidents and eliminate their consequences;
- make an executive survey of the gas distribution network with the establishment of the boundaries of its buffer zones, include the data obtained in the survey documents and transfer them to organizations maintaining the state land cadastre;
- to approve the boundaries of the security zones of the gas distribution network and the imposition of restrictions on the land plots included in them in the executive authorities of the constituent entity of the Russian Federation;
- register encumbrances in the Unified State Register on real estate and transactions with it.
Reading time: 7 minutes No time?
If you are the happy owner of a cozy summer cottage far from a polluted city and want to recreate the best environment for cooking various dishes there, the only solution may be a gas stove for giving under a cylinder. The variety of such appliances is impressive in its scale, so anyone can choose something suitable for themselves - from a compact stove with a single burner, to a large multifunctional thing with four burners.
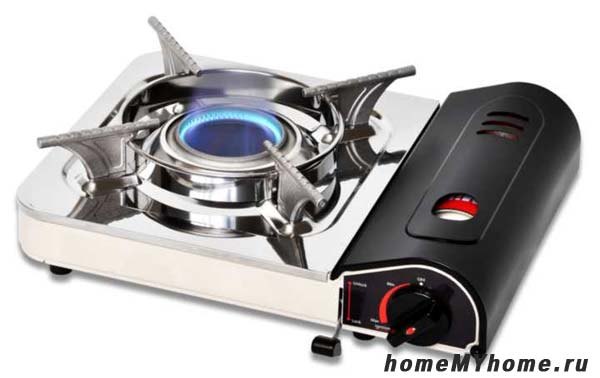
Single burner gas stove
Connecting the hose to the gas stove
To connect the hose to the stove, look at its back wall. Here you can see the inscription "exit". Immediately you will need to determine what kind it is.Perhaps it will be made absolutely straight or have a slight angle.
This is very important as the hose must not be kinked too much. When the pipe is located a little to the side, and the exit is made straight, you will have to purchase an additional metal threaded elbow
When the thread diameter is 3/4 inch, you will also need to install an adapter (futorka) with a diameter of half an inch.
Usually in all kitchens, the gas riser is installed in a certain corner. A welded tube equipped with a ball valve departs from it for connecting a gas hose.
The union nut is screwed onto the faucet. When the faucet has an internal thread, the hose must be screwed into it.
Before you connect a hose to the "output" of the system, you need to put a paronite gasket. It is usually sold as a set.
But it is better to purchase such a gasket on the market, equipped with a metal mesh. It will serve as protection against possible pollution.
After installing the gasket, the flexible hose is screwed to the plate outlet and tightened with an open-end wrench.
Then the gas leak is checked. All connections must be washed thoroughly. Open the faucet and turn on the gas. The absence of bubbles at the joints indicates that the system is ready for operation.
GAS TO THE HOUSE STEP BY STEP
The construction of the gas pipeline is preceded by preparatory work.
The first step is to collect the necessary documents and obtain written permission from the owner of the gas pipeline to connect to the existing network (or refusal, indicating the reasons).
At this stage, the permission of the heads of the architectural and planning department (APU) for the gasification of private ownership or SNT will be required; a copy of the technical passport of the building from the Bureau of Technical Inventory (BTI); topographic survey of the site with the location of the house and other gasified structures on a scale of 1: 500 with applied communications and a gas pipeline, certified by the local gas service; written permission from neighbors to connect to the highway, if it passes through their sites. The second step is to obtain technical conditions from a specialized organization that operates and maintains the gas pipeline.
Specifications - a document that establishes requirements for specific products, materials, services for laying a gas artery. It defines the point of connection to the highway, lists the necessary approvals, technical requirements (recommendations) for the designed object. For individuals, technical conditions for the construction of a gas pipeline with a volume of pumped gas up to 8 m3 / h are issued free of charge. If this rate is exceeded, the removal of technical restrictions is paid in accordance with the current rates.
Before obtaining technical conditions for gas supply, it is necessary to establish the required volume of raw materials. For this purpose, it is necessary to determine how much gas this or that equipment consumes in accordance with the manufacturer's passport. The total volume of gas is equal to the sum of the volumes of gas consumption of all installed devices, including backup ones.
A copy of the passport of the owner of the facility subject to gasification should be attached to the application for obtaining technical conditions; copies of documents confirming the ownership of the premises, structures, buildings, land for construction (certificate of state registration of ownership or lease agreement, technical passport for a separate room); as well as topographic survey at a scale of 1:500. The term for preparation of technical specifications is from 2 weeks to a calendar month, but most often the coordination takes longer.
The technical conditions have a limited validity period (usually up to 2 years), that is, the gas pipeline must be built before the end of this period.
Step three - contacting a specialized licensed organization for the design of a gas pipeline based on technical specifications, permission for connection and terms of reference
When choosing a designer, pay attention to whether he has the appropriate license, and also make sure that he is a member of a self-regulatory organization. (An easier option is to ask for a designer recommendation at the stage of applying for a permit to the gas service.) It may be necessary to visit the site of an engineer who will make the necessary measurements
This item should be included in the contract with the project company, since the work will require additional time and money.
At the design stage, the customer should be especially active - both technical and aesthetic parameters must be included in the project, because the reconnection and transfer of equipment will have to be re-coordinated with the gas service. The minimum price of the project today is about 20 thousand rubles.
The finished project must be agreed with the organization that issued the specifications. This procedure usually takes about 2 weeks.
Finally, the fourth step is to obtain permission from the Committee for Architecture and Urban Planning to carry out earthworks if the gas pipeline is laid in a closed (underground) way.
Connecting to a gas pipeline is fundamentally impossible if its capacity is exhausted (for example, in settlements where networks have been laid for a long time). In addition, difficulties in obtaining technical specifications may become an obstacle to construction if the developer has violated the procedure for registering ownership of the gas pipeline.
Connecting equipment
Connecting the gas hob to the cylinder is carried out in several stages:
- balloon installation;
- connection to the stove;
- connection to the cylinder;
- examination.
Choosing a location for the balloon
The gas cylinder can be located:
- outdoors in a special metal box;
- at home, directly in the kitchen or in a separate room.
Outdoor installation improves safety when using gas. However, it should be taken into account that:
- the cylinder can only be placed on a flat and dry surface (pallet, slats, and so on);
- when the temperature drops to 0°C, the pressure in the system may decrease.
To use the gas cylinder in cold weather, it is recommended to insulate the equipment. For insulation, you can use any material that allows you to keep warm or a specialized self-regulating cable.
The location of the gas cylinder near the house
When placing a gas cylinder with your own hands inside the house, the following rules must be considered:
- the distance from it to the tile should be no more than 1 m;
- it is forbidden to install inside the house if there are more than 2 floors;
- it is impossible to have a cylinder in the basement;
- distance to heating equipment - more than 1 m.
The process of connecting to a gas stove
Next, you need to connect the hose to the gas stove. The connection diagram is as follows:
- a hose is connected to the outlet pipe of the stove. A rubber gasket is installed at the junction. In the absence of a gasket, sealing the joint with a sealant is required;
- the hose is secured with a clamp.
Connecting a hose to a gas stove
If the size of the hose and the outlet of the tile do not match, then different adapters are used. Installation of adapters must be carried out with a sealing compound.
Accession to the cylinder
The next step is to connect the hose to the gas cylinder.
If the cylinder is located on the street, then the outlet through the wall is carried out using a special metal sleeve.
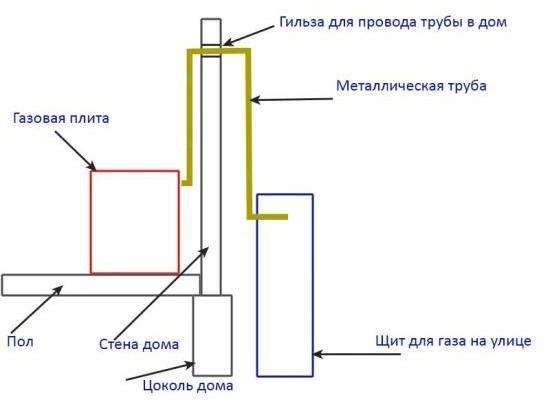
Gas hose outlet
Next, the reducer is connected to the cylinder and the hose is connected using a mounting clamp, as well as the installation of additional equipment. All connections must be sealed.
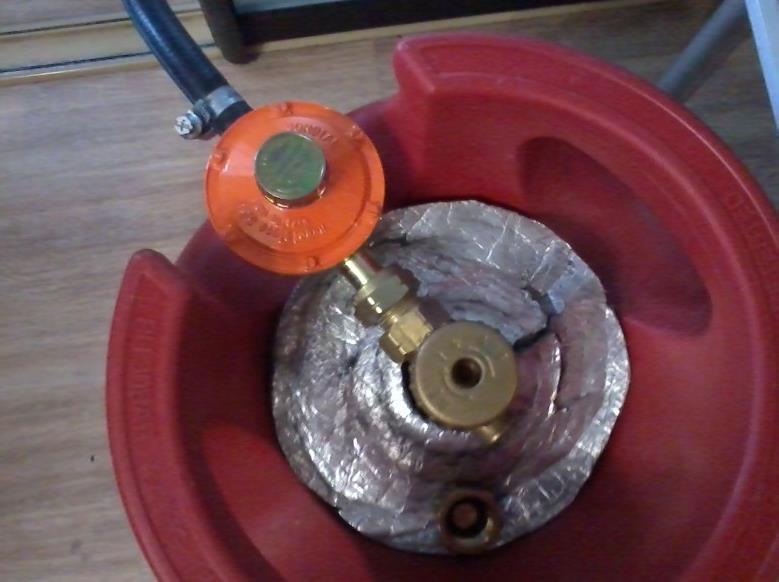
Connecting the plate to the cylinder
Leak test
Before putting the system into operation, it is necessary to check its tightness according to the following scheme:
- a soap solution is prepared;
- with a sponge (rag), the solution is applied to the joints;
- if soap bubbles appear within a few seconds, then the tightness of the connection is broken.

Violation of the tightness of the connection
How to connect the stove to the gas cylinder, see the video.
After completing all the work, you can turn on the gas stove and check the pressure in the system. If the gas burns in a bluish or slightly greenish color, then the pressure is normal. When other colors are formed, the pressure is adjusted by the reducer.