Do-it-yourself wooden floors in a private house on logs
One of the floor laying technologies is to build wooden floors in a private house on logs.
- We prepare a high-quality base: remove part of the soil (5 - 10 cm), pour sand and ram.
- On top we lay crushed stone of the same thickness and ram it again.
- We lay a vapor barrier (roofing material, oilcloth) and proceed to laying the log on the racks with an approximate step of half a meter.
- The space formed between the lags is filled with a heat-insulating pillow.
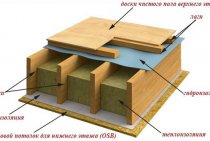
Wooden floors in a private house have a rough floor, on which the final coating is laid. This completes the formation. Next, it remains to clean and varnish it.
Material requirements
There are only two main requirements for floor materials:
Environmental friendliness. If you live in the house permanently, then you can choose respectable options for coatings such as parquet, grooved boards, porcelain stoneware
If a private house is used for living only in the warm season, then you need to pay attention to how the coating tolerates changes in temperature and humidity. In this case, linoleum, tiles are optimal.
Strength and durability
If the house is designed for the life of several generations, then the service life of the material is of paramount importance. Replacing the flooring in a spacious private house is a financial, time and labor cost.
Less significant, but also important requirements are the design and comfort of coatings.
Repair of linoleum, carpet, stone
Do-it-yourself floor repair in an apartment is carried out in stages as follows:
- The most common defects in linoleum can be swelling, cracks, delamination or breaks. Such problems are easily solved like this:
- using a special glue, which should be drawn into a syringe and injected under the damaged area;
- then a load is placed on this part of the floor and the glue is allowed to dry completely;
- if the damage to the coating is significant, then in this case the sections are replaced with new ones.
- In order to repair defective areas of carpet flooring, you need to have its spare parts:
- the damaged area is cut out, a patch is put in its place. It is attached with double-sided tape or glue;
- so that the edges of the patch do not unravel, they are pre-treated with latex glue;
- before cutting and gluing a patch, it is worth considering the pattern, as well as the direction of the pile.
- In order to give an aesthetic appearance to stone flooring, the following series of actions are carried out:
- various cracks and chips are easily removed by grinding the stone, and then polishing it;
- polishing is carried out with special chemicals that are rubbed into the stone and make the coating immune to dirt;
- such simple manipulations will help get rid of cracks up to 5 mm deep.
Preparatory work
When choosing materials and methods for installing the floor, you should first pay attention to the average soil moisture under the house. In some residential areas, logs are laid on the ground, laying cut-off waterproofing under them. Such floors confidently serve for several decades, but such dehydrated soils are quite rare.
Below we will consider the method of preparing the base, which is used almost everywhere in our area. The whole point of this method is to install a concrete screed on a waterproofing pad. In a country house, a concrete screed will carry two functions at once: isolate the floor from moisture and serve as a rigid base for a wooden floor.
When starting to arrange a concrete base for a wooden floor, you must make a small pit in the house and carefully tamp its bottom.In the hole made, it is necessary to fill in a layer of sand with a thickness of 20 mm or more. You can also add a layer of gravel under the sand, but this step is often skipped. After you have made a sand cushion, close it with cut-off waterproofing, which can be used as a cellophane film or roofing felt. It does not make sense to use vapor-permeable waterproofing, because its properties are not needed at this stage, and the overpayment will be significant.
How to make a floor in a private house from boards
Floor from boards in one layer. It is the simplest floor option. This design is suitable exclusively for summer buildings or housing in warm countries. If the building design provides that the floor beams are mounted in the walls, then the distance from one beam to another is, most often, too large to immediately lay the boards.
To provide the necessary strength, laying a log is required. If you plan to arrange the floor on top of the supporting pillars, then the placement of the beams can immediately be made as required.
Now, logs are laid on top of the supporting beams, which are set strictly horizontally, for this, wooden spacers and wedges are used. After checking the location of all the logs with a level, they need to be attached to the beams with nails, and then the floorboard should be nailed to them.
Two layer plank floor
To equip such a floor, significantly higher costs and efforts will be required, but this is offset by a decrease in heat loss. For the device of the subfloor, it is better to use coniferous wood. To save money, you can use a non-edged board or slab.
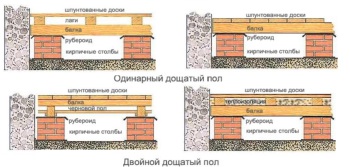 Most often, thermal insulation is laid in the space from the draft to the finishing floor.
As thermal insulation, you can use expanded clay, a mixture of clay and sawdust, or straw. Naturally, you can use modern materials - polystyrene foam or extruded polystyrene foam. A finishing floor (grooved board) is laid on the thermal insulation.
concrete floor
The concrete floor is equipped in several stages:
- First of all, markup is done. Here it is better to use a laser level. After its installation, it will mark the walls in the right places for the future floor. To mark the level in the center of the room, threads are pulled from the marks in the walls.
- Next, we do gravel backfilling. This is the insulation in your floor. The earth should be cleared of plants so that they do not germinate through the floor. After that, drive in stakes so that their level does not reach the level of the future floor by 100 mm. Dumping starts from the wall opposite the door. After backfilling the entire area, the gravel is leveled and compacted, and the pegs are removed.

- At the next stage, sand is poured, compacted and leveled.
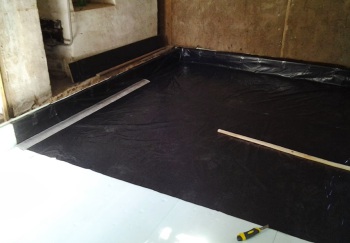
- The arrangement of proper waterproofing plays a huge role, the moisture insulation of a concrete floor is usually made with a plastic film, the thickness of which is not less than 250 microns.
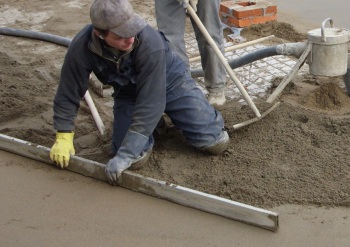
- Next, we make the filling. First of all, you should set the level of the beacons, which are used as wooden or metal slats, the distance between which is from 1 to 1.5 m. The upper edge of the slats should be in contact with the stretched threads. Then, the rope marking is removed.
- Now the inter-rail space is poured with concrete, from the end of the room to the door. After that, the concrete is leveled using the rule.
After the "seizure" of the concrete, it is necessary to dismantle the rails, and fill the voids with a solution. To level the mortar in the cracks, a “grater” is used for plastering. After that, the floor is covered with plastic wrap for a month. It is better to periodically moisten the concrete. This will enable the concrete to gain maximum strength.
Filling the floor in a private house instruction
For self-pouring a concrete floor, no special skills in construction are required.The main thing here is the preparation of the necessary consumables, and the calculation of their quantity. If this is done, then filling the floor in a private house will be effective and simple.
Do not forget, the arrangement of a durable and even concrete floor is the key to the quality arrangement of any floor covering. For quality work, you need to use:
- vibrotamper;
- ruberoid;
- polyethylene film;
- expanded clay;
- foam boards;
- reinforced mesh;
- restrictive rails;
- building levels.
The order of work or instructions for pouring the floor in a private house
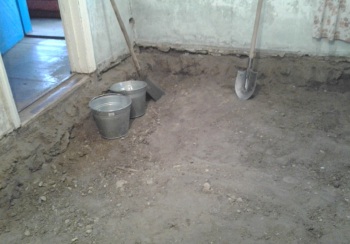
1. First of all, you need to prepare the base surface for the future concrete floor. To do this, the top layer of soil should be removed to the required depth. Make an effort to make the plane as flat as possible. Now, it must be rammed with broken bricks or rubble. A vibrotamper will help you with this. If you do not have the opportunity to use such a tool, and you need to equip the floor in a small area, then tamping can be done manually.
- 2. At the next stage of work, waterproofing and thermal insulation should be arranged. It is most rational to use roofing material for these purposes. If you want to save a little money on insulation and you are sure that the groundwater level will never reach the floor in your house, then floor insulation can be done by laying several layers of a material such as ordinary plastic sheeting. Here the main role is played by your personal preferences and financial capabilities.
- 3. When the waterproofing is fully equipped, you should start laying the heat-insulating material. For these purposes, you can use expanded clay, or foam boards. Although this material is being used less and less, glass wool can also be used to equip the heat-insulating layer. When insulating a concrete floor, approach responsibly the process of calculating the amount of consumables, otherwise, such repairs can cost you dearly.
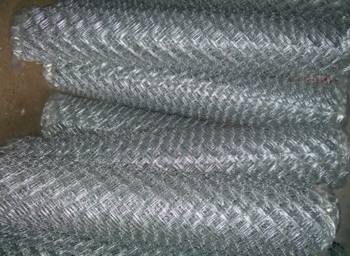
4. Now, you can start the process of filling the floor with a solution. Concrete is laid on top of the prepared surface from the end of the room, which is opposite to the door, while gradually moving towards the beginning of the room. In this process, the use of restrictive rails, which are set in accordance with the level of the floor, will help you. Here it is very important to strengthen the final layer with a metal frame. To carry out reinforcement, a conventional chain-link mesh can be used. With the help of these actions, it is possible to achieve an increase in the impact resistance of the upper layer.
5. Well, now you can proceed to the final stage. Here you will need to carefully make a screed using a leveling layer of cement, which has been diluted with water, until it turns into a liquid slurry. For these purposes, you can use a special leveling mixture, which is freely sold in specialized stores.
How to lay an array with your own hands
 The massive board keeps within on plywood sheets. The base can be either a concrete floor or a wooden one on the logs.
- It is necessary to measure 15 mm from the walls to create a ventilation gap and in case of seasonal deformations.
- The boards of the finishing floor must be laid so that they are located across the boards of the subfloor. The first row is placed with a spike against the wall and screwed with self-tapping screws. It is necessary to tighten the screws so that they are covered with a plinth near the wall. From the second side, the screws are screwed into the groove at an angle of 45 °.
- A wooden spacer is placed in the gap between the board and the wall. If the dimensions of the room are greater than the length of the floorboards, then the boards are spread "in a row". This will make the floor more durable.
- The second and subsequent rows of boards are placed with a spike in the groove of the previous row, sealed with a mallet and fastened to the groove on the other side with self-tapping screws. If you want the wooden floor to last as long as possible, you need to lay the boards in such a way that the growth rings are opposite to each other.
The parquet board is laid "in a row". A solid parquet board can also be used as a finishing floor. In fact, this is the same grooved massive board, only shorter. Its installation is somewhat different:
- It can be fixed on self-tapping screws only from the side of the spike.
- Installation is carried out only "out of the box".
- If the base is made of plywood, then it is better to glue the parquet board first, and then additionally fix it with self-tapping screws.
- If you lay the board diagonally, the room will visually look larger.
Related Materials:
Choosing a floor board - thickness, wood species and how to lay it correctly
Parquet for renovation
Parquet flooring has been known since the 17th century, when it was first used in the palaces of the kings of France. The main advantage of parquet flooring is its environmental friendliness. Modern manufacturers offer a wide range of colors, sizes and ways of laying parquet and parquet boards, which allows you to repair the floors in the room in a unique style for each room.
Before laying such a coating, the floors are leveled with a special screed so that the height differences of the irregularities do not exceed half a centimeter. Next, the humidity of the room is determined, for which a small piece of plastic film is laid on the floor for a day, the edges of which are fixed with adhesive tape. If there is high humidity in the room, then the film will be covered with perspiration from the inside. In this case, laying parquet is not recommended.
The disadvantages of such a coating are the high price and instability to moisture. Also, this material cannot be used when mounting a "warm floor".
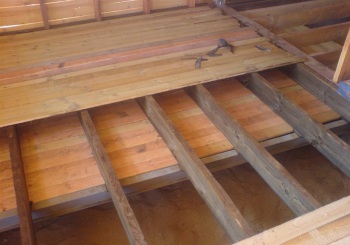
Methods for laying a wooden floor
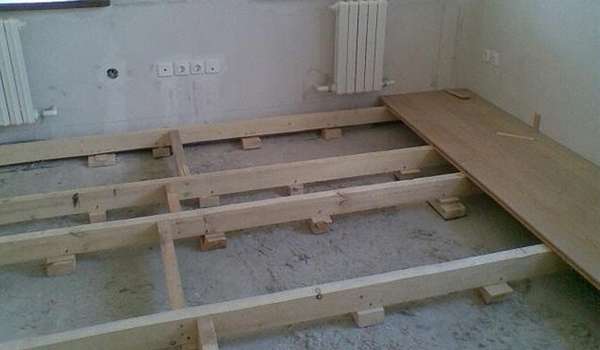
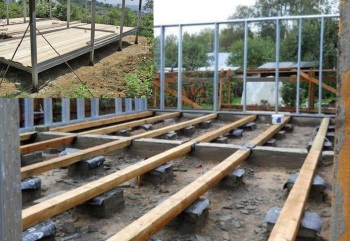
The installation of a wooden floor can only be started after the frame device of the posts and beams is finally ready. A layer of roofing material is laid on the posts, which serves as a good waterproofing. Beams are installed on the waterproofing layer, and logs are fixed on the beams for additional strength. It’s good when the width of the room corresponds to the length of the lag, but if you have to connect the lags, then it’s better that the joints are right on the support pillars, and they are fastened with self-tapping screws.
The very device of the wooden floor is both single and double. Single floors are not very durable, and they are usually placed in summer country houses. Such a floor does not tolerate weather fluctuations and is not intended for year-round use. In order to feel comfortable in winter, it is recommended to build double insulated floors. It will take a lot of time and the right material. But the extra effort is worth it, as it increases the degree of strength and reliability. To do this, a list of works is performed in a certain sequence:
- Install lags;
- Lay moisture-resistant plywood between them, and lay insulation on top;
- Lay the rough base of the floor on the logs.
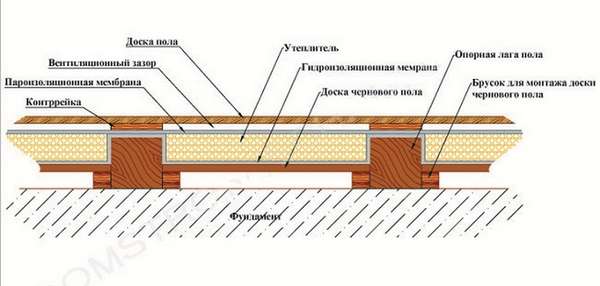
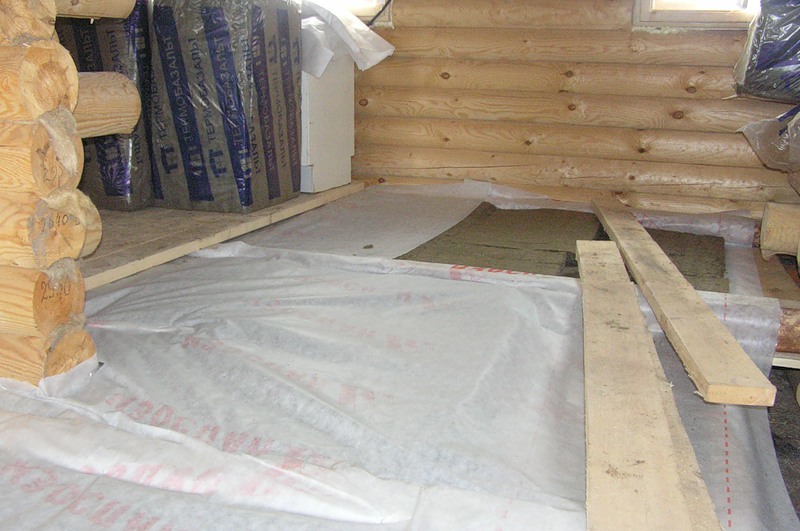
 Double plank floor pie
To create a subfloor, boards of low grades are suitable, the thickness of which is 15-50 mm. Such boards, carefully processed, are adjusted to each other. Then the finished boards on the screws are attached to the logs.
Boards are laid 15-20 mm from the wall. This promotes ventilation and prevents the floor from swelling during the seasonal deformation of the tree. Waterproofing is carried out using a polyethylene film 200 microns thick, and additional thermal insulation is made of foamed polyethylene. The film is overlapped, the edges are glued together with adhesive tape.On the walls you need to make an overlap of 20 cm and stick it on adhesive tape. After that, the finishing floor and top coat are laid.
For flooring, plywood sheets or solid wood are used. Plywood is placed on top of the heat-insulating layer and fixed with self-tapping screws.
The massive board has an attractive appearance, it is convenient to lay it, and besides, it is easy to operate. The advantage of solid wood flooring is that you can apply varnish or paint to the floor and thus do without additional costs for finishing materials. The massive board is made in two options: usual and tongue-and-groove. The difference between them is in the installation method. The tongue-and-groove board is much easier to install. However, before installation, it must lie down in the room for three days.
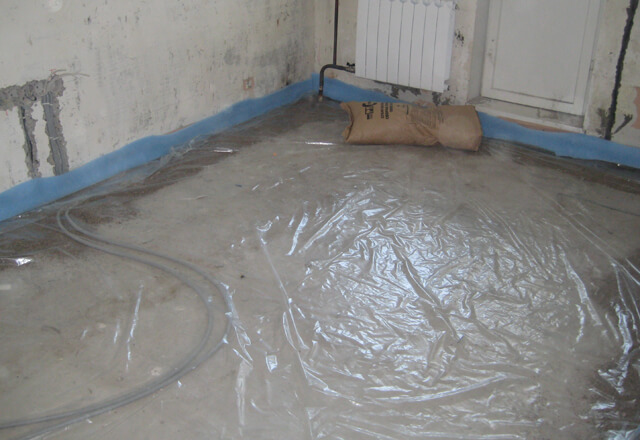
Pouring concrete floor
Arrangement of a concrete floor in a private house begins with preparatory work. First, markings and gravel filling are done at the site of the future floor. The soil is preliminarily cleared of plants and the top layer, and then compacted. Next, a layer of gravel is poured, which also needs to be well compacted. In the construction of a concrete floor in a private house, gravel will play the role of thermal insulation. Sand is poured over the gravel. After it is compacted, a thick polyethylene film is spread on the surface, which acts as a waterproofing material.
How to make a concrete floor in a private house? After installing the waterproofing layer, you can start pouring the screed. A cement screed in a country house is poured in the same way as a screed in an apartment: levels are set and a mortar is poured, which is leveled from wall to door by the rule.
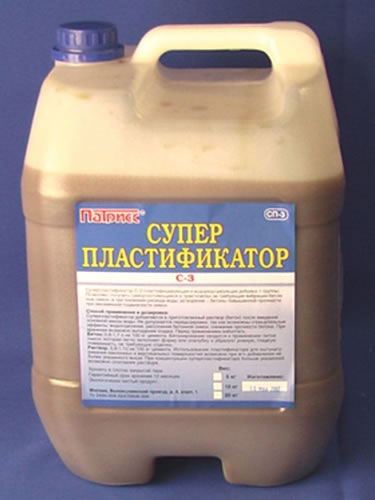
When pouring a concrete screed, several features should be taken into account. The solution for pouring must be fresh, for its preparation it is recommended to use cement grade not lower than M-300, screening of sand and water. To increase the strength of the concrete layer, special compounds can be added to the solution - plasticizers, which will give additional strength to the future coating.
When pouring a screed with a height of 5 cm, you can use reinforcing elements or a reinforcing mesh, which is laid on the waterproofing layer before pouring. In the case of arranging warm water floors in a private house, the use of a reinforcing mesh and the addition of plasticizers to the cement mortar are mandatory procedures.

When the concrete hardens a little after pouring, you can remove the beacons. The voids left after their removal are filled with the same solution. After filling and leveling all the cracks, the floor is covered with polyethylene and left to dry. Drying a concrete floor is a long and responsible undertaking. The concrete must dry itself within a month; if there is a floor heating system, heating is prohibited until the screed is completely dry. By turning on the heating elements, you will help the concrete to crack even before the room is used. When drying, it is recommended to periodically moisten the concrete screed with water and cover it again with polyethylene: if this requirement is met, the coating will gain maximum strength and will not crack.
In order to correctly make the cement pour, remove the beacons and dry the concrete, it is recommended to consider photos with the work of builders specializing in arranging floors in private homes.
Floor repair sequence of actions
You can make a floor from scratch in a private house with your own hands. First you need to remove the old structure, which is usually made in the form of a log system and a wooden covering in an old private house. If you plan to create a floor covering of ceramic tiles, you need to make a screed. Tiles cannot be laid on a wooden base. For other types of flooring, such as linoleum or laminate, you can restore the lag system and make the thermal insulation of the structure.
The process of repairing floors in a private house.
A new floor in a private house with a screed is created in the following sequence:
- The old structure is dismantled, the base surface is leveled.
- A pillow is constructed from gravel or brick chips and sand.
- A layer of film or roofing felt is laid so that moisture from the soil does not penetrate.
- The level of the future screed is determined, marks are placed on the walls.
- Insulation is laid (expanded clay, polystyrene, mineral wool).
- Reinforcing mesh is laid.
- The base with the help of rails is divided into sections of 2 m. The height of the rail should correspond to the height of the future screed (at least 7 cm).
- The cement mortar is mixed and poured into each section.
- The solution is leveled using the rule.
- The finished draft floor is covered with a film and left to dry for 2 weeks. Periodically, concrete should be moistened.
- After the concrete has dried, a leveling screed is made.
- The floor covering is laid.
The concrete base can be used for any type of flooring.
A multi-layer pillow made of crushed stone and sand serves as a shock absorber in case of subsidence and heaving of the soil.
Scheme of pouring a warm floor with concrete.
In addition, it is the receptacle for all communications that are in a private house. Pipes and wires are insulated in special boxes and hidden under a layer of sand and gravel. The bulk pillow is created as follows:
- A layer of gravel (5 cm) is poured, then it is leveled, moistened and compacted.
- A layer of sand (10 cm) is poured, moistened and rammed.
- A layer of gravel (10 cm) is poured and rammed again.
Concrete flooring is more reliable and durable than wooden flooring on logs. It can serve for decades, retaining its qualities. Concrete does not contain harmful components, retains its strength, remains dry, does not deform from temperature fluctuations.
The wooden structure is exposed to external factors. Logs can be destroyed by pests. With temperature fluctuations, the boards are deformed, cracks appear in the flooring, the boards begin to creak. Mold can form on wood when exposed to high humidity. But creating a wooden structure is a more economical way to make a floor in a private house.
Clean coating from an environmental point of view
Wood floors come in different types.
When choosing, both price and prestige play a decisive role:
- A massive board is an expensive classic material that is often used for flooring. Perfect for a log house. Whole layers are always good enough.
- Parquet board - made of wood, it is equipped with grooves that give convenience when docking. The thickness of the standard material reaches 0.25 cm, and the length is up to 200 cm.
- Parquet adhesive board - does not differ much from the previous version and is not inferior in quality at all. Has a long period of operation. Its top layer is usually made of precious wood, its thickness can be up to 5 mm. Other layers are not so big.
- Ordinary parquet is a set of planks that have grooves. This material is the best suited and is often used for sophisticated floors.
Wood floor repair
Repairing old wood floors begins with identifying creaking floorboards and lags, as well as those parts of the structure that are covered with mold. Detected defective parts are exchanged for new elements. The entire floor area is treated with an antifungal agent. If certain areas of the floor in the room are more often than others exposed to moisture, then they should be covered with waterproofing materials, since antifungal impregnation alone will not be enough.
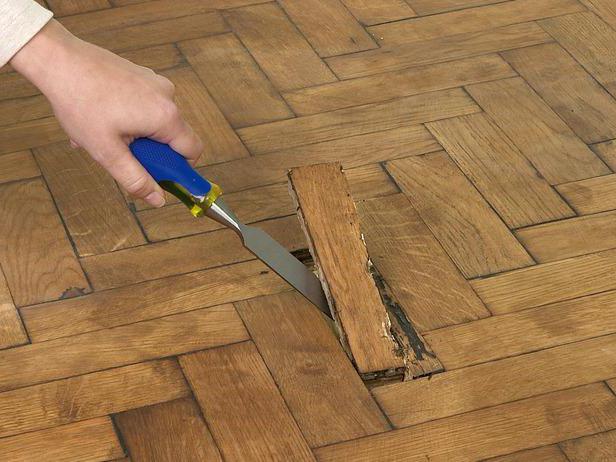
Often, cracks form in the wooden flooring due to the drying of the wood. You can eliminate them as follows:
- The floor is treated with a grinder.
- The gaps are sealed with a primer and another layer is removed with a grinder.
- The boards are primed with nitro-lacquer.
- After the nitrolac dries, primed with a top coat (matte or glossy).
Concrete floor installation
In order to properly install the concrete floor with your own hands, you first make markings, and the soil is covered with gravel for thermal insulation. Layers of sand are poured over the gravel, each layer is carefully rammed. Then the sand is covered with a waterproofing material in the form of a polyethylene film or sheets of roofing material.
On top of the waterproofing, insulation is laid in the form of crushed stone or another layer of gravel, then the waterproofing is laid again and only then a concrete screed is made. The solution is used only fresh brand not lower than M-300. To increase the strength of concrete, special plasticizer compounds are added to the mixture.
It is important to dry the concrete properly. It usually takes three to four weeks
During drying, the surface should be covered with a film and periodically wet the screed with water. Do not use heating elements and do not turn on the heating in the house before the concrete dries! Otherwise, the surface will crack.
To enhance the thermal insulation of the concrete floor, you can use additional heaters. From above, concrete is covered with wooden materials or a “warm floor” system is laid.
Installation of wooden floors
When building a private house, many people prefer to make the floor out of wood. Such a desire to have high-quality wooden flooring underfoot is explained by the desire to use environmentally friendly materials, which include wood. In addition to high environmental friendliness, such a floor has a number of other advantages.
Wooden floors are easy to install and easy to repair during operation. Due to the low thermal conductivity of the material, such a floor will keep heat inside the house without releasing it outside. Plank flooring made of quality wood is characterized by a long service life and an attractive "natural" appearance.
To make a floor in a private house, you need to choose the right wood. The choice of starting materials should be based on the design features of the structure itself. The device of the floor in a country house must necessarily provide for the presence of a subfloor that acts as an air gap. If such a layer is absent, then the wooden floor will quickly become unusable due to moisture.
In addition, for a good floor, it is important to have all the layers of the structure, including logs, rough flooring, hydro and thermal insulation, finishing

The floor in a private house is subjected to significant mechanical stress, so for its construction it is required to choose wood with good technological characteristics. The boards must be well dried, the recommended moisture content is no more than 12%. Any chips and cracks on the surface of the material are not allowed. Experts recommend giving preference to coniferous wood, suitable for pine, larch, fir, cedar. To increase the life of the future floor, all boards must be treated with an antiseptic and fire retardant.
The installation of a wooden floor begins with the determination of places for the supporting pillars and their installation. The fertile layer of soil around the entire perimeter of the house is removed and removed, gravel is poured in its place, and sand is placed on top of it. Layers of gravel and sand must be well compacted. Waterproofing material is laid on the ends of the supporting pillars, most often ordinary roofing material is used for these purposes.
Next, we make beams that need to be fixed on poles with metal corners. Floors in a private house are best done with double insulation. Experts suggest first laying plywood sheets on the sides of the beams, and then placing mineral wool or other insulating material on them.

When the insulation layer is ready, you can start laying the rough coating.The boards of this layer should fit well to each other; ordinary self-tapping screws can be used as their fastening to the beams. It is better to leave some distance between the flooring and the walls of the house: a gap of 1.5 cm can be considered the norm for this part of the floor. These gaps provide ventilation for the entire floor structure and protect the walls from expansion of the floorboards when they dry out.

A layer of vapor barrier made of polyethylene film with a thickness of 200 microns is laid over the subfloor. The joints of individual pieces of film must be glued with adhesive tape, and the edges should be wrapped on the walls to a height of about 20 cm - to the height of the finish coating. When the film is laid and fixed, you can proceed to the assembly of the finished floor.
The finished floor is assembled from solid boards or plywood sheets. Plywood sheets are easier to attach, but in the end they do not look very attractive. Therefore, if you want to leave wooden floors in your house, then it is best to immediately collect the finishing coating from a grooved board, and if you plan to cover it with decorative material, it is enough to fix the plywood sheets. Plank floors after assembling the finished floor must be varnished, which will not only protect the material from external influences of a mechanical and chemical nature, but also emphasize the decorative qualities of natural wood.

What repairs and when to do
Repairing the floor on your own is a rather complicated, time-consuming and responsible process. First, it is worth understanding the types of manipulations that will have to be carried out.
To do this, it is important to assess the condition of the structure and decide what needs to be done: cosmetic or overhaul. repair
Owners of new buildings have a floor with a ready-made and well-made screed. In this case, it will be possible to do with cosmetic repairs: if necessary, fill in the leveling mixture and lay the floor covering.
An old apartment often involves a cap. floor repair, especially if wood was used as a coating. Wood flooring has a limited lifespan and over time the floorboards begin to creak or sag when walked on. It is out of the question to carry out a cosmetic finish of a wooden coating that has served its time.
Types of floor repairs largely depend on the type of flooring that will be used. There is a standard classification of coatings used in floor repair. It distinguishes materials such as parquet, laminate, ceramic tiles, linoleum, solid board, stone flooring, carpet, self-leveling floors.
Installation of concrete screed
There is no strict thickness of the expanded clay layer, however, it must be at least 40 mm. It is worth noting that the larger the fraction, the thicker the expanded clay layer should be. The thickness also depends on the local climate, in some cases the thickness of such a layer can reach 100 mm. If you cannot decide on the thickness yourself, then use the universal size of 80 mm.
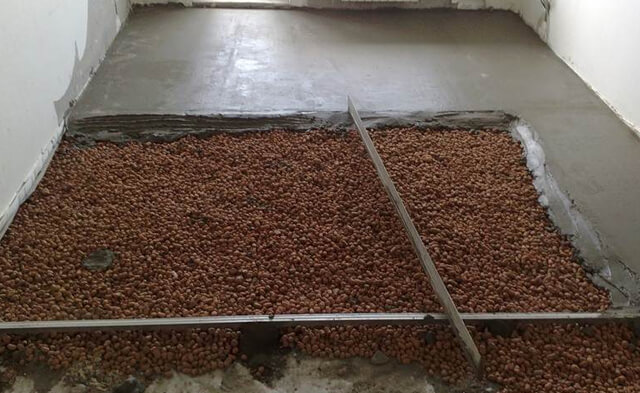
There is no need to dwell on the installation of a concrete screed, because our website provides many articles on its installation. A solution prepared from sand and cement, or a ready-made mixture, is poured between beacons installed directly on expanded clay. Remember that it will take several weeks for the screed to dry completely. This base can last for decades, in addition, it extends the life of the floor itself.