By the pike command of Emelya A fairy tale with pictures
il-was an old man. He had three sons: two smart, the third - the fool Emelya. Those brothers work, but Emelya lies on the stove all day, not wanting to know anything.
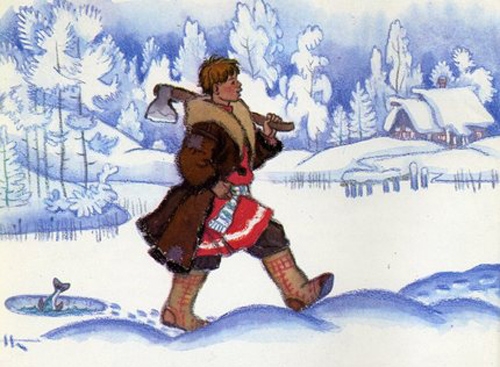
 Once the brothers went to the market, and the women, daughters-in-law, let's send him: - Go, Emelya, for water. - Well, okay. Emelya got down from the stove, put on his shoes, got dressed, took buckets and an ax and went to the river. And I saw Emelya in the hole in the pike.
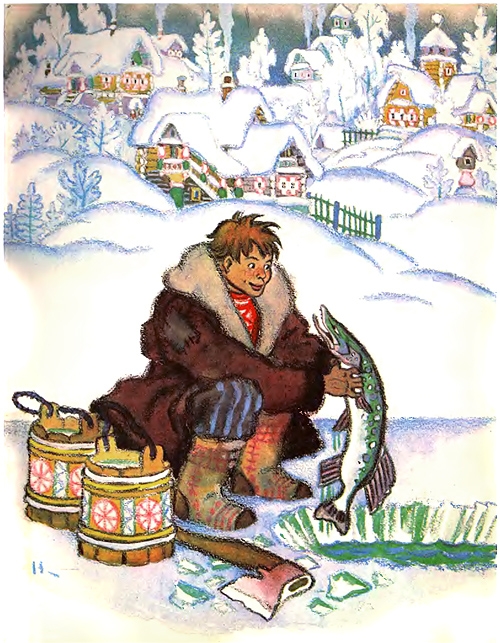 He contrived and grabbed the pike in his hand: - Here the ear will be sweet! Suddenly the pike says to him in a human voice: - Emelya, let me go into the water, I will be useful to you. And Emelya laughs: - What will you be useful to me for? No, I’ll carry you home, I’ll tell my daughters-in-law to cook the fish soup. The ear will be sweet. The pike pleaded again: - Emelya, Emelya, let me go into the water, I will do whatever you want. - Okay, just show first that you are not deceiving me, then I will let him go. , tell me - what do you want now? - I want the buckets to go home by themselves and the water would not spill ... The pike says to him: - Remember my words: when you want something - just say: By the pike command, By my desire. Emelya says : - At the command of the pike, At my will, go, buckets, go home yourself ...
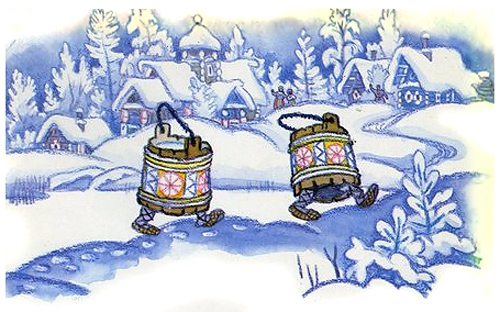 He just said - the buckets themselves went uphill. Emelya let the pike into the hole, and he went for the buckets.
 Buckets go through the village, the people marvel, and Emelya walks behind, chuckles ... The buckets went into the hut and stood on the bench themselves, and Emelya climbed onto the stove. I would go and cut some firewood. - Reluctance ... - You will not chop firewood, the brothers will return from the market, they will not bring you gifts. Emele is reluctant to get off the stove. He remembered the pike and slowly says: - At the pike's command, At my will, go, an ax, chop wood, and firewood - go into the hut yourself and put it in the oven ... The ax jumped out from under the bench - and into the yard, and give firewood chop, and the firewood themselves go into the hut and climb into the oven. How much, how little time has passed - the daughters-in-law again say: - Emelya, we no longer have firewood. Go to the forest, cut it. And he told them from the stove: - What are you doing for? - What are we doing? .. Is it our business to go to the forest for firewood?
- I'm reluctant ... - Well, there will be no gifts for you. There is nothing to do. Emel's tears from the stove, put on shoes, got dressed. He took a rope and an ax, went out into the yard and sat in a sleigh: - Babs, open the gate! Emelya says quietly: - At the command of the pike, At my will, go, sleigh, into the forest ...
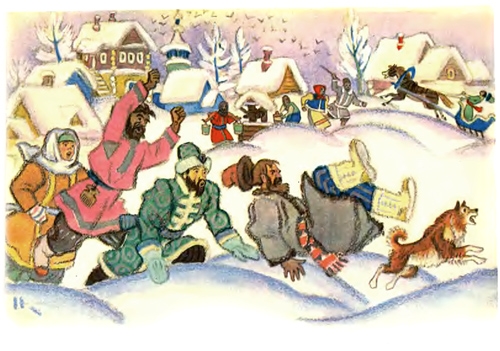
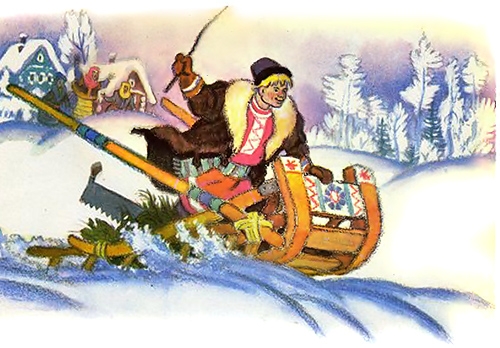 The sleigh drove through the gates on its own, and so quickly - it was impossible to catch up on a horse. But we had to go to the forest through the city, and then he crushed a lot of people, crushed them. The people are shouting “Hold it! Catch him! And he knows the sleigh drives.
 He came to the forest: - At the command of the pike, At my desire, an ax, chop dry firewood, and you, firewood, fall into the sleigh yourself, knit yourself ... The ax began to chop, chop dry trees, and the firewood themselves fall into the sleigh and knit with a rope. Then Emelya ordered the ax to knock out a club for himself - such that he could hardly lift it. I sat on the cart: - By the command of the pike, According to my desire, go home, sleigh ... The sleigh rushed home. Again Emelya is passing through the city where just now he crushed, crushed a lot of people, and there they are already waiting for him. They grabbed Emelya and dragged him from the cart, scolded and beat him. He sees that things are bad, and slowly: - At the command of the pike, At my will, come on, club, break off their sides ... The club jumped out - and let's beat. The people rushed away, and Emelya came home and climbed onto the stove. How long, how short - the tsar heard about Emelya's tricks and sends an officer after him: to find him and bring him to the palace. The officer arrives in that village, enters the hut where Emelya lives, and asks: - Are you a fool Emelya? And he is from the stove: - And what do you need? - Get dressed soon, I will take you to the king. - But I don’t feel like it ... The officer got angry and hit him on the cheek. And Emelya says quietly: - At the command of the pike, At my will - a baton, break off his sides ...
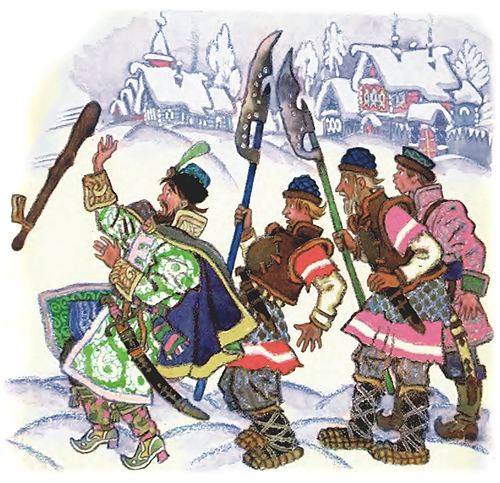 The club jumped out - and let's beat the officer, he took his legs by force. The king was surprised that his officer could not cope with Emelya, and sent his greatest nobleman: - Bring the fool Emelya to me in the palace, otherwise I’ll take my head off my shoulders. the nobleman of raisins, prunes, gingerbread, came to that village, entered that hut and began to ask his daughters-in-law that Emelya loves. - Our Emelya loves when they kindly ask him and promise a red caftan - then he will do whatever you ask. The greatest nobleman gave Emelya raisins, prunes, gingerbread and said: - Emelya, Emelya, why are you lying on the stove? Let's go to the king. - I'm warm here too ... - Emelya, Emelya, the king will feed and drink well, - please, let's go. - But I don’t feel like it ... - Emelya, Emelya, the king will give you a red caftan, a hat and boots.
Fairy tales with pictures
+170
Ladder Do-it-yourself furniture for the mini-museum Russian hut.
We take two sticks of the same length, corresponding to the desired length of the stairs. We outline the cuts for the steps.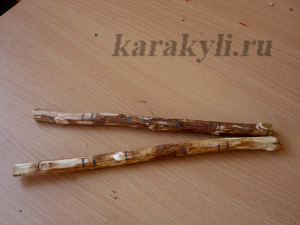
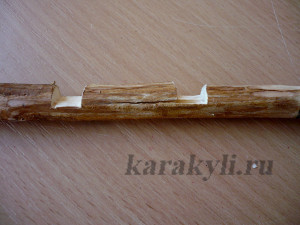
We cut cuts for steps. To do this, we make two parallel cuts at a distance of 0.5-0.7 cm to about half the stick, and then break out a part of the tree between the cuts with a knife.
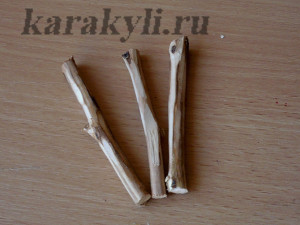
We cut the required number of sticks-steps.
We insert sticks-steps into the cuts. For strength, we fix the junctions with threads.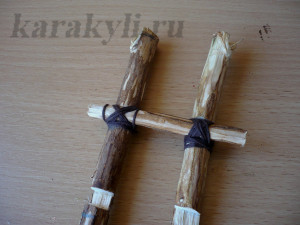
The ladder for the mini museum Russian hut is ready.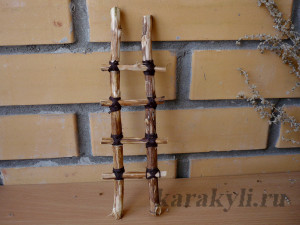
The necessary set of furniture for the mini-museum Russian hut, which you can do with your own hands from improvised materials, is ready.
But the most important thing in a Russian hut is missing - a stove. How to make a stove with your own hands is dedicated to the post
Now we will make a character who rode a stove. Emelya origami is done like this:
Prepare from yellow paper, painted on one side, 2 squares measuring 10 x 10 cm (head, legs), from paper of any color 1 rectangle measuring 5.5 x 3.5 cm (hat), 1 square measuring 9 x 9 cm ( sheepskin coat), 2 squares measuring 6 x 6 cm (hands), 1 dark-colored square measuring 13 x 13 cm (pants). Fold the head, hat, sheepskin coat and hands using the origami Ivan Tsarevich figurine folding patterns.
Legs Square with a side of 10 cm bend diagonally. Place the triangle right angle up.
1. Lower right angle (one layer of paper).
2. Lift the two bottom corners from the middle of the bottom side.
3. Bend the resulting triangles.
4. Turn the part over to the other side.
5. Open the "pockets".
6. Bend the corners, and then fold the part in half.
7. Bend the corner into the part.
8. Check the result.
Pants From a square of dark color, fold a triangle, then fold it in half.
Hello everyone! Not so long ago in my hometown Energodar was held, in which our family took part. After we decided on the theme of our composition (Ukrainian stove) and submitted an application for participation, the question arose of how to build this miracle. Knowing that such competitions have recently been held in many cities not only in Ukraine, but also in Russia, it was decided to google in search of any examples. Climbing through the expanses of the Internet, we found pictures from other stroller parades, however, we did not see examples of creation anywhere. Therefore, I decided to fill this gap and write my own story about the construction of a Ukrainian stove, so to speak, based on a baby stroller. Maybe someone will find it useful.
So, imagining the shape and size of the furnace, we are looking for suitable materials. They didn’t find suitable ones, so I had to pay for what it was: a piece of a large torn box from under the TV and a couple of small boxes found at my parents’ house.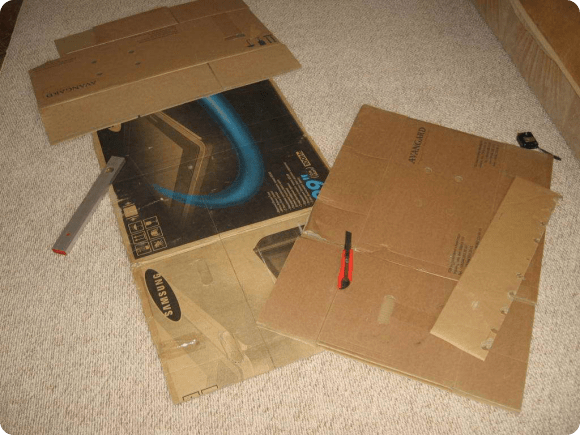
We take out an old stroller from the balcony (of course, you can also use a new one, but since it was old, we decided to use it). We are estimating how we will pave the box on it, so that there is access to the handles and in general all this miracle somehow rides. The length and width should be slightly greater than the length and width of the stroller itself, because. we will put the oven on top. Height to taste. I chose to be a little higher than the handles, plus there will also be a chimney.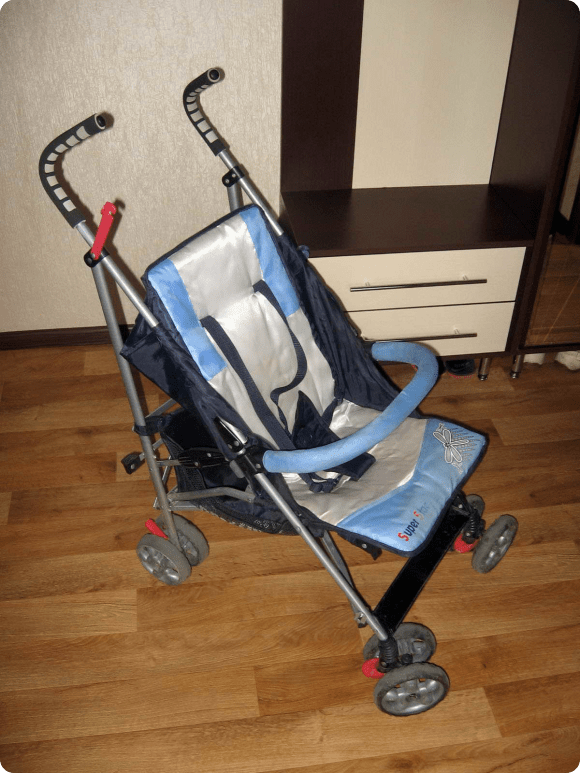
From the tools we need: adhesive tape, stationery knife, PVA glue, drawing paper, watercolors, a large stapler, level (as a ruler), scissors, pencil, tape measure, etc.
We measure all the necessary dimensions and get to work.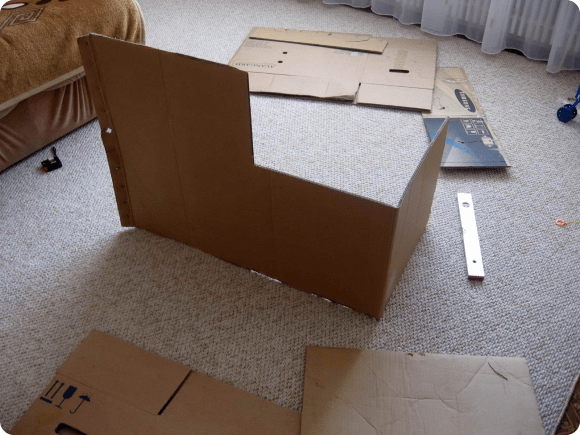
Since he sculpted the walls of the furnace from different pieces, he had to work a lot with a stapler.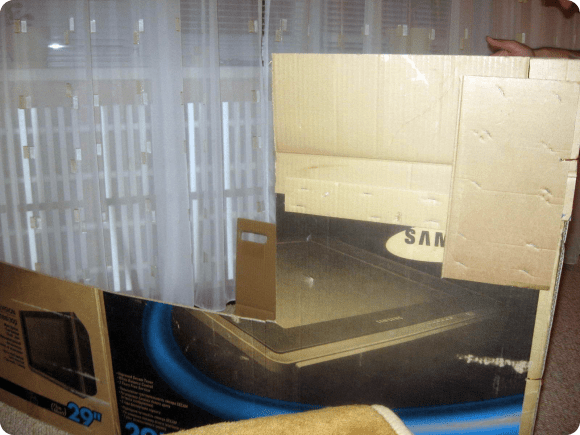
The assistant came. Work has stopped.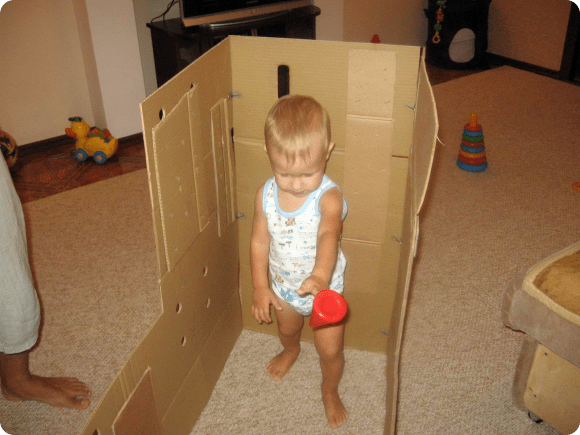
It took about half a day for this. We glue all parts with adhesive tape, in some places we twist with wire so that this creation does not fall apart during the competition. The only thing missing is a roof and a chimney.
We add what is missing. We sculpt the chimney on double-sided tape to the roof. The roof with a chimney is removable, because. we will put the design on top of the stroller.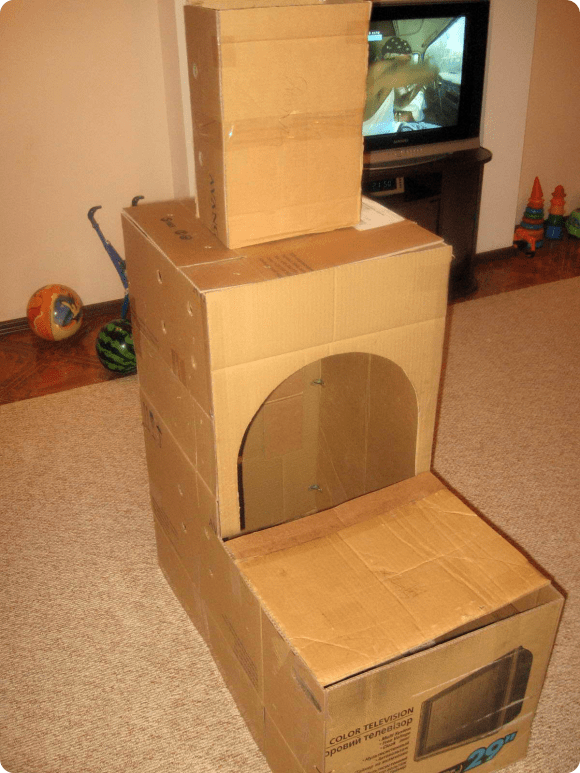
Paste with Whatman paper. We admire.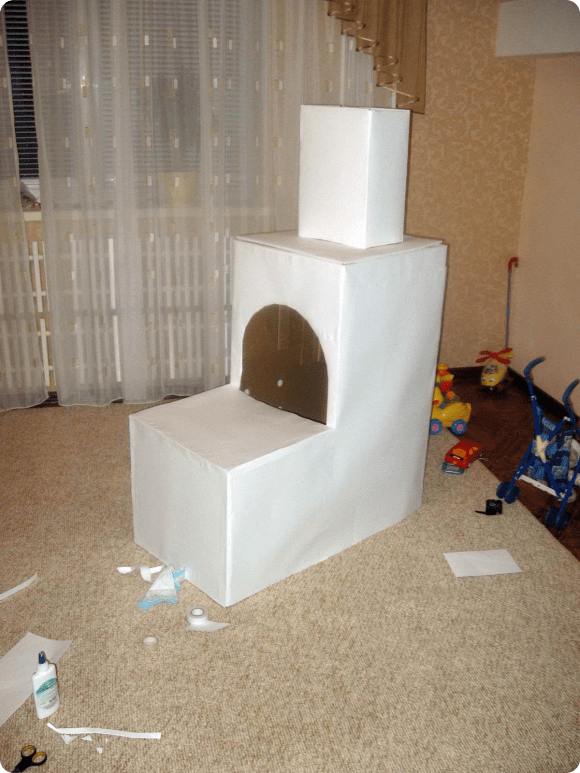
We figure out how we will cling accessories. Already better, but not enough drawings.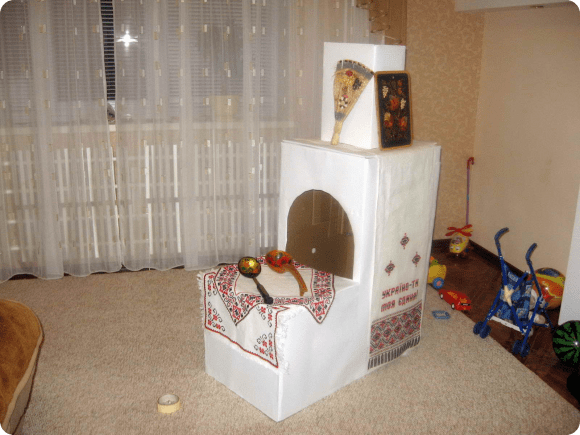
We are looking for inspiration in Ukrainian ornaments and photographs of real stoves.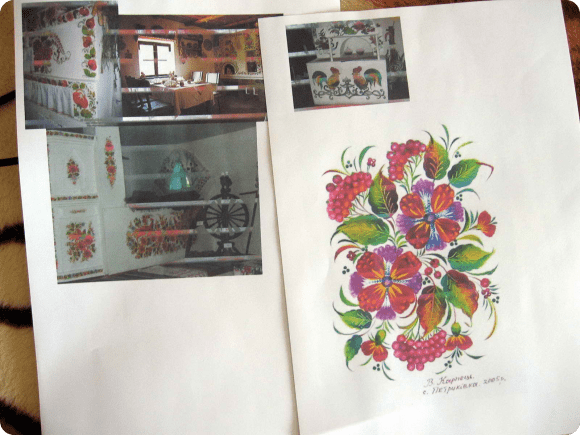
We pick up a pencil and watercolor, the smell of which immediately reminded me of school drawing lessons.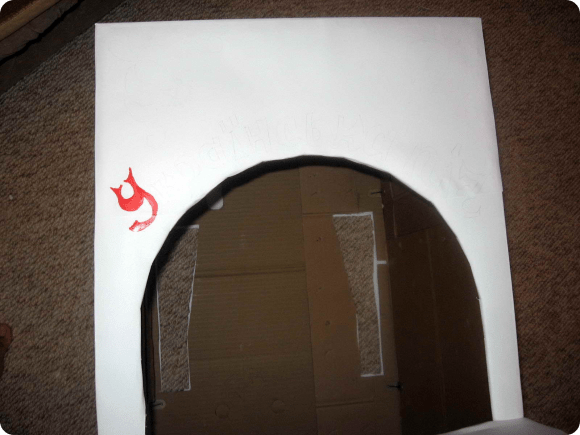
A couple more hours and the drawings are ready.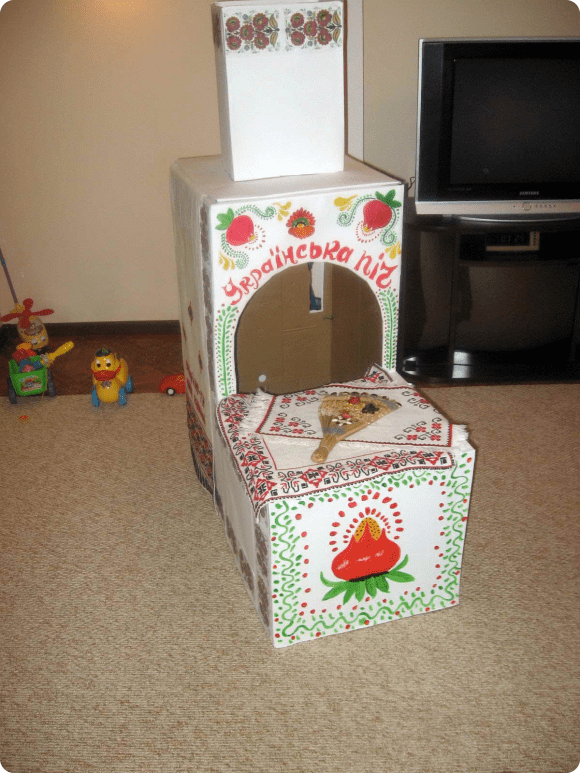
The ornaments on the chimney and on the sides were printed on a printer and glued on with glue, because. there was no desire to draw them by hand already at midnight before the parade of carriages.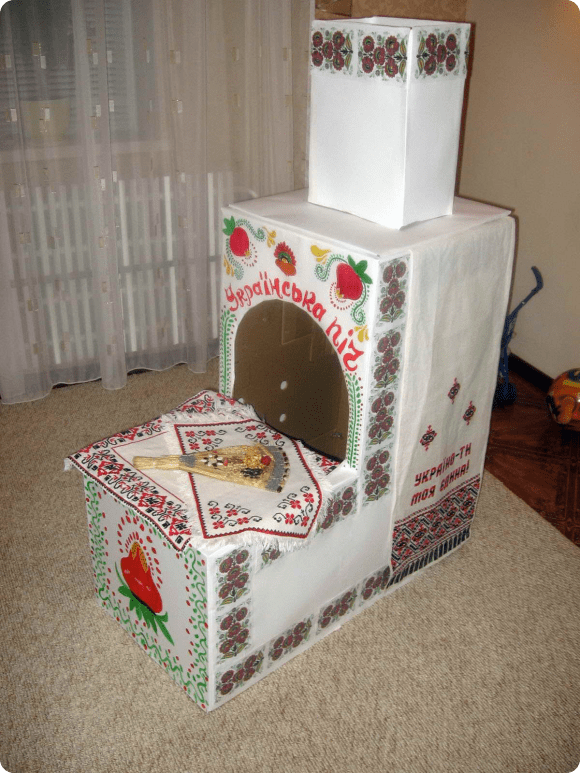
At the back you can see the holes for the pens cut out with a clerical knife.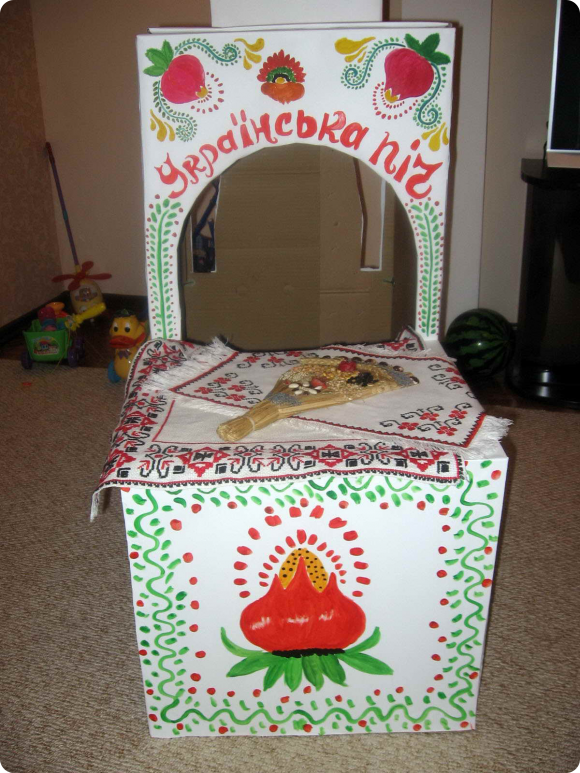
And here we are.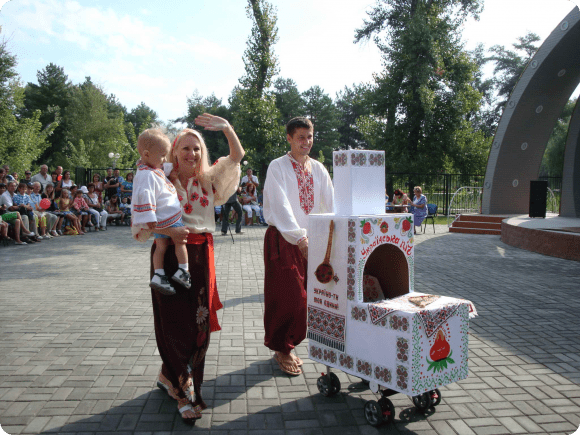
At the end of the parade of carriages, the stove went to the kindergarten as a decoration for a corner of Ukrainian folk art.
Vacation with a child
Table and stool from matchboxes. Do-it-yourself furniture for the mini museum Russian hut.
For the manufacture of table legs, we need four empty matchboxes. Slightly push the boxes, grease two of them with glue. The places of lubrication with glue are shown by shading.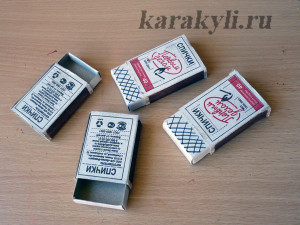
Connect both legs-corner. To do this, slightly crush one of the matchboxes.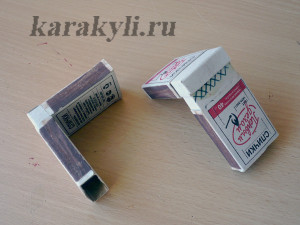
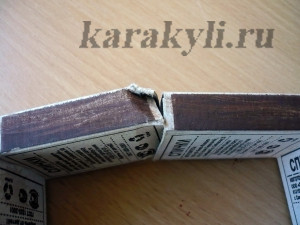
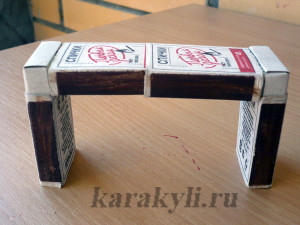
The legs for our table are ready.
Paint the table legs and glue the table top. The tabletop is cut out of cardboard. Size 13x7 cm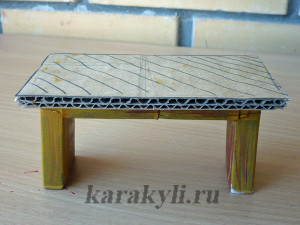
The table is almost ready, it remains only to paint the countertop. Now let's start making a stool. The technology is very similar to a table, but the stool should be lower. Therefore, matchboxes are cut into two parts.
This is what the base for a matchbox stool looks like.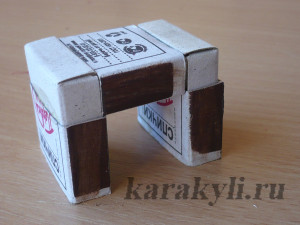
We glue the seat, paint, and the stool is ready. 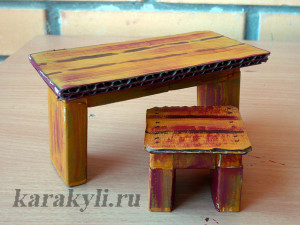
In this way, you can make a Russian hut and benches for a mini museum of folk dolls and folk life. You can try it yourself. And now we will tell you how to make wooden benches with your own hands.