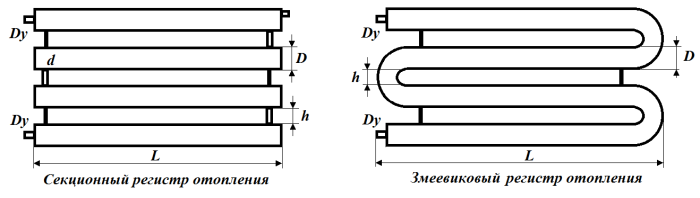
Additional design features
Some experts advise welding supports or brackets. This is not very good, because it makes the design more massive and not universal. Without welded supports and brackets, it can either be hung on the wall or installed on stands fixed on the floor.
In some cases, the owner, who dismantled the old sectional batteries. using a radiator key, and made the device, could make a mistake in calculating the optimal dimensions of a homemade radiator. As a result, the design is not able to heat the air in the room to the desired temperature. One way out is to manufacture an additional heater. However, you can improve already made.
To enhance heat transfer, vertical metal plates can be welded. They will also heat up and give off heat. Thanks to them, convection will improve.
These plates can be cut from a metal sheet with a thickness of 1.0-2.0 mm. Their features should be:
- The height is greater than the height of the battery.
- Width - 10-15 cm.
- The presence on one side of 3 cut out squares or rectangles. The dimensions must correspond to the dimensions of the profile pipe.
Such plates are applied to the battery and welded. As for their number, the more, the better, because the greater the heat transfer becomes.
Selection of a heating battery according to the area of the apartment How much heating batteries should be heated Production of a solar battery Heating meters for batteries
We weld the structure
This process is done like this:
- The pipes are set up with their own hands so that cut-out 10-cm round tubes fit between them. The holes should "look" to the sides. The ends of the profile pipes must be in one straight line.
- Wooden planks or other objects (for example, a wrench) are substituted under the round tubes so that the first are placed and fit snugly into the holes made.
- Tack welding 25 mm tube. In two or three places, the tubes are welded to the profile pipes. If two tacks are made, they should be positioned so that the line between them represents the diameter of the tube. If you plan to make three tacks, then they are evenly dispersed along the length of the tube. Choosing one of these methods, fix each end of the jumper.
- They put the structure in a vertical position and proceed to welding the jumpers of the profile pipe. Experts recommend that you first make a thin seam using a small current. This will fill all the gaps. Next, you need to make a thick main seam. Do it by increasing the welding current. This tip is primarily for beginners. Professionals can immediately make a beautiful, durable and reliable thick seam. So boil the seams at each end of the jumper.
- They clean the interior of the structure made from metal debris and slag.
- Plugs (rectangles or squares cut out of sheet metal) are applied to the ends of the profile pipes and they are grabbed in the same way as the jumpers were.
- Weld plugs to the ends of the radiator base. At the end, you get a rough design, in which you still need to make holes for the inlet and outlet of water.
- Processing welds. Parts of the seams that protrude very much are knocked down with a hammer, which could lie near the radiator key. A large wrench may work instead of a hammer. Next, each seam is treated with a grinder. Sanding will make them smooth.
- Holes in an almost finished radiator are drilled depending on how it will be connected. In general, it is desirable to make four holes. Unnecessary will be closed with a stub. Then, if necessary, it will be used. Holes can be made at the ends of the pipes or at the bottom and top sides of the created structure.Again, it all depends on the features of the connection. If the holes should be at the ends of the profile pipes, then they are not made in the center of the ends. The upper holes are placed closer to the top of the structure, the lower ones - closer to the bottom.
- Couplings cut in half by 15 mm are welded to the holes made. First they are seized, and then the main welding seam is made. Below, instead of muffs, you can use transitional knees. Of course, at the end of each of them must be an internal thread.
- They clean all the seams, plug three holes and pour water into the radiator through the last one. The water must be under pressure. You can pump air. In any case, check the reliability of the seams. If there are problem areas, they are marked and then additionally boiled, having drained the water before that. If not, then that's good.
- Clean the outer surface. they process, or rather wash it with a degreaser and paint it with heat-resistant paint, which stood next to the tools and the radiator key.
- A Mayevsky crane is installed in one of the upper holes (the key to it is placed in a safe and at the same time accessible place). You can also fix the shut-off valve.
Size calculation
Making your own pipe heating device is not very difficult. But there is one important point here - to correctly calculate the dimensions of the device. After all, such an indicator as heat transfer will depend on them.
Required indicators
The calculation is not easy, because it requires some criteria of the room itself. For example: the area of glazing, the number of entrance doors, which windows are installed, whether the floor, walls and ceiling are thermally insulated.
All this is difficult to take into account, so there is a simpler option, which takes into account only two indicators:
The heating radiator is selected on the basis of heat transfer per 10 m² equal to 1 kW of thermal energy. The ceiling height must not exceed 2.8 m.
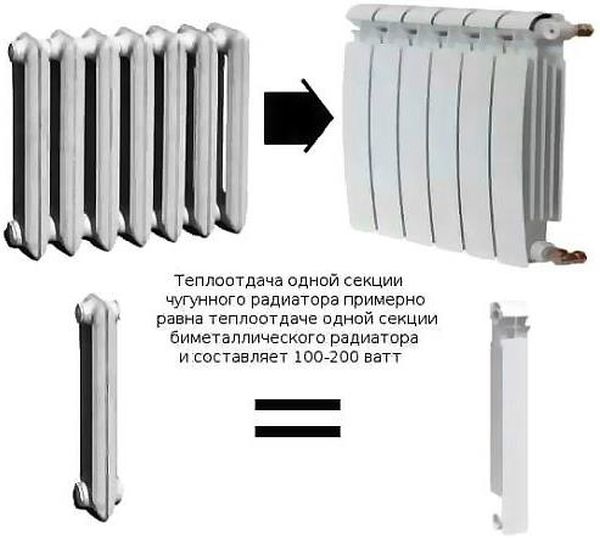
How can this help when assembling a homemade heating device? To do this, you will have to compare with a conventional cast-iron radiator of the MS-140-500 brand. The heat output of its one section is 160 W, the volume is 1.45 liters. What does this give us?
You can determine exactly how many sections will be needed if you use a cast iron appliance. From the number of sections, the total volume of coolant is determined, which will fit in one battery. And knowing this number, you can approximately set the volume of the pipe radiator.
The thing is that the thermal conductivity of steel is 54 W / m * K, and cast iron - 46 W / m * K. That is, a small downward error will not have any effect on the quality of heat transfer.
Calculation example
We will conditionally assume that an eight-section cast-iron heater corresponds to the above ratio. Its volume is 8x1.45 = 11.6 liters.
Now you can calculate the length of the pipe with a diameter of 100 mm, which we will use to assemble a homemade battery. The pipe cross-sectional area is standard - 708.5 mm². We divide the volume by the section, we get the length (liters are translated into mm³): 116000: 708.5 = 1640 mm. Or 1.64 m.

A small deviation in both directions will not greatly affect heat transfer. Therefore, you can choose either 1.6 or 1.7 m.
Rules for the location of the battery and wiring diagrams
In addition to the characteristics of the radiator itself and the literacy of its connection, one of the most important factors affecting the efficiency of the heating system is choosing the right place to locate the product. True, in most cases it is predetermined in advance - the new battery, most likely, will stand in place of the old cast iron one, which has been since the building was built. But still, here are a few recommendations for the proper placement of the radiator.
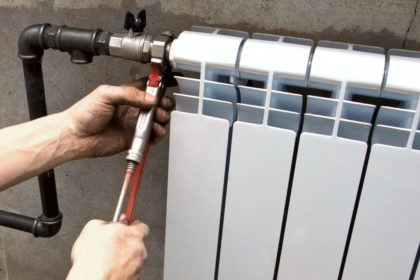
How to install a radiator with your own hands
Firstly, it is desirable to place the battery under the window. The fact is that it is a “bridge” through which cold from the street enters an apartment or cottage. The presence of a radiator under the window forms a kind of "thermal curtain" that interferes with the process described above.In this case, the battery should be placed strictly in the middle of the window, and, preferably, occupy up to 70-80% of its width.
Secondly, from the floor to the radiator should be at least 80-120 mm. If there is less, then it will be inconvenient to clean under the battery, a huge amount of dust and debris will accumulate there. And if the radiator is located higher, a certain amount of cold air will collect under it, which requires warming up and, as a result, worsens the operation of the heating system. In addition, a too small distance to the window sill negatively affects the battery efficiency.
Thirdly, a distance of 2.5-3 cm is allowed between the back of the radiator and the wall. If it is less, the processes of convection and the movement of warm air flows are disturbed, and, as a result, the battery works less efficiently and wastes part of the heat in vain.
All of the above principles for placing a heating battery are presented in the diagram above.
Table. Standard schemes for connecting heating batteries.
Electric convector heating: how to choose a good unit Electric convectors are often used as main or additional heating devices, especially in.
Two-pipe heating system of a private house Already when designing a future building, the drawings indicate the places for laying communications - water supply, etc.
Thermal calculation of the heating system Coziness and comfort of housing do not begin with the choice of furniture, finishes and appearance in general. They start with heat, which.
Water heating convectors: selection, principle of operation, installation Water heating convectors are increasingly being installed in modern houses and apartments. High heating efficiency.
Advantages of homemade radiators
 The main advantages of do-it-yourself radiators:
- The opportunity to express yourself, your imagination and give the room an interesting look.
- Self-assessment of heat loss or heat transfer, drawing up an individual installation plan, according to the characteristics and purpose of operating the dwelling.
- Use of improvised materials, spare parts and equipment.
In order to make a battery with your own hands, you will need:
- welding machine (not necessarily powerful);
- electrodes;
- special strength stainless steel sheet (from 3 mm), 100x500 mm in size;
- steel pipes: brand VGP Du-25, 20 cm long; length 2 m, diameter 100x3 mm;
- squeezing brand Du-25, length 100mm x 2 pcs.;
- plug brand Du -25 x 1 pc.;
- grinder with a circle for metal (grinder).
Please note: it is best to use cast iron: although it is heavy, it is much cheaper than, for example, aluminum. The disadvantage of cast iron is its brittleness, so you will have to work with it carefully.
Helpful Hints
If the heating system of the house was assembled taking into account the use of forced movement of the coolant, that is, a circulation pump is installed in it, then the home-made device can be installed as you like (vertically or horizontally).
If in the heating system the coolant moves according to natural laws, then the battery must be mounted only horizontally. At the same time, there is no need to install an air vent (Maevsky crane) on it.
You cannot make a quality radiator out of pipes if you have the skills to work with a welding machine at the beginner level. It is necessary to weld the seams well, the safety of operation of the device and the entire heating system depends on this.
The thickness of a 100 mm pipe must be at least 3.5 mm.
Two spurs can be welded to the ends of the pipes, where metal pancakes were welded. In this case, the holes in the ends are not made in the middle, but with an offset: the inlet (upper) is closer to the upper edge of the pipe, the outlet (lower) is closer to the lower edge. It is better to make holes in pancakes in advance, before welding them to the pipes.
When calculating heat transfer, there is no need to pay attention to the area of return. It is clear that this figure for a cast-iron radiator will be greater
All this is compensated by the high thermal conductivity of steel.
Welding seams need to be cleaned and given a presentable appearance. To do this, scales and smudges are knocked down with a hammer, and the entire surface of the seams is polished with a grinder.
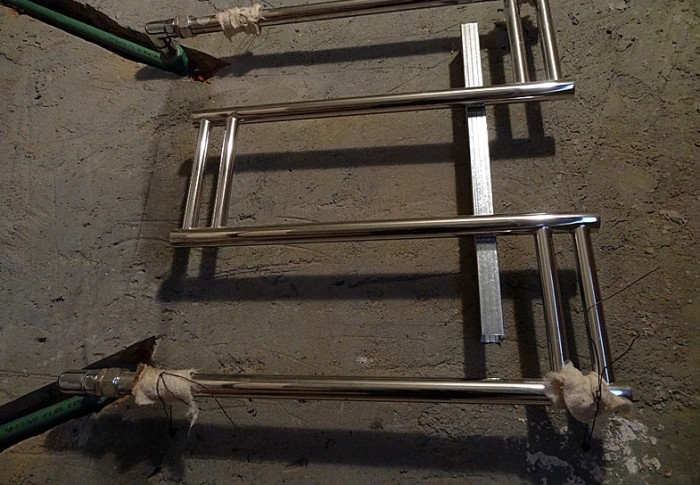
Production of a heating battery from a profile pipe
A heating radiator is such a device that not only industrial companies can make, but also homeowners, including beginners in this business. True, the latter will have to spend a lot of time. The easiest way is to make a battery from a profile pipe with a square or rectangular sectional shape. That's because it doesn't spin and is easy to lock in place, allowing you to focus on all your welding and cutting jobs.
The device of a heating radiator from a profile pipe is as follows:
- 3 horizontal pipes;
- 4 vertical jumpers;
- 6 plugs;
- sleeves with internal thread welded to the ends of the upper and lower pipes.
Vertical lintels are placed at the ends of the pipes and allow water to flow from the top pipe to the bottom.
Starting to make a homemade radiator
 Let's break down the progress of the work:
- To weld the supporting frame, steel pipes are needed. For greater efficiency and heat transfer, it is better to use large diameter pipes. Scrap or scrap metal will do - the main thing is that they are in good condition and not covered with rust. If the pipe has threads or other metal elements, then they need to be cut off. All pipe edges must be smooth, without burrs.
- Calculate the power of the future radiator system. In order to correctly distribute the batteries around the house, you need to write down the quadrature of the living area.
Master's advice: feel free to take calculations for standard cast-iron pipes, you can't go wrong!
We measure the primary indicators: the outer diameter of the pipe = 12cm; pipe inner diameter = 9.5cm; thickness of the outer wall of the battery = 3.5 cm; sectional area = 7.8 cm.
Battery volume = 14500 cm3. Further, the volume of the radiator must be divided by the cross-sectional area. We get the length of the desired radiator = 2 meters.
- You can bring your own nuances to the design of the battery: if you often experience air in pipes, freezing of water or heating fluid, water hammer, then install a special swivel-type crane. At the right time, you can easily restore the pressure in the system.
- The battery can be with any number of sections. It all depends on the type of room where it will be attached:
- in a large room (more than 30 m2), it is advisable to install a three-section radiator;
- in the bedroom, study or children's room, a two-section is enough;
- for basements, warehouses, pantries, where it is necessary to maintain a minimum positive temperature at any time of the year, a single-section radiator can also be installed.
- Before you start working with the grinder, free up space around you. Make sure the extension cord is at a safe distance.
Specialist's note: remember safety precautions when working with power tools!
Take a large diameter pipe and cut it into 3 equal parts. In each part, make holes at an angle of 180 degrees and with a diameter of 2.5 cm, with a power tool equipped with a ballet nozzle
Pay attention to the distance between the holes: they need to be done by measuring 5 cm from the end on both sides. As a result, you will get a design in which the holes are located both in the lower and in the upper part of the pipe
Clean the pipes and sharp edges of the holes with coarse sandpaper from metal chips. Next, take a thin pipe with a diameter of 20 cm and measure it in the middle. Then cut with a grinder to make 2 pieces of 10 cm. Weld these pieces of pipe to the structure of large pipes, so that you get a cruciform water circulation system. Cut thin rods and weld to the opposite side of the large pipe structure. Thus, you will get a rigid and stable frame that can withstand strong water pressure.To fix the resulting frame, install the slings: one sling is welded to the inlet, and the second to the outlet.
Good to know: in order to check the radiator for leaks, it is necessary to close the bottom outlet with a plug. Pour water into the upper run and observe: if there is still a leak, then drain the water, dry the radiator and weld the gap.
 If you have central or steam heating, then you can make a battery from ordinary plastic water pipes. They are light weight, low cost and quick to install.
To increase the temperature in a living room or apartment, a pipe structure is welded to a ready-made profile battery. These manipulations are subject to agreement with the chief engineer of the ZhES and registration with public utilities.
The danger of carrying out this type of work by an incompetent specialist is that the registers will record a decrease in pressure and such “work” will lead to airing the water supply system of the entire residential building. To avoid trouble, you must completely turn off the water supply and block the inlets.
It is important to know: in no case should you embed home-made structures without the presence of a specialist. A sharp water hammer can lead to depressurization of a welded radiator
As practice has shown, 15-16 battery ribs are needed for 20 m2. This is quite enough to maintain the optimum temperature of +20 degrees Celsius.
Watch the video in which the specialist explains how to make a heating radiator with your own hands:
Where does the production of a radiator begin?
Before you make it with your own hands, you need to know what dimensions it should have. For this, the following actions are performed:
Determined with the room in which he will be.
Calculate the volume of the room and determine the power that the radiator should have.
According to the figure obtained, the dimensions of the panel radiator suitable for the situation are determined
They should be taken into account because the unit is made of steel. Actually, those profile pipes that will be used to make a home-made battery are made from this alloy.
Using a special table, calculate the volume of water
which can fit in a panel heating device.
Such an internal volume should also have a profile pipe used to make a radiator with your own hands. Knowing this volume, determine its length. To do this, the main figure is divided by the cross-sectional area of \u200b\u200bthe selected material.
The cross-sectional area is equal to the product of the lengths of the two walls of the pipe.
Calculation example: if the volume of water in the radiator is 10 l, and the cross-sectional area of the profile pipe is 3,600 mm² (dimensions 60x60 mm), then the length of the pipe is 10 x 1,000,000 / 3,600 = 2,777.78 mm. The number 1,000,000 is used to convert liters to cubic meters. mm. The length of the pipe used should be 2.77 m. Since the battery consists of three segments, this figure is divided by 3. As a result, it turns out that the length will be 93 cm. If this length is too long, a pipe with a large cross section is selected and repeated payment.
Now you can go to the store and buy all the necessary materials and tools.
- Profile smooth-walled pipe with a wall thickness of 3 mm. Sizes may vary. From 30x30 to 80x80 mm.
- Round pipe with the same wall. Diameter 25 mm.
- Steel sheet with a thickness of 3 mm.
- Steel sleeve with internal thread. Diameter 15 mm. Quantity - 2-3 pcs.
- Mayevsky crane.
- Stop valve.