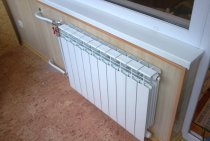
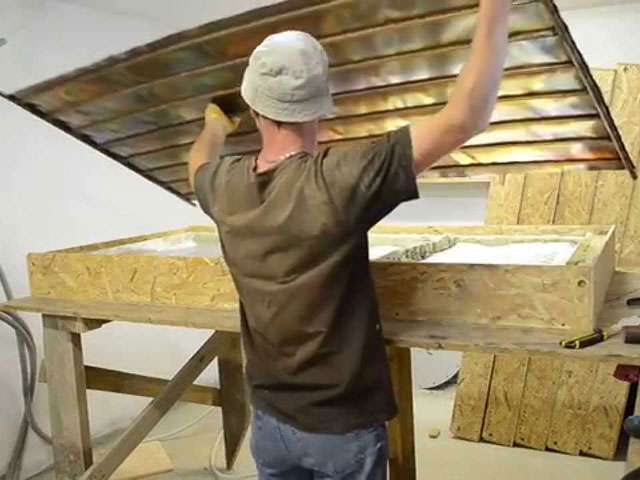
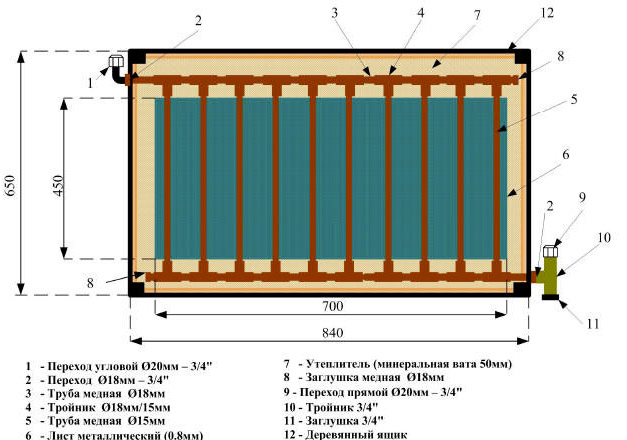
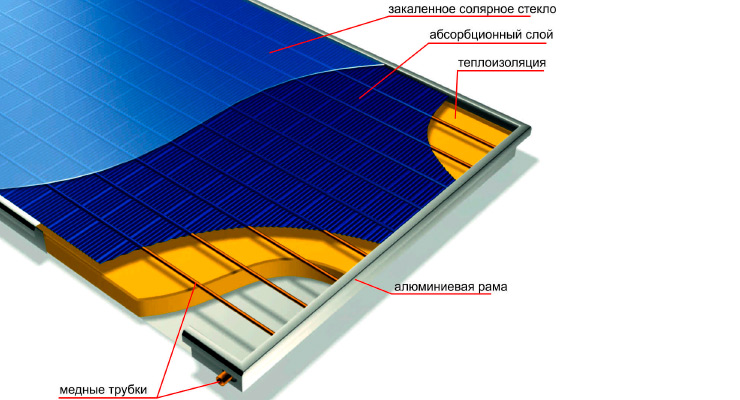
Fabrication of a flat type structure
In a summer cottage or suburban area for household needs of a family of three, it is enough to install a water heater with an area of 2 m2 for a 200-liter tank. To assemble a solar collector on your own, you will need:
- absorber body made of plywood and wooden planks;
- sheet steel, copper or aluminum for solar energy absorber;
- lattice of seamless pipes for the coolant;
- insulating material (mineral wool, Penofol, foam plastic);
- glass with a thickness of more than 5 mm;
- capacity for 200 l;
- 6–7 m of copper tube for the heat exchanger;
- heat-resistant black paint;
- wood and metal tools, welding machine, fixing materials, silicone.
To save money, you can do without a metal absorber, and use the back wall of a wooden case, which must be painted black, as an absorber of infrared radiation. Copper pipes are replaced with polypropylene. The cost of tees for their connection is much lower than welding.
A step-by-step instruction will help you make a solar collector with your own hands:
- A grid for the coolant is welded from metal pipes.
- If there is a metal sheet of the absorber, a lattice of pipes is welded to it.
- According to the drawings, plywood is cut and the body is mounted.
- If plastic pipes are used, they are fixed with clips on the base and connected to each other with fittings.
- The body and grille with absorber are coated with black paint.
- Under the sheet absorber, insulation is laid or the heater is insulated from the outside.
- To fix the glass around the perimeter of the body, a frame is made of planks, in which inlet and outlet holes for pipes are drilled.
- The glass parts of the top cover of the collector are connected with aluminum corners.
- Seal with silicone.
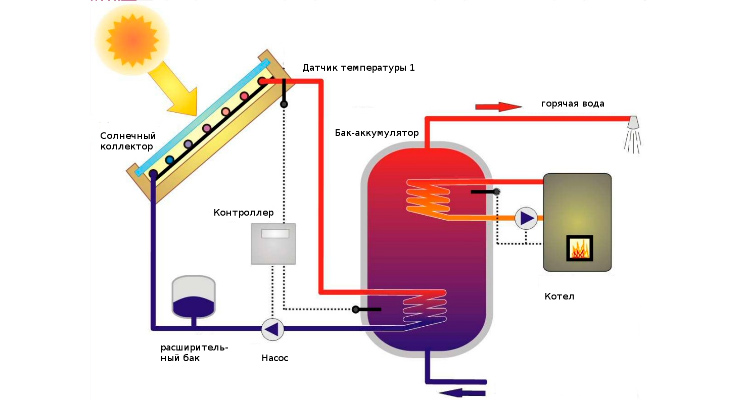
The manufacturing technology of the heat exchanger consists in insulating the storage tank, organizing the inlet and outlet for the copper coil, through which the coolant will circulate. Install the collector on a support of 50x50 mm bars, fastened with metal corners, since the weight of the structure, even without water, is quite impressive.
Collectors made of non-traditional materials
The general scheme and manual for the manufacture of a classic solar water heater gives scope for self-modeling of the structure using improvised means, cellular polycarbonate, and a plastic hose. You can make a small collector yourself from the freon circuit of an old refrigerator. The coil is fixed in the frame, the back wall is insulated, and covered with glass from above.
The simplest pool heater in a summer cottage can be made using a garden hose, which is twisted into a spiral and laid on a foam insulator. Glass creates a greenhouse effect and the plastic pipe heats up quickly. To increase the performance of the system, several spirals are connected in series with each other.
It will not be difficult to assemble the lightest and most durable polycarbonate solar collector if you buy:
- polycarbonate honeycomb sheets 1000x2000 mm 4 mm thick - 2 pcs (for heat carrier and protective coating);
- foam for insulating the back wall;
- 2 m PVC pipes with a diameter of 32 mm - 2 pcs;
- plugs and threaded corners for pipes - 2 pcs.
The instruction will help to make a water heater from polycarbonate:
1. Make drawings and assemble the base frame following the woodworking guide.
2. Using a drill with a disk nozzle in the pipes, it is necessary to make longitudinal cuts along the width of the polycarbonate sheet.
3. The edges of the polycarbonate are treated with sandpaper and degreased.
4. Plates are inserted into the cuts so that they do not block the lumen in the pipe.
5.The joints are sealed with hot glue for plastic.
6. Painted with black paint.
7. Connect fittings and test.
The process of assembling a homemade solar collector
The beginning of the assembly of this solar energy product starts with the manufacture of the coil. If you managed to pick up a ready-made coil, the final assembly will take much less time. The selected coil should be washed very thoroughly under running water (preferably hot) in order to wash all blockages from the inside and get rid of freon residues. If you did not find suitable tubes, then you can purchase the right amount in the store. But in this case, you will have to make the coil itself. To make it, cut the tubes to the required length. Next, using corner transitions, solder them in the form of a coil structure. Further, so that the collector can be connected to the water supply system, solder ¾ plumbing transitions on the edges of the coil. There are several options for the shape and design of the coil, for example, you can solder tubes in the form of a "ladder" (if you are going to implement this option, then buy non-corner adapters, you will need tees).
Solar collector assembly
Then, on a pre-prepared sheet of metal, you apply a selective coating with black matte paint, it is advisable to do this in at least a couple of layers. Wait for the airflow to dry the paint and start soldering the coil (unpainted side). The entire coil structure must be soldered along the entire length of the tubes, by doing this, you guarantee the most efficient heat transfer and, as a result, the maximum heat transfer to the water supply system. If you do everything right, the solar collector you have assembled will work as it was intended.
What materials will you need
To assemble your own solar collector, you can find all the necessary tools and materials in a regular hardware and plumbing store.
To design the device, you will need to stock up:
copper tubes 18 mm in size (will serve as material for creating a coil);
- plumbing and corner transitions with a size of 18 mm;
- metal sheet (approximately 0.8 mm thick);
- thermal insulation;
- soldering iron;
- cellular polycarbonate;
- plywood with wood bars or aluminum sheets and corners;
- spray black paint (must be heat resistant);
- absorber and mineral wool.
How to make selective coating
The high efficiency collector has a high degree of absorption of solar energy. The rays fall on a dark surface, after which they heat it. The less radiation is repelled from the absorber of the solar collector, the more heat remains in the solar system.
To ensure sufficient heat storage, a selective coating is required. There are several production options:
- Homemade selective collector coating - use any black paint that, after drying, leaves a matte surface. There are solutions when an opaque dark oilcloth is used as a collector absorber. Black enamel is applied to the heat exchanger pipes, the surface of cans and bottles, with a matte effect.
- Special absorbent coatings - you can go the other way by purchasing a special selective paint for the collector. The composition of selective coatings includes polymer plasticizers and additives that provide good adhesion, heat resistance and a high degree of absorption of sunlight.
Solar systems used exclusively for heating water in the summer may well get by with painting the absorber black with ordinary paint. Homemade solar collectors for heating a house in winter should have a high-quality selective coating. You can't skimp on paint.
Homemade or factory solar system - which is better
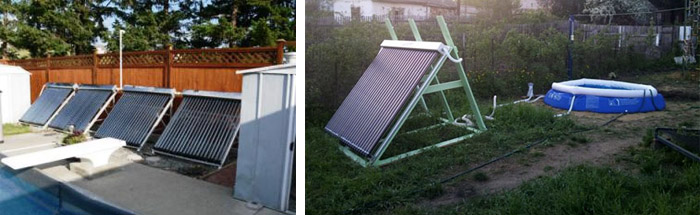
It is unrealistic to make a solar collector at home that can be compared with factory products in terms of technical characteristics and performance. On the other hand, if you just need to provide enough water for an outdoor shower, solar energy will be enough to operate a simple homemade water heater.
As for liquid collectors operating in winter, not even all factory solar systems can operate at low temperatures. All-weather systems, these are most often devices with vacuum heat pipes, with increased efficiency, capable of operating down to a temperature of -50 ° C.
Factory solar collectors are often equipped with a rotary mechanism that automatically adjusts the angle of inclination and direction of the panel to the cardinal points, depending on the location of the Sun.
An efficient solar water heater is one that is fully consistent with the tasks assigned to it. To heat water for 2-3 people in the summer, you can get by with an ordinary solar collector made with your own hands from improvised means. For heating in winter, despite the initial costs, it is better to install a factory solar system.
Converting solar energy into electricity
Solar energy is developing in two directions, semiconductor converters generate electricity from daylight. The solar system works thanks to photocells, which consist of two silicon wafers with different conductivity. In one there is an excess of negative particles, in the other - a lack. Under the influence of light between the cathode and the anode, the movement of electrons begins and a current arises. Modern technology allows the production of mono- and polycrystalline silicon wafers, the former have a longer service life and high efficiency, the latter have a low cost.
The performance of a single photocell is of little importance, so solar panels are collected from them. The simplest generator of light energy is a series chain of semiconductor plates with a total voltage. Common photocells have parameters of 3.6 A and 0.5 V. A standard design can be assembled from 36 of these plates, which will generate a current of 18 V, which corresponds to about 60 watts. To increase the current strength, several solar panels are connected in parallel, while the power of the system increases, and the voltage remains unchanged.
Photocells work as energy generators during daylight hours, when darkened, they turn into current collectors, they can overheat and fail. To protect the solar system from daytime losses and nighttime battery discharge, a semiconductor diode is connected in series to each panel.
They store the energy produced by photovoltaic cells in batteries with a lower voltage. Since the solar panels work intermittently during dimming, they are connected to the tank through the controller. It provides battery overcharge protection and switches the system to a resistor. To use sunlight in a household electrical network, an inverter is installed in the circuit, which converts direct current into alternating current.
You can assemble solar panels with your own hands from ready-made photocells and a homemade frame:
1. The power of the system is determined by the expected loads, then the required number of plates and the area they will occupy are calculated.
2. The bottom of the shallow body for placing photocells is made of plywood. In the sides it is necessary to make holes for ventilation and equalization of internal pressure.
3. Chipboard is used as a substrate for the plates, and plexiglass is used to protect against atmospheric precipitation, which will withstand hail impacts.
4. The photocells are laid face down on the substrate so that there is a gap of 5 mm between them.
5. The connecting conductors of one plate are placed over the solder points on the back of the other.Use a low power soldering iron, solder and flux.
6. Chains of photocells are fastened in series using copper wire or a special bus.
7. The panels are turned over and, together with the substrate, are installed in the case. Connect the diodes and lead the wires through the hole in the bottom to connect to the battery.
8. Cover the frame with plexiglass, seal the joints with silicone. Perform a battery test.
| System type | Size, mm | Absorber material | Price, rubles | Manufacturer |
| Flat-plate collector for seasonal water heating: | ||||
| Falcon Effect-A | 2000x1000 | aluminum | 16800 | OJSC "VPK NPO Mashinostroeniya" |
| Sokol Effect-M | copper | 19400 | ||
| Light warm standard 2 | 1980x920 | 18680 | Exmork LLC | |
| ISolar | 2065x1100 | 19700 | OOO Novy Polyus | |
| Vacuum all-weather for hot water and heating: | ||||
| 30 tubes with frame | 2370x1430 | copper | 49900 | SGVA (China) |
| SUNRAIN ES-R1 (30 pcs) | 2420x2010 | 39800 | Korsa LLC | |
|
SCH-30 |
2400x1900 | 61700 | ANDI Grupp (China) | |
| Battery for power generation: | ||||
| CHN150-36M elements 36, 150W, 12V | 1480x670 | silicon single crystal | 14780 |
Chinaland Solar Energy (China) |
| Exmork FSM-250M elements 72, 250 W, 24V | 1640x920 | 17750 | Sunny Energy Science and Technology (China) | |
| Exmork FSM-300P elements 72, 300 W, 24V | 1956х992 | silicon polycrystal | 19260 |
Classification according to temperature criteria
There are a fairly large number of criteria by which one or another design of solar systems is classified. However, for devices that can be made by hand and used for hot water supply and heating, the most rational would be the division by type of coolant.
So, systems can be liquid and air. The first type is more commonly used.
Image Gallery
Photo from
Step 1: Assembly of the corrugated pipe manifold
Step 2: Paint the solar fixture black
Step 3: Installing the Air Inlets
Step 4: Making the Cover for the Solar Appliance
In addition, a classification is often used according to the temperature to which the working units of the collector can be heated:
- Low temperature. Options capable of heating the coolant up to 50ºС. They are used to heat water in containers for irrigation, in bathrooms and showers in the summer and to increase comfort on cool spring and autumn evenings.
- Medium temperature. Provide temperature of the heat carrier in 80ºС. They can be used for space heating. These options are most suitable for arranging private houses.
- High temperature. The temperature of the coolant in such installations can reach up to 200-300ºС. Used on an industrial scale, installed to heat production plants, commercial buildings, etc.
In high-temperature solar systems, a rather complex process of transferring thermal energy is used. In addition, they occupy an impressive space, which most of our lovers of country life cannot afford.
The manufacturing process of their labor-intensive, the implementation requires specialized equipment. It is almost impossible to independently make such a version of the solar system.
High-temperature solar panels on photovoltaic converters at home are quite difficult to make.
Principle of operation
The collector is used to heat water using solar energy. Such a device can be installed near a summer shower or on the roof of a private house.
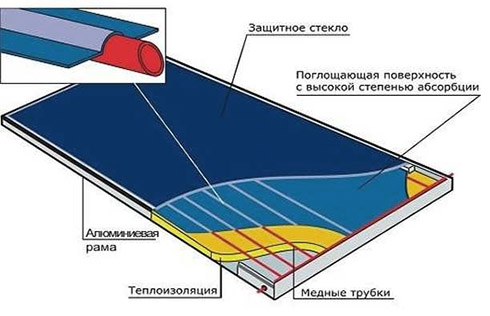
Factory models consist of a glass outer panel and a piping system underneath. Behind the pipes there is a heater. Glass contributes to the creation of a greenhouse effect inside.
Handmade models made of polycarbonate are simpler - the water in them is heated in the cells of the sheet itself. Hot fluid goes into the tank, and cold fluid automatically enters in its place. In sunny weather, such a collector allows you to heat enough water for several people to bathe.
 The solar collector heats the water entering it through copper tubes due to solar energy.
Procedure
Let's look at how to make a simple collector with your own hands.
Training
First, take measurements and determine how much area you can allocate for the device. If the roof is made of polycarbonate, glass, or similar relatively weak materials, the collector should not be made too large.
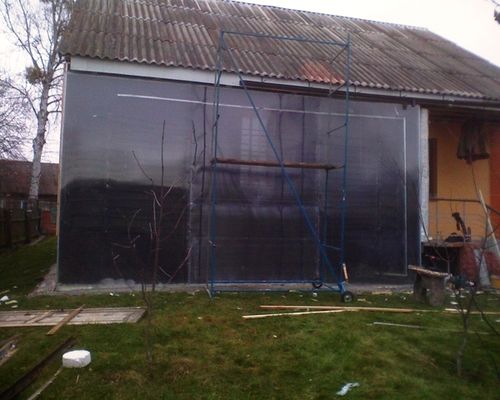
A very convenient design is made of two plates approximately 2.1x1 m. One sheet directly heats the liquid, the second plays the role of a protective coating. Polycarbonate should only be cellular, preferably black.
The recommended sheet thickness is 4 mm. The total cross-sectional area of the channels in this case is 35 cm² per linear meter, which is approximately equal to the cross section of a pipe 6–7 cm in diameter. Thus, 1 m² of sheet will hold up to 4 liters of water. A 10 mm thick sheet will hold up to 10 liters per 1 m².
 Before starting the construction of a solar collector, a detailed diagram of the entire structure should be drawn up.
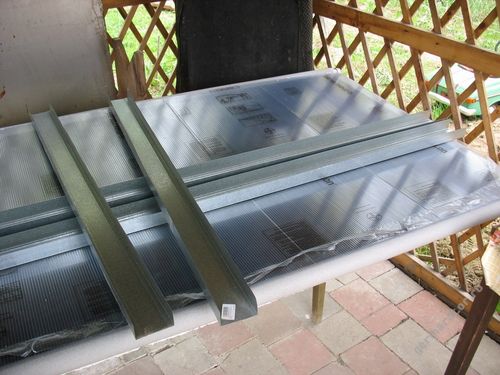
In addition to polycarbonate, you will need the following materials:
- two PVC sewer pipes 2 m long and 32 mm in diameter;
- 2 plugs for pipes;
- 2 flexible hoses with threaded connection;
- 2 polypropylene corner fittings with metal thread;
- foam sheet for insulation;
- galvanized drywall profiles and cross rails for the frame;
- silicone sealant.
Polypropylene corners should fit tightly into the pipes, so it is better to purchase them together.
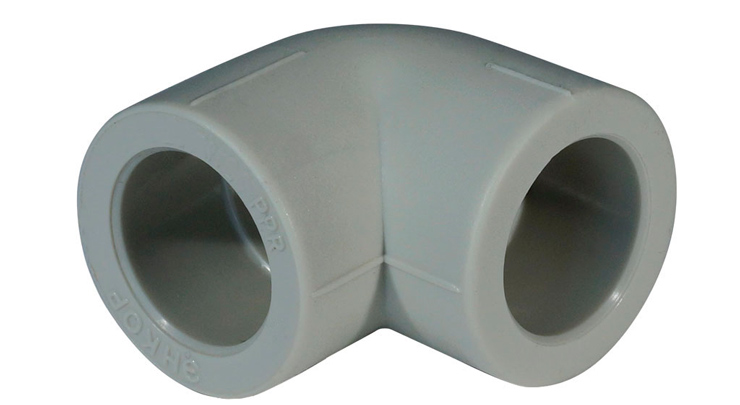 Polypropylene pipes in the solar collector are fastened with polypropylene corners
The width of the profiles must correspond to the total thickness of the polycarbonate and foam sheets.
You will also need a device for cutting pipes - a grinder or a drill with a saw nozzle.
If you were unable to purchase black sheets, you will need the appropriate paint. Polycarbonate can be painted with nitro enamel, water-based acrylic paints or plastic sprays.
Frame assembly
Collector assembly is carried out as follows:
Clamp the pipes with clamps and make cuts on them corresponding to the length of the future collector. Do not touch the edges: the beginning and end of the pipe must remain intact to connect to the system.
Sand the parts of the polycarbonate that will be in contact with the pipe with sandpaper - the sealant adheres better to the rough surface.
Insert the edges of the sheet into the cuts. The cells must be perpendicular to the pipe so that water enters them. If the cut is too tight, widen it. You can also use a clerical knife to bring the cut to the edge of the pipe, after which, moving from the side, gradually drive the sheet.
Look into the pipe. Polycarbonate should go inside no more than ¼ of the diameter, otherwise it will impair water circulation. Adjust the sheet position as needed.
Degrease the joint and seal it. To prevent the collector from leaking, go through the cut 3-4 times: the first time try to drive the sealant into the joint, then form the outer seam
Pay special attention to the ends. Apply a new layer of sealant after the previous one has dried.
If you cut the pipe to the edge, be sure to carefully process this area.
If you purchased clear polycarbonate, paint it black and leave it to dry.
Insert threaded corners into the edges of the pipes and seal the joint. Close opposite edges with caps.
Use hoses and fittings to connect the manifold to a full tank of water. Check all seams carefully. Seal any leaks found.
Make a frame with cross rails from the profiles. Lay the foam inside and secure it with screws. Place a collector on it. Cut holes in the profile for hoses and connect them to the corners. Close the structure with a protective sheet. It is attached to the frame with corners and screws.
Connect the manifold to a hot water storage tank and a cold water pump.
Although such a collector can only be used in summer, it will still significantly reduce the cost of heating water.