Features of the construction of chimneys
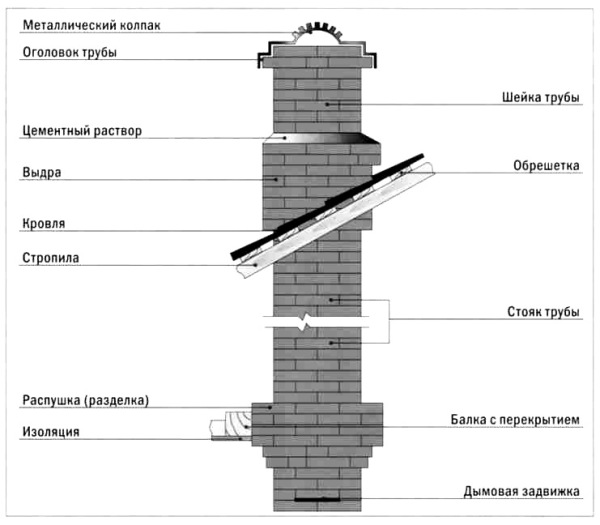
Chimney cap
In order to install the pipe correctly, you should carefully listen to the tips below:
- Brick chimneys should be brought out as close as possible to the roof ridge;
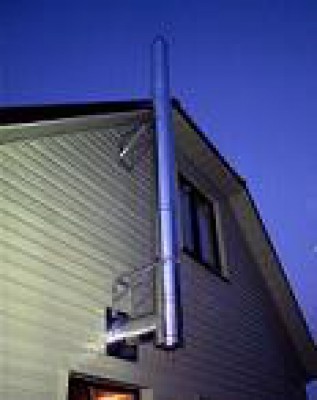
- Stainless steel chimneys as attachment devices are most often placed depending on how the stove, fireplace or other similar object is located;
Chimney structure
The height of the pipe depends on the distance it is removed from the ridge. For example, if the distance between the ridge and the chimney does not exceed 1.5 m, then the height of the chimney above the ridge will be 0.5 m.
With a distance between the ridge and the pipe of 1.5-3 m, the pipe is placed on the same level with the ridge, and at a distance exceeding 3 m, the pipe can be located below the level of the ridge;
Self-supporting chimney
- The installation of chimneys should also not be carried out with several stoves connected to a common chimney, as this will cause a violation of draft. In some cases, the norms provide for the connection of two objects located on the same floor to one chimney;
- Proper construction of the chimney also includes cutting and erecting a partition in the common channel of this chimney, which eliminates the oncoming movement of gases. In this case, the minimum overall size of the flue passage is 27x14 cm;
Chimney mount
It is recommended to protect the fluff with a cement layer or roofing steel coating. In addition, in any case, it is recommended to plaster the chimney with cement-lime or cement mortar, and then whitewash it.
This allows you to extend the life of the chimney, as well as make the cracks appearing more visible, which will need to be repaired.
Building instructions
After the dismantling of the chimney that was previously available, you can begin to build a new chimney from the prefabricated blocks supplied in the kit.
Consider the main stages of construction:
- The first step is to study the detailed instructions on how to assemble this chimney.
Mortar laying
- A layer of cement-lime mortar (group II) is laid on the foundation slab.
Foundation for chimney
- Roofing is spread in the solution layer, preventing the rise of dampness.
Application of the second layer
- Next, the entire surface is covered with a second layer of solution.
Shell installation
- Install the first shell block. In the case of building a chimney with two chimneys, work is best done by two people.
Foundation inserts
- The foundation inserts are inserted into the holes of the block and straightened with a spirit level and a rubber mallet. This completes the construction of the basement.
Hole for ventilation
- A ventilation hole is cut out under each chimney using a friction disc.
Mortar Template
- Uniform application of the solution is ensured by a special template for the solution.
Second block
- The second shell block is processed and also adjusted using a spirit level and a rubber mallet.
Plinth block
- A thick layer of mortar is laid and the base block of the internal fireclay pipe is installed on it.
First thermal insulation board
- The first thermal insulation slab is cut along the height of the block.
Dew drain
- The dew drain is closed in the basement fireclay block, where a special container is later installed to neutralize the acid-containing condensate.
Hole drawing
- On the next block, using the template included in the kit, a hole is drawn for the door designed to clean the chimney.
hole cutting
- Cut a hole after making sure that this maintenance point is easily accessible.
Installation of the block and thermal insulation
- The cut shell block is installed and the thermal insulation layer is cut to leave the front part free, where the door will be installed.
Mortar application
- Before installing the connecting fittings of the door, the next shell block is also covered with mortar.
- A hole is cut in the next block for the door so that access to the door (or two doors in the case of a double draft chimney) is not blocked in the future by pipelines or a heating boiler.
- After laying the block with a hole, heat insulation and a shaped fireclay part are built in.
- Fireclay pipes are interconnected using a special putty for sealing seams. The width of the seam in this case should not exceed 7 mm.
- The pipe to be installed is turned over and putty is applied to it, after which it is turned over again and carefully inserted through the previously lined hole.
When carrying out the construction of chimney pipes, attention should be paid not only to the chimney device itself, but also to its timely maintenance during operation. This will significantly extend the life and reliability of the chimney, as a result of which it will most efficiently cope with its duties.
How to start bookmarking
As in the process of laying a furnace, well-fired bricks will be needed, since the foundation has a large thermal load. Each subsequent tier should be one brick less than the previous one, until it is finally possible to reach the planned size of the chimney. During the laying process, a very careful adjustment of the bricks to each other is required, and the thickness of the joints must be the same as during the construction of the furnace. Depending on the chimney, foundations can also be:
- stand alone;
- be an extension of the wall
In the event that the foundation and the pipe are attached to the wall, it is necessary to additionally process its surface, and during the laying process, add clay mortar to the space between the brick and the wall. After the foundation for the chimney is laid out, you can lay several bricks of the future chimney, after which, at least a day, you should let it dry and you can start laying the chimney itself.
A do-it-yourself smoke pipe can be made no worse than that of professional stove-makers, if you follow simple rules. If desired, several channels can be equipped in the pipe, to which devices located on the same floor will be connected, and these may not necessarily be stoves, but, for example, gas water heaters or hoods. The preferred shape of the channel is in the form of a square or rectangle. Experts do not recommend plastering smoke channels inside, since the interaction between combustion products and plaster components will lead to its cracking and falling off. If several channels are designed in the chimney, then the wall thickness between them should not exceed half the brick and the same amount is allocated for the wall that goes inward.
In the case of laying smoke channels in a wall that goes outside, or in an unheated attic, the wall thickness should be equal to one brick, or insulation is made, with a layer of up to five centimeters. It is recommended to group smoke and gas exhaust ducts with ventilation ducts in one pipe, which helps to improve draft and reduce heat loss.
Particular attention should be paid to the interface between the wall and the chimney if the material for the wall is not brick. Most often, ceramic or expanded clay concrete blocks are found in use.
In such a situation, between the chimney and the wall, an anchor connection is created from steel strips, which is laid in every second row, and with large sizes used for the wall materials, the anchors are laid in each of the rows. The depth of entry of anchors into the masonry of the chimney and the wall must be at least twenty centimeters.
furnace chimney stack
Materials for the foundations of furnaces.
For laying the foundations of furnaces, hearths and chimneys use the same materials as for the foundations of the house, for the main masonry of furnaces, hearths, chimneys and channels in the walls - ordinary clay brick (solid).
If the walls are made of silicate bricks, cinder blocks, etc., then sections with smoke channels should be laid out from ordinary (solid) clay red bricks.
Furnace foundation options, fireplaces and other hearths are selected depending on the geological conditions of the construction site according to table 1 below.
Table 1: Materials for furnace foundations.
| p/n | Geological conditions | natural materials | Red brick | Silica kir-pich | Concrete monolithic and prefabricated (brand) | Brand of rast-thieves | ||||
| limestone with a volumetric mass of 1800 kg / m3 | sandstone - shell rock with a volumetric mass of 1500 kg / m3 | granite, basalt, diorite | cement-clay | cement-lime | cement | |||||
| 1 | 2 | 3 | 4 | 5 | 6 | 7 | 8 | 9 | 10 | 11 |
| 1 | Soils are low-moisture. The level of groundwater is below 3 m from the surface of the earth | Yes | Yes | Yes | Yes | Yes | M-50 | M-10 | M-10 | M-10 |
| 2 | Soils are moist. Groundwater level is from 1 to 3 m from the ground surface | Yes | Yes | Yes | Yes | No | M-75 | No | M-25 | M-25 |
| 3 | Soils saturated with water. The level of groundwater is less than 1 m from the surface of the earth | No | No | Yes | No | No | M-100 | No | No | M-50 |
Furnace foundation material rubble stone, ordinary brick, as well as monolithic concrete can serve. If the soil is dry, the foundation is made of brick.
Laying in dry ground can be carried out on lime mortar, in wet soil - always on cement mortar.
The composition of mortars and concretes taken according to table 2 and 3 in parts (for example, in the ratio = 1 part of cement + 2.5 parts of sand + 4.5 parts of crushed stone or gravel) -
Table 2: Concrete composition for furnace foundations.
| p/p | Grade of cement | Concrete brand and composition | ||
| cement + sand + crushed stone (gravel) | ||||
| M-50 | M-75 | M-100 | ||
| 1 | 2 | 3 | 4 | 5 |
| 1 | 100 | 1:2,5:4,5 | 1:2:4 | 1:1,5:3,5 |
| 2 | 200 | 1:3:5 | 1:2,5:4,5 | 1:2:4 |
| 3 | 300 | 1:3,5:5,5 | 1:3:5 | 1:2,5:4,5 |
| 4 | 400 | 1:4:6 | 1:3,5:5,5 | 1:3:5 |
Table 3: Compositions of mortars for laying the foundation of furnaces.
| p/p | Grade of cement | Brand of solution and composition | |||||
| cement-clay (cement + clay + sand) | cement-lime (cement + lime + sand) | cement (cement + sand) | |||||
| M-10 | M-10 | M-25 | M-10 | M-25 | M-50 | ||
| 1 | 2 | 3 | 4 | 5 | 6 | 7 | 8 |
| 1 | 100 | 1:0,4:4 | 1:0,5:6 | 1:0,2:3 | 1:4 | 1:3 | 1:2,5 |
| 2 | 200 | 1:0,6:6 | 1:1:8 | 1:0,4:5 | 1:6 | 1:4 | 1:3 |
| 3 | 300 | 1:0,8:8 | 1:1,5:10 | 1:0,6:7 | 1:8 | 1:6 | 1:4 |
| 4 | 400 | 1:1:10 | 1:2:12 | 1:0,8:10 | 1:10 | 1:8 | 1:6 |
The approximate ratio of the components of the solutions, which include Portland cement, is given in table 4 (CH 290-74).
Table 4. Composition of mortars for building foundations for furnaces in parts by volume.
| p/n | Brand of solution and composition | ||
| cement-clay (cement + clay + sand) | cement-lime (cement + lime + sand) | cement (cement + sand) | |
| M-25 | M-25 | M-50 | |
| 1 | 2 | 3 | 4 |
| 1 | 1:0,3:4(200)* | 1:0,3:4(150) | 1:0,6(300) |
| 2 | 1:0,6:6(300) | 1:0,1:2(100) | 1:0,4(200) |
| 3 | 1:0,9:8(400) | 1:0,8:7(200) | — |
| 4 | 1:0,1:2(100) | 1:1:10(100) | — |
| * Cement brand is indicated in parentheses. |
Cement mortar with inorganic plasticizers (clay and lime) is made in this way:
- First, clay or lime milk is prepared with such a consistency so as not to pour water into the solution separately.
- Then clay or lime milk is poured into a large container, after which cement with aggregate is poured.
- All components of the solution are dosed by weight indicated in tables 2 and 3.
Masonry mortars must be used before the start of setting. "Rejuvenation" (dilution with water) of "seized" solutions is FORBIDDEN.
Foundation for household stoves and pipes.
Chimneys are erected by masonry or assembly of concrete or metal elements.
The traditional way of building pipes is brickwork. The chimney is usually placed in a brick wall.
Single pipes must be installed on the foundation. The stability of the pipe must be calculated.
Pipe foundation if possible, it should be built together with the foundations of load-bearing structures so that there are no various settlements.
The foundation can be laid out of stone and brick with full filling of vertical and horizontal joints with cement mortar, but it is better to make a concrete foundation.
It is more convenient to lay pipes according to special templates with the required sizes of smoke channels.
Smoke channel device
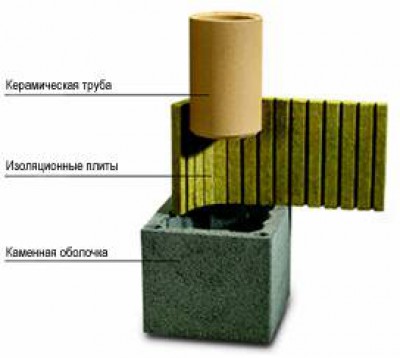
A chimney project cannot be drawn up without knowledge of the design device. Since the main types of modern chimneys are devices made of sandwich pipes and bricks, we will deal with the design of the chimney using these examples.
Sandwich chimney design
The design of a sandwich chimney consists in the selection of elements necessary for the correct functioning of the smoke removal system and combustion products harmful to human health.
Sandwich chimney consists of:
- supports necessary to give the structure stability;
- condensate collector;
- revision, through which the inspection and, if necessary, cleaning of pipes takes place;
- sandwich pipes connected by clamps;
- adapters, tees and bends used in the case of connecting additional elements to the main pipe;
- mounting clamps or brackets that provide additional stability to the structure;
- an unloading platform connected to the system before arranging the transition through the ceiling or exit to the roof of the building;
- specialized adapters through the roof and exits to the roof, protecting the walls of the building from overheating and fire;
- a skirt designed to protect the chimney from moisture from outside;
- a protective cone or cap that prevents precipitation and foreign objects from entering the chimney.
Sandwich chimney design
All pipe joints are additionally protected by a sealant that prevents the system from malfunctioning.
Construction of a brick chimney
The design of the chimney, made of brick, is somewhat different from the metal counterpart and consists of:
- smoke damper installed at the point of connection of the chimney to the heater. With the help of a valve, it is possible to regulate the volume of smoke entering the pipeline;
- rows of bricks laid in a checkerboard pattern;
- fluff or expansion, constructed when approaching the place where the chimney passes through the floors. The design allows you to give the chimney additional stability;
- chimney riser, laid out in a checkerboard pattern. This element is located in the attic of the house and connects the lower and upper parts of the chimney;
- otter, which, like fluff, is laid out with a slight external expansion. Designed to prevent moisture from entering the chimney;
When laying fluff and otter, only the outer diameter of the chimney changes. The inner dimension of the diameter must remain constant throughout the structure.
- the neck of the pipe connecting the section of the chimney channel from the otter to the tip;
- a head and a protective cap that protect the entire structure from precipitation and foreign objects clogging the pipe.
Construction of a brick smoke channel
The brick is laid on a mortar consisting of cement, sand and lime in a ratio of 1:2.5:1.5.
The transition points through the ceiling and roof are additionally reinforced and insulated with heat-resistant materials.