Choose the composition
For facing foam plastic, several types of plaster are used. All of them differ in component composition and are characterized by certain properties. So, there are such types of solution:
- Plaster based on mineral components;
- silicate mixture;
- Acrylic plaster.

Silicate plaster from Ceresit
mineral mix
So, the mineral composition is made from cement and various polymer additives. Such plaster is characterized by high resistance to moisture, resistance to fungus and mold. The price of such plaster is quite affordable. Due to the elasticity of the mixture, it is easy to apply on the treated surface. This is a great option for protecting insulation.
silicate mixture
The silicate composition has unique properties. In the production of such plaster, liquid glass is used, which gives the solution excellent abilities. Thanks to these components, the plaster adheres perfectly to the surface, becomes durable after drying, and is not afraid of water and moisture. Therefore, it is used both for interior decoration and facades.
Acrylic plaster
Acrylic plaster is used to finish surfaces that are exposed to moisture and the sun. All this is possible due to the components that are present in the composition of such a mixture. So, where the cement mortar does not cope with the task, the acrylic mixture will come to the rescue. And the cost of such a solution, of course, is higher.
Manufacturers of building materials offer the consumer a large selection of plasters. Various mixtures from Knauf and Ceresit have proven themselves to be excellent.
Experts recommend: When starting repairs, remember - for a good interaction of materials, choose primer, putty and plaster of the same brand.
Plastering penoplex
Foam plaster has a certain technology. If these steps are performed correctly, we will get excellent results. So the order is:
- We prepare the solution
- Installation of reinforcing mesh;
- Surface grouting;
- Padding;
- Surface leveling;
- Grout.
Preparing the mixture
The first stage of our work is the preparation of the mixture. It is necessary to prepare the solution, following the instructions in the instructions. For the processing of expanded polystyrene, craftsmen use both universal mixtures, with which they glue the insulation segments to the wall and apply on top, and narrow-purpose mixtures.
Usually, the manufacturer indicates the consumption on the packaging. But the average can be calculated using the formula:
- When reinforcing, you need about 4 kg of the mixture per 1 square meter;
- For leveling - 6 kg per 1 square meter.
These figures also depend on the thickness of the plaster layer: the thicker the layer, the greater the consumption.
Advice from the master: To glue the reinforcing mesh, make the solution thinner than indicated on the package. And for alignment - the solution should be in consistency like jelly.
The use of a reinforcing mesh for foam plaster is a prerequisite for a high-quality finish of the insulation. Otherwise, after drying, the solution will crack and fall off.
We begin to fasten the reinforcement from the corners and slopes. To save on mounting corners, you can make such profiles from the grid with your own hands. We cut off a strip about 35 cm wide and bend it in the center along the entire length. Next, we apply the solution to the surface and apply our workpiece, slightly pressing into the mixture. And so we do with all corners. After that, glue the mesh over the entire remaining surface. At the same time, as if drowning our grid in the solution. We glue the strips overlapping relative to each other - about 5 cm. We smooth the grid from the center to the bottom, and from the center - up.
Applying plaster
Next, we move on to grouting the surface. To do this, use a plastic grater with an abrasive strip.This operation is done after the plaster is completely dry. If it's hot outside, it will take a couple of hours. Well, if it's damp and cold, then you have to wait a day. We make movements with the tool in a circle counterclockwise.
After that, the surface must be primed. The primer promotes good adhesion of the finish coat and the surface. Now let's start leveling the surface. To do this, we need two spatulas - large and small. With a large spatula, evenly apply the plaster to the surface. The layer thickness should be about 3 mm.
After the solution has dried, we proceed to grouting. You can do this work in a day, not earlier. We rub the surface to a smooth state.
Often during the repair the question arises: how to paint penoplex without plaster. Masters advise the following: given the features of this insulation, you can paint with mineral paint, water-based emulsion or a composition based on liquid glass.
Foam plastering technology
So, we decided to make a decorative lining of the insulating material with our own hands, and you are interested in the question of how to plaster foam? In principle, there is nothing complicated, however, it is better to study the plastering technology in order to avoid unforeseen situations.
For work you need to stock up: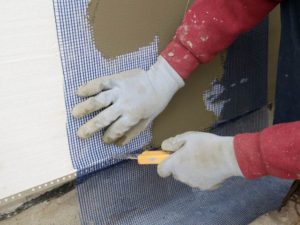
- Textured plaster (such as "bark beetle" or other);
- primer;
- paint;
- mesh for reinforcement with a small cell;
- spatulas of different sizes;
- graters with an emery base;
- glue for tiles;
- containers for glue, primer, plaster, paint;
- gloves.
When choosing the products you need for the job, stick to the same brand to avoid disappointment as some mixes from different brands combine to produce unexpected results.
Carry out facing work slowly, confidently and scrupulously. Haste in this matter is an unaffordable luxury. Yes, the work is long and painstaking, requiring perseverance and good nerves.
The process consists of stages.
- We blow out the seams between the plates (if any) with mounting foam.
- We make sure that the walls are perfectly even. Take the level and check. If errors are observed somewhere, we rub it with a special grater.
- We deepen the caps of the dowels that secure the insulation (in cases where necessary). If for some reason this cannot be done, we cut off the hat with a clerical knife, and next we hammer in a new dowel, having previously drilled a hole for it.
- Cut off the excess hardened mounting foam.
- Prime the surface twice.
- We cover any recesses in the insulating material.
- We glue aluminum perforated corners on the outer corners.
- Cut out the fiberglass mesh.
- We apply glue (3–5 mm thick) to the surface and glue the mesh using a wide spatula.
- We cover the mesh with a layer of adhesive.
- We wipe the dried mesh. We do this in a circular motion. We are not zealous.
- We dip a wide spatula into liquid plaster and process the surface of the walls.
- After drying, we rub the walls with a brush with an emery base so that the surface is perfectly smooth.
- We apply a primer - 2 layers.
- We apply decorative plaster with a wide spatula.
- We overwrite the seized composition with a small one.
- We cover the surface with water-dispersion paint of the desired color (if required).
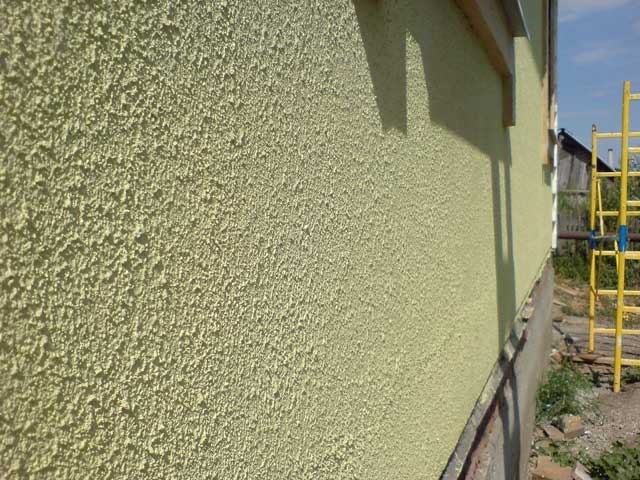
The result of the work done
That's all, you can enjoy the work done. Your home will certainly enjoy the luxurious finishes, and will thank you with caring hugs of health, sweet kiss of beauty and a weightless touch of youth!
Anecdote in the topic: A conversation between two future engineers. Do you know how to hold a hammer so as not to hit your finger? - So how is it? - With two hands, dunce ...
I think for some amateur builders, the material will be useful. Good luck in finishing work and peace to your home. Till!
Quote of wisdom: The wisest person is the one who is most annoyed by the loss of time (Dante Alighieri).

Notable Manufacturers
In the domestic market of plastering materials, products from different manufacturers are presented. The following three brands are most widely used:
- "Ceresite";
- "Ecomics";
- "Stolit".
There are imported products and mixtures of other domestic companies, the characteristics of which are always indicated in the attached instructions.
Ceresit products are presented in a large assortment, including all types of plaster: silicate, silicone, acrylic, cement. The products have good performance characteristics, are easy to use due to elasticity, and are durable.
Ekomiks plasters can be used for outdoor work or for interior walls. The compositions are characterized by environmental safety, resistance to moisture. Work on finishing facades using plaster of this company should be carried out in the warm season, at temperatures not less than +7 ° С. Mixtures can also be used to eliminate defects: chips, cracks, deformations on old surfaces covered with plaster for a long time.
The range of the company "Stolit" is represented by compositions based on cement, to which stabilizers and modifiers are added. Due to this, the plaster has high heat resistance, does not react to elevated and negative temperatures, and is well attached to the foam.
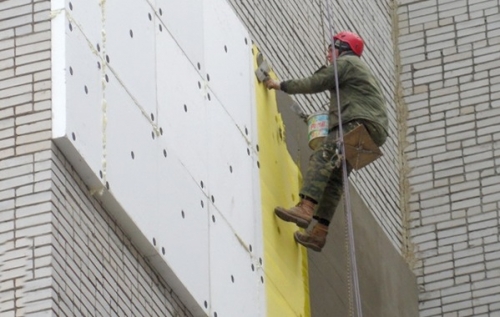
More about process and material
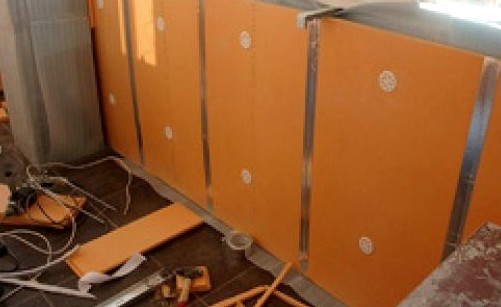
Penoplex - popular these days insulation and soundproofing. But after installation, it sometimes has to be processed additionally
What is penoplex - the answer to this question is known to many today. This is an excellent material with decent soundproofing and heat-insulating characteristics. However, the thermal insulation parameters are comparable to foam, although sellers and manufacturers often deny this. Of course, there are certain differences, but they are not critical. Also, it is recommended to read the material about different options for finishing facades.
You can plaster penoplex safely, if such a task is worth it. The advantage of this material is a high level of strength. At the same time, its surface is smooth, respectively, it is necessary to carefully plaster the products.
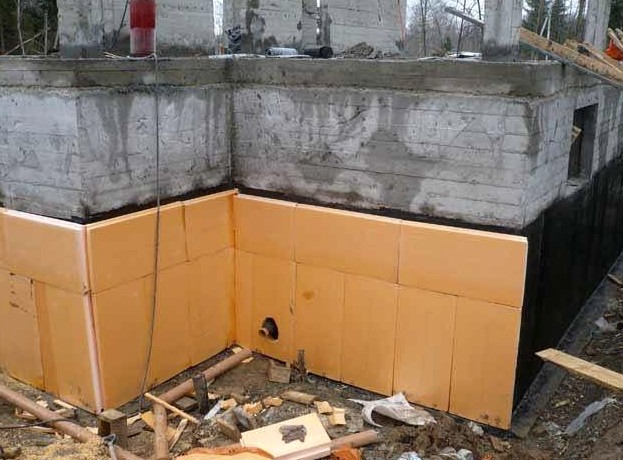
For basement work, this material is also actively used.
Experts recommend using a reinforcing mesh, it is also worth using an adhesive primer (the popular Betonkontakt is suitable), but it is customary to use a special adhesive as a plaster.
Some home craftsmen confidently declare that ordinary plaster is a suitable material and the answer to the question of how to plaster penoplex outside.
That is, such experiments are carried out even without the use of a grid.
In fact, you can only do this at your own peril and risk. Often, the work already done has to be started all over again - in order to get a good result. Even if it turns out that the composition on the surface will seize, the likelihood that it will crack quickly is high.
Delaminations and other defects are also observed. Therefore, the conclusion is simple: you don’t need to do this, it’s worthwhile to approach the plastering process thoughtfully.
Types of mixtures
Stucco on foam plastic for the facade requires strength, it should not change under the influence of precipitation. There are compositions for universal and narrowly targeted purposes. When choosing, all possible types of coating loads should be taken into account.
Multifunctional tools
The universal composition can be used at several stages of finishing work. With such plaster, you can fix the penoplex to the wall, then fix the reinforcing mesh on the outside on the sheets. With a universal mixture, you can not only plaster, but also pre-prime surfaces.The tool costs a little more than the compositions of a strictly directed action. The higher price is offset by the possibility of multifunctional use.
Mineral Remedies
Popular with craftsmen is a cement mixture, which includes sand and a small amount of polymer filler, which improves the fixing of the material on the surface. Often such plaster is called mineral because of the predominant amount of inorganic components. The mixture must be prepared in accordance with the recommendations of the manufacturers, which often contain instructions on the need to add PVA glue to the mass. If the accompanying documents do not specify the introduction of additional components, there is no need to do this yourself. Some plasters contain gypsum and stabilizers. Such mixtures are very plastic, stick to foam more slowly.
If there is not enough money to purchase ready-made plaster, you can make the compositions yourself from two components:
- cement and lime;
- clay and lime;
- clay and cement;
- clay and plaster.
This is not the best solution, especially since the grade of clay is fundamental to the quality of the plaster. With the right clay, quality cement and slaked lime, the mixture can turn out to be quite successful. Mineral compositions can be used to plaster the facade insulation from the outside and putty foam inside the room.
Acrylic
Mixtures based on acrylic polymers are intended primarily for finishing areas located in areas of high humidity, high mechanical loads. The cost of polymer plasters is more than mineral compositions, but the greater resistance to external influences justifies the difference in price. Acrylic plaster masses have great elasticity, which makes it easier to work with them.
silicate
A successful combination of properties is demonstrated by silicate plasters, which do not contain polymer additives, therefore, they are not electrified. Silicates pass steam well, do not collapse under the influence of atmospheric moisture, and do not undergo microbiological destruction. This is the most acceptable mixture that can be used to plaster both external and internal walls. It is enough to correctly process the surfaces once and you can not have problems for many years. Silicate material is environmentally friendly, does not contain harmful impurities, guarantees the cleanliness of the surrounding air space.
The specifics of working with foam
Styrofoam does not have decorative properties, therefore, after insulation, such facades must be plastered, and then the final coating must be performed.
Styrofoam comes in several varieties. The best of them is considered extrusion. It has a closed-cell structure and durability.
It is easier to work with such building materials. In addition, it has better performance compared to water and heat insulation than simple foam.
There is a special special technology called "wet facade" foam. Applying it, you can apply decorative plaster directly to the foam.
The result of such work is by no means short-lived, therefore experts recommend performing the entire set of plastering works using foam. Such building material also needs protection, since under the influence of sunlight the foam is destroyed. In addition, it is fragile and unstable to mechanical stress.
In this regard, the following order of work will be correctly observed:
- Performing a primer on the foam surface;
- Reinforcement of the coating using mineral plaster, as well as mesh made of fiberglass;
- Grout, which allows you to level the surface;
- Primer;
- Final coating as decorative acrylic plaster (or as mineral plaster).
Necessary tools and materials
In order for the case to be argued easily and quickly, you need to think through everything in advance, collect the necessary materials, aids, and tools.
There are different brands of plaster mixtures, primers that have a similar basic composition, which does not exclude the presence of small features in the nature of impurities. To finish the wall, the room as a whole, it is advisable to stock up on a sufficient amount of material from one manufacturer. This will eliminate the possibility of incompatibility of mixtures, they will be ideally combined with each other in work.
Advice! Prepare in advance devices for mixing the plaster mixture. There are many options: from the usual long wooden spatula or spatula to a drill with a special nozzle. Pick up good, comfortable spatulas with an ergonomic handle that allows you to easily move them around the plane.
To improve the adhesion of foam plastic with a paste-like mass of plaster, the surface is treated with a metal brush or a spiked roller. Roughness will improve adhesion, ensure reliable adhesion of the composition to the insulation.
Finishing the outer corners requires special perforated corners and levels to check the correct installation. Be sure to buy a reinforcing mesh, without which all work loses its meaning. In some places, you will need glue to fix it. Study the composition, recommendations for use in advance. To grout the surface, you need to purchase a plastic grater with sandpaper. The final finish is conveniently carried out with a roller with a small dense pile.
Why is a stucco mesh needed and how to mount it
 Some "craftsmen" advise to plaster the facade directly on the foam, covering its surface with a primer and glue.
They explain this by the fact that polystyrene is a material on which plaster, regardless of its variety, cannot be held for a long time.
Well, if the plaster still falls off, then there is not much point in messing with the grid.
Meanwhile, such an approach to finishing the facades of cottages is incorrect, since strengthening the coating of foam boards with a fiberglass mesh makes the surface more durable.
The acquired mesh must be cut into pieces - their width should be approximately 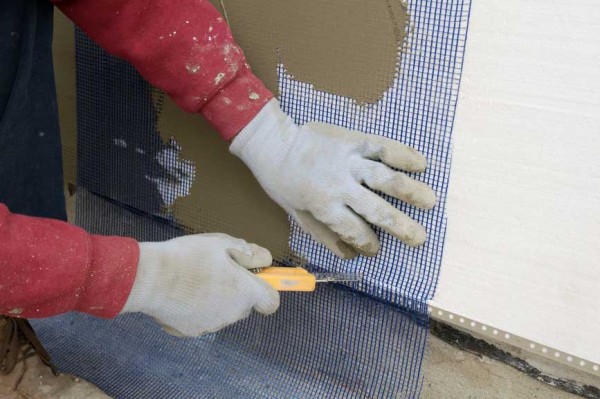 one meter, and the height is like a work surface.
When a decision is made to plaster the facade, which is covered with foam plastic, with your own hands, it is important to take care of an assistant. It's easier to work together
Plus, you can get the job done faster.
After all, it is easier to work together. In addition, the work can be done more quickly.
The application of a layer of the composition that has been prepared to the foam plastic is carried out with a coating of a surface the size of a mesh piece.
The work is carried out with a notched trowel. Then, in a quick but gentle manner, the mesh is pressed against the surface.
It is necessary to press down well, completely pressing it into the prepared composition. After that, using a spatula, it is necessary to smooth the surface. As a result, the reinforcing mesh will become completely covered with mortar. 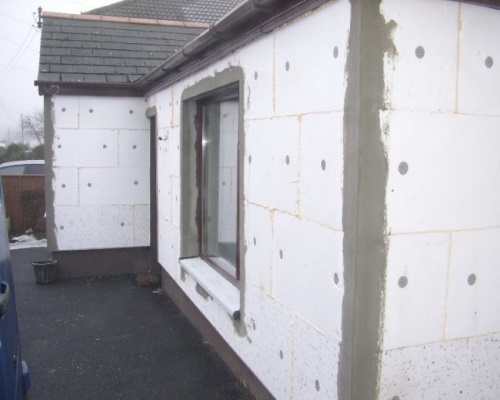
Gluing the next piece must be done with an overlap - approximately eight to ten centimeters.
At the same time, they do not need to be smeared with a solution first, otherwise the seam will look quite rough.
In a similar way, it is necessary to close the entire facade of the building with reinforcement.
Finishing the facade with foam is different in that at first it is necessary to close all the corners with a reinforcing mesh and only after that begin to reinforce your facade.
Grid grout
Surfaces that dry out during the day should be wiped down. To do this, take a piece of wood, which is soaked in water for a certain time and gently rubbed.
You can also use a plastic trowel on which an emery cloth is fixed.Thus, the coating is brought to an almost perfect condition.
Upon completion of the grouting of the grid, it is necessary to apply a leveling layer. To do this, a solution is prepared that is similar to the solution for gluing a reinforcing mesh
It is important to follow the instructions
It is desirable that the solution be more liquid, as it must drain directly from the spatula. As a result, the surface will be thinner.
It is required to apply the composition in small areas. Their joints overlap. In this case, the joints of the solution areas should not be located above the grid joints.
After that, the leveling layer dries out during the day (but not more than four days) and it is grouted in the same way as the mesh was grouted. Now the base is completely ready for the final coating.