Types of warm floors
At its core, underfloor heating systems can be divided into two types: electric and water.
Electric floor. The most common system is made in the form of special heating mats, which consist of heating sections through which a heating cable passes. The latter, through a thermostat, is connected to the power supply. The heating cable can be single or double-core. In the first case, both ends of the cable must be connected to the thermostat, in the second, it is enough to connect one end. Heating mats are embedded in a layer of tile adhesive or laid on a concrete floor screed;
The water floor consists of flexible pipes connected to central heating or a gas boiler. These pipes are mounted directly into the floor, both under the tile and in the cement screed.
Warm floors allow you to unload the heating system up to 30%, and in the case of water floors, completely replace it. Currently, in addition to the above two underfloor heating systems, film systems have begun to appear on the market, but they are intended rather for temporary use. There are also rod and cable underfloor heating.
How to lay ceramic tiles on underfloor heating
To cover such special equipment, the tile laying scheme does not differ much from the usual work with this type of flooring. Here is a step by step guide for this process:
- check the reliability of fixing the elements of the heating structure and the absence of cavities. So, at a wired underfloor heating, tape should be cut, with three help of which it is attached to a polymer mesh, otherwise this will lead to the appearance of air pockets, which will negatively affect the quality of work. You can fix the structure with tile glue, smearing it on top;

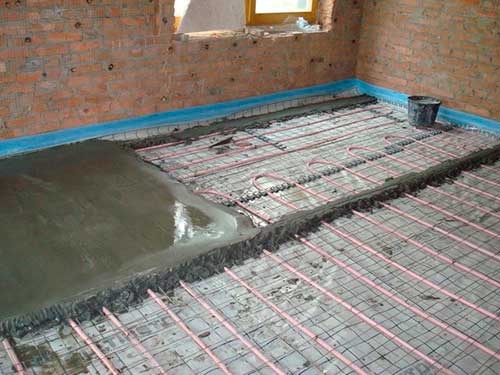
Pouring screed on a warm base
pour the screed with a sand-cement mixture or use tile adhesive on a warm floor - you will have to decide on your own, but if the layer is small and the area of \u200b\u200bthe room allows, it is quite possible to use the second option. A screed filled with tile adhesive will be stronger and less prone to damage. Careful consideration should be given to the distribution of material. Structural elements must be securely cast to avoid air pockets and subsequent cracking of the web. In the form of a screed, a self-leveling floor will also serve perfectly. Particular attention should be paid to the evenness of the coating in terms of level, because. its mismatch in different corners of the room, differences in the future will lead to a poor-quality arrangement of the tile. The level and the rule will help in the work. In no case should you forget about the overall measured level. The screed, depending on the material, dries from three to five days, despite the fact that complete drying can occur on the 21-25th day. But the tiles can be laid out already on the fifth day;
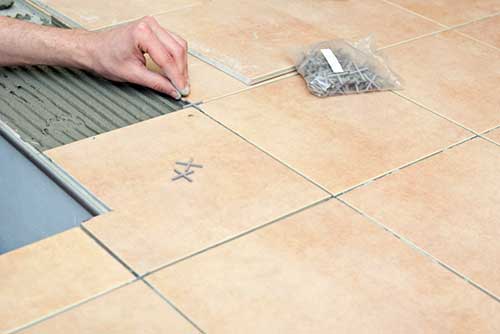
tile laying also begins with measuring the area. In addition, it is important to decide on the pattern. The layout usually starts from a flat surface, an adjacent room, a wall, etc. A layer of fixing tile adhesive, approximately 50 millimeters, is applied with a notched trowel, after which the tile is fixed on the screed, pressed or tapped with a hammer, leveled. After that, crosses are placed at the corners of the elements, butt-to-butt to which the next tile is adjusted and beyond. Having reached the corner, leave a gap. The final part, consisting of cut off parts, is displayed last. Each level is measured, in case of a mismatch, the element is removed and reinstalled, removing the excess or adding the missing layer of tile adhesive. However, with a fairly even initial screed, this happens extremely rarely.It should also be remembered that walking on a freshly laid surface is prohibited. This will lead to deformation of the coating and possibly a complete alteration of the work done;
Grouting floor tiles
the drying time of the tiles is 3 - 5 days. Only after this time can you begin to grout it. Grout is needed not only for aesthetic reasons, but also to protect against chips, mold in the seams and stubborn dirt. At this stage, the crosses are removed. The adjoining surface of the wall and decorative elements, if any, are glued with paint glue, if this is not done, after the grout dries, it will be very problematic to clean it from them. Do not wait for the grout to dry completely to clean non-grout tile elements. Already after two hours it should be washed, carefully bypassing the seams, because. after the grout has completely set, it will be much more difficult to wash it off.
But the question of when you can turn on the warm floor after laying the tiles requires detailed consideration. The total drying time of tile adhesive and screed is 21-25 days, only after the final drying of these materials can the equipment be started. Premature switching on will lead to the formation of air bubbles in the coating, which will lead to brittleness, or overheating and, as a result, burnout of the cable structure. Therefore, no matter how much you want to check the result of your own work in action, you will have to wait, this is provided for by the technology of work.
Options for laying water floors
The three most common flooring options are:
- with a screed;
- flooring (without screed, and tiles are laid using special plates);
- with wooden logs (pipes are placed on top of wooden logs).
Let's take a look at all three options below.
Screed-based water floor
Water heated floor based on screed
For laying with a screed, you will need the following materials:
- metal-plastic or polymer pipe;
- fasteners;
- pump for creating forced circulation of water;
- valves;
- fitting;
- collectors.
The assembled system is filled with cement mortar. The screed must not have defects or voids, as this can lead to deformation of the pipes. The tile is placed on top of the screed. The tile must be perfectly flat, then the heat transfer will be higher.
flooring way
Laying on polystyrene boards
Polystyrene plates are used here, in which there are aluminum plates with grooves for mounting the pipeline. The advantage of the flooring method is its simplicity and low time consumption.
The flooring option is used in such situations:
- with a low ceiling, when the screed hides the height of the room;
- if the creation of a screed is difficult for technical reasons;
- when there is doubt about the strength of the floors.
Polystyrene boards are usually covered with parquet or laminate. For tiles, moisture-resistant material is needed, for example, gypsum fiber sheets.
Water floor on a wooden base
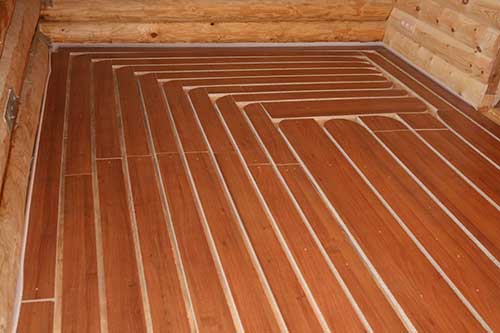
Water floor on a wooden base
Most often this method is used in wooden houses. In the process of creating the floor between the lags, mineral wool or a polystyrene base is placed. Laying is carried out in one of two options: rack or modular. With the rack method, plates and pipes are placed between chipboard slats. With the modular method, modules of their chipboard are used, which have special channels for pipes. For fasteners, aluminum plates with grooves are used.
After installing the system, it is necessary to lay gypsum fiber sheets on top. Then you can lay tiles.
Preparatory work
Installation of underfloor heating and flooring can be done independently, without involving third parties. To begin with, the existing finish must be completely dismantled up to the supporting floor. In order to correctly put all the elements you will need:
- make a leveling screed, which is located directly on the concrete base. This will eliminate the possible occurrence of air jams in the future;
- the concrete surface needs a high-quality waterproofing layer. This will minimize possible damage during depressurization when using tiles on a warm water floor;
- the base must also be insulated. This will reduce possible heat losses.
The water heated floor in the bathroom is unable to function normally with insignificant surface differences of 1 cm. An additional screed (2.5 cm) will be required, which could even out the existing differences and would not allow air jams to form that can affect the circulation of hot water. For laying a water floor, you will need a solution based on sandstone and cement, from which the screed is made. A 3:1 ratio is used.
Screed scheme
Advantages and disadvantages of water floors
For residents of the house, it is optimal if the heating of the room is carried out evenly and the heating source is located below. When heating a room with radiators, air is converted from the floor surface to air, while warm air moves up, and cold air goes down. Water floors allow you to get a slightly higher temperature in the leg area and a slightly lower temperature in the head area, which is more comfortable for residents.
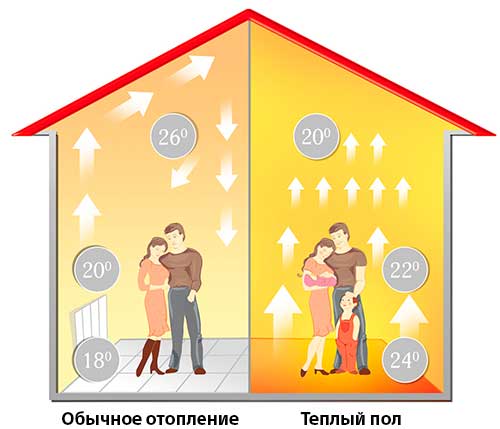
The scheme of heating the room with radiators and underfloor heating
The main advantages of a water floor:
- heating is carried out by radiation, and not by a conversion method;
- since there is no air conversion, there is no circulation of dust flows;
- no need for radiators, which are not always aesthetically pleasing;
- if radiators are still available, they are compatible with a water floor;
- there are no conditions for the occurrence of damp corners in the room, as well as the development of the fungus;
- optimal humidity is maintained in the room;
- water floors are easier to keep clean than radiators;
- there is no danger of burns;
- the ability of the system to self-regulate (when cold air enters from outside, the water floor increases heat transfer, and vice versa, if the temperature in the room rises under the influence of, say, sunlight, heat transfer decreases);
- in comparison with heating with radiators, water floors are 25-30% more economical;
- the service life of the water floor is limited only by the life of the pipes used in the system.
In addition to the advantages, water floors also have disadvantages:
- water floors are rarely allowed for use in apartment buildings due to insufficient strength of the floors, as well as due to dependence on the central heating system (increased load and the need for more powerful pumps);
- water floors significantly reduce the height of the room, since for the arrangement of the system it is necessary to increase the level of the floor (at least 10 centimeters).
Choice of ceramics
In order to choose a quality tile material that will be used as the main floor covering, it is necessary that it meets some basic requirements.
Requirements:
- a high level of security, the presence of which requires water-heated floors;
- strength indicator;
- resistance to possible temperature changes that occur when heating rooms of any size;
- the required indicator of thermal conductivity and density of the material used.
In addition to using tiles on water-heated floors, it is possible to install other facing materials:
- brooms, but not glazed;
- granite;
- glazed clinker;
- marble;
- porcelain tile.
The warm water floor and the materials used for its arrangement must have a high level of porosity. That is why the use of terracotta is not recommended.Such a device involves the use of various grouts and adhesives that have been specially designed to work with warm water floors. They are as elastic as possible even after passing through the rejection stage. Able to compensate for the temperature difference that occurs between the tile and the base.
Stages of laying tiles on the floor
Lay the tiles on the floor “dry”. This will make it possible to mark the trim
It is important to consider the size of the seams.
Clean off dust and primer the back of the tiles and the floor.
Dilute a small amount of tile adhesive according to package directions.
Use a notched trowel to apply an even layer of mortar over a small area of 1-2 tiles on the floor as it dries quickly and becomes unusable. You can apply glue on the tile itself.
Lay 1 row of tiles, inserting plastic crosses between them in order to make uniform seams between them
Check the stacked row with a level. If the tile protrudes, it should be slightly upset with gentle back and forth movements. You can use a mallet to knock it out a little. If it is located below the level, then it should be carefully torn off the floor and a little more adhesive solution should be applied to it. If the seams diverge, you need to install wedges near the walls. For reliability, you can fix a row of tiles with masking tape.
Lay subsequent rows of tiles in the same way, remembering to check the level of the differences between them. Excess glue can be removed with crosses and wiped with a damp sponge.
The last row must be measured and trimmed, and then laid in the same way as the previous rows.
After the glue has dried, you can start grouting the seams. To do this, dilute the puffer according to the instructions and apply to the seams with a rubber spatula. Without waiting for the fugue to dry, remove it from the surface of the tile with a damp sponge.
Adhering to all the instructions and recommendations, laying tiles on a warm floor with your own hands will not be difficult. You do not have to resort to the help of specialists.
Water floor installation
To install the system with your own hands, you will need the following materials and tools:
- pipes;
- valves;
- fitting;
- clips;
- pump;
- reinforced mesh;
- collector;
- damper tape;
- waterproofing materials;
- thermal insulation materials;
- construction tape;
- fasteners;
- a set of screws;
- perforator;
- roulette;
- building level;
- screwdriver;
- wrenches.
Sequence of work
First of all, it is necessary to clean the surface from dirt, all kinds of bulges and small cracks. The quality of the surface leveling should be checked with a building level, since if the surface is uneven, the balance of heat transfer may be disturbed.
The next step is to install the collector, where the main components of the system will be located. When installing the cabinet, you need to choose the correct height from the floor surface in order to avoid problems with pipe kinks.
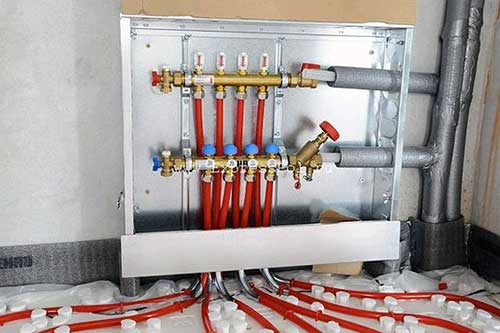
Collector for water floor heating
After installing the switch cabinet, you need to start laying the waterproofing. The cheapest cost is polyethylene, which is overlapped. The seams are joined with adhesive tape.
Next is the insulation. As heat-insulating materials, you can use:
- foamed foil polyethylene;
- extruded polystyrene foam;
- foam plastic (thickness in the range of 50-100 millimeters).
After laying the heat-insulating material, you need to decompose the damper tape. It is designed to compensate for the expansion of the screed due to surface heating.
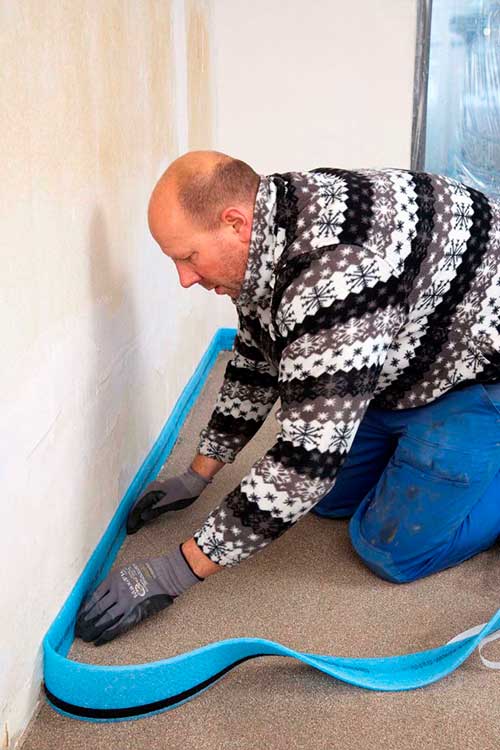
Damper tape laying
Next, a reinforcing mesh is placed. It is needed to strengthen the screed. If you use special plastic puffs, the pipes can be attached to the reinforcing mesh, which will save on the purchase of clips.
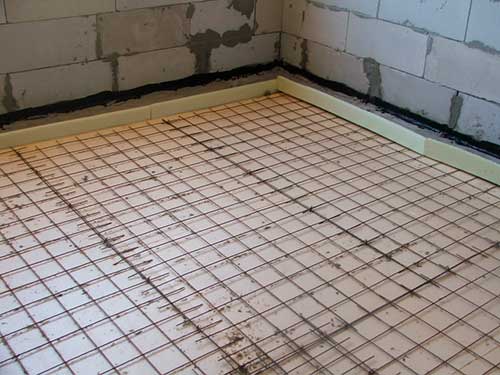
Reinforcing mesh for underfloor heating
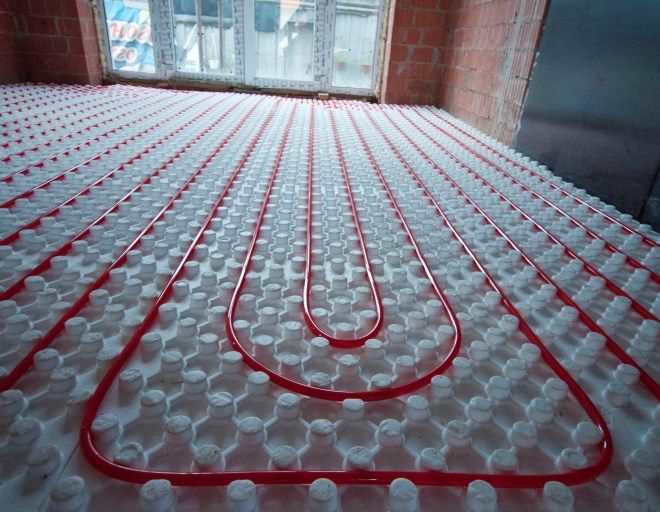
Pipe laying
When laying pipes, you can use one of three main methods: double helix, ordinary helix or "snake". It is better to use a spiral in interior spaces, and where there are windows it is better to use a “snake”. Pipe laying starts from a colder wall - this will allow the heated air to be distributed more evenly.
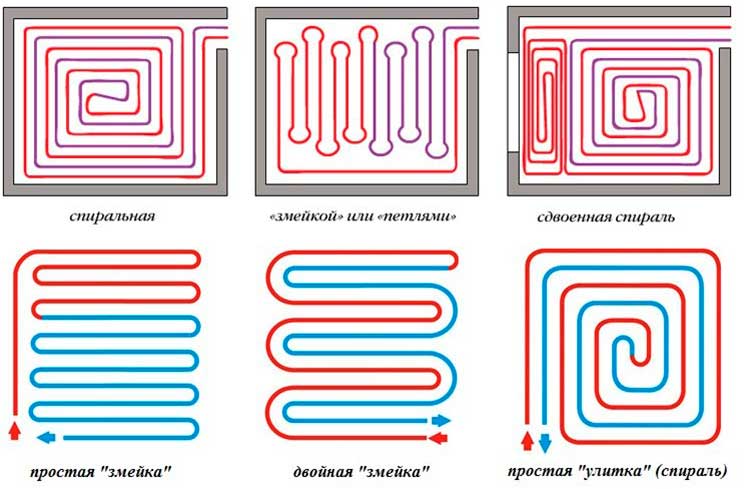
Underfloor heating pipe laying scheme
For rooms that have a balcony, loggia, veranda or attic, an additional circuit will be required, otherwise there will be serious losses of thermal energy.
During installation, the pipe must be connected to the switch cabinet. Also, the pipe is joined to the return manifold. At the joints of the pipe, corrugated gaskets should be worn.
System testing
After creating a warm floor, it is necessary to carry out a hydraulic test (pressure test). This is necessary to identify defects in the system. To do this, the system is filled with water at a pressure 1.5 times higher than normal. Testing can also be done with an air compressor. The test period is one day. If leaks and other pipe defects are not detected, you can start creating a screed.
Finishing screed
The thickness of the screed under the tile can vary between 3-6 centimeters. Laying tiles can be done only one month after the creation of the screed. To speed up the drying of the screed, you can turn on the heating system, but the temperature should not be higher than 30 degrees.
The screed can be made in one of two materials:
- sand-cement mortar (an economical option, but it will take 25 days to dry such a screed);
- self-leveling mixture (dries 10 days).
Until completely dry, the screed must be under high pressure. After the mortar has hardened, you can start laying the tiles with your own hands.
Ceramic tile laying
Laying ceramic tiles on underfloor heating
The process of laying tiles with your own hands on a water floor is the same as when working with other surfaces. It can only be noted that it is more convenient to use smooth tiles. A layer of glue is applied using a special notched trowel. After applying the tile to the surface, it must be carefully pressed and held for a while. The seams must be very even, so it is better to use special crosses. Grouting is done only after the glue has completely dried, which can take up to 2 days.
During the laying of tiles, the water floor should not be turned on. Its functioning is possible only after grouting.
If you follow the instructions, then creating a warm floor is quite possible on your own. Although this work is very laborious, the result will justify the effort. A properly installed water-heated floor will serve the inhabitants of the house for many years.
Laying tiles
There is almost no difference on which floor the tiles are laid. The only difference is that for a warm water floor it is necessary to choose a smooth tile, without a relief pattern.
The tile laying technology is as follows:
- Glue intended for warm floors is applied to the surface.
- Using a notched trowel, the adhesive is applied to the tile. Then it is applied to the floor and pressed in the middle.
- To form even seams, plastic crosses are inserted into them.
- After laying 2-3 rows, it is necessary to check the surface for level. Crosses must be removed before the glue hardens. In this way, the entire surface is laid.
- When the glue hardens, it will take 1-2 days, the seams are rubbed.
Tiles can only be laid when the floor heating is switched off. Only after completion of all work with tiles is it allowed to use the system.
It is not quite easy to install a water-heated floor on your own, but if you have a desire, then you can cope with this task.
Especially if you take into account the fact that for the work of the master you will need to pay approximately the same amount as for all the material.
Floor device
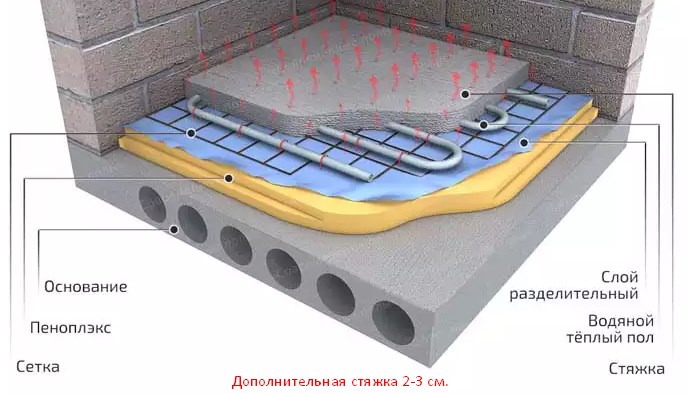
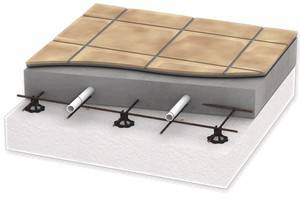 The design of a warm water floor under a tile includes several layers:
- Waterproof underlay. The material depends on the type of installation: if the laying is done on the ground under the screed, roofing material or polyethylene is sufficient. If without a screed, it is advisable to purchase a waterproofing membrane;
- Insulation. Dense polystyrene foam or mats made from it. A less successful choice is basalt wool. It is a hygroscopic material. In case of leaks, it will get wet and lose its heat-insulating properties;
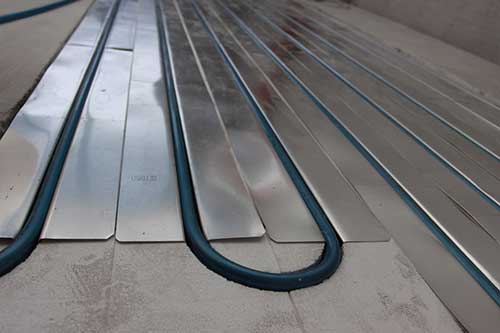
- Reflective foil layer. Instead, you can use metal plates with channels for laying pipes;
- Pipes;
- A solid base is required under the tile. If the floor is mounted without a screed, the base can be a sheet of moisture-resistant plywood, OSB, drywall. It should be borne in mind that both wood and drywall are good heat insulators.
The thickness of the warm water floor under the tiles depends on the installation method and consists of several numbers: the thickness of the insulation, the pipes themselves, the screed or plywood of the subfloor.
The screed is at least three centimeters. The thickness of the insulation depends on the place of installation (on the ground, on the ceiling). The height of the PPS mats is about 8 centimeters. There are already channels for pipes in the mats; in this case, the thickness of the pipe can be ignored.
Water heated floor under the tile
Liquid heating elements in this case consist of heating pipes forming a collector, water is used as a heat carrier. A properly installed and designed water-heated floor distributes heat in the room no less evenly and efficiently than electrical systems. All main communications are hidden under a concrete screed and do not interfere with the arrangement of furniture.
Water floor heating device
The option under consideration is more suitable for private dwellings with autonomous heating; in a simple city apartment, it is problematic to equip a water-heated floor in a bathroom or other rooms. With proper installation, it can replace standard radiator heating. The main elements of liquid heating systems:
- PVC or metal-plastic pipes;
- thermal insulation;
- damper tape self-adhesive;
- fittings for pipes;
- cranes;
- mounting brackets;
- manifold cabinet;
- boiler;
- pump.
Characteristics of a water heated floor
When calculating liquid systems, slightly different quantities are used than in electrical heating appliances. When solving the problem of how to choose a warm floor for tiles, you need to make an estimate by determining the exact amount of consumables. The approximate length of the pipe is obtained by the formula: L \u003d P / U x 1.1 + K x 2. For correct calculations, you will need the following values:
- P is the area of the rooms;
- Y - laying step;
- K is the distance from the entry point to the manifold cabinet.
The main characteristics of the liquid floor:
- The water floor temperature is up to 29°C (33°C in bathrooms).
- The maximum length of pipes in one circuit is 120 m.
- Pipe diameter - 16-25 mm.
- Water consumption - up to 30 l / h.
- The optimum temperature in the boiler is 40-55°C.
Pros and cons of a water-heated floor under a tile
The advantages of liquid heaters installed in the screed make up an impressive list. Water heated floor under the tile has the following advantages:
- The radiation method is used to heat the space.
- No wall mounted radiators needed.
- Optimum humidity in the rooms.
- Easy to operate.
- There are no risks of burns.
- Saving up to 30%.
- Durability.
- Safety.
Cons of water floors:
- Difficult to implement in an apartment building.
- The thickness of the warm floor under the tiles, taking into account insulation, pipes and other elements, is up to 14-15 cm, which causes some loss in the height of the room.
Do-it-yourself water-heated floor under a tile
Work on the installation of liquid heating with bottom heating is carried out quickly, this is a simple task for a qualified locksmith. The main stages of how the underfloor heating is installed under the tile:
- We level and clean the base of debris.
- Installing a switch cabinet.
- We lay thermal insulation (styrofoam, polystyrene foam).
- Lay out the damper tape.
- We fix the reinforcing mesh.
- We collect the pipeline on the floor.
- Type of pipe laying - snake or snail.
- We fill and test the warm floor under the tiles with a pressure 1.5 times higher than the nominal pressure.
- Fill the finishing screed 3-6 cm.
- After drying, lay the tiles.
https://youtube.com/watch?v=3d08pGYjrRA%250D
Features of laying infrared floor heating
When installing an infrared floor under a tile, it is recommended to use additional material - plasterboard or glass-magnesite sheets.
Figure 2. Ease and short installation time is the main advantage of heating mats.
Laying an infrared floor under a tile consists of the following steps (see Fig. 3):
- cleaning the base and laying heat-insulating material with metallized lavsan (for example, Infraflex or Poliform);
- laying thermal film, which should be cut into the longest webs in order to minimize the number of connection points;
- isolation of all outputs of copper strips;
- fixing the film panels with masking adhesive tape without overlaps;
- connection of the thermostat in a convenient place;
- supply and connection of connecting wires to the thermostat;
- connection of a temperature sensor located under the tile;
- isolation of all connections with a thermo-silicone gun;
- connecting the thermostat to the electrical network;
- checking the performance of a warm floor;
- laying of polyethylene film;
- laying plasterboard or glass-magnesite sheets;
- laying floor tiles.
Do not use foil as a heat insulator and when laying tiles do not lay a mounting grid made of metal. For floor heating to be effective, you need to place an infrared film on at least 80% of its surface.
You can lay tiles on a warm floor without a screed
You can, of course, and sometimes you need to. Moreover, in the instructions for underfloor heating, it is precisely about this that it is said that the mats of their design make it possible to do without a screed. We installed floor heating ourselves twice in both apartments in the bathroom. Rather, in both cases, the toilet and bathroom are combined. The husband applied the following technology for the first time.
A heat-insulating layer is laid on the floor. Holes are cut in it, where there will be no heating mats, so that the glue adheres to the floor surface. It is rational to stick it on the surface so that it lies flat. Then a heating mat is spread on top. It won't lie flat. To fix it, there are special devices. But we didn't buy them. There they cost some exorbitant price. We got out of the situation in a worker-peasant way. I took a needle and thread, and stupidly sewed the heater with stitches to the base, in steps of about 10 cm. It was made of a material somewhat similar to foam rubber, and it turned out to be effective. The first time they didn't tie. The husband applied glue to the floor, and the one that applied to the tile smeared it with a thin layer. After a wet sponge, he removed his remnants from the ends of the tile. But at the first estimates, it turned out that the tile, which will lie where there is no heater, lies lower by these same 5 mm. It was necessary to do something quickly, and my husband came up with the following. I ran to the nearest hardware store and bought a dozen plastic nets that they put in the sink in the kitchen. They cost a penny, but they allow you to compensate for the height. They were laid out where there is no heater. It came out cheap and cheerful.
In the second apartment, they did not go this way, but made a semblance of a screed. Namely, they used a self-leveling floor. 4 bags made it possible to fill the floor with a layer of about 1 cm. Thus, the heater closed and the level came out perfect. Laying tiles on such a smooth surface is then a pleasure.
the author of the question chose this answer as the best
add to favorites link thank you
If the warm floor is made with water pipes, then a screed is necessary, even if the pipes are laid in special heat-insulating mats, which also have damping properties. And if the warm floor is made with mats with electric heaters, then the screed will even be redundant - the thermal conductivity from the heaters to the surface of the tile decreases, and as a result, energy costs increase. But most importantly, both in the first and in the second cases, for laying tiles on top of a warm floor, it is necessary to use a special tile adhesive with damping properties, otherwise the tiles will “swell” over time. For example, I used UNIS glue in red bags.
add to favorites link thank you
If the warm floor is based on pipes, then a screed is required. Make a screed at least 3 cm to cover the pipes. If the warm floor is cable-based, then you can do this:
Treat a solid, even concrete base with cement-based waterproofing. Lay a warm floor, smear it with tile glue on top, where gaps are simply filled with glue
Work with a spatula carefully so as not to damage the warm floor. Glue must be for underfloor heating
In this option, the heat will be worse.
add to favorites link thank you
What you need to know about the warm field
Water and electric, diverse in terms of action and energy consumption, a warm floor requires special handling during installation, laying finishing materials such as tiles or laminate on it, as well as its subsequent operation.
Failure to comply with the precautions and installation technology will entail not only the destruction of the surface, whether it be a detached tile or a cracked self-leveling coating, such as expensive 3D, but also the absolute inoperability of the heating elements
Nevertheless, having familiarized yourself with all the rules for installing equipment and its subsequent finishing, you can do without outside help and do everything yourself.
The most common areas for laying underfloor heating are the bathroom and kitchen. For decoration, tile is most often used here, it does not absorb moisture and is easy to clean, in addition, less laminate and parquet are subject to mechanical damage. Also popular installation areas are swimming pools, garages and home parking lots. The use of a water floor for the latter eliminates glaciation and snow drifts in winter, which means it saves time and effort of the owner of the premises.