Why is it better not to use a tile screed
For the device of such a floor, reinforced concrete slabs are used. Such a floor requires additional ventilation in the foundation - it is necessary to form air ducts. It is better to make them through for sufficient ventilation under the plates. The minimum height from the ground to the bottom of the slab should be half a meter. Therefore, the foundation must be high enough.
Using slabs for flooring
For low-buried foundations, which are most often built under frame houses, this type of screed is not suitable. Moisture emanating from the ground will lead to premature destruction of the plates, which makes their operation unsafe.
To lay the unused part of the foundation, it is necessary to lay it with bricks, which leads to additional costs and difficulties in work.
Foundation with air
That is why it is better not to use a dry tile screed for frame houses.
How to make flooring
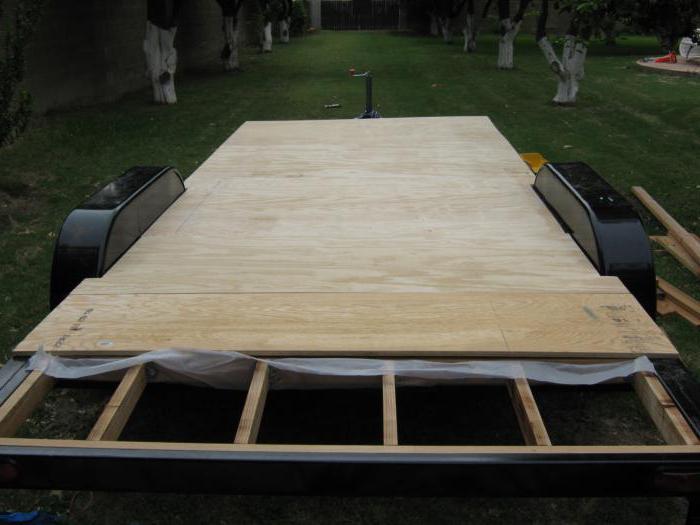
 Often the floor covering in the rooms is different, so a layer of plywood 16 - 20 mm is placed on the logs, and the finishing takes place after construction is completed.
- We mark the sheets of plywood so that the joints are on the log. We coat the logs with liquid nails (eliminates creaking and additionally strengthens), lay plywood sheets, fasten with nails or self-tapping screws.
- We leave a 2 mm gap between the sheets so that the floor does not lead to high humidity.
- In places where communications pass in plywood, we make cuts with a circular saw, for which we first mark it.
- We align the edges of the plywood along the strapping board, mark it with a coated thread and cut it.
After arranging the floor, further construction can be carried out - the construction of the frame of the walls and the roof. The finishing coating on the floor is laid after the installation of internal partitions.
Warm floor in a frame house
 It is necessary to think over all the important details at the stage of planning the floor. That is, if you need the floor in the bathroom, or the entire floor in the house to be heated, you need to make a thermal coating in advance.
It is necessary to study all types of heating and choose the desired one. Underfloor heating can be done throughout the house, and only in certain rooms.
It consists of a system of plastic pipes that are placed throughout the room or house. If your frame house is equipped with underfloor heating. take care of the management of this system, make a control center located in a place where it will not interfere with anyone.
Savings on ceilings and floors
You can save in the manufacture of interfloor ceilings and floors using:
- used floorboard;
- door panels instead of floorboards.
Not a new floorboard is often even better than the one that is sold to us in the construction markets. It tends to be drier, and by using it, you reduce the risk of being driven. The price of such material can be several times lower than a new raw board.
You can find it at the dismantling of old buildings and technical structures.
Saving on floors using old interior doors
The second option is to use door panels instead of boards. You can find old interior doors and lay them instead of boards. From above everything is covered with a parquet board. Thus, on a medium-sized house, you can save tens of thousands of rubles.
Using this method, you can also save time, since wooden sheets are faster to cover than boards.
You can find old door leafs during the demolition of old five-story houses or in the production of doors, where defective lots are redeemed for nothing
Creation of a rough coating based on a wet screed
If you will be installing the floor in a frame house, then you can apply the wet screed technology on the ground.This technique is not always preferred because the floor surface will need to be left to dry completely, which will take several weeks. The deadline will depend on climatic conditions. Today, two methods of wet screed are known, one of which involves the use of cement mortar, while the other involves the use of self-leveling floor. The most common way to create such a base is the use of cement brand M-250.
As a result, it is possible to obtain a smooth surface due to the inclusion of polymer ingredients in the composition. Among other things, they give the coating increased resistance to mechanical stress. The thickness of this system can vary from 30 to 100 mm. The screed should be additionally reinforced with metal elements.
Water and electric floors what is the fundamental difference
Water heated floors are a system of metal-plastic or polypropylene pipes laid under the finish coating, in which the coolant flows. Its function is performed by hot water supplied from a heating boiler.
Please note: in wooden and frame houses, only floor water floors are mounted without arranging a concrete screed. The service life of such systems reaches 50 years, they provide uniform heating of the premises, do not weigh down the floors, are economical
This is a good option for private houses with autonomous heating. The disadvantage of water-heated floors in a frame house is the risk of leaks and low heat accumulation. They heat up quickly but also cool down quickly.
The service life of such systems reaches 50 years, they provide uniform heating of the premises, do not weigh down the floors, and are economical. This is a good option for private houses with autonomous heating. The disadvantage of water-heated floors in a frame house is the risk of leaks and low heat accumulation. They heat up quickly but also cool down quickly.
In electric floors, the heat carriers are cables, insulated graphite strips (heating mats) or carbon rods (IR film). Connect the systems to the mains. They are easy to install. At the same time, they cannot serve as the main source of heat in residential premises, and are also not safe in case of fire in a frame or cobbled wooden house.
Knowing the fundamental differences between water and electric underfloor heating is important not only when choosing a system, but also when installing it yourself.
Benefits of underfloor heating
When selected, the air is heated at the bottom. Due to convection, warm air cools and rises. Gradually warms up the whole room. A person is most often in the lower half of the room, therefore he will always be warm.
With radiators, only part of the room near the radiator warms up and warm air escapes under the ceiling due to convection. Accordingly, in the other half of the room you will freeze.
Electrically heated floor. It is practically the easiest to install and connect, but it is very costly during use, because electricity is an expensive resource.
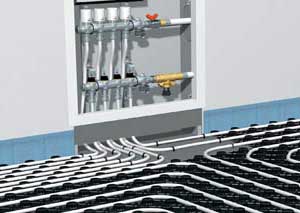
The device of a water-heated floor in a frame house

Peculiarities
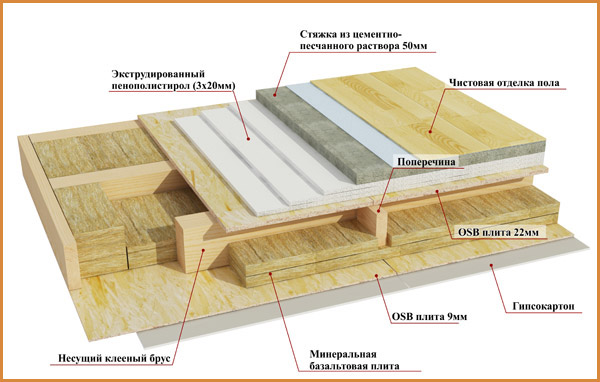
In brick and concrete houses, a water-heated floor is usually arranged in a cement-sand screed. However, a wooden floor simply cannot withstand such a load. In such cases, the underfloor heating system is mounted on a dry polystyrene foam screed.
Installation of a warm floor
 Styrofoam boards (a material related to polystyrene) with fasteners for piping are laid on the floorboards. These plates are extremely light in weight and only 2-3 cm thick. They are fastened together by a lock-type connection (like a laminate).
 On the plates, the contours of the pipes are laid in the grooves. The length of the circuit should not exceed 100-120 meters, one circuit is designed to heat a room no more than 40 square meters.It is unacceptable to use one circuit for several rooms, even if in total they have an area of \u200b\u200bless than 40 m 2.
 After laying the pipes, it is necessary to conduct a hydraulic test to make sure that the system has no leaks and heats the room properly. After checking, you can lay aluminum heat-distributing plates on top, cover them with a waterproofing substrate.
When installing underfloor heating, it is useful to immediately consider the layout of the room. So, under large-sized furniture, there is no point in having a warm floor, and when located under appliances (refrigerator, washing machine, etc.), it will only harm it with additional heating.
On average, a warm floor will cost between one and a half - three thousand per square meter.
Other options for underfloor heating in a frame house
 An alternative to a water-heated floor will be electric - cable or with infrared carbon film.
 The cable is laid in increments of 10-20 cm on the floor surface on a heat-insulating material. To increase the temperature, the step can be slightly reduced, but not more than up to 5 cm. The power of the system varies depending on whether the warm floor will be the main way to heat the room, or will only complement traditional batteries.
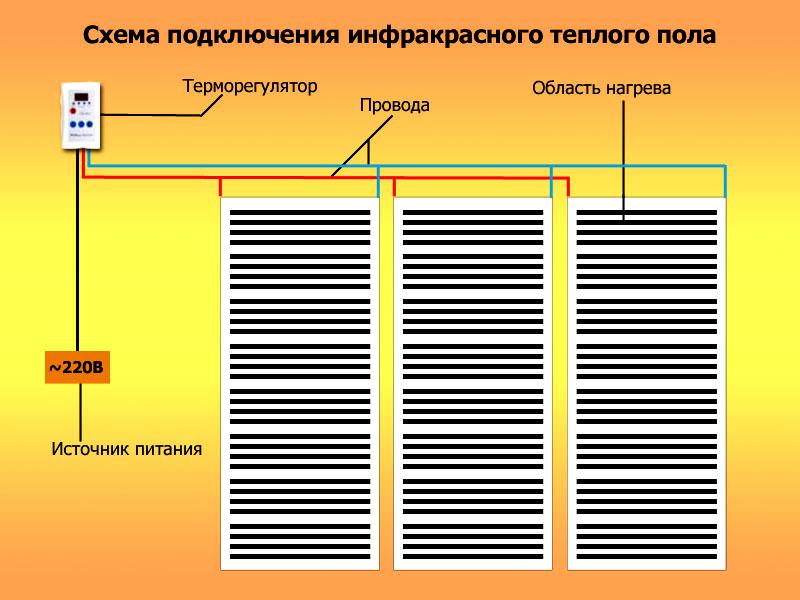
 The action of film heating systems is based on infrared radiation of the carbon paste inside the film. To increase the efficiency of such a floor, a heat-insulating substrate with a foil coating is laid under it, which will reflect heat back into the room. Fragments of the film are stacked butt-to-butt, with indents from walls 10 cm. If it is necessary to cut a whole piece, then this can be done only in the places specially marked on the film with a dotted line.
 Heating is also located only under the useful open part of the room. Before laying the floor covering, the performance of the underfloor heating system must also be checked.
Subfloor device in a frame house

Bed laying
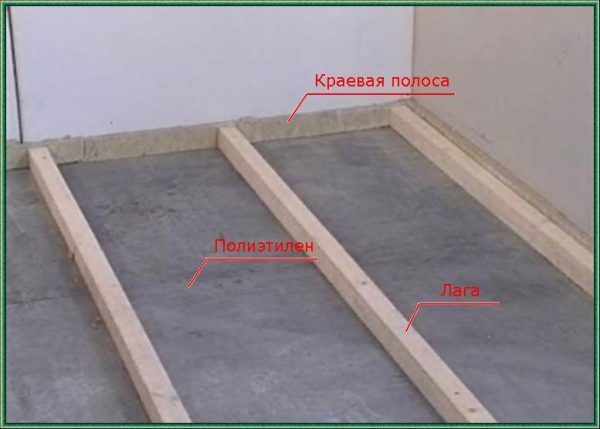
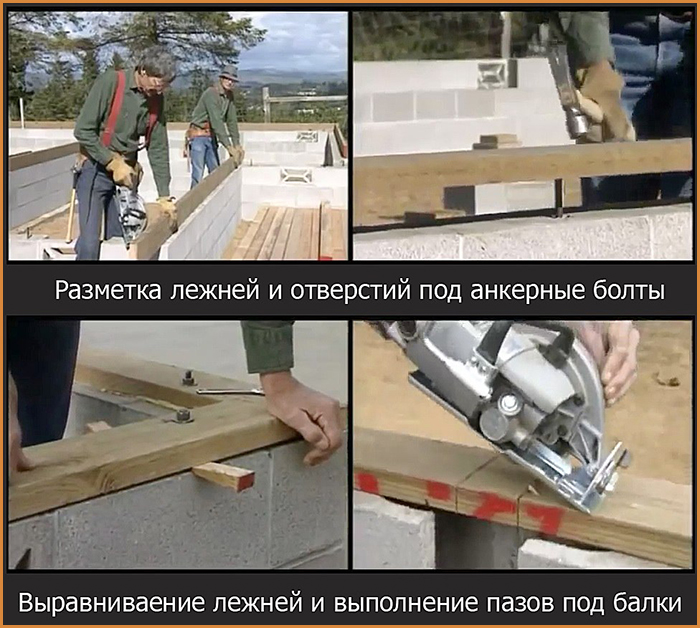
A layer of waterproofing (usually roofing material) is laid between the upper surface of the foundation and the beds. Along the perimeter of the foundation, boards with a width equal to the width of the foundation and a thickness of 50 mm are attached to pre-installed anchor bolts. The most popular wood option for this is larch, because. she is resistant to decay. However, the boards are still impregnated with an antiseptic, which is allowed to dry well.
Supports and floor beams
 If the span is more than 3 meters long, then so that the floor boards do not sag much, it is necessary to arrange additional supports under them. They are brick columns with a section of one brick and a concrete reinforced base measuring 40x40 cm, buried in the ground by 30-40 cm.
Under these pillars, holes are pulled out a little deeper than is necessary for their concrete base. The bottom of the pits is rammed, filled up and carefully leveled with a sand cushion about 5 cm thick. The bottom and walls are covered with polyethylene or similar waterproof material, formwork is installed. Next, the reinforcing mesh is laid and concrete is poured.
Brick laying can be carried out no earlier than after 3 days, when the concrete dries up and gains the minimum strength that can withstand the load from the bricks.
Strapping and lags
Along the perimeter of the foundation, strapping boards are laid on the bed on the butt butt joint, logs are laid out along the plane of the future floor in increments of an average of 40-50 cm. The position of the boards at the end provides high rigidity and geometric stability of the structure. Between themselves, the strapping and logs are connected using galvanized corners. It is also possible to use nails, but such a connection will turn out to be much less reliable. If there are no boards long enough to cover the entire span at once, then it is permissible to make logs from several fragments. In this case, the joints should be on brick supports.
For the construction of the strapping and log, wood impregnated with protective compounds, 5 cm thick and 20-25 cm wide, is also used.
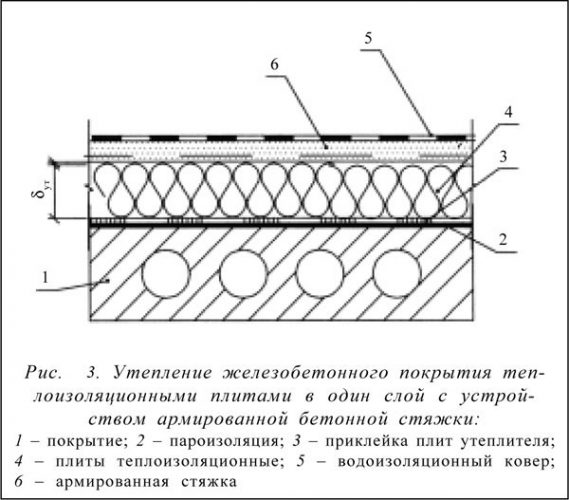
Floor insulation
 The floor of the lower floor is a source of constant cooling of the room. No matter how efficient home heating systems are used, they will be useless without proper floor insulation. In addition, condensation will inevitably form in the room, leading to dampness, mold, fungus development, damage to wooden floor structures, etc.
 The construction market offers a wide variety of natural and synthetic heaters of varying degrees of efficiency. When choosing between them, it should be remembered that with high environmental friendliness, natural materials will turn out to be much less durable, in addition, there is a high probability that rodents can settle in them.
Installation of insulation and flooring
 In order for the insulation to have a place to lie, boards are hemmed to the lags from below. If they cannot be accommodated there in height, you can nail the log bars to the side surface and lay the boards for insulation on them. If rigid slab insulation is used, then the boards can be replaced with a fine mesh. Rolled waterproofing is laid on top of the flooring. Next, the heater is installed. It should be remembered that the denser it is laid, the worse the heat-insulating and sound-proofing properties will be.
Also, the insulation should not reach the top of the log by a few centimeters in height in order to provide floor ventilation. Among the popular materials for insulation are expanded clay, mineral wool, polystyrene foam, polystyrene foam, penofol, sawdust
If mineral wool is chosen, then special care should be taken during its installation, protecting exposed areas of the skin and face from small particles of material flying everywhere
 After laying the insulation, you can proceed with the installation of the floorboards. The less often the logs are laid, the greater the thickness of these boards should be: for example, with a log step of 70 cm, a flooring of at least 4 cm thick is recommended, with a more frequent arrangement of the log every 40 cm, a three-centimeter board will suffice.
 Floor boards have grooves and protrusions - spikes. The first flooring board is laid with a spike against the wall with a 3-4 cm indent from it. The indentation is necessary to compensate for fluctuations in the dimensions of the boards with changes in temperature and humidity.
It is better if the transverse joints of the boards fall on the logs - this will increase the strength of the floor structure.
Wooden construction based on lags
Wooden floors for a frame house are considered a universal solution. They support the traditions of wooden construction, breathe, perform a certain role of ventilation of a frame house. and the whole house is made in one technology.
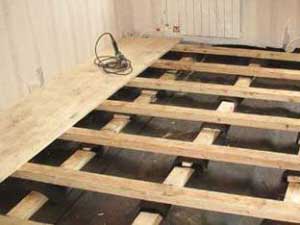
Wooden floor joists
Wooden floors for the carcass are made with the help of logs, which are an ordinary timber made of high-quality, better than coniferous, wood. All elements of a wooden house must be impregnated with an antiseptic. The logs are laid out across the light from the windows, then the flooring boards will be located along this direction. A gap of 2-3 cm must be left between the lags and the wall. The joists must touch the soundproofing layer without gaps.
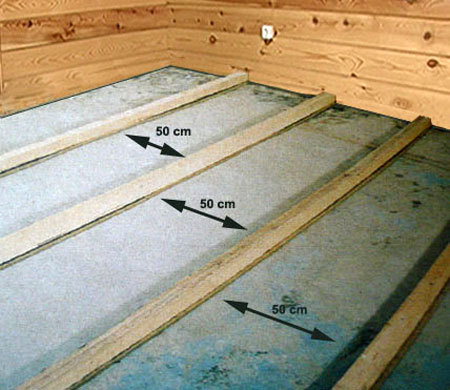
Step between lags half a meter
If you plan to join two lags, then their length must be at least 2 meters. If the surface on which the logs are laid out is uneven, it is necessary to place a gasket under them. The height of the space between the rough screed and the floor surface must be at least 10 cm. The logs are attached to the rough screed with anchors. Logs must be laid evenly, so we check the laying geometry in all directions. To do this, you can use a two-meter rail, which we lay on the logs, checking if there are any gaps. The rail should lie flat, with no free space under it.
Floor plan in a frame house
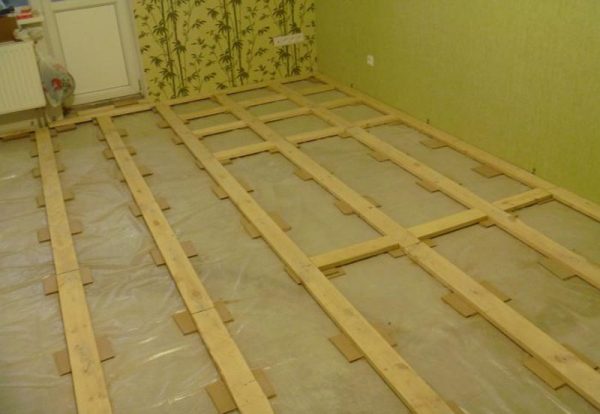
After all the logs were laid and checked, it was the turn to make the crate.We lay the crossbars on the bosses (linings), fixing them with self-tapping screws. The size of the crate must match the size of the plywood used. The distance between the crossbars must be at least 30 cm.
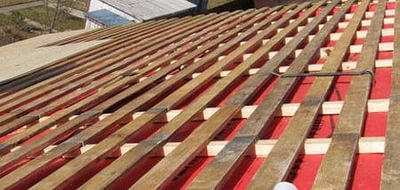
Lathing on the lags with a board
We lay sheets of plywood on the crate. It also needs to be pre-soaked with an antiseptic. Laying should take place so that the sheets do not touch each other. If the sheets have a point of contact, then the floors may creak in the future, so leave a space of 2 mm between the sheets. We fix the plywood with self-tapping screws, the distance between which is about 50 cm.
The warm floor is laid most often on a plastic film, with a thickness of 100 microns.
The next stage of work is preparing the surface for finishing. We perform priming or antiseptic treatment. The last stage is the laying of finishing material, for example, laminate or tiles.
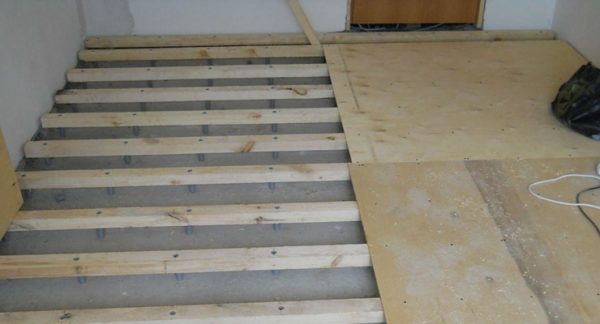
We lay plywood on the crate
If you decide to arrange a warm floor, use special concrete mixes.
Useful video on the topic:
Do-it-yourself frame house floor. Device and step by step instructions
Supports and floor beams
Beams are the main elements of the support on which the logs are laid. Supports are wooden poles mounted on concrete that serve to stabilize the beams and protect them from contact with concrete. These elements are made from coniferous wood impregnated with a bioprotective compound.
- We carry out the marking of the supports. To do this, draw a plan for their location, indicating the height. Along the line of the location of the supports, we stretch the twine, fixing it on the beds, where the cuts for the beams are made. We measure the height of each support and enter the results into the plan.
- We cut the beam 100 x 100 mm in accordance with the measurements. We place the blanks in their places, laying a layer of waterproofing on the base. We nail the supports with nails to the wooden inserts made during pouring.
- We put the beams with the end in the pocket, use the liners to regulate their height flush with the beds. If the blanks are long, mark the second end of the beam and cut off the excess. If short, then we join the beams on the support.
- We fasten the beams to the beds and intermediate supports with corrugated nails. With a support height of more than 1 m, we strengthen them with cuttings from the board.
Strapping and lags
We also carry out the strapping from a board of 50 mm, the width depends on the planned load and the thickness of the insulation.
- We lay the strapping on the sides of the house, parallel to the floor beams. We put the boards on the end, align them along the outer edge of the beds and fasten them with nails in increments of 20 cm.
- We mark the location of the lag. We measure from the corner along the laid strapping board a step of 40 cm. We lay out the log boards on the beams, put them on the side plane and align them with the markings.
- With the length of the board covering the length of the building, on the other hand, the markings are performed in the same way. We cut the logs and fasten them with nails to the harness and beds, check and fasten them to the beams at the intersection.
- If the size of the building is larger, then we overlap the logs. The joint should be on the floor beam. We cut 30 cm intermediate logs and put together the joints between each other, using the trimmings as spacers. After we fix the logs on the floor beams.
Floor insulation
The optimal material for insulation is mineral wool. Its disadvantage is the loss of thermal insulation ability when wet. Therefore, we protect the insulation layer with a vapor barrier and windproof film.
If a low-density insulation is chosen, we hem a subfloor treated with bioprotection under the logs.
- We lay the vapor barrier film across the lag with sagging, which will allow laying insulation between the lags. Glue the joints of the strips with adhesive tape, fasten the film with a stapler.
- We put the insulation plates between the lags, leaving no gaps. When double-laying insulation, the second layer overlaps the joints of the first.
- On top of the insulation we put and fasten with brackets a waterproofing film that protects against the flow of liquid in the house.
Step-by-step floor installation on a pile foundation
Let us describe the sequence of actions for arranging and insulating the floor of the frame on screw piles. Work begins after careful preparation of wooden elements: treatment with an antiseptic and flame retardant composition.
Strapping device and fastening of the crate
Suppose that the piles are installed, the metal heads for fixing the beams are fixed. Further progress of work:
- Drill four holes on each "sole" of the screw supports.
- Lay waterproofing on the heads, for example, roofing material.
- Lay out the bars along the perimeter of the structure and connect the elements to each other “in half a tree”.
- Attach the beams to the heads with self-tapping screws.
- Carry out the insertion of the remaining bars inside the perimeter.
- With steel brackets, additionally connect the strapping parts.
- Check the horizontal position of the beams.
- Fill the crate to the bottom of the bars - the base for attaching the base.
Draft base and thermal insulation
Lay sheets of OSB, chipboard or moisture-resistant plywood on top of the guide rails. If edged boards are used, they must be nailed perpendicular to the joists.
After preparing the subfloor, proceed to its isolation:
- Cover the base with waterproofing film.
- Place a heater in the cells between the lags. When cutting mineral wool, it is necessary to provide a margin of 0.5 cm on each side for the most snug fit and to prevent the appearance of cold bridges.
- Spread a vapor barrier membrane over the insulation with an overlap between the sheets. Glue the joints with construction tape.
The next steps depend on the type of flooring.
Creating a plinth thermal circuit
The device of the floor in the house on stilts without fail provides for driving the basement. The following insulation options are available:
- Brickwork. The base is a pillow of crushed stone and sand. The pick-up is laid out in half a brick, reinforcement is not necessary. For work use ceramic or clinker bricks.
- Siding. Thermal plates are mounted on a crate made of galvanized profile or bar, assembled on piles.
- Decking. Runs are welded to the bored posts, which serve as the basis for fastening the profiled sheet.
- DSP. Sheet material is mounted by analogy with a profiled sheet. The outer part can be decorated with flexible tiles, porcelain stoneware.
Regardless of the chosen method of finishing the underground part, it is necessary to provide for "vents" - holes for natural ventilation.
The blind area of the house is laid out from a concrete screed, paving slabs or paving stones. When arranging, it is necessary to maintain a slope angle of 4 ° outward. Be sure to seal the junction of the false plinth cladding with a blind area. This will prevent meltwater and precipitation from entering the underground.
Floor device in a frame house overview of existing options
Even if you are a person who is far from the construction industry, then you should be aware that it is extremely uncomfortable to live without high-quality flooring. This applies to houses made of different materials. The frame building is no exception. If you properly equip the floor structure, then with its help it will be possible to keep the heat inside the premises, as well as create a reliable support that will extend the life of the building for several decades.
In order to give the building strength, a subfloor should be created, which will act as the basis for the future topcoat.
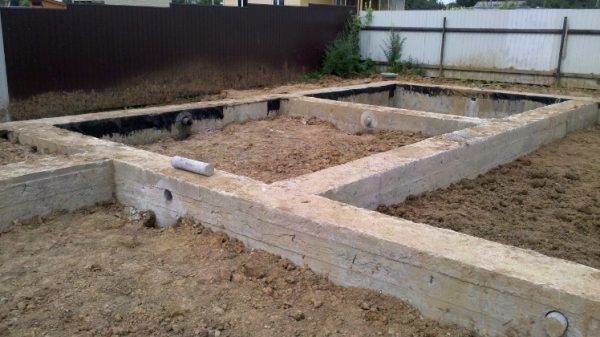
foundation requirements
The foundation surface must be checked for surface evenness. The height difference should not exceed 1 cm per 1 linear meter. Otherwise, you must additionally use a cement-sand screed.
 In the process of pouring the concrete of the foundation, when it has not yet hardened, anchors for the beds must be installed in increments of up to 2 m.
 Prior to proceeding with construction work, proper waterproofing of the foundation should also be taken care of.This will ensure its durability, protect it from gradual destruction, protect the first floor and basements (if any) from fungus, dampness and insect breeding.
It is possible to waterproof the foundation using a variety of options for rolled, coating, sheet and sprayed materials. You can also use concrete with special hydrophobic additives that increase the degree of water repellency.
Concrete gains full strength by 28 days of hardening under normal conditions. However, laying the floor can begin about a week after pouring, when the foundation is already about 60-70% of the final strength.
 If the laying of the floor is carried out before the construction of the walls and the erection of the ceiling of the next floor, then the work must be carried out in dry weather, as well as making sure that the foundation is dry from precipitation.
Selection of structural elements and materials
Reliability, durability and heat efficiency of the floor largely depend on the materials used. Let's consider admissible options and we will designate unacceptable decisions.
Attention to the quality of floor beams
In frame housing construction, wood is mainly used for tying screw piles. Usually softwood lumber is taken: larch, pine and spruce.
The main requirement is the use of dried materials. The humidity of the beam should not exceed 12%, otherwise the structural parts may be deformed after their installation.
The arrangement of the grillage is possible in several ways:
- Laying a monolithic beam measuring 20 * 15 cm. When building a two-story house, you can use a beam of 20 * 20 cm.
- Rostverk from assembled boards. A budget option. Each beam is formed from two or three boards. The output should be a beam with a section of 20 * 15 cm.
With reliable fixation of the boards, the “package” method is not inferior in strength to the strapping from solid beams.
Bottom trim options
When choosing a material for the sub-base, it must be remembered that it is undesirable to overload screw piles. Therefore, the casing must be strong enough, but not heavy. Its main task is protection from wind and moisture.
What will do? Here are some options:
- OSB. An affordable material with good strength, but vulnerable to water. Before installation, it requires treatment with a compound designed to protect wood. The weak point is the joints of the plates. They must be covered with acrylic sealant.
- Chipboard. It is easy to process, but like OSB it is vulnerable to moisture. Inferior to the previous material in terms of environmental friendliness.
- Multilayer plywood. It is permissible to use only moisture-resistant sheets marked FK or FSF. The composition contains formaldehyde resins - they increase the resistance of the material to an aggressive environment.
Very often, ordinary flooring made of boards with a section of 5 * 10 cm is used for subfloor installation. This option cannot be called economical, but durability and environmental friendliness are beyond doubt. The main requirement is pre-treatment of wood.
Insulation - the basis of thermal insulation of the floor
When choosing a heat-insulating material, the main attention is on the possibility of its operation in a humid environment. The most rational solutions:
- Mineral wool. The best solution is basalt fiber mats. Pros: environmental friendliness, incombustibility, low thermal conductivity, resistance to deformation, minimum water absorption - 2%. Over time, stone wool shrinks only 5% - with proper installation, cold bridges at the junctions with lags do not form.
- Extruded polystyrene foam. The leader in insulating properties. Additional advantages: elasticity and resistance to deformation, lack of water absorption, biostability, ease of installation. Disadvantages: high cost and flammability.
- Expanded clay. Budget alternative to sheet heaters. Somewhat inferior in terms of thermal insulation characteristics to mineral wool and expanded polystyrene. An important plus is fire safety.
Styrofoam is sometimes used to insulate the floor in a frame house on screw piles. The main advantages: good thermal protection and low cost. However, upon contact with moisture and under the influence of low temperatures, the material loses the integrity of the structure. This solution is applicable in warm regions.