Infrared heating heating ceiling ZEBRA EVO-300
Film heater Zebra EVO-300 was developed by the Chelyabinsk plant "PSO-EVOLUTION" and is constantly being improved. This is a modular type heater, which gives an advantage in installation. The film electric heater is sold in two versions: in a box (50 segments with an area of 15 sq.m of material in a single tape) or in segments of standard sizes with a length of 0.6–6 meters. The Chelyabinsk heater ZEBRA EVO-300 will require a much smaller area of electric heaters - only 60% of the heated one.
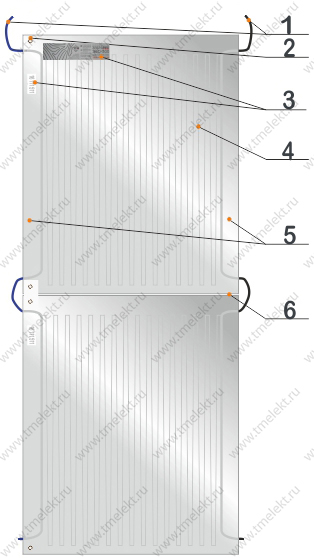
Appearance of ZEBRA EVO-300:
1. Branch wires (phase, zero);
2. Grounding contact;
3. Company logo ZEBRA EVO-300 and a laminated sticker indicating the working side of the heater;
4. Heating elements;
5. Fields for fastening;
Specifications:
• Rated voltage Un – 220 V, 50 Hz;
• Maximum power - 220 W/sq.m;
• Rated load current In – 1 A/sq.m;
• Max. heating temperature ZEBRA EVO-300 45-50°С;
• Thickness of a cloth – no more than 1 mm.
Size range of the ZEBRA heater:
• Length - from 0.6 to 6 m;
• Width - 0.5 m.
Each segment of the EVO-300 is a full-fledged heating element with a power of 66 W, which effectively operates from the mains voltage of 220V. Infrared heating based on ZEBRA EVO-300 can become the main source of heat in any room. Heating is carried out with minimal energy consumption and extremely quickly, which is facilitated by the unidirectional radiation of the heaters.

In addition to the standard EVO-300 ST series, the improved ZEBRA EVO-300 PRO series has become available, capable of generating 10% more heat energy with the same power consumption. The manufacturer's warranty for ZEBRA EVO-300 is 10 years, the estimated service life is at least 25 years. You can get acquainted with the prices for turnkey installation of ZEBRA EVO-300 here.
Ceiling water-type IR panels
The design is a system of insulators and reflectors that direct energy to specified areas of the room. Water heated to a certain temperature circulates through pipes enclosed in an aluminum shell. The heating of the liquid takes place in the block, and the heat is distributed into the room due to the active movement of water through the pipes.
In the hot season, coolant circulates through the pipes, thanks to which you can create a comfortable indoor temperature all year round.
Infrared heating water type has the following advantages:
- adjustable heating level;
- the possibility of local heating;
- safety for human health;
- low power consumption;
- silent operation;
- ease of installation;
- possibility of remote control;
- versatility (you can heat the room or cool the air temperature).
Ceiling water IR panels have a significant drawback - high cost.
Warm ceiling
- The main advantage of a warm ceiling
- The lack of a warm ceiling
- Installation of a warm ceiling
The main advantage of a warm ceiling
So, the most important argument in favor of using infrared heating is precisely the low power of this type of heating compared to other heating systems.
For example, the power of a water-heated floor system averages 50-80 watts per square meter. And the power of the films for the ceiling heating device, declared by the manufacturer, is 15 watts. It's great of course. But not everything is so simple.
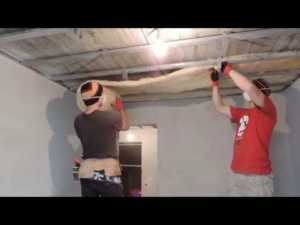
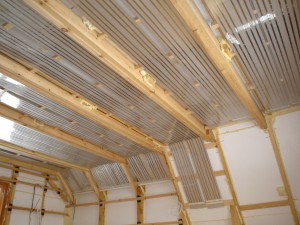
To mount the heating film on the ceiling, it is necessary to mount the lathing, mount heat-insulating mats, mount the reflector layer, and only then mount the heating film.
At the same time, you need to understand that the heat loss of your home or premises should be minimal.Otherwise, the energy consumption when using a warm ceiling will be comparable to traditional heating systems.
This is of course cheaper than a device, for example, a concrete system for a warm water floor. But the quality is the only positive.
The lack of a warm ceiling
If you have warm water floors, then they can be heated by any boiler. For example, electric, gas, diesel, solid fuel, heat pump, solar collector and so on.
But the infrared heating film works only on electric energy. Thus, if the electricity is turned off, you will be left without heating.
According to the principle of heating, warm ceilings and warm floors are the same. Both of these systems work in the range of long-wave infrared heating.
Therefore, I would not consider warm ceilings as the main heating. As an alternative please. For example, you turn on warm ceilings during the day while you are at work. And at night, heat the stove or turn on another boiler.
It is also convenient to use ceiling heating in the off-season to maintain a comfortable temperature in the house without turning on the main heating.
Installation of a warm ceiling
When installing a heating film on the ceiling, it is necessary to pay attention to the quality of the connection between the supply cable and the film and the reliable insulation of this connection, since water leakage from the roof or upper apartments is not ruled out. And if the connection is poorly insulated, then you can get an electric shock or a fire may occur due to a short circuit with water.
And if the connection is poorly insulated, then you can get an electric shock or a fire can occur due to a short circuit with water.
The next rule when installing a warm ceiling is precisely the permissible installation of a finishing ceiling at a distance of no more than 100 mm from the heating film.
In this case, the thickness of the finishing ceiling materials should not exceed 20 mm.
In addition to all of the above, a heating film for a warm ceiling device differs from a film for a warm floor device.
The film for a warm ceiling is equipped with additional reflective elements, which in turn allow you to mount warm ceilings with a height of no more than 4 meters.
To summarize the above, it is advisable to use warm ceilings in well-insulated buildings and premises as an alternative heating or in the off-season.
It is also convenient to use warm ceilings with an uninterrupted supply of electrical energy. Although today no one will give guarantees for an uninterrupted supply.
And to provide basic heating, you can use radiator heating systems, underfloor heating or any other system.
If you have questions about the installation of underfloor heating systems, then follow the links and you will receive comprehensive answers on the installation of water or electric underfloor heating. published by econet.ru
If you have any questions on this topic, ask them to specialists and readers of our project here.
Installation of film heating on the ceiling
In order for the finished heating system to be effective, the following rules should be followed when working:
- Before installation, it is necessary to perform thermal insulation of the room (walls, doors, windows).
- Do not install film heating in a room with high humidity or at low temperatures.
- The heating system, which acts as the main one, must occupy at least 80% of the total ceiling area. For additional, 40% is enough.
- The current power must correspond to the value specified in the passport of the heating system. If it is less than required, it is necessary to install a distribution block.
- The temperature sensor must be installed at a level of 170 cm from the floor level.
- It is forbidden to bend the roll heater at an angle of 90 °.
- For ceilings that are too high - above 360 cm - standard models will not work, since the energy consumption in this case will be unreasonably large.
- In order to reduce heat loss, it is recommended to mount a foil film under the IR film. It will reflect heat into the room.
- The roll heater should be cut only along the marked lines.
- You need to fix the IR heater with a stapler or special fasteners, while the fasteners must be located on the transparent sections of the film.
- The distance between the film strips should be no more than 50 mm.
- During installation, make sure that the heating surfaces do not come into contact with flammable or combustible materials.
- Electrical wiring contacts must be carefully insulated using insulating tape and plastic caps.
Film infrared heating is mounted in four stages:
- Calculation of materials for the installation of a film heating system.
- Carrying out work on thermal insulation of the ceiling.
- Installation of elements of the heating system, installation of a temperature sensor.
- Connection to the network and thermostat.
After determining the required amount of materials and their purchase, proceed to the thermal insulation of the ceiling. To do this, use a foil heat insulator (folgoizol penofol and others). The material should be reinforced over the entire surface of the ceiling and go a little on the walls to reduce heat loss.
An IR film is mounted on top. Fix it on the fasteners included in the kit, positioning it so that it falls on the places marked for the cut - this way the heating elements will not be damaged.
When the film is fixed, on the one hand, it is necessary to isolate the contacts, and on the other, connect the wires. Then you need to install a thermostat on the wall. Testing the operation of the system. If it works as it should, move on to finishing.
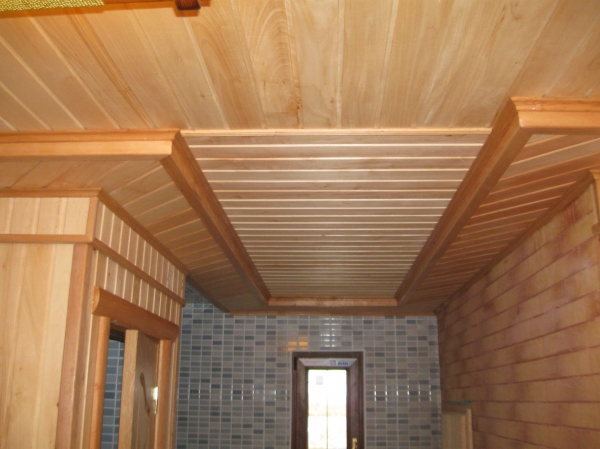
You can close the IR film with various finishing materials: MDF, plastic clapboard, drywall and others. The main thing is that they do not have heat-reflecting properties.
Home heating with infrared heaters is a modern alternative to traditional electrical systems. Its high cost is justified by ease of use, ease of installation, reliability and efficiency.
Efficiency and economy are the main indicators when choosing infrared ceiling heating. The cost of energy sources is high, and many owners of private houses try to use them rationally. These two indicators form the basis for the creation of a unique and modernized IC heating system. How does this system work and is it possible to install it yourself?
Ceiling infrared heating
Myths and facts about PLEN ceiling heating
PLEN heating technology is quite new, and a lot of myths have appeared about it. How true are the common statements about this heating system?
| Myth | Fact |
| With the help of ceiling heating, the effect of "warm floor" is created | A wavelength of 9-15 microns when passing 250 cm (usually ceilings are located at such a distance from the floor) cannot heat the floor to a temperature of 36 degrees and above |
| The film helps maintain optimal humidity, fights mold | Infrared radiation cannot affect humidity and does not kill mold |
| The installation will cost significantly (up to 70%) less than the installation of water and other heating systems | Not true. A ceiling heating PLEN device will cost about the same as a convector |
| The heat produced by this heating system is more comfortable for the person | According to manufacturers, the optimum temperature under film heaters is about 18 °C. But that doesn't affect comfort. |
| Long (up to 50 years) service life | Since the technology is quite new, this statement cannot be verified in practice. |
| The film can be closed with any finishing material, excluding metallized | Then most of the rays will heat the finish |
| Film infrared heating - the most economical of all infrared heating systems | PLEN is much higher than other IR heaters |
| PLEN is switched on only for 3-15 minutes per hour, due to which the energy consumption is 7 times lower than when an electric boiler or convectors are operating | Such a mode of operation is able to heat the room and maintain an acceptable air temperature in it only if the house is insulated so well that heat loss is reduced to almost zero. This is usually not the case and the PLEN will have to work much more frequently. |
| The system is absolutely safe | Breakdown may form in the film |
| Permits are not required for the installation and operation of the system | It is necessary to document the allocation of the specified electrical power and update the electrical network if it does not meet the requirements |
The device and principle of operation of an infrared heater
The steel case of the device contains a reflector and a heating element or emitter. When connected to the network, the emitter heats up and emits infrared waves, which are perceived by a person as thermal. The heating element can be made in the form of a heating element - a tubular heater, an open or closed coil, or a carbon coating in film heaters.
The reflector is used for directional heating and protection of the device itself from overheating. Infrared waves are completely safe for humans and animals, except for possible overheating. To prevent it, heaters are equipped with thermostats and sensors. With their help, you can set the heating temperature and turn off the device when it is reached.
What is infrared heating
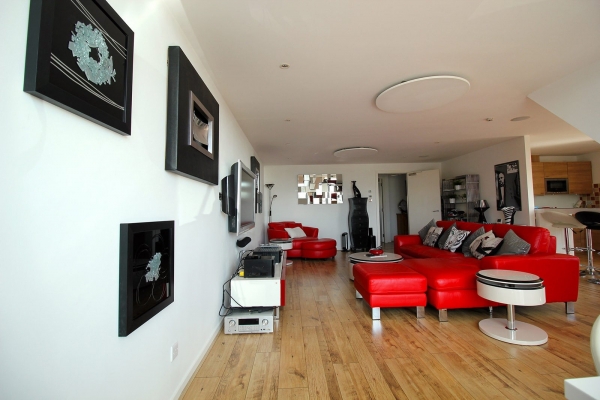
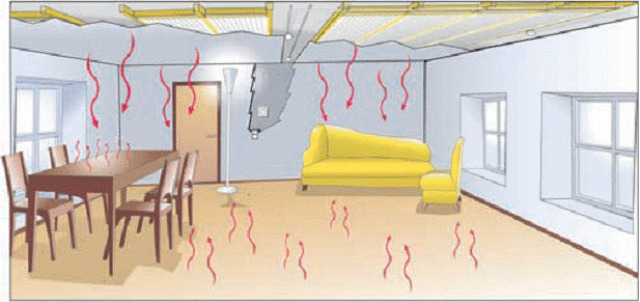
Infrared (IR) heating works differently than the more conventional convector heating. From the emitted waves, objects are heated - walls, floors, ceilings, furniture - and the air in the room is already heated from them. A person who is in a room heated by infrared radiation is enveloped in warmth from all sides, and from the side of the floor too. For this reason, the level of comfortable temperature decreases by a couple of degrees, which means that under the same conditions, heating costs will be lower.

The difference between traditional types of heating and infrared
Nevertheless, miracles do not happen and only the heating of the house will be economical, in which heat losses are minimized. Under such conditions, of course, all costs for heating will be less, including for any electric one. But with IR heating, the temperature really needs to be lower. The second reason for savings is the presence of a thermostat. If it is present, the heaters operate for a short period of time when the room temperature drops below the set one. Otherwise, the heaters are on all the time, the room is hot, you have to open the windows, and the electricity bills are high (to put it mildly).
You can use infrared heating as the main one, or as an additional one to create more comfortable conditions in a particular place - near the desktop, in a recreation area, etc.
Operation method of infrared heating
In the environment, infrared radiation is present in the spectral region of electromagnetic waves that are emitted by the sun. Thanks to such an invisible wave range emitted by it, all life lives and develops on our planet. Scientists divide infrared radiation into three components:
The most productive for heating and safe for living organisms are electromagnetic waves that go immediately after the visible red side of the middle range. The emission wavelength spectrum varies from 8 to 12 µm. It is the long-wavelength that developers use when creating equipment and an IR heating system. Infrared installations are something like the sun only in miniature
The only distinguishing feature from the sun is that they heat the room constantly, no matter what the weather is outside.
Functioning of infrared heating
They operate in domestic conditions from a network of 220V. The heating element, which is considered the main part of the device, distributes light radiation. Thanks to the reflector, at the time of operation of the work, the object at which the device is aimed is heated. The role of receivers and emitters can be played by different objects in the room: furniture, windows, floor, ceiling, living organisms. These objects take heat for themselves or transfer it into space.
At the time of operation of the infrared heating system, all surfaces of interior parts in the place of radiation are 10 degrees warmer than the surrounding air. Infrared heating works perfectly with other traditional heating options, making it possible to create a piece of warmth in any room at a minimal cost - a place of increased comfort. This type of heating is convenient to use as additional or emergency heating. The cost of heat when using it is not more than 10%.
Advantages and disadvantages of infrared warm ceiling
Compared to other types of heating systems, a warm ceiling has many advantages:
- the greatest efficiency in comparison with conventional radiators and reflectors;
- the natural level of humidity is maintained in the room;
- simple installation and no labor-intensive operations;
- simple automatic control will allow you to forget about temperature changes;
- possibility of installation in buildings of any type, including wooden ones;
- a wide range of ceiling finishes.
Of the significant shortcomings, only the limitation in the height of the ceilings can be distinguished, but even in this case, you can get out of the situation. For example, when installing a thermal film, bypass those places where people are constantly: above the head of the bed or above the workplace.
Film heaters
Film infrared heaters are devices used for general or partial heating of a room. They consist of a film, foil and heating elements that produce long-wave infrared radiation. Also, the devices have special sensors that turn off the system when the air temperature reaches a predetermined level, and when it drops below the minimum acceptable level, they activate the heater. Thanks to this, electricity is saved - the device does not just work.
Some film heaters have thermostats with the ability to program the temperature for 24 hours. In this case, during the absence of people in the room, the IR device does not turn on, and some time before the owners return, the device starts working and has time to warm up the house. However, these heaters cost significantly more than simple models.
Do-it-yourself warm ceiling is simple and affordable
To create comfortable living conditions in the house, it is necessary to solve the issue of maintaining heat in it. In addition to thermal insulation of the floor and walls of the house, it is necessary to insulate the ceiling. Over 50% of heat can escape through it. A warm ceiling in the house will reduce heat loss and reduce the cost of heating it during the cold season.
The scheme of insulation of the roof and ceiling.
To do this job correctly, you need to know how to do it? You can insulate it in 3 ways:
- from inside the room;
- outside (from the attic);
- combined insulation method (inside and outside).
Various materials can be used as thermal insulation. The most common ones are:
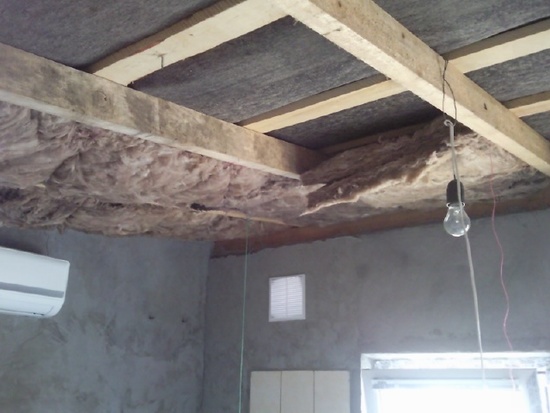
- various types of mineral wool (rolled or in the form of plates);
- expanded polystyrene;
- expanded clay;
- warm slag;
- sawdust;
- warming mixtures based on clay and various polymeric impurities.
Scheme of insulation, vapor barrier and ventilation of a residential attic.
Making a warm ceiling with your own hands is easy.First you need to measure its area and prepare the necessary material. To perform the work, you will need the following material and tools:
- warming material;
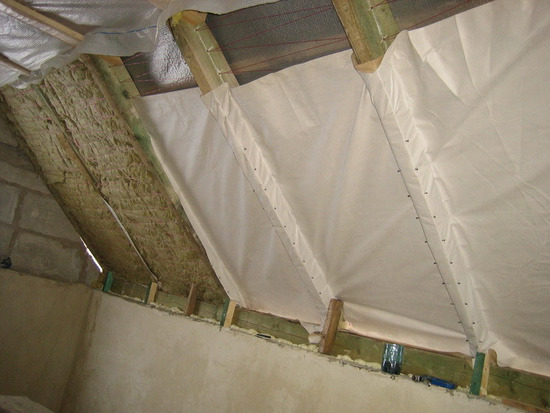
- vapor barrier film;
- waterproofing material;
- bars measuring 50x50 mm;
- wood saw;
- knife for cutting insulation;
- perforator;
- hammer;
- dowels;
- screws and nails;
- construction stapler.
External insulation
Attic insulation inside and out.
If the attic in the house is not used as an attic room, the best option would be to make external insulation from the attic side. For this you need:
- Clear the attic of debris.
- Cover the surface with waterproofing material.
- Install logs at the height of the insulation being laid (for loose insulation about 200 mm high, for mineral wool or polystyrene about 100 mm). If the insulation will be laid in the form of plates, the logs are set to their width.
- The space between the lags is filled with insulation to the upper edge or filled with insulation boards (polystyrene or mineral wool). Sawdust mixed with lime or clay can be used as an insulating material.
- The surface of the laid layer is covered with a vapor barrier film.
- On top of the log, in order not to damage the installed insulation layer and vapor barrier, a subfloor is installed.
Warming from inside the room
Scheme of the main heat loss of buildings.
It should be borne in mind that when installing an insulating layer from the inside of the room, the height of the ceiling will decrease by its thickness. The best option is to install insulation when creating suspended or stretch ceilings. In this embodiment, the insulation material is placed between the ceiling and the surface of the ceiling finish.
Mineral wool in the form of plates is used as a heater when using it indoors. It can be attached to the ceiling surface by 2 methods: with glue or inside the frame. When gluing, the following procedure must be observed:
- The inner surface is cleaned from whitewash to concrete.
- A layer of soil (liquid diluted glue) is applied to the base.
- Glue is applied to the concrete base, the plate of insulating material is pressed against the base with force and held for 15 seconds. All other plates are attached in the same way.
- The gaps between the plates are filled with mounting foam, after the foam dries, the protruding pieces are cut off with a sharp knife.
- A vapor barrier film is attached to the surface.
- A polymer mesh is glued onto the surface, the surface is puttied, cleaned and then finished.
When installing inside the frame, the procedure is as follows:
- To install a false ceiling, a frame is installed. The frame logs are fastened with a step equal to the width of the insulation boards.
- Mineral wool is inserted between the lags.
- The gaps are filled with mounting foam. After it dries, the protruding parts of the foam are cut off.
- A vapor barrier film is installed over the installed layer.
- Drywall sheets are installed on the frame.
- The surface is being prepared for finishing.
The insulated ceiling will create comfortable conditions for living in the house, significantly reduce heat loss and save money on energy bills.
How infrared film ceiling heaters work
Infrared film heaters
When it comes to heating their own home, people are looking for ways to create a system that is cheap but works efficiently on less fuel. We will not consider all types of heating devices offered by manufacturers today, but we will focus on only one. This is an infrared ceiling film heater. Why exactly him?
IR heaters appeared on the market not very long ago. They have not gained great popularity only because consumers treat new products with some apprehension. This is the first.The second is a volatile device that runs on an electric current network. You yourself know how our networks work, especially outside the city. Outages occur with enviable constancy, so we are still afraid to use film infrared heaters as the main source of heat.
Material selection
It is necessary to be guided by the following characteristics when choosing:
- the material must be safe;
- it is necessary to choose a material with non-combustible impregnation;
- the environmental properties of the material are very important, your housing should be environmentally friendly;
- try to purchase materials from a reputable manufacturer.
Slag, expanded clay, mineral wool, glass wool - choose depending on the humidity of the room, its volume and your preferences. Consultants will help you make a specific choice if you tell them about your problems and challenges. You will be guided by the amount of materials required for the size of your house, you will be shown the necessary certificates and will be given explanations for installation.
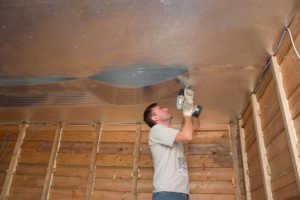
How to insulate the ceiling with your own hands
The solution of this issue will allow the owners to save on heating and live in comfortable conditions, having a warm private house.
To begin with, professionals lay glassine, which protects the insulation from moisture and decay, attaching it to the ceiling beams. Then the foam is laid. The gaps between the sheets are sealed with ordinary mounting foam. Glassine is again placed on top of it. Only after that proceed to laying the insulation. Thanks to such good insulation, your insulation will last for many years and will not be susceptible to mold and rot. And thanks to this, the ceiling can be repaired less often. We tried to reflect the entire process of insulation in the photo, which will help you repair the ceiling yourself.
Tips for hosts
If you really want to have a warm private home, then listen to our advice. It is better to lay the insulation in two layers, then the ceiling will be well insulated, and the house will be warm. The upper layers of insulation should cover the lower joints, so your ceiling will be perfectly insulated. On top of the insulation, you can put wooden boards that will press the material, ensuring solidity and reliability, and they will make it durable. You can see a photo of the correct laying of insulation in several layers
Also pay attention to how insulated your ceiling is outside the house, because heat loss also depends on this. If insulation is needed outside, then it is carried out according to the same scheme, only instead of the top layer of the boards, roofing material is used, and on top - tiles or any other material
At the end of the insulation process, you will immediately feel that the microclimate around has changed, your house is warm and without drafts, which until recently walked through the cracks.
The warming procedure at first glance may seem long and complicated, but after trying, you will learn how to do it with the necessary skill and in the next room you will do it easier and faster. The prize for your efforts will be a warm home, cozy, where the whole family will feel calm and comfortable.
Types of infrared heating
An infrared heating system can be:
They differ not only in design, each type has its own characteristics.
Ceiling infrared heating systems
This type of heating system is installed on the ceiling, while the heat flow is directed to the floor. The floor covering heats up, giving off heat to the air and warming up the room.
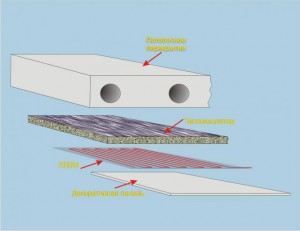
Infrared ceiling lamps consist of:
- aluminum reflective plates;
- base heating element;
- thermostatic sensors.
The system produces electromagnetic waves that turn into thermal energy. The performance of the system depends on the material from which the base element is made. The most effective are quartz, tungsten and ceramic heating elements.
- ease of installation and dismantling;
- compactness;
- the possibility of automatic regulation of work;
- compactness.
Heating a house with ceiling systems has the following disadvantages:
- difficulty when mounting on non-standard (for example, sloping) ceilings;
- high cost of equipment;
- the need to place heaters at least 1.5 m from the floor level.
Wall mounted infrared heating systems
Wall-mounted heaters can be made in the form of skirting boards, PLEN systems, radiators, panels. Installing the EINT is simple, no experience is required for this: you just need to fix the brackets on the wall and hang the heater, using the instructions.
- automatic mode of operation;
- long service life;
- low energy consumption for heating 1 m²;
- low maintenance costs.
Infrared wall-mounted heating panels also have disadvantages:
- high price;
- the need to place devices at a given level for uniform heating of the room;
- the inability to use as the main heating system in regions with a harsh climate.
Floor standing infrared heating systems
Floor heating IR system - thin film mats with flat heating elements. For their installation, you can use any type of screed, and use natural stone, laminate, ceramic tiles, linoleum and other coatings as a finish.
Installation is carried out quickly, while laborious operations are not required, and as a result, the floors will be warm.
- long service life;
- noiselessness;
- environmental friendliness;
- Ease of controls;
- fire safety.
The cons include:
- low efficiency with poor-quality thermal insulation or its absence;
- high price;
- the need to draw up a plan for the location of the plates, taking into account the characteristics of the room and the arrangement of furniture in it.
Sun on the ceiling
Those who had to read “Three from Prostokvashino” in their happy childhood will surely remember that the stove in Uncle Fyodor’s house performed purely decorative tasks. To heat the house, he used an electric sun, ordered from some research institute and nailed to the ceiling. Now it is difficult to say whether the creators of ceiling infrared heaters themselves thought of their brainchild or stole this idea from the author of the famous story, but, one way or another, the electric sun turned from a fairy tale into a reality. Unless it has a round shape, but a rectangular one.
What is an IR ceiling film heater and how does it differ from its lamp and tubular counterparts? First of all, the emitter. Instead of metal spirals and ceramic elements, thin carbon threads are used here. which are laid on a polymer film smeared with carbon paste. The thickness of the latter is only 1 micron (0.001 mm), so the whole pizza-like product is placed in a durable fire-resistant shell made of laminated polyester, which plays the role of a reliable electrical insulator. At the edges, both layers of the shell are glued together without laying carbon strands between them. The empty tracks thus obtained are used to mount the heater on the ceiling.
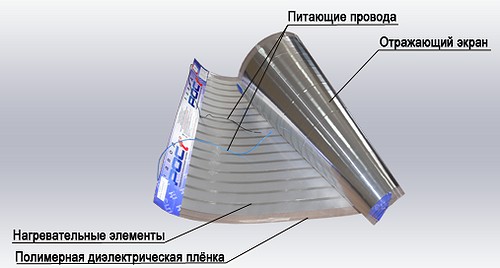 The design of the film ceiling heater
The heater is controlled by a thermostat. installed on the wall at a height convenient for the user, which is usually from 1 to 1.5 m. It is enough to set the desired temperature on this device, and it will turn the ceiling heater on and off at the right time. Simple and cheap thermostats have a mechanical device, more expensive ones are electronic and can be programmed.
All ceiling IR heaters are divided into three categories:
- low-temperature with a wavelength of radiated waves from 5.6 to 100 microns and a heating temperature of up to 600 degrees (the minimum installation height is from 2.5 to 3 m);
- medium temperature with a wavelength of 2.5 to 5.6 microns and a temperature of 600 to 1000 degrees (the minimum height is about 3.6 m);
- high-temperature with a wavelength of 0.74 to 2 microns and a heating temperature of over 1000 degrees (installed at a height of at least 8 m).
IR films are low-temperature long-wave devices; on average, their heating temperature is about 45 degrees.
One square meter of an IR ceiling heater consumes from 130 to 200 W of electrical power, the efficiency of the device is about 95%.
Ceiling IR heater installation
All work related to the installation of a film ceiling IR heater is based on the requirements of the system operation. But the main thing is the area of \u200b\u200bthe ceiling. If it is large, then it is better to shift the burden of responsibility onto the shoulders of professionals. If the ceiling is small, then you can try and install the device yourself.
Like many installation processes, the installation of a film heater is divided into several stages:
- A reflective screen is installed.
- Heating films are installed.
- An electrical wiring diagram is created.
Scheme of laying PLEN
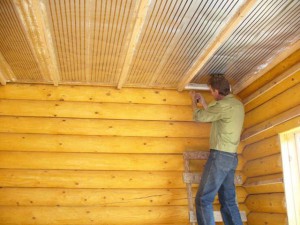
For him, you need a material with a foil layer. It is better if it is a small thickness insulation, trimmed on one side with aluminum foil. The optimal thickness is 5 mm.
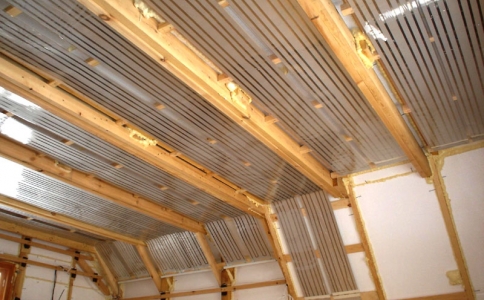
If the ceiling is made of lumber, then a stapler and metal brackets can be used to fix the heat insulator. If the ceiling is concrete, then you can’t do without a perforator. With its help, holes are drilled in the ceiling surface every half a meter for a special fastener - UKE. The strips overlap each other with an offset of 2–4 cm.
In fact, the technology for installing a film ceiling IR heater is no different from installing a heat insulator. After all, the heater is a thin film on which carbon paste and carbon filaments are applied. That is, it is all the same rolled material.
Please note that the design of the heater has special transparent strips along the edges - these are places for fastening. Therefore, it is quite difficult to make a mistake and install fasteners in the wrong place.
And one more thing - the installation must be carried out only in a heated room.
It is very important to read the instructions several times in detail before installation. A small deviation from it can lead to big problems during operation.
Often, home craftsmen simply spoil the film and carbon threads, which requires the replacement of the entire strip. And these are unnecessary expenses.
Installation of a warm ceiling
Electrical work is the most difficult and responsible stage. For their implementation, a PV-3 wire with one core is required. A trunk line is constructed from it, which must be hidden in the canal. The highway must be isolated and camouflaged from the eyes.
If the area of the film infrared heater is large enough, then a magnetic contactor will have to be installed in the electrical circuit. All main channels must be carried out to the switchboard.
The next step is to install the thermostat. His place is 1.4 m above the floor. When the whole circuit is ready, the system is tested, small problems are fixed, and it is ready for operation.