A little about the principles of work
 To begin to consider the main faults, let's remember exactly how the tank works.
So, water through the water pipe begins to flow into the tank, filling it. At the same time, the float rises. Drainage is carried out thanks to the well-coordinated work of the float, seals and levers. Having accumulated in the tank to the desired volume, the water closes the shut-off valve, thereby stopping the water supply to the tank. We press the drain lever, or button, pull the chain, as a result of which the drain valve opens, and a large volume of water rushes down, thereby draining. But here's the problem - the toilet bowl is leaking, and you don't know what the problem is. Don't worry, almost every problem can be fixed in a few minutes. Moreover, sometimes a leak will not require the replacement of any elements. This means you don't have to spend money.
In preparation for the repair, you will need to arm yourself with gloves, wire cutters, pliers, as well as new items to replace the old ones. After all, when the toilet tank is leaking, you should not hesitate. After all, you yourself know what water bills are coming in now.
Why a leaking tank is a bad partner
If you at your leisure come up to your toilet and study its structure, you will notice that the cistern is the most complex in structure. Inside it there is even a mechanism of a certain action, all parts of which interact regularly and allow significant amounts of water to be drained, taking all the waste into the sewer. It is expected that it will not always work so clearly, and someday its plastic elements will crack, gaskets will leak, bolts will rust or simply unwind. All this will cause a leak, the consequence of which will be, at best, an increased figure in the water consumption column on the utility bill. At worst, a sudden flood awaits you, the consequences of which will also affect your neighbors.
To avoid all this, you should sometimes look closely at the space near the toilet and behind it, so you can notice a puddle under the tank or in the hose area in time, and also do not disregard the phenomenon of water leaking from the flush hole. If even minor flaws are found, care should be taken to eliminate them, it will cost faster and cheaper than later to carry out major repairs. Tank designs come in several types, but they differ slightly, so when looking for problems and solutions, you can navigate by lifting the lid. So, in total, there are three areas for inspection and repair - the tank itself, its mechanism and hoses. Let's deal with each option separately.
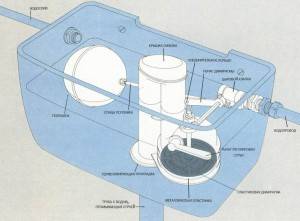
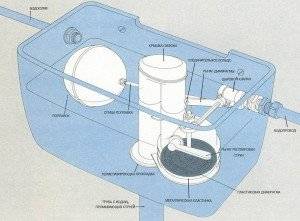
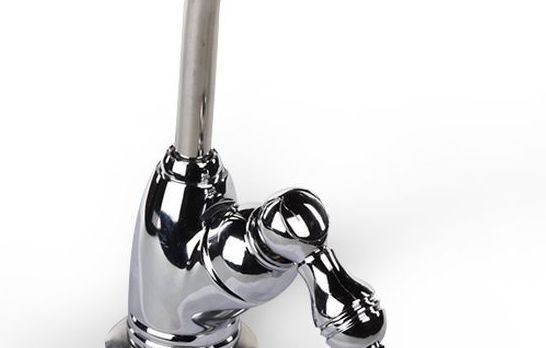
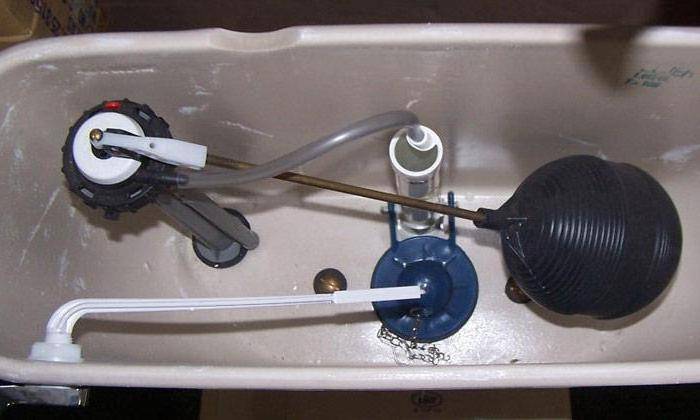
How is the drain tank
How can you fix a leaking toilet tank if you don't know how it works? Naturally, no way. Therefore, before reviewing repair methods, it is necessary to study the device of the restored object.
It usually consists of the following elements:
- The overflow is a hollow column that connects to the toilet. This column protects the container from overflow. If the water level reaches the edge of the column, the liquid then begins to overflow into the toilet bowl.
- A faucet or float valve is a fitting connected to the water supply, where a shut-off assembly is fixed, which is controlled by a float. When there is no water in the tank, the float, opening the fitting, pulls down the shut-off mechanism of the tap. If the container is filled, the float, closing the fitting, rises.
- The drain lever is the mechanism that controls the drain valve. This unit consists of a rocker with a stand, the edge of which is connected to the hatch (valve) by a metal or polymer chain. By pressing on the free edge of the rocker, you will pull the chain up, slightly opening the valve hatch. By lowering the rocker (lever), you loosen the chain, lowering the hatch into place.
- Flush valve - a hinged hatch that closes the drain hole and leads to the toilet. When the hatch is closed, water fills the tank from the float valve. When the hatch is open, all the water that is located flows into the toilet through the drain hole.
Of all the nodes described above, only three elements can provoke a leak in the toilet - a valve, an overflow, a faucet. Therefore, leak repair involves the restoration of the work of these particular elements.
Elimination of a leak at the junction of a cast-iron pipe
If a sewer pipe made of cast iron leaks at the joint, you can fix the problem with:
- cement mortar;
- lead cones.
In both cases, the order of work is the same and consists of the following steps:
- all unusable residues (remains of cement screed or lead) are removed from the joint;
- the junction of cast-iron pipes is cleaned of dirt and corrosive deposits, and then dried with rags;
- if lead is used to seal the joint, then new cones are placed in the hole formed and then smeared with cement mortar prepared in a ratio of 1:10 (10 parts of cement are needed for one part of water);
- procedure for sealing a lead-free joint:
- a cement mortar and a conventional medical bandage are prepared;
- the bandage is dipped in the solution and placed in the hole between the pipes;
- connection is completed.
Sealing the joint of a cast-iron pipe
It takes approximately one day for the cement to dry completely.
Common breakdowns and how to fix them
Water constantly flows into the tank
This can be caused by a misalignment of the float arm, damage or malfunction of the float valve.
How to fix. You need to install the float arm horizontally, replace the valve or the float itself. If you don't have a replacement float, simply seal the float with hot plastic. An even simpler option is to wrap the float in a plastic bag.
It is important to completely isolate it from contact with water.
Toilet water won't stop flowing
It is obvious that the siphon membrane is damaged.
How to fix. It is only necessary to replace the membrane, since it will not work to fix the old one. To do this, put a crossbar (some kind of stick) instead of the tank lid, attach a float lever to it, unscrew the nut that fixes the tank and the flush pipe. Now you can disconnect your siphon from the lever, into which you should place a new membrane, which is the same size as the old one. After completing the repair, collect all the fittings back.
Your toilet bowl is leaking due to the loss of elasticity of the pear
Alas, rubber pears are very short-lived. Over time, they lose elasticity, become rigid, completely inelastic. Because of this, it cannot tightly contact the seat, thereby starting to flow.
How to fix. There is only one way out in such a situation - to change the old pear, installing a new one in its place.
https://youtube.com/watch?v=TRspHFKXgCI
The pear retains water because of the saddle
The pear sits on the saddle, thereby retaining water, but over time, the appearance of corrosion and plaque on the saddle leads to a deterioration in the fit. As a result, the flow begins.
How to fix. To do this, you will need to disconnect the pear, thoroughly clean the saddle from dirt. Sandpaper helps a lot here. In addition, it is recommended to properly tighten all nuts and fasteners.
Loose nut on overflow base
It's not a rare cause of leaks.
How to fix. Everything is quite logical here. Once the nut is loose, it is necessary to remove the elements that prevent access to it and tighten it.
Cuff leakage
Cuff problems are not uncommon, as it connects the toilet to the cistern.
How to fix. Try to put the cuff in its original place. If not, tighten with a clamp. Please note that over time, the cuff may prohibit, thus even the clamp will no longer help. There is only one way out - to purchase a new one, put it in place of the old one.
Actively flows between the drain tank and the toilet
The reason may be gaskets that are made of rubber.Long-term operation leads to their rotting, displacement. Sometimes they were simply not inserted correctly.
How to fix. Everything is quite simple - the gasket between the tank and the toilet is removed, a new, high-quality one is taken, and placed in the right place.
Cracks in the cistern
The problem is quite serious, but it can be dealt with without resorting to replacing the entire toilet.
How to fix. Remove the drain tank, dry thoroughly, then coat the detected cracks with a high-quality sealant. This is a pretty efficient way. Of course, the sealant will not last forever, but it will last until you raise money to purchase a new toilet.
https://youtube.com/watch?v=AdxwO9YWGnw
Shut-off valve does not hold water
It is easy to detect a broken valve - press it lightly with your hand, as a result of which the water will stop flowing. If the water continues to flow, then the valve is broken.
How to fix. Such a breakdown does not pose serious problems, since you only have to change the gasket in the faulty valve.
Button height adjuster moved
As a result of the displacement, the valve is located higher than the drain hole. This leads to the appearance of a gap through which a leak is observed.
How to fix. Adjust the height of the button.
Water flows at the junction of the tank and the water hose
How to fix. Try tightening the nut. Perhaps she cracked. In this case, simply replace the damaged nut, use sealants.
Reinforcement mount broken
How to fix. If you find that the fasteners are completely broken, then the fittings will have to be changed completely. Remove it, take it with you to the plumbing store, where they will pick up similar consumables for you.
As you can see, the tank can indeed leak for many reasons. However, most of them are easily fixed. Try to deal only with high-quality plumbing that can last for many years without giving you trouble.
Of course, no plumbing is eternal, so problems will arise sooner or later. Well, you will already know how to deal with them.
Tampons - how they are
On the topic of identifying the potential danger of tampons, many studies have been carried out, both paid for by manufacturing companies and independent ones, including those commissioned by regulatory and certifying authorities in Russia and abroad. After all, it has been proven that when used correctly:
- tampons do not interfere with the outflow of menstrual blood and cannot create a cork effect - when the tampon is completely saturated, the blood seeps through it and flows out freely;
- tampons do not cause changes in the microflora of the vagina and an increase in the number of bacteria - changes in the composition of the vaginal environment are associated with the menstruation itself; the composition of the tampon (cotton, viscose, or a combination thereof) also does not affect the microflora of the vagina;
- tampons do not lead to rupture of the hymen - the hole for the outflow of blood in it is large enough (about 1.5 cm) and the hymen itself is quite elastic during menstruation. Absorbing moisture, the tampon increases mainly in length and, when removed, also cannot lead to loss of virginity;
- tampons do not cause “bad” sexual habits (with the correct insertion, the tampon is located in the vaginal area poor in receptors and is not felt at all, i.e. it cannot physically become a provocateur of erotic sensations);
- tampons do not cause endometriosis, cervical erosion, infertility and do not affect the duration of the cycle and the menstruation itself - firstly, the vagina is highly adaptable and is able to "get along" even with the penis, the size of which is at least several times larger than the size of a tampon; secondly, the tampon does not come into direct contact with the uterus, which also adapts perfectly and is quite well protected; thirdly, the duration of the cycle depends on the physiology of the woman, her hormonal background, body structure, state of health, weight and other internal factors, and not at all on whether a small cotton ball is inserted into the vagina for several hours;
- tampons themselves cannot get into the uterus, get stuck in the body forever or “get lost” - with a slight muscular effort (preferably while sitting on the toilet), a tampon inserted too deeply (if it is saturated with secretions) will come out by itself, even if its lace is torn off, which , by the way, is also almost impossible, because the lace can withstand loads up to 5 kg and is firmly sewn into the tampon along the entire length.
Hygiene alternatives An alternative to tampons and pads is the menstrual cup. The manufacturers of this remedy claim that it was invented and patented in 1932, and the modern version, very similar to the vaginal contraceptive diaphragm, in 1970. The cup is made of silicone - free of latex, fragrances, dyes - and, when inserted into the vagina, collects the flowing menstrual blood. The advantages of cups are reusability - washed and put on again, hygiene - bacteria do not multiply on silicone, reliability - the edges of the cup seem to stick to the walls of the vagina, creating a vacuum and providing complete protection. Major manufacturers of hygiene products do not manufacture cups, but these devices have been tested by specialized agencies such as the US FDA. In Russia, cups are not certified and are not sold. Domestic gynecologists prefer not to speak out on the topic of their beneficial properties and potential dangers, pointing out only that if this remedy were really so convenient, reliable and superior to all others, it would have conquered the world market long ago. The price of one cup is about $40.
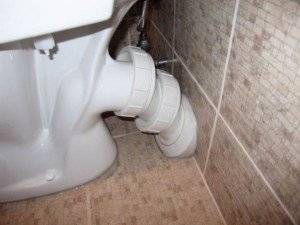
Leaks between cistern and toilet
It happens that the tank does not overflow, and water flows from the tank into the toilet. Usually the problem is with the connecting bolt. It is made of steel, so over time it rusts and leaks. You need to carefully inspect this area and, if necessary, replace the fasteners.
 Work is performed as follows:
- Turn off the water and empty the tank.
- Disconnect the water pipe.
- Unscrew the bolts. If they are rusted, they are cut down with a hacksaw.
- Move the tank aside and pull out the shelf from the cuff.
- Drain the remaining water and remove all rust.
- Replace gaskets and bolts.
- Reinstall all items.
Features of repairing toilet bowls with different flushing systems
In modern tanks, water can go down in different ways. Therefore, the repair of such toilets is slightly different. They understand quite simply. But the push-button system requires careful handling. Before disassembling the one-button toilet, it is necessary to turn off the water, drain its remnants, unscrew the plastic nut and remove the lid. The next steps depend on the type of failure. If the toilet bowl with the button is leaking, you need to draw some water into it, inspect the float and, if necessary, correct it.
One-button design problems:
- Water is not washed off when the button is pressed. This may be due to a broken mechanism between it and the drain valve. This part is usually replaced with copper wire or a new valve is installed.
- Flow through overflow. The height of the float and overflow is adjustable. To do this, the nut is unscrewed and the level of the part changes.
- Constant flow into the bowl. Most likely the gasket has failed. Therefore, the entire valve will have to be replaced. It is necessary to unscrew the nut at the bottom of the tank, remove it and install a new element.
Repairing a two-button toilet is practically no different from its one-button counterpart. If the water does not drain, then the integrity of the elements is checked (they are straightened or replaced with copper wire). Leaks can be caused by an incorrect position of the drain valve. In this case, the height of the float or overflow changes.

Tanks with a bottom water connection are equipped with a special membrane valve, problems with which may arise due to low water pressure. If it is constantly supplied at low pressure, it will be necessary to replace the diaphragm with a rod element. Quite often, the toilet bowl flows in the area of the inlet valve. He is constantly in the water. Therefore, insufficient tightness leads to breakdowns. Repair of a system with a lower connection is carried out in stages. First, turn off the water, remove the lid.Then they fix the problem according to the above algorithms.
Horrible
The main source of horror stories about tampons are forums on women's sites, where the most incredible versions exist:
- the introduction of a tampon is fraught with fainting, and for virgins - the loss of innocence;
- the use of tampons by teenagers leads to masturbation and promiscuity;
- men do not respect girls who use tampons;
- A tampon is an excellent contraceptive.
Advanced opponents of tampons prefer to use medical arguments, arguing that:
- cervical erosion, endometriosis, and pelvic inflammatory disease are direct consequences of tampon use;
- tampons are impregnated with adsorbing chemicals that corrode the mucous membrane;
- the tampon clogs the vagina like a cork, preventing the outflow of blood;
- The use of tampons increases the risk of STDs and may cause problems conceiving.
It is noteworthy that most of these statements do not stand up to scrutiny and are ridiculous because of their obvious illiteracy. But what are tampons, really? What is the danger of their use, and how to insure against it?
How to fix a water leak
It's a situation
when the leak does not occur from the spout (spout) of the instrument tap, but where it
comes out of the base. The result of such leakage is the constant presence
water next to it and change the color of the faucet surface.
Cause of the leak
Such a defect occurs over time due to wear of the sealing rings installed there.
 The outlet of the spout from the faucet body is a possible place to solve the problem of how to fix a water leak
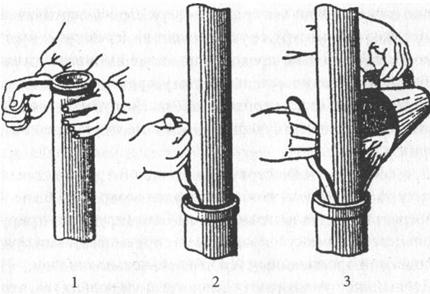
To understand the reason, we will briefly talk about the structure of this junction.
Device
mounts
The spout is attached primitively. On the outer surface of the tube in the lower part there are two grooves around the perimeter. Here are the rubber rings.
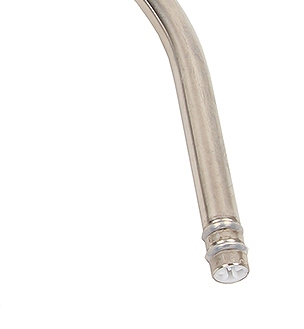 The grooves on the tube body are where the O-rings fit.
They are the ones who decide everything. The vertical position of the spout and the sealing of the space between the surface of the tube and the inner part of the body are ensured.
How to fix a water leak - sequence of operations
Before the beginning
work, you need to shut off the repaired crane. If it is in the closed position
passes water through itself, this is enough. If there is a leak, you need
additional measures. Close another faucet located first downstream from
being repaired.
Dismantling the spout
crane
holding
the base of the tap with one hand, with the other we take the lower part of the tube near
grounds
Gently begins to pull the tube up, trying to remove it.
Depending on the
the degree of wear of the sealing rings, the applied force may be different.
To facilitate the process, at the same time turn the spout at a small angle with
side to side. After several such rotations, the tube comes out of the base.
Understanding how to fix a water leak,
check the condition of the sealing rings. Typically, in this situation,
worn out. This can be seen from their appearance. Rings can just be broken
cracked or with reduced thickness. They need to be replaced.
In progress
pulling the tube, the rings may break and remain in the faucet body
On this
attention should be paid. If necessary, they must be removed from there so as not to
interfere in the future
What rings
acquire
Now appeared
the ability to determine the size of the rings and buy the same ones. You need to understand how
inner and outer ring size matters. If the dimensions are not
match, the rings will not fit. They either won't fit on the tube, or they won't.
allow you to insert it into the base.
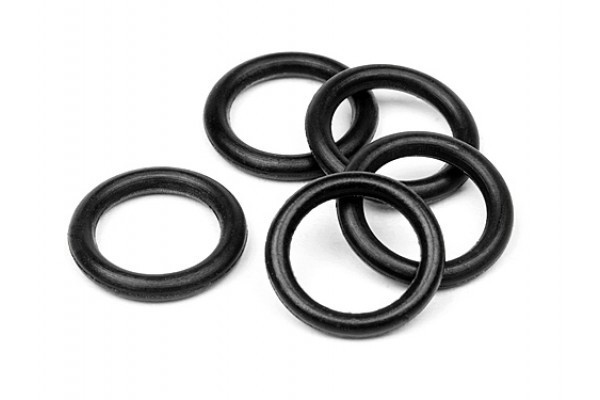 O-rings to solve the issue - how to fix a water leak
Therefore, deciding
How to fix a leak
water, it is better to have removed copies with you when buying. showing them
(or their remains) to the seller, you can’t go wrong with the size.
How is it performed
ring replacement
Cleaning up places
installation of sealing parts. We put rings on the tube. Here for sure
you will run into a small problem. They are slightly smaller in diameter than the outer
spout size. This is done specifically for the tightness of their fit.
Don't try with
effort to dress them. In most cases, this results in product failure.
Use a simple trick. Remove the plastic from the tube cavity with tweezers
limiter. This is done simply.
Next, select
any object of conical section, slightly larger than the spout of the crane.
It can be anything, up to a ballpoint pen. Put rings on her
pre-lubricated with silicone grease.
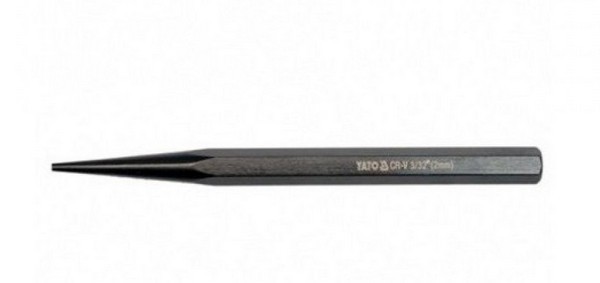 A taper punch can be used to make it easier to fit rings onto a faucet spout
Insert Taper
object with a narrow edge into the spout of the tap until it stops. Start moving rings on it
surface until they each fall into their own groove. The lubricant gives the rubber
elasticity and improves the rolling process. Their safety is guaranteed.
How to fix a water leak - faucet assembly
Now paste
in place of the previously removed plastic limiter. We begin to insert the tube into
crane base. I do it gradually, without applying a big vertical
efforts. For the best effect, rotate it a small angle to the left and right.
We do it until
until we see that both o-rings have entered the housing. They have to
be in their original places. If during this operation the ring is slightly
squeezed out, it's not scary. Take a screwdriver and its flat surface
press it until it hits the base of the faucet.
Then continue
spout installation. After completing the rotation, make a few oblique movements,
so that he finally sits down in his place. Open the faucet and check that the leak
the water has disappeared. Now for you the question of how to fix a water leak in such a situation is not
insoluble.
Attention! This article is protected by digital copyright law.
era (DMCA). Any copying without my permission is prohibited.
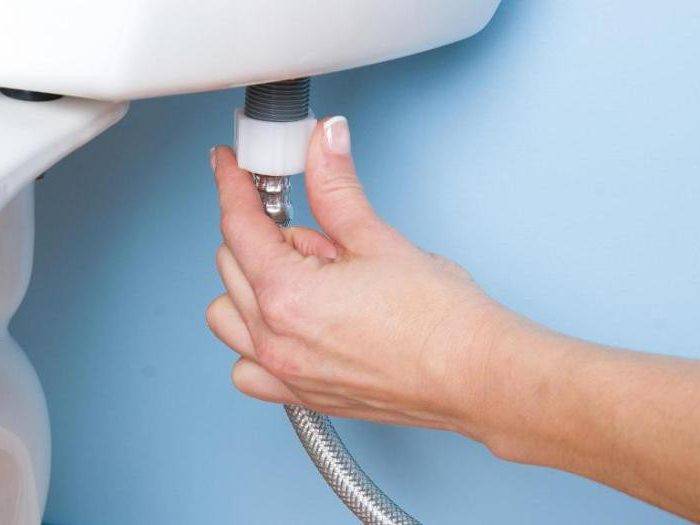
When the tank hoses can leak
Let's start with the hose, which is still outside and connects the water pipe to the tank. As a rule, it breaks in the middle and rarely leaks, unless, of course, it is mechanically damaged on purpose. But the junctions, especially from the side of the float structure, are problem areas. It is quite simple to determine the breakdown here, a trickle, which, depending on the severity of the damage to the fastener, will either drip steadily or gush, persistently hints at you about this. In this case, it is necessary to establish whether such a phenomenon is caused simply by loosely tightened nuts, or whether a crack on the valve is to blame, which crowns the end of the hose at the junction with the float mechanism.
Check the fasteners and gaskets under them, if everything is tightened well, and the rubber part has retained sufficient thickness and has no signs of wear or breakthrough, then you should look at the valve
By the way, if you nevertheless found a lack of connection in this particular place, then it is enough to change the gasket and tighten the nuts, just pay attention to what material they are made of. Plastic products should not be twisted with a metal tool, you can not only damage it from the outside, but also strip the thread, or even split it completely without calculating the effort
In this case, it is enough to screw it by hand, you can use a rubberized glove so that your hands do not slip.
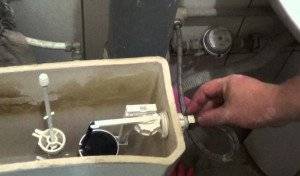
If the problem is in the valve, and it can only be a crack, then it does not make sense to eliminate it, such a part just needs to be replaced. But do not rush to run to the store, remove the old valve and take it with you.Due to differences in cistern designs, you may end up purchasing a product that won't fit your toilet even though it looks very similar to what you're looking for. To remove it, turn off the water, remove the tank cap and remove the valve from the junction of the hose with the float mechanism. How to install a new one, you already guessed it.
https://youtube.com/watch?v=99EHsZwczR4
The toilet cistern is leaking, we are looking for a problem from the outside
Now let's pay attention to the other outer side of the tank, with which it adjoins the toilet itself. To do this, the latter has a kind of shelf on which the gasket is laid, and the drain tank is placed on top
So this intermediate strip, which saves sanitary ware from mutual abrasion and seals the joint at the same time, can be rubber, plastic and metal. Leakage in this place is characterized by the formation of a puddle after each flush. The gap through which water escapes may appear due to wear or even due to a banal shift of the cuff.
The first step is to check the clamps that secure the material between the tank and the toilet shelf. The gasket will become unusable even faster if you tighten these fasteners, so do not get carried away, and if during the check you determined that they are tightened enough, you do not need to make a “control” turn with a key. If this does not help, but the cuff still looks good outwardly and promises to serve at least 5 years, you can treat its edges with a sealant and press it.
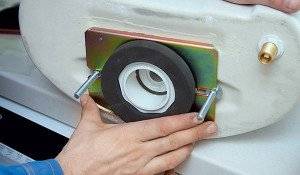
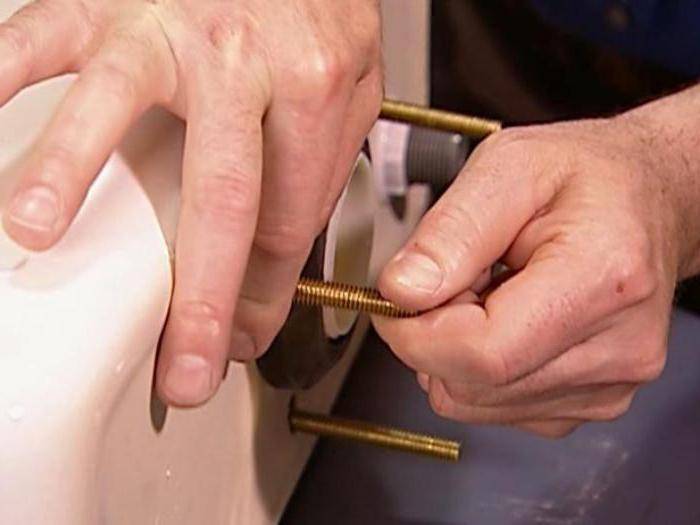
Sometimes the gasket is not to blame for the leak, but the problem lies in the bolts that directly fasten the tank and the toilet during installation, these are two large fasteners with nuts. That's just their weakening, rust or abrasion of the gasket under the nuts and causes constant seepage of water, even if no one uses the toilet. To get to this part, you need to turn off the water and drain the entire contents of the tank. Unscrew the nuts that are under the toilet, check the metal for rust, and the rubber bands for signs of wear. If such defects are found, purchase a new set of fasteners and install it.
How to fix an air leak on the ISS
The first signs of an air leak were discovered around 2:00 am, and since at that time most of the ISS crew was asleep, and the leak itself was insignificant, it was decided to start fixing it in the morning. Initially, it was necessary to find the exact location of the leak, so the ISS team began to block and inspect the compartments of the ship one by one. It is noteworthy that when the place of the crack was nevertheless found, judging by the negotiations of the astronauts with the Earth, they decided to temporarily plug it with their fingers. This was done by the German astronaut Alexander Gerst, who is now at risk of becoming a hero of social networks, because no one has ever had a chance to plug holes with a finger in spaceships from earthlings. Later, the ISS crew took out a repair kit specially prepared for such cases, in which there are patches designed to eliminate cracks in the skin. At the same time, a small dispute broke out between the Russian and American parts of the ISS crew regarding the appropriateness of their use, and as follows from official reports, NASA astronaut and crew commander Andrew Feistel decided to suspend repair work. According to some reports, Russian cosmonauts carried out part of the work on sealing the station without the participation of their American colleagues.
During the break, a meeting of specialists from Roscosmos and NASA was held, as a result of which it was decided to eliminate the crack using a special sealant. The basis of such a sealant is an ordinary epoxy resin, which is easily diluted and allows you to effectively cope with cracks of various sizes, as it turned out now not only on Earth. Two such microcracks were found in the hull of the Soyuz spacecraft, and after they were filled with sealant, the previously proposed patches were additionally applied on top.As a result, as of August 31, NASA sources report that the air leak on the ISS has been completely eliminated.
All's well that ends well, so we can only be glad that the leak was successfully fixed and the ISS crew is no longer in danger. But in any case, this incident will not remain without consequences, and the Internet will now even more actively discuss the upcoming replacement of the Soyuz spacecraft (which have been delivering astronauts into orbit for more than 50 years) with those that are now being developed by SpaceX, Boeing and other companies. Let's hope that in the near future Roskosmos will be able to give a worthy answer to Elon Musk, since I would really not like the domestic cosmonautics to die completely.
Components of a toilet bowl
All tanks consist of almost the same elements. They differ only in the mechanism of descent of water. It can be represented by one or two buttons, as well as a lever. Important details of the tank are:
- Fill valve. It keeps the water at a certain level.
- Float. Closes the supply valve (when there is enough water).
- Drain mechanism. It is equipped with an overflow system.
- Overflow. It regulates the maximum water level.
The descent is made either manually or by buttons. At the same time, the drain valve opens, allowing water to pass through, and the float drops. The two-button tank has a more complex structure. However, it saves water due to the possibility of partial draining. Also today there are toilet bowls with a lower connection of communications. They are used when lateral connection is not possible.
The first tampons how it all began
The first tampons similar to modern ones were created in the early 30s of the last century by the American doctor Earl Haas, presumably at the suggestion of his wife. The invention was cotton wool wrapped in gauze. The product was called Tampax (from the English tampon and pack - tampon and packaging). The first tampons had neither an applicator nor a string. The fate of the novelty at first turned out to be sad: the American monster Johnson & Johnson was not interested in it, and the patent was sold to the side. Industrial production of tampons began in 1936. The Tampax brand is now owned by Procter & Gamble, and Johnson & Johnson have been promoting the alternative o.b. brand of tampons since the 1950s.
Over the past 70 years, tampons have been improved, although fundamentally not changed. Appeared: a cord sewn into the tampon, an applicator, a silky top layer that facilitates insertion. Tampons began to be divided into degrees of absorbency - mini, normal, super, super-plus. The essence remains the same: a tampon is made from a mixture of specially processed and bleached natural fibers - cotton and viscose, pressed into a cylinder of a certain density. There are no chemical ingredients in tampons. In contrast, by the way, from pads filled with substances that convert liquid into gel and can cause irritation of the mucous membrane upon direct contact.
Why did the depressurization of the ISS happen?
Near-Earth space is a gigantic dumping ground containing millions of debris from rockets, satellites, boosters and other debris. Since it rotates in a vacuum in orbit, all debris particles are accelerated to tremendous speed, and even small parts the size of a bolt can have a large kinetic energy, turning into a kind of bullet or projectile. All this space debris poses a great danger to operating vehicles, in particular, to the ISS, so the station is forced to regularly perform special maneuvers to fly around such debris.
But small parts still regularly damage the skin of the ISS, and many emergency situations in the history of the station were provoked precisely by a collision with space debris. Recall at least the recent damage to the solar panels of the station or a hole in the radiator, which were just caused by space debris. Perhaps this happened this time as well, although Roscosmos still calls a micrometeorite hit as a preliminary reason for the depressurization of the ISS.Perhaps this should cause the public to believe that the Soyuz is not afraid of a collision with small space debris, and the ship could not resist only when it was faced with the whims of the Universe itself.