The choice of insulation
There are four most popular materials used in the insulation of balcony doors:
- expanded polystyrene;
- isolon;
- foam rubber;
- mineral wool.
Previously, plastic wool was used, but in the presence of more modern materials, it should not be chosen. Such cotton wool easily absorbs moisture, due to which small insects, mold, and fungus start up in it. In addition, the layers themselves can shift over time, which greatly spoils the appearance.

Izolon - thin, but at the same time, effective insulation
The most popular insulation in our time is foam rubber. Its main advantages are low cost and ease of use. Glue or nails are sufficient to secure the layer. However, when insulating the doors with foam rubber, a repetition will be required after a couple of years, because the material will begin to crumble due to moisture.
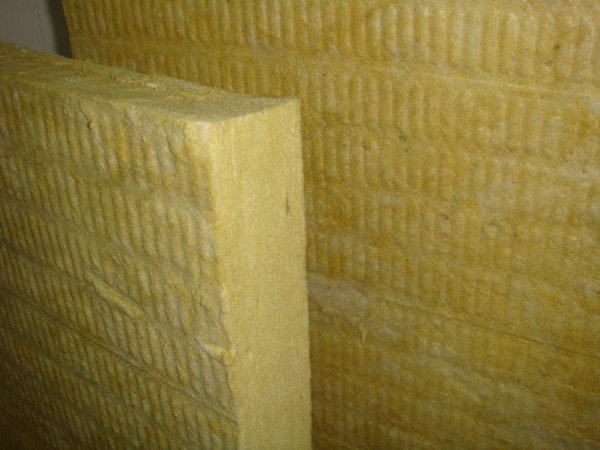
Mineral wool is more often used in wall insulation. It has good insulating characteristics, while such wool does not burn, and it is convenient to mount the layers. But this is a difficult material to work with, it crumbles and dust irritates the mucous membranes and skin. Because of this, special protection measures are applied during installation, the room is carefully cleaned after it, and the mineral wool itself should eventually be securely hidden under the finish. In addition, like plastic wool, mineral wool is deformed by moisture.
Isolon has a high thermal insulation effect, while the layer thickness required is small, and does not have pronounced functional shortcomings. The main disadvantage of this modern material is the high price.
Insulation and upholstery of the door video
We bring to your attention a video on the topic of our article about the insulation of wooden and plastic balcony doors. In the video, using the example of the front door, you will see how easy it is to insulate the door from the outside with your own hands using foam rubber.
To prevent cold air from entering the room from the loggia or balcony, it is necessary to exclude all cracks, including those in the doors. Modern metal-plastic models provide tightness at a sufficient level, but with prolonged use, their canvas ceases to fit snugly against the box, which leads to heat loss.
In the event that the door leading to the balcony is wooden, then over time the wood dries out and the cold enters the gaps formed almost unhindered. In such situations, it is necessary to insulate the balcony door, often with your own hands.
Wooden door insulation
The insulation of the wooden door leaf is carried out in several stages:
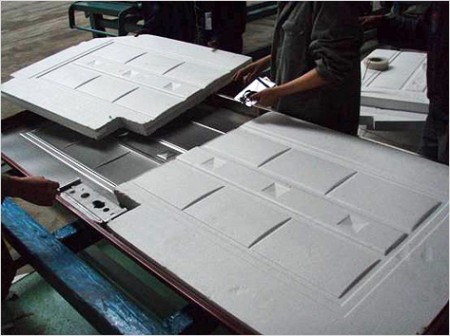
- Production of blanks for special rollers from foam rubber and leatherette or other durable material. The number of rollers depends on where the door opens: inside - 4 pieces, outside - 3. They will need to be nailed on all sides of the door, except for the connecting one, so one is made equal to the height, and two to the width. Thus, the problem of loose fit is eliminated. Leatherette strips should be 14 cm wide, and foam rubber strips - 3 cm.
- Making a canvas that will upholster the door. A piece of leatherette is cut to the size of the canvas with an allowance of 10-15 cm, and foam rubber or other insulation is exactly the size of the door.
- Door leaf preparation. It consists in removing the door and all accessories from it.
- Finished rollers are nailed next to the corresponding ends. To do this, a strip of material is laid face down next to the door leaf, insulation is placed on top, the material is wrapped and nailed.
- The prepared insulation sheet is nailed with small nails (or fastened with glue), and leatherette is laid on top and fastened with furniture nails. Additionally, nails are hammered into the canvas according to the invented pattern, this is necessary for better fastening of all layers.
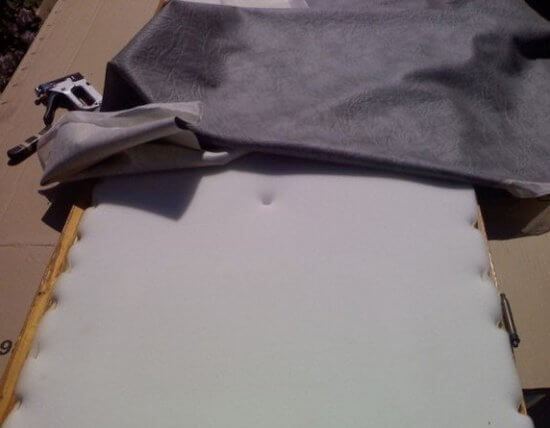
A wooden door can be insulated with foam rubber
If there are windows in the door, it is better to replace the glass with double-glazed windows. Such services are provided by many companies involved in the installation of plastic windows. Be sure to process all through cracks. This can be done with putty, sealant, adhesive foam sealant. If the gaps are small and in the door leaf itself, a simple painting may be sufficient.
You will learn about the repair of plastic balcony doors from this article.
How to insulate a wooden balcony door
Required materials and tools:
- leatherette strip;
- insulation;
- small nails;
- furniture nails with a wooden hat;
- hammer;
- carpentry knife.
Sequence of work
1 For convenient work, it is advisable to remove the door leaf from the hinges and lay it horizontally on any supports, for example, on a pair of stools.
2 Remove handles and other protruding parts.
3 We prepare the basis for the preparation of rollers, with which we will cover the gaps around the door leaf. If it opens outwards in relation to the room, then it is necessary to cut out three strips of leatherette about 14 cm wide. One is equal to the height of the door. The other two are in its width. If a wooden door is opened inward, then you need to prepare one more strip, because it will be necessary to block all possible cracks along the perimeter of the door leaf with rollers. To fill them, it is required to cut strips of 4 cm wide from foam rubber.
4 Lay the cut out leatherette strips face down on the doors. Using ordinary nails, we fix the strips of decorative material to its edge along the entire perimeter.
5 We lay the cut foam rubber on the strip located at the bottom of the door. Wrapping it with leatherette, we nail the resulting roller to the door leaf.
6 Now you need to cut out the leatherette panel for the decorative upholstery of the door. Its dimensions should correspond to the full area of the door leaf with a small allowance (about 10 cm) for each edge of the door. In order to save money, you can use old raincoats and leather jackets to decorate the door. To do this, parts of various shapes and sizes are cut out of them, for example, in the form of a rhombus or a rectangle. You can diversify their appearance with the help of leather paint.
7 We lay out foam rubber on the surface of the door leaf. So that it does not slide down after a while, it is advisable to put it on glue.
8 From above, we cover the insulation with an upholstery cloth, which we nail to the wooden base of the door using carpentry studs with a decorative cap. We start fixing the panel along the height of the door, then below and above. When fixing the facing panel, it is necessary to ensure that it does not warp and wrinkles do not form on it.
9 Now it remains to make and fix the remaining rollers
When installing them, you need to pay attention to the fact that the leatherette strip with the top layer overlaps the edge of the bottom one.
10 To create a more exclusive look of the door, it is desirable to break through some premeditated pattern using furniture nails with a decorative cap.
Insulation of metal doors
Metal doors can create so-called cold bridges. Through them, frost sneaks into the room, even if the door leaf is completely sealed and closes tightly. Therefore, the purpose of insulating a metal door is the following:
- increasing the sealing of the door;
- insulation of all metal parts of the product, except for the door handle;
- the placement of insulating material inside the door leaf.
The design of almost all metal doors is hollow. Thanks to this, it is very easy to place mineral wool or foam board inside as an insulating material.
So, the process of warming metal doors will look like this:
- Carefully remove the locks and door handles;
- Disassemble the box (in case the fastening is carried out by welding seams, they must be removed with an angle grinder);
- Lay the insulation inside the empty box;
- Assemble the door structure to its original position.
If you chose polystyrene to insulate the door, then there will be gaps between the sheet and the fixing and fixing metal profiles. In order to ensure complete thermal insulation, fill these spaces with mounting foam.
If you have a non-separable door, it can be insulated with an internal additional lining. To do this, remove the door from the hinges, remove the handles, locks and other adjusting fittings. Screw a beam with a diameter of 10 X 10 mm along the perimeter of the door leaf from the inside, stretch the upholstery for the entrance doors and fix it on the beam with special nails.
Causes of cold getting into a room with a balcony block
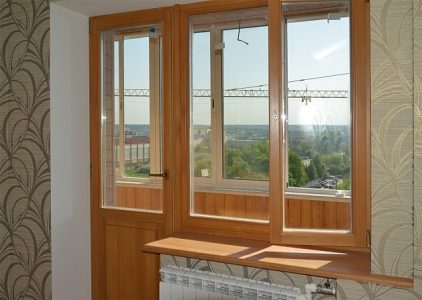
A standard door to a balcony or loggia can be of two types: with continuous glazing and partial, when the canvas below is closed with a plastic shield. Partially glazed construction is warmer - plastic has a much lower thermal conductivity than window glass.
Before you insulate the balcony door, you should establish the places through which the cold penetrates into the room. The main ways in which cold air enters the apartment are the places of imperfections or individual elements of the balcony block:
- Glazing for a balcony door. The lowest protection from the cold have ordinary sheet glass and single-chamber large-area double-glazed windows (fully glazed balcony door).
- The gap between the canvas and the box. If the insulation loses its performance, gaps may appear between the canvas and the box, and cold air will enter the room.
- Loose fit of the door leaf to the frame. If the door has moved away from the box, then a gap may appear in the hinge area that the seal cannot close - cold air will flow through it.
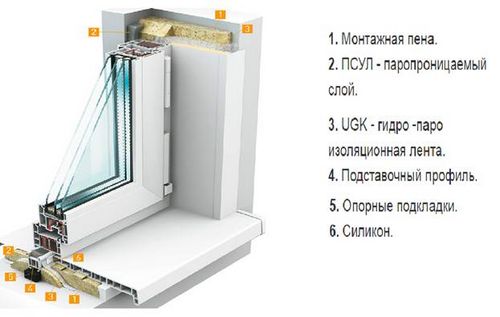
Rice. 2 Scheme of installation and thermal insulation of the balcony block
Poor assembly of the balcony block. Usually a block for a balcony is assembled by connecting two parts - a window and a door frame. To do this, a sealing strip is laid between the walls to be joined or mounting foam is applied to the surface, then both parts are connected with metal screws. If the sealant was not applied or the self-tapping screws parted during installation, then cold air will penetrate into the gap between the frame of the door leaf and the window block.
Poor installation of a balcony block in the opening. Sometimes it happens that for the sake of economy or lack of mounting foam, the balcony block is fixed in the opening not with a continuous strip of foam, but in separate sections. Also, the mounting foam can decompose and crumble over time, and if the unit was installed without a vapor barrier tape, cold will enter the room through the empty space. In this case, outside air enters the room through the gap between the outer slope and the frame of the balcony block.
Another reason for the penetration of cold air into the room is a violation of technology. The plastic frame has poor adhesion with cement mortars used for external slopes. With proper installation around the perimeter of the balcony block box, a pre-compressed self-expanding sealing tape (PSUL) is glued on the outside, which seals the gap between the outer slope and the frame of the balcony block. In its absence, due to poor adhesion of the plastic to the cement surface, cold air will flow through the gap between the slope and the block box.
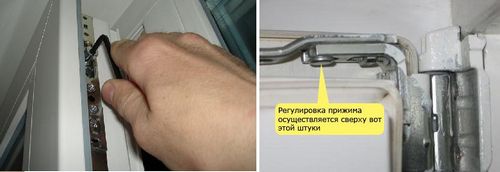
Rice.3 Adjusting the web pressure and its distance from the box
How to insulate front doors
By and large, the plastic construction is a frame made of a supporting metal-plastic profile with plastic or glass inserts. The first, as a rule, are arranged according to the principle of a sandwich and include a heat-insulating layer. Glass windows are designed as hermetic windows: a mixture of inert gases is pumped between the glasses, which act as a heater. That is, the design, in principle, ensures the preservation of heat in the room.
It is important to achieve not only the thermal insulation of the door block itself, but also the tightness of the structure, that is, the tight fit. The entrance insulated plastic door is upholstered around the perimeter with a sealing rubber tape
For greater density, the tape is recommended to be lubricated with a special lubricant.
It is possible and necessary to insulate plastic doors for the winter in a private house based on the cause of heat loss.
Oddly enough, glass inserts are the first factor here. Despite the tightness of this design, the glass itself does not contribute to the preservation of heat. The heat insulator is air, an inert gas, or even a vacuum between the panes. The main reason for the dysfunction of such a gasket is a violation of tightness, for example, if the sealant is damaged. In this case, it is necessary to replace the glass inserts on the inlet sash with airtight ones.
To make the street sash of such a plan insulated, you can put energy-saving glass. They retain heat better under any circumstances, but this solution is more expensive.
The second reason is poor sealing of gaps during installation. Such gaps must not only be closed, but thermally insulated and carefully sealed. To fix the situation with your own hands, you need to remove the mounting foam by clearing the gap. Then you need to fill the gap with foam as tightly as possible, and then foam or plaster.
In their home, such repairs are carried out independently, since there is nothing complicated in this work. In an office building, repairs, of course, are carried out by specialists.
The third reason, which is equally common both in a private house and in an office building, is the sagging of the street sash. Over time, any product wears out and this fully applies to the plastic door. In this case, insulating for the winter means adjusting the sash.
To begin with, they determine exactly how the door sagged, since in appearance it can be completely invisible. Consider the seal: in places of displacement, it will be more crushed or even damaged. Correlating the location of the damage with the displacement of the entrance leaf, they begin to adjust in order to make the door insulated.
So, if the upper corner of the sash has shifted and no longer fits snugly, he tightens the screw on the upper hinge with a hex wrench, after removing the plug from it. If the lower corner sags, do the same with the lower loop with your own hands.
In those cases when the street sash falls down under its own weight, vertical adjustment is carried out: for this, the screws on the lower hinges are rotated clockwise.
How to insulate the roof of a house from the inside
Agree, it is not always advisable to insulate the ceiling from the inside - if you have low ceilings, then there is little point in this. Moreover, it is not very convenient to do such thermal insulation - it is much easier to putty the ceiling and give it an attractive look by painting. It is more logical to carry out thermal insulation of the upper part of the house from the side of the attic - this is where you can simultaneously insulate both the ceiling and the roof, thus creating a reliable barrier to heat leaving the house.
- The ceiling is the floor in the attic. The option is the same as with the floor in the house. Often, a wooden floor is laid in the attic, and all that is required of you to insulate it is to fill the underground with insulation.Here you can already use polystyrene, but it’s still better not to do this, since apart from being cheap, this material has no advantages.
- Roof. As a standard, it is insulated at the installation stage, but if for some reason this was not done, it does not matter. The question of how to insulate a brick house from the inside, or rather its roof, is never too late to decide. Here, the same technologies are used as for wall insulation - you can still add a couple of other options to them. The so-called sprayed mineral wool does an excellent job of insulating the roof - with the help of a compressor and a special device, the fibers of this material are literally driven into the under-roof space. They fill everything, even the most inaccessible places - such insulation needs a vapor barrier.
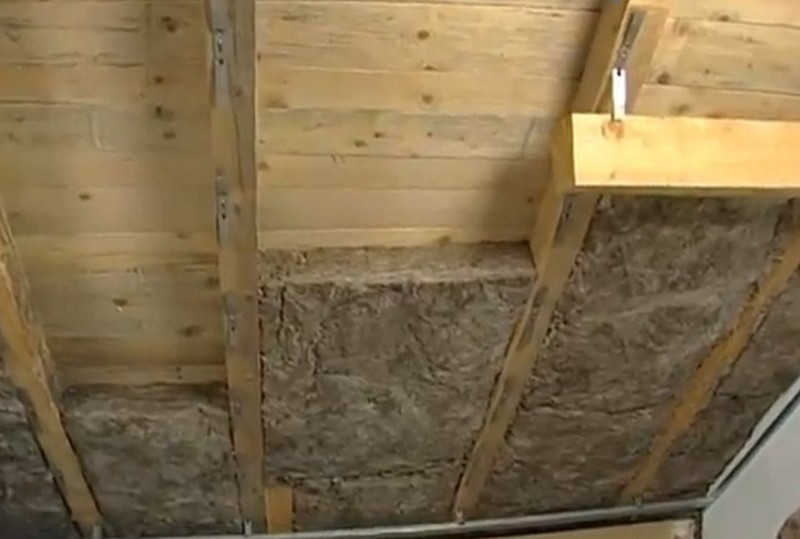
How to insulate the roof of the house from the inside photo
Subsequently, the insulation is hemmed with panels. In principle, you can leave everything as it is, but if you plan to use the attic as a living space, then you cannot do without exterior wall decoration.
In conclusion, the topic of how to insulate the house from the inside in the country, I will add only one thing - no matter how hard you try, no matter how you insulate the walls, ceiling, floor and roof, the effect will still not be complete if you do not take care of such structural elements as window and doorways. They occupy a considerable area of \u200b\u200bthe walls, and significant heat losses occur through them - this issue must be dealt with before the walls are insulated. It should also be remembered about such structural elements that also need to be thermally insulated, like slopes.
As you know, in the insulation of housing there is nothing superfluous. Floor, ceiling, walls, windows - everything must be carefully insulated if you want your apartment to keep its comfort.
And the insulation of the door in this situation is no less important concern.
Drafts coming from the front door can bring a lot of trouble. Any design: wooden, metal, in itself does not save from the cold. Therefore, additional insulation of the door is required.
How to do all the work correctly so that the door faithfully serves to preserve warmth and comfort in your home for many years, we will tell in this article.
Insulation of the front door with foam rubber
If you want the insulation of the front door to not take you a lot of time and money, use the most familiar, common material - foam rubber. It is not suitable for sealing on the sides of the door frame, but it can be sewn onto a wooden door on both sides.
To work, you will need the following:
- Foam rubber;
- Upholstery fabric;
- Glue;
- Threshold board;
- Rails made of wood and plastic.
- First of all, cut off the outdated coating from the door and get rid of the remnants of insulating materials. Wash the surface thoroughly.
- After the door dries, stick on its inside and outside with layers of foam rubber, cut strictly to size. If necessary, pieces of foam rubber can be glued together in 2-3 layers (for example, if the material is thin, or you think that additional insulation will not damage).
- Now stretch the upholstery over the foam rubber, fixing it to the door with nails or a construction stapler. You can decorate the surface with a pattern of wallpaper nails. Do not overdo it: the nails are pressed and pressed into the insulation, because of this, its heat-saving properties are lost.
- It's time for the door frame. Fill the rails around the perimeter of the door, which were previously covered with foam rubber and fabric. At the same time, control the position of the closed door: it should fit snugly, without gaps.
- The last stage of warming is the installation of the threshold. The board for the threshold should completely close the gap under the door, but not prevent the door leaf from opening and closing.
Instead of foam rubber, you can use materials such as foam (2 to 5 cm thick) or polyethylene foam.In terms of their heat capacity, they are superior to any traditionally used materials.
Such a simple and economical way will help you quickly insulate the door, additionally protecting you from extraneous noise.
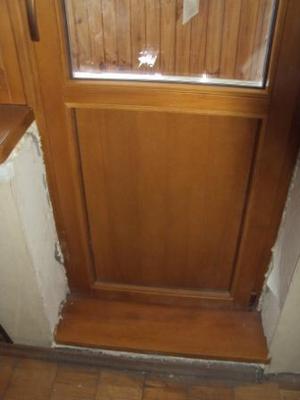
Insulation of a wooden balcony door
One of the most common reasons for the incoming cold from the street is the presence of a wooden door to the balcony. Moreover, if you take the wooden sheet itself, then it perfectly holds air. But, unfortunately, such doors are usually made of thin panels. And in some cases, they generally install a canvas that can be used exclusively for interior doors.
Therefore, when deciding to insulate a room, it is necessary to take into account what kind of door defects the work will be aimed at eliminating. It could be:
- Joint sealing.
- Warming of the canvas itself.
- Slope sealing.
Depending on this, both the methods used and the materials that will be needed may differ.
What you need, materials and tools
When deciding how to insulate balcony doors with your own hands, you should take into account that maximum efficiency can only be achieved through complex work. So, we need: Warming a wooden balcony door will help keep the heat in the room
 Warming a wooden balcony door will help keep the heat in the room
- Insulation. This material, depending on the destination, will be different. So, to insulate the door leaf, you will need foam rubber, for slopes you will need polystyrene foam or mineral wool, and for joints, a regular sealant (available at any hardware store).
- Wood putty.
- Upholstery for the door (can be made of leatherette).
- Consumables.
- Construction mixes.
Also, the following construction equipment will come in handy:
- Level.
- Spatulas.
- A set of standard construction tools.
- Wallpaper knife.
- Roulette.
The set of tools and materials may vary depending on what kind of insulation work is planned.
How to do the work, a brief step-by-step description
How to insulate a wooden balcony door with your own hands? To do this, it is important to understand that the essence of this procedure basically boils down to eliminating the unhindered penetration of cold air into the room. To do this, do the following:
- We remove the old paint, conduct a cursory inspection of the door leaf and determine for what reason the cold air enters the room. Cracks between the panels are carefully sealed with putty.
- Take off the door panel. We unscrew handles, hinges and other accessories from it. Lay the door leaf on a flat surface. We take the upholstery and attach it to the canvas on one side. The size of the upholstery should be slightly larger than the size of the insulated part of the door. To do this, we use special nails with a wide curly hat (usually come with upholstery).
- Further on the area of the door we fix the foam rubber.
- We begin to stretch the upholstery on the door. To do this, we fix it from the fixed edge. The distance between the nails should be about 15-20 cm. We tuck the edges of the upholstery so that the place of the fabric cut is inside. Insulation of a balcony door in this way can be carried out both on one external side and on both.
- Then we take the foam rubber and cut off three strips from it, with a width equal to the thickness of the door. Two strips along the length should be equal to the width of the door, the third - to its height. We are preparing three strips of leatherette of the same length as the foam rubber, and a width of about 10-15 centimeters. We nail leatherette on the edges of the door on three sides.
- For additional sealing, we roll up the rollers, wrapping the cut-out foam rubber with strips of dermantin, and attach them to the door with furniture nails so that they bridge the gaps between the box and the canvas on three sides.
- After completing these works, the canvas can be installed back.If necessary, apply sealing tape to the joints. But in most cases, it will not be needed if the upholstery work is done correctly.
- If the door has glass, then window putty can be useful to seal the cracks, and energy-saving window film can be glued onto the glass itself.
What are plastic platbands on windows and how do they affect insulation? You will find the answer on our website.
We insulate the door leaf around the perimeter
No matter how well the door leaf is insulated, no matter what materials you use for this, the work will not be enough if the door does not fit snugly against the frame.
Gaps between the jamb and the door occur in the event of installation errors, or after some time due to the shrinkage of the building or the distortion of the structure. The sealant will help to solve this problem quickly and easily. It is enough to fit it tightly to the door frame, and the structure will become completely airtight, all the cracks will be filled, and, accordingly, the heat loss of your house or apartment will be significantly reduced.
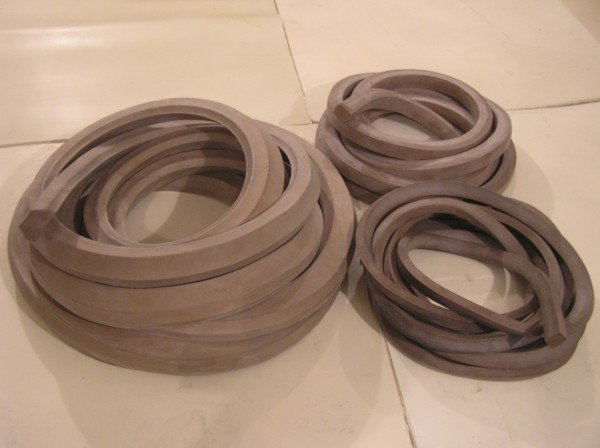
- The modern building materials market offers a large selection of sealants. The best option is rubber tubular seals with a self-adhesive base.
- In order to select the desired width of the seal, be guided by the width of the canvas. Its thickness during compression should be equal to the width of the gap between the frame and the door.
- The thickness of the seal also requires special attention. Too thin material is not effective enough, and too thick material will cause inconvenience when closing doors.
Work on insulation using a sealant is quite simple: remove the protective film and glue the sealant around the entire perimeter of the canvas. If your caulk does not have an adhesive backing, use liquid nails or silicone.
Do not forget to check the integrity and condition of the door frame. If it is rotten, replace it before you start insulating the door. If you mounted the box on mounting foam, check if it crumbled.
As you can see, self-insulation of almost any door can be done even by a beginner. Share with us and other readers your practical experience in such work, ask any questions, and we will be happy to discuss all comments and suggestions. Warmth and comfort to your home!
Owners of private houses, as a rule, are well aware of the need for thorough insulation of all structures, since heating costs directly depend on this. The front door deserves special attention, since in a private house it does not go out into a relatively warm entrance, but directly onto the street. Consider how to insulate a door in a private house, video instructions will help us in performing these works.
One of the conditions for the comfort of a residential building is the quality of the insulation. In order not to spend extra money on heating, it is worth insulating all structures through which heat can escape. These are the windows, the roof, the outer walls and, of course, the front door.
In a private house, the front door can be made of different materials, but in the vast majority of cases, the owners install metal or wooden models.
What to do if additional insulation is not enough
A well-insulated exterior door should not allow a single gram of cold air to enter the room, nor should it let heat out. But you may encounter the fact that you seem to have done all the work correctly, but the expected result was not achieved. What could be the reason?
First of all, pay attention to whether the door leaf was correctly positioned during installation, and whether there were any gaps in the mounting foam. Both causes equally lead to a violation of the sealing of the entire structure.
To determine the quality of foaming and find the gap, use the traditional folk method: light a candle and slowly move along the joints of the door frame.Even the smallest draft will begin to shake the flame, thereby pointing you to the remaining gap.
In order to properly adjust the door leaf, you will need sets of hexagons and socket wrenches.
Adjustment is carried out due to canopies, which are usually 4-5 pieces on the door. Each canopy is fixed with a fixing nut and four bolts. Adjustment work is carried out as follows:
- lower the adjusting nut on all hinges;
- lower the bolts with a hexagon and level the canvas;
- tighten the bolts and fix their position with a nut.
Unlike work on the insulation and installation of doors, adjustment can be done in all weather conditions, but severe cold can cause additional adjustment of awnings in summer.
Canvas insulation
It is worth starting work with the insulation of the door leaf, regardless of whether it is wooden or metal.
Warming of a cloth from a tree
It is advisable to choose a model from the array for the entrance group, since hollow models are less durable. To qualitatively insulate the canvas of a wooden door, you will need:
- Insulation. This can be foam rubber, synthetic winterizer, polystyrene, etc.
- Glue.
- Carnations are furniture.
- Finishing material. As a finish, you can choose leatherette, leather, laminated MDF lining, etc.
- Rails are wooden.
 Work order:
- the canvas is removed from the hinges, all fittings (handles, lining, etc.) are dismantled;
- clean the canvas from dirt, allow it to dry;
- lay the door on a flat horizontal surface - a workbench, a table, two stools installed at a distance from each other;
- a blank is cut out of the insulating material according to the size of the canvas;
- apply universal glue to the canvas and lay a layer of insulation on it.
After installing the insulation on a wooden door, you need to complete its decorative finish. When using soft insulation, various upholstery fabrics, artificial or natural leather are used. If foam plastic is used, you can upholster the door with clapboard or install a ready-made decorative MDF overlay, the material is attached to a wooden frame around the perimeter of the door.
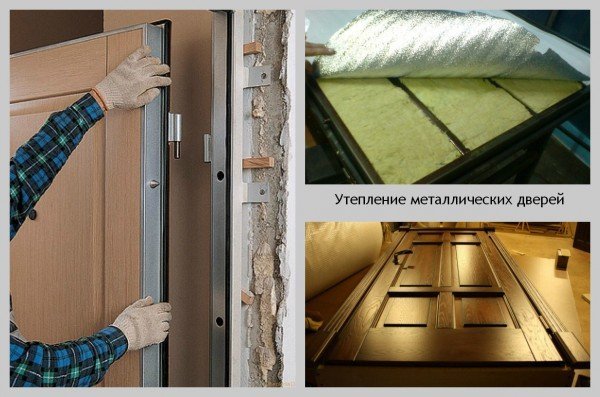
Insulation of a metal sheet
When buying a metal front door, you should choose a model with ready-made thermal insulation. But even in this case, additional insulation will not be superfluous, especially if an inexpensive Chinese-made model is purchased.
 The leaf of a metal door can be collapsible. In this case, it will be easy to perform work on insulation:
- the sheet is removed from the inside of the door;
- the selected insulation is placed in the cavity;
- all gaps are filled with foam;
the removable sheet is put in place.
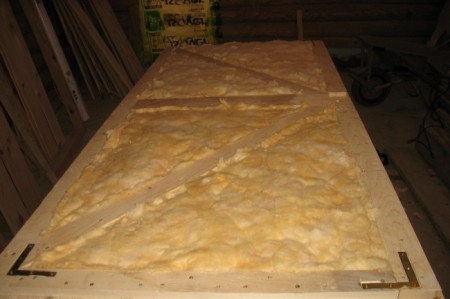
In the event that the canvas is non-separable, then before laying the insulation, it will be necessary to assemble the frame. To do this, you can use a metal profile or wooden slats. The frame is fixed at the locations of the stiffeners with self-tapping screws.
 Then it will be possible to lay a heater in the formed cavities, and then install the finish. Most often, MDF lining is used as a finish.
Ways to insulate front doors
If the manufacturer has provided for thermal insulation of the door, then you will not have to make much effort, because the insulation layer is already inside the structure. But most often we purchase a regular, standard door leaf, since it is much cheaper.
How tightly you need to insulate your door depends on what material it is made of. As a rule, doors are:
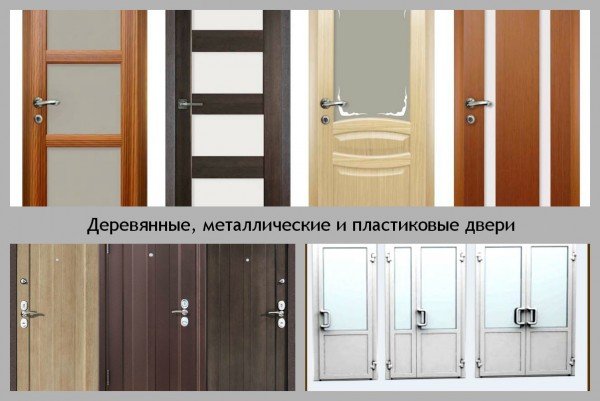
To isolate plastic blocks, tools and special skills are needed, in this case it would be more correct to turn to the services of professionals. But a wooden or metal door is easy to finish and insulate with your own hands.
The best option for insulation may be the installation of a second door.Thus, a small vestibule with an air cushion is created between the entrance and internal doors, which will slow down the escape of heat from the room, and at the same time will not let the cold outside.
In addition, any gaps around the door frame should be sealed - it is through them that the cold penetrates into the room. To do this, it is enough to use mounting foam.
You will also need to use a sealant. The more loads it can withstand, the better, because the doors often have to be opened and closed. This material is presented on the construction market in a wide range. Sellers will help you choose the most suitable for your door.
If your apartment is located on the first floor, it is better to immediately take care that the entrance door of the entrance closes automatically. To do this, you can install a closer. An agreement with the neighbors about the intercom will solve this issue thoroughly.
How to insulate a wooden door to a balcony
The most popular reason for the cold to enter is a wooden door to the balcony. Although the wood sheet itself holds air remarkably well, thin panels are usually used to make doors. Before proceeding directly to the insulation, it is necessary to figure out what specific defects have to be dealt with. Most often, joints and webs are sealed, and slopes are also compacted. Experts advise to insulate a wooden door comprehensively in order to achieve the maximum level of efficiency.
The first thing you need is to select the necessary set of materials and tools. Very often, plastic wool is used as sealants, but it has a significant drawback - it absorbs moisture and promotes the development of microorganisms. In addition, the operational process leads to displacement of the wool under the skin, and this reduces efficiency and worsens the appearance. Another material that will allow you to insulate the balcony door is foam rubber. The installation procedure consists in fixing the foam rubber to the surface with glue or nails. Unfortunately, the presented material is short-lived, after 2-3 years it will begin to crumble due to high humidity. Isolon is considered a more modern insulation, it allows you to achieve noticeable thermal insulation characteristics.
Insulation of the door to the balcony, in addition to seals, requires wood putty, building mixtures, a level, spatulas, a set of conventional construction tools, a tape measure and a sharp knife.
Stages of work that will relieve the penetration of cold into the room:
- Removing old paint, conducting a thorough inspection of the canvas, determining the reasons for the ingress of cold air. Filling the holes between the panels with putty.
- Parsing the canvas, unscrewing the handles, hinges and other fittings. Then you should put the door on the floor or table, take the upholstery and attach it to either side of the canvas. The upholstery should be larger than the insulated part of the door. Here you can not do without special nails, which have wide hats. Then you need to fix the foam rubber around the entire perimeter of the door.
- Stretching the upholstery onto the fabric. To do this, perform fixation from the fixed edge. The gap between the nails should be - 16-20 cm. The edges of the upholstery are tucked so that the fabric can be cut off inside. It is allowed to seal the balcony door from the inside or from both sides.
Then you need to take the foam rubber and cut off 3 strips, their width should correspond to the thickness of the door. 2 strips in length match the width of the canvas, and 3 - with its height. After that, you need to prepare 3 strips of leatherette with a length corresponding to the height of the canvas, and a width of 12-15 cm. The material must be nailed from three sides along the door edges.
In addition, it is possible to create a protective seal using rolled up rollers.The cut out piece of foam rubber is wrapped with leatherette strips, fastened with nails to the furniture so that they can close the gaps between the canvas and the box from three sides. At the end of all manipulations, the canvas is returned to its original position, and if there is a desire, then a sealing tape is glued to the joints.