To create comfortable conditions in rooms where the floor is made of tiles, a system of warm floors is often used. Traditionally, in tandem with tiles, water or electric heating is used, carried out using a cable or heating mats. However, many are interested in whether it is possible to put an infrared warm floor under the tiles. Let's find out how to do this and how useful this combination is.

Types of warm floors
Modern floor heating technologies imply two types of heating source: water and electricity.
Water heated floors
They are tubes with a coolant placed under a thin screed and floor covering. In fact, these are modified heating radiators. Therefore, this type of heating can be used both in combination with the traditional scheme, supplementing it, and independently, replacing it completely. The disadvantages of water heated floors include:
- A significant amount of screed, which not only reduces the height of the room, but also significantly increases the load on the floors.
- The possibility of leakage in the event of a violation of the tightness of the system, which is fraught with flooding of neighbors from below. And this can lead to very significant financial losses.
- In the event of a power outage or hot water in cold weather, the pipes of such a warm floor can defrost. As a result - a large-scale repair of the system.
- Installation of water heated floors quite complicated, so not everyone can do it with their own hands.

Electric underfloor heating
For the most part, they are divided into three groups:
- Cable. The heating element is made in the form of a cable fixed on a special tape or metal mesh. When laying, they require careful calculation of the required cable length, as well as a fairly solid screed with a height of 30 to 50 mm.
- Heating mats. Most often this is the same cable, but fixed on a fiberglass mesh. Such warm floors are much easier to install and require a smaller screed - up to 30 mm. The tile adhesive can also play the role of a screed: in this case, heating mats are placed in its thickness.
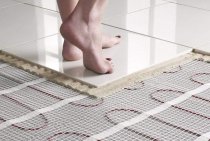
- Film: heating elements are placed in a fairly thin film. According to the material of the heating elements, carbon and bimetallic (copper and aluminum) types of film underfloor heating are distinguished. Unlike the first two groups of electric heating systems, heat transfer is carried out mainly due to infrared radiation, which is why they are often called infrared warm floors.

Is it possible to combine film underfloor heating and ceramic tiles?
Before laying the infrared floor under the tiles, you should decide: is it worth it? The opinions of professionals on this matter are ambiguous.
Installation of an infrared warm floor is primarily advisable for such types of flooring as laminate, linoleum, carpet. But with tiles, the situation is more complicated.
Opponents of laying film underfloor heating under tiles put forward the following arguments:
- The heating film itself has extremely low adhesion, which leads to the risk of detachment of the screed or glue from it. This, in turn, can lead to such undesirable consequences as the appearance of voids and cracks in the screed.
- Greater energy consumption than with heating cable or mats.
- It is impossible to exclude the gradual erosion of the film by adhesives having an alkaline base.
- Laying underfloor heating film under the tile is quite difficult. You need to be extremely careful and careful. At the same time, to achieve the desired effect, it is quite easy to lay cable or frosted electric heating elements.

But there are a number of advantages of this material, given which, you can decide to lay the infrared floor heating under the tiles:
- Minimum screed thickness. If it is not possible to painlessly reduce the height of the room, then film floors are the only option to ensure tile heating. You will need a screed no more than 8-10 mm.
- Such warm floors are more reliable. If the elements are connected in parallel, then the failure of one of them will not lead to the failure of the entire system. Damage to the cable or the conductive circuit of the mat will inevitably render the heating system inoperable.
- Infrared heating elements are not sources of electromagnetic radiation.
Taking into account the features of the system, we can conclude that it is advisable to use infrared film floors under tiles in small rooms with low ceilings.

Preparatory work
Like any other underfloor heating systems, infrared film requires careful preparation of the base:
- It is necessary to eliminate protrusions and cover up the cracksavailable in the base surface.
- For laying electrical wiring and installing a thermostat, grooves are made in the wall. As a rule, the thermostat is placed near the switch. This is more comfortable. If necessary, a groove in the floor is hollowed out to accommodate the temperature sensor.
- A layer of thermal insulation is laid, professionals recommend a perforated isolon with a heat-reflecting foil surface. Thermal insulation is laid with the foil side up so that the heat goes back into the room, and is attached to the base with metallized tape.

Do not install insulation around the perimeter of the room at a distance of 20 cm from the wall. This is done in order to provide a more secure fastening to the extreme tiles.
- It is necessary to paste over the floor around the perimeter with a special electrically conductive adhesive tape. It will serve as a kind of grounding. The heating elements must be powered through a separate line with the obligatory use of an RCD.
- A laying plan is being drawn up. Heating is not done under heavy stationary furniture; it is necessary to retreat at least 40 cm from the walls.
In order to save money, you can put infrared film under the tiles only in those places where you will walk. Get a kind of warm track.

Heating foil laying
The set of infrared heat-insulated floors necessarily includes detailed installation instructions. Many manufacturers even supply the product with CDs, where everything is described step by step. But it would be useful to know some of the nuances of laying the film:
- The film is not laid in a continuous array, but at intervals of 50–100 mm.
- Stripes should not be allowed to overlap.
- To fix the elements on the thermal insulation, adhesive tape is used.
- It is necessary to cut the film along special cut lines.
- It is better to place the elements with contacts in the direction where the thermostat is located. This will shorten the length of the wires.

- So that the wires do not protrude above the surface of the film in thermal insulation, special grooves can be made under them.
- According to the instructions, a clamp is attached to the copper strip for supplying electricity. After connecting the wires, all contacts must be reliably protected with bituminous insulation or heat-shrinkable insulating tubes.
- The temperature sensor is installed. It can be located in a special strobe, in a corrugated tube. Its end is securely closed with a cap. With another placement option, it is attached under the film, for which a hole of the appropriate shape is cut out in the insulation.
- Connected to a thermostat. If you are not confident in your abilities, then it is better to use the services of a professional electrician.
- After checking the performance of the system, a layer of ordinary polyethylene film is spread, which is fixed with adhesive tape.

Laying tiles
Tiling can be done in two ways:
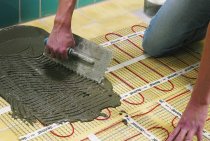
- A masking net is placed on top of the film, on which a 8–10 mm thick screed is poured.
- Gypsum boards can replace the screed. Their fixation must be carried out very carefully in those places where the gaps between the individual stripes of the infrared film are located.
Myself tiling process will differ from the standard only in that the adhesive and grout must be designed for underfloor heating.