Leveling the floors in the room is a prerequisite for quality repairs. For this, a floor screed is used. Leveling the floor is necessary in order to properly lay the tiles, parquet board, laminate, carpet, linoleum or some other cover. Floor leveling can be carried out only when the old wall and ceiling coverings are removed, the old ones are dismantled and new ones are erected. drywall partitionselectrical work carried out.

Recommendations for the selection and performance of work
The most popular are the following types of screed:
- concrete;
- self-leveling floor (self-levelling);
- cement with the addition of sand;
- dry.
When performing all types of screed, except for dry, it takes about a month for them to dry completely. You can walk on a fresh screed only after a few days, but lay flooring possible after a month. A thin layer self-leveling floor, which is used to even out small differences in floor height, dries much faster, usually in 2 weeks. However, before performing the screed, it is imperative to ensure waterproofing.
During the subsequent laying of parquet, it is necessary to cover the screed with plywood that is resistant to moisture. When using another type of final coating, a polyethylene foam substrate is laid on the dried screed.
The most effective result can be obtained by combining several methods in leveling the floor. The combined method of leveling the floor is recommended when it is impossible to level unevenness with one self-leveling mixture. For this, a rough screed is made of concrete or cement, with the addition of quartz sand. The rough screed layer will be thick enough to hide all the irregularities. After this layer has dried, it must be impregnated with a special waterproofing compound (bituminous or rubber mastic). Next, a thin layer of self-levelling compound is applied.

When organizing a heated floor in a room, electrical cables are laid on a rough layer, then covered with a waterproofing material, and only then the finishing leveling layer is poured.

If tiles are planned for the floor in the room (bathroom, bathroom), the floor screed is completed. If laying is planned on the floor carpet or parquet, plywood sheets should be laid on top of the screed. Leave small gaps between sheets.

Dry floor screed, which recently began to be used in construction, is a laying of special plates that are highly durable and similar in composition to drywall. A special waterproofing composition has already been applied to the plates. For laying slabs, you need to level the floor surface with a special backfill. Laying of plates must be done so that all joints are tightly closed. This type of do-it-yourself floor leveling is very convenient, because the plates are light in weight, and you can start laying the floor immediately, rather than waiting for several weeks for the screed to dry.

Often a screed made of concrete or cement is not possible, because the load on the floors in the premises is very large. The only way out is to use a dry screed.
Work instructions
How to make a concrete floor screed with your own hands?
Reinforcement
It is carried out in the case when you need to make a layer of 40-60 mm. If the layer is thicker, you can do without it. Most suitable for reinforcement mesh (the cell should be 100x100 or 150x150, and the wire diameter should be 3 mm).

If the floor where the screed is made is constantly subjected to high loads, then the fill layer can be made larger (up to 150 mm, and the wire diameter is 4-5 mm).

The grid should not be at the very bottom of the layer. Otherwise, it will not perform its function, and the fill will crack. Ideally, if the mesh lies in the middle of the layer, for which you need to use substrates. Also, the surface must be cleaned of debris and treated with waterproofing agents, provided with heat and sound insulation.
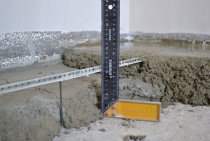
Displaying beacons
lighthouses are called metal guide profiles. The quality of the floor depends on the correctness of their exposure. Using the level, you need to determine the highest point on the surface. It is at this point that there should be a layer of cement with the smallest thickness (minimum 40 mm). After that, a clear line is made along all the walls of the room, which is measured by the level.
Beacons are set parallel to each other, the distance between them should be approximately 1.5 meters. It is important to achieve parallelism in the horizontal plane for all installed beacons. This is easy to do if you screw the screws into the floor. The horizontal plane can be achieved by adjusting the height of the screws. Checking is carried out using a flat rail and level. After that, small slides of gypsum are superimposed on the screws so that they are slightly higher than their hats. Beacons lie on these slides, after which they must be gently pressed with a rule until they touch the screw head. When the installation is completed, you need to once again check all sags and bulges, correct them, if any.

Cement mortar should not be used, it is not suitable for beacons, since its adhesion to galvanized screws is poor.
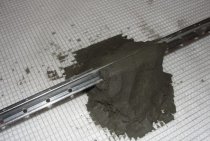
Filling the screed
Do-it-yourself floor screed enters the final stage - pouring. After correctly setting all the beacons, it is allowed to start pouring. To do this, you need to prepare a solution: cement and sifted sand in a ratio of 1: 3. It is necessary to achieve a homogeneous solution, the consistency of which should be like thick kefir. A large bucket and a mixer are ideal for mixing, this will allow you to get a homogeneous solution.
Fill with such a solution should be one interval of the surface after another, removing the excess with wave-like movements to the side. It is most convenient to do the filling with two people. In this case, one person will mix the solution, and the second will fill.

Drying
Need to give the coupler a good dry upbecause the remaining moisture will ruin the top coat. To ensure gradual setting of the solution during the setting time, it is necessary to periodically moisten the surface with water. If the surface dries out, the screed, even in the place where the reinforcement was made, may begin to crack.