The durability and appearance of laminate flooring largely depend on the proper preparation of the subfloor. Many apartment owners who have chosen laminate as their floor covering, complain about creak while walking, loose locks and cracking panels. The main reason for these troubles is laying laminate on an uneven floor. In order for laminate floors to serve for a long time and not cause problems during operation, before installing them, you need to take care of a perfectly even base. Learn how to level the floor under the laminate in different ways.

In order to find out whether it is necessary to level the floor under the laminate, it is necessary to examine the surface for irregularities. To do this, you can use the rule, a meter-long ruler or a flat piece of plywood. When applying the tool to the floor on each surface area, pay attention to the gaps between the base and the rule. Laying laminate on an uneven floor is unacceptable, so if the height of the gaps exceeds 2 mm, then the base must be leveled. The same applies to height differences, which are determined by the building level. Leveling will be required if the difference between the highest and lowest point of the floor exceeds 2–3 mm.

Leveling a concrete base in different ways
There are many ways to prepare a concrete floor for laminate flooring. The choice of method depends on the scale of the irregularities, the time allotted for repairs and on your financial capabilities.
Standard cement-sand screed
This method is designed to prepare a subfloor that has significant flaws. Price screeds depends on its thickness, but in general the price of the material is relatively low. The main disadvantage of this method is the long waiting time. screed dries 28 days.

Leveling the floor under the laminate with your own hands with a cement-sand mortar is as follows:
- Before starting work, the concrete floor is primed in 2 layers.
- With the help of the level, the highest point of the base is determined, the boundary of the future fill is outlined on the walls and the cord is pulled. On the basis at a distance of 1.5–2 m, they are installed and aligned lighthouses.
- The solution is prepared from cement and sand in a ratio of 1:3.
- The screed is poured between two beacons to the required level and leveled using the rule.
- Within 48 hours, the screed is wetted with water, and then rubbed with a grater with a solution of sand and cement in a ratio of 1:1. At this stage, the beacons are removed, and the voids are filled with fresh mortar.
- For 14 days, the floor is covered with a plastic film, after its removal, the screed is wetted with water for 5 days, then left to dry completely.
- After the installation of hydro and sound insulation, the preparation of the floor for the laminate is considered completed.
self-leveling floor
Usage self leveling compounds it is advisable if the defects and differences in the surface are small. Mixtures for leveling floors are quite expensive, but they allow you to get a perfectly flat surface and do not require a lot of time. The sequence of actions for the installation of a self-leveling floor will be as follows:
- A line of the future floor is marked on the wall, located at the level of the highest point of the surface.
- On a primed base, waterproofing is arranged.
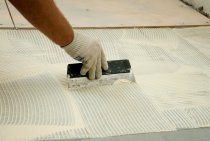
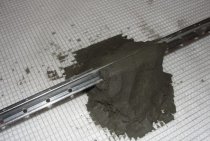
- A self-levelling mixture prepared in accordance with the instructions is poured in a small thickness, leveled with a spatula and a spiked roller.
- After 3 days, on the surface prepared as a base for the laminate, it remains only to put a waterproofing film and a cork substrate.

Dry screed
Performing a dry screed using bulk and sheet materials allows you to prepare the floor for laminate as quickly as possible. The main disadvantage dry screed is the fear of moisture.

The essence of the technology is as follows:
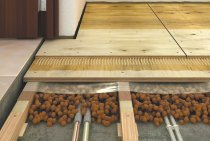
- A layer is laid on concrete slabs waterproofing, on which a profile is set in terms of level, fixed on a gypsum mortar and acting as beacons.
- Expanded clay is poured into the space between the profile, on top of which a layer of vapor barrier is placed.
- The top layer of the structure is made of plywood with a thickness of 10 to 12 mm or gypsum fiber sheets, which are glued and additionally fastened with self-tapping screws.

Leveling with plywood or chipboard
How to lay a laminate on an uneven floor with significant height differences? For this, plywood is used, laid on wooden logs.

Alignment using plywood is as follows:
- Before starting work, the level of the future floor is marked on the walls, hydro and sound insulation, and a shock-absorbing lining are laid.
- At a distance of 3 cm from the walls and about 50 cm from each other, logs are laid and fixed with dowels - wooden bars with a section of 50 × 60 or 40 × 80. Height differences are compensated for by wooden spacers fixed on the base.
- Sheets of plywood or chipboard are fixed on top of the screws so that their connections are located in the middle of the supporting module.

How to level wooden floors
Preparing a wooden floor for laminate flooring can involve a variety of steps, depending on how uneven the floor is.
First you need to assess the condition of the current flooring. Floorboards and logs are checked for strength, all elements are inspected for the presence of fungus and rot. Defects are eliminated - creaking floorboards are fixed, damaged ones are replaced with new ones, problematic logs are strengthened with the help of beams. The gaps between the floorboards are filled with a mixture of sawdust, putty and varnish.

Laying laminate on an uneven wooden floor is not allowed, however, it can be mounted directly on the old floor under certain conditions:
- the boards are not curved, do not creak or bend;
- there are no gaps between the floorboards, there are no traces of fungus on all elements;
- after measurements, no height differences of more than 2 mm were detected.
Tip: even in the case of a perfectly even wooden base under the laminate, do not forget about a special cork substrate.
For minor height differences, a scraping machine or an electric planer is used for leveling. Before sanding, be sure to fix the boards with long self-tapping screws and sink the nail heads into the wood to a depth of about 2mm.

Preparing a wooden base with plywood
Leveling a wooden floor under a laminate using plywood sheets allows you to eliminate significant height differences without resorting to dismantling the old floor. The thickness of plywood is selected depending on the width of the floorboards and the specifics of their deformation:
- if the boards are within 20 cm wide and the wavy curvatures are evenly distributed, then plywood 9-10 mm thick can be laid.
- with an uneven arrangement of floorboards having a curved shape, and a large width of the boards, you need to take plywood with a thickness of 15 mm or more;
- For two-layer laying, which is used when using guides and a mini-lag, plywood 9 mm thick is sufficient.

In the absence of a general floor slope, you can lay plywood directly on the boards, screwing them with long self-tapping screws to the logs. It is necessary to arrange plywood sheets so that their joints are perpendicular to the future layout of the laminated panels - this is necessary for proper load distribution.
Small deviations can be eliminated with the help of bars or pieces of plywood placed under the sheets. In case of serious differences, it is necessary to use mini-logs from bars of different thicknesses, attaching them to the floor with self-tapping screws at a distance of 50–60 cm. Support bars are always located at the joints of plywood sheets. A distance of 3-5 mm must be left between the wall and the sheets, the plywood is attached to self-tapping screws with a cone-shaped cap.
Tip: it is better to cut out the plywood in advance, then lay it out on the floor and draw the joints of the sheets with a marker directly on the boards - this will make it easier to lay the bars.