wooden floors are considered the best option for finishing. This is an environmentally friendly and warm material. But the installation of such floors on a concrete base is associated with certain difficulties. In order to perform this process technologically correctly, it is necessary to first fix the log to the concrete floor. Laying wooden floors directly on a concrete screed is not recommended. Usage lag as additional elements, it will provide floor ventilation and optimize heat transfer in the apartment. Accordingly, the floor covering will last much longer. Fastening a structure to a concrete floor is a simple process and does not require special knowledge and skills. We will acquaint you with all the subtleties of this work.

Preparation of materials and tools
Before starting work, you need to stock up on everything you need. Considering that you will have to work with wood and concrete, the list of necessary tools will be as follows:
- pencil;
- building level;
- roulette;
- perforator drill;
- devices for working with wood (planer, hacksaw or circular saw);
- screwdriver or a set of screwdrivers;
- fasteners (usually self-tapping screws, dowels and anchor bolts).

Having prepared the tools, you can go to the nearest construction market for material. Usually lumber sellers, pursuing personal gain, are advised to purchase expensive types of wood, referring to the reliability and long service life of the material. You don't have to fall for this trick. For your purposes, spruce, fir and pine may well be suitable. Wood varieties of category B or BC are quite suitable, the moisture content of the material should not exceed 18-20%. At the same time, the appearance, color and even evenness of the parts do not play a big role. The only thing you should pay attention to is the absence of mold and traces of the bark beetle.
The cross section of the log depends on the thickness of the flooring and insulation. Experts do not recommend using a beam with a cross section of less than 20 millimeters as a lag.
Installation process
It is immediately worth clarifying that the use of logs under the floors is advisable only in apartments with high ceilings. This floor installation technology quite strongly “steals” the height of the premises. So, the installation of the lag occurs according to the following scheme:
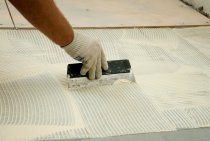
- coupler or a concrete base is recommended to be leveled. Otherwise, the elements will not be in the same horizontal plane. Accordingly, they will need to be leveled by laying plates. This can lead to the fact that the floors in the apartment will creak.
- On the base you need to lay a layer waterproofing, or treat concrete with special mastic. In the first case, the use of soft materials should be avoided. Over time, they will sag, and the floor will no longer be reliable and monolithic. For a waterproofing layer, roofing felt or plastic film is perfect.
- Logs are treated with an antiseptic composition and cut according to the size of the room.
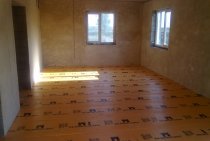
- The installation process begins with the installation of a log at two opposite walls. These elements are leveled using a building level and immediately fixed to the concrete floor. Then a string is stretched between the installed lags. It will serve as a guide for the installation of the remaining elements.

- The remaining lags are laid. The distance between the elements directly depends on the thickness of the future floor covering.
- A heater is poured between the lags. For this, ecowool or roll materials can be used. In the second case, you need to mount the material as tightly as possible without leaving gaps between the layers.
- A layer of vapor barrier is being laid. This is a necessary condition for protecting the insulation from external influences.The vapor barrier can be attached with a stapler, the joints must be glued with adhesive tape.
- You can lay a layer of plywood. This will serve as the basis for the installation of the floor covering.
Distance between structural elements
In order for the floors to serve for a long time, it is necessary to strictly observe the step between the laid parts. You can use a table for this.

When laying a plywood base on the logs, the distance between the elements can be increased.
Lag installation methods
There are four ways to install a log on a concrete base. After reviewing the above material, you will be able to choose the best option for you.
self-tapping screws
This fastening scheme is considered the simplest and fastest. It looks like this: the logs are laid in place and drilled through. Please note that the drill must go through the wood and go deep into the concrete pavement. A dowel is driven into the hole and a self-tapping screw is screwed.
The recommended distance between fasteners can vary from 40 to 80 centimeters. The length of the fastener depends on the thickness of the log. Please note that the self-tapping screw must go into the concrete by at least 50 mm. For better adhesion of the log to the surface, it is recommended to use self-tapping screws with a thread that does not reach the cap.

Anchors
This method is used not only for fastening elements, but also to give the structure additional strength. Pulling the anchor out of the concrete base is quite problematic, so it can be difficult to dismantle such a structure. Anchors are installed, like self-tapping screws, by drilling through holes. A locking element is inserted into the concrete, into which the bolt itself is screwed through the log. In order for the bolt head to "drown" in the wood, the holes must first be countersunk.
In the process of work, it is recommended to use anchor bolts with a diameter of about 10 mm. The length is selected individually, taking into account the entry of the bolt into the concrete by 5-6 cm. To fix one log, you will need 4-5 anchors.

Metal corner
Another way of mounting wooden elements on a concrete base. To do this, you will need a corner made of galvanized metal. The installation process looks like this: the corner is attached to the log with a self-tapping screw (the fasteners must go into the tree by at least 3 cm). Then, with a self-tapping screw through the dowel, the corner is attached to the concrete surface.

Adjustable lags
This is the most expensive design, greatly simplifying the alignment of elements in a horizontal plane. It looks like this: plastic racks are built into the wooden elements, which, in turn, are attached to the base of the floor. Alignment occurs with the help of an adjusting bolt. The use of this design will allow you to perform work without prior alignment of the screed.