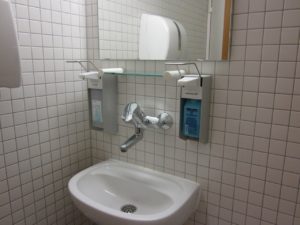
Sink and mirror installation
The assembly of the sink includes fitting with marking the place of attachment to the wall, as well as the installation of a mixer and a drain with a siphon.
You also need to fix a mirror on the wall above the sink, if one is included in the kit or was purchased separately.
You will need:
- drill;
- drill in a tile;
- drill with a hard-alloy tip;
- wrenches;
- open-end wrenches of the required sizes;
- fluoroplastic sealing tape (FUM) or combed flax for sealing threaded connections;
- level;
- soft pencil;
- hammer.
To try on the sink, you need to put it on the pedestal and with a soft pencil mark the places of its attachment to the wall.
After that, holes should be made in the wall to the desired depth in accordance with the dimensions of the fasteners included in the kit.
Drilling the tile should be done with a special pen drill, and drilling into the wall with a drill with a carbide tip, switching the drill to shock mode.
We insert dowels into the holes and screw metal studs into them, which will serve as fastening of the sink to the wall:
After that, you can attach a mirror to the wall.
To do this, using a tape measure and a level, you need to mark the locations of the mounting holes, drill to the desired depth, install dowels and screw metal hooks into them. Everything is done in the same way as it was described a little higher for the sink mounts.
Hanging the mirror on hooks, you need to check its horizontalness with the help of a level:
Making a homemade pedestal and installing it
A sink with a siphon and a mixer is placed on a cabinet and moved up to the wall. Make a markup for the mounting bolts with a pencil. Then the cabinet with the sink is moved away from the wall and drilled at the marking points. Dowels are inserted into the holes and the sink is screwed on.
If the purchase of a cabinet for the bathroom is impossible due to any circumstances, you can make it yourself. To do this, you will need the following materials and tools:
- waterproof tabletop;
- metal legs;
- fasteners;
- self-tapping screws;
- drill;
- jigsaw.
In a waterproof countertop, they independently cut a hole that is suitable in size for a washbasin. In addition, it is necessary to purchase special metal legs and fasteners for them. The legs are attached to the bottom of the tabletop near its corners. Fastenings are carried out using self-tapping screws, which are screwed into special fasteners. If it is necessary to reduce the height, the legs are cut to the desired size.
Before installing a sink with a pedestal, a communication line (water supply and sewerage) is drawn under the washbasin to the location of the latter. After that, corner valves are installed on the pipes of cold and hot water supply. The faucet comes with flexible hoses that are mounted together with the faucet on the back of the sink in a specially provided hole. If the hoses are not long enough, it is necessary to buy nozzles of the required length.
To make a cabinet, you need to purchase material for the countertop, doors, as well as legs, handles and fasteners.
Before installing the faucet and connecting the water to it, the bedside table in the bathroom is marked out for installing the sink. To do this, using paper and scissors, a shell pattern is made, the contour of which must be marked with a pencil, after which a hole is cut out in the pattern so that the bottom of the shell fits freely in it. The resulting paper template is applied to the surface of the countertop and its inner contour of the hole is circled.
Using a drill with a thick drill, a hole is drilled, which will be the beginning of cutting a hole for the sink.A jigsaw blade is inserted into the resulting hole, with the help of which a hole for the sink is cut along the marked line. It should follow the contours of the bottom of the sink. Silicone is applied to the edge of the sink and inserted into the previously cut hole, gluing it to the nightstand.
After that, the installation of the mixer and the connection of water to it begins. If the washbasin has a special hole for the mixer. at its location in the countertop, a hole of the appropriate size is drilled. If the sink has the form of a trough without a faucet edge, the faucet can be fixed to the countertop by drilling a hole with a diameter of 32 mm in it near the sink. From the outside, a mixer is inserted into the hole, from the inside, they are pressed with a nut. After that, flexible pipes for cold and hot water are installed.
Such work must be carried out with special care, it is important not to confuse the hoses in places, otherwise hot water will flow from the cold water supply tap and vice versa
The sink kit usually includes a siphon. It must be attached to the drain hole of the washbasin and connected to the sewerage system using a corrugated hose. The connections must be sealed with putty or sealant so that the smell of the sewer does not go into the bathroom.
There is another option for installing a cabinet under the washbasin - a hanging cabinet under the sink. It differs in that in order to fix the tabletop at the desired level, the legs are not used. Metal corners are attached to the wall. Their number depends on the width of the countertop, but at least one on each side, after which a countertop with a sink is attached to them. Hanging structures can also be bought in the store. This option should be attached to the wall with only a few powerful hangers.
So, the basic rules for choosing and installing a cabinet under the sink in the bathroom are described. You will only need to purchase all the materials and tools necessary for this, prepare the installation site and perform the installation work correctly.
Share this helpful article:
http://bezsantexnika.ru
How much does it cost to install a bathroom sink
In the modern world, many men, due to absolute employment at work, do not have enough time for household chores. And some simply prefer to trust the installation to professionals in their field. But since many are interested in the cost of such services, we will certainly tell you about it.
- The cost of installing a console sink in a bathroom on average in the country ranges from 1,200 rubles to 2,000 rubles. This is together with the installation of the mixer and drain fittings.
- If the bathroom requires the installation of a sink with a cabinet or on a supporting pedestal, then the price for the work increases by five hundred rubles.
- Cutting a hole in the countertop for a built-in washbasin costs 800 rubles.
- In Moscow and St. Petersburg, prices are slightly higher than in other regions, and lead to an increase in the cost of each operation by an average of 500-700 rubles.
- And of course, the more famous the company, the more expensive its services. Follow this advice when choosing a wizard, and you will save up to a third of the declared installation amount.
Installing a sink usually does not take much time and does not take a lot of effort. If you correctly and accurately perform all the operations of the process, then the washbasin will last a long time, and the result of the work performed will pleasantly please you and your household.
Installing a wall hung sink in a bathroom
Choosing a place to install a sink with a cabinet
Drawing of a corner cabinet for a sink with basic dimensions.
Now you need to determine where the selected sink with cabinet in the bathroom will be located. The ideal option would be to install it at the location of the old sink. However, this is not always possible, since when repairing a bathroom, it is also most often re-planned.The location of the furniture in the bathroom must be determined even at the stage of laying pipes for cold, hot water supply and sewerage. This is necessary because the place for the sink with the cabinet is selected based on its size, that is, the room must be measured and divided into segments corresponding to the location of a particular piece of furniture, plumbing fixtures and other things.
The curbstone can have shelves, it is important to make sure that the pipes coming out of the wall do not rest against them. To do this, you need to pre-calculate the output level of the hot and cold water pipe fittings for the sink
The best option would be to position the fittings at a level just above the middle shelf. The same rule applies to sewers. If the pipe comes out of the floor, then when installing the bedside table with a sink, you will have to cut a hole in it to pull the hose from the sewer pipe to the siphon. If possible, the sewer pipe should be located next to the water pipes.
To do this, you need to pre-calculate the output level of the hot and cold water pipe fittings for the sink. The best option would be to position the fittings at a level just above the middle shelf. The same rule applies to sewers. If the pipe comes out of the floor, then when installing the bedside table with a sink, you will have to cut a hole in it to pull the hose from the sewer pipe to the siphon. If possible, the sewer pipe should be located next to the water pipes.
Installing a washbasin with cabinet
Scheme of assembly cabinets under the washbasin.
Now it will be told about how to install the washbasin with your own hands. After making sure that the plumbing and sewage connections to the place where the bedside table will be installed are correct, you need to prepare the necessary materials and tools:
- cabinet;
- sink;
- self-tapping screws;
- screwdriver;
- perforator;
- metal corners;
- mixer;
- metal-plastic pipes;
- siphon;
- FUM tape;
- sealant.
The pedestal can be connected to the bathtub sink by means of a metal bracket and screws. The furniture assembly kit may include instructions with an assembly diagram, but it may not be required, so there is nothing complicated in this process. During the assembly process, it is necessary to ensure that all the screws are well tightened, since after the installation of the sink, the screws may not be able to be tightened.
After assembling the cabinet, you need to install the sink. The mixer is tightly screwed to it so that it does not rotate. After that, it is necessary to install the water pipes, screw them to the mixer and press it to the sink completely. It is not recommended to use metal-braided branch pipes supplied with the mixer, because the hose may leak if the metal corrodes. Installation of metal-plastic branch pipes is recommended.
The siphon is installed by screwing it to the washbasin drain.
Next, you will need to install a siphon. by screwing it to the drain hole of the sink. A washbasin with a siphon and a mixer is placed on a pedestal and the structure is moved to the wall, where it was planned to be installed. A marker is applied to the wall markings for several mounting bolts. The holes for them are located on the back wall of the sink, while mounting bolts with offset plastic washers are usually included in the set of sinks. But if they are missing, you can purchase fasteners separately. The cabinet with the sink is moved aside and the wall is drilled at the marking points.
Dowels for such bolts, as a rule, have a diameter of 10-12 mm. They are inserted into the drilled holes, after which you can put the cabinet in place and screw the sink to the wall. After that, water supply and sewerage are connected. In order to avoid leakage when connecting water to the mixer, it is necessary to use a sealant or sealing paste. Better to use paste in combination with FUM tape.
Bathroom sink installation
Before you begin work, you need to determine the location of the sink. In order to make it easy to approach, it is worth leaving a free space. For example, you can leave 70 centimeters wide and 110 centimeters deep. The height of the sink in the bathroom depends on the specific needs of the person. To date, the height of 80-85 centimeters from the floor is considered standard.
The work itself is carried out in several stages. The first step is to drill a few holes in the wall. Screws are screwed into them, on which brackets are hung.
Installing a sink in the bathroom video will help anyone who decides to install such a unit. The video shows in detail all the installation steps.
If we are talking about a sink on which a mixer is already installed, then it is attached to a water source using a winding. After that, the sink itself is attached to the brackets, and then the flexible pipes of the mixer are connected to flexible wiring.
During installation, it is necessary to pay attention to the fact that the upper font of the bracket fits tightly into the hole in the lower plane of the sink rim. First of all, it is necessary, of course, to connect the outlet to the sink
Lucky is the one who has all the pipes hidden in the floor or wall. in this case, the sink can simply be installed on a support leg.
If we are talking about installing a sink with a siphon, then the outlet can be connected to the pipe. Its length should be 110 millimeters. In this case, one end of the pipe must be designed for a siphon, and on the other side a thread is cut on it. after that, a sleeve is put on the pipe, through which it is connected to the downpipe. To prevent breakage of the sink, rubber rings must be placed before installing the outlet. The following sequence of actions follows:
the sink is neatly installed on a leg or bracket
This should be done with extreme caution so as not to damage the unit;
a sink faucet is attached to the washbasin, unless, of course, it is sold with the sink;
water pipes are connected to the tap installed on the sink;
a siphon for the sink is attached to the outlet. practical location of the sink above the washing machine
practical location of the sink above the washing machine
This sequence of actions completely describes the entire process of installing the sink on special brackets. As you can see, it's not that difficult. Even a non-professional plumber can cope with the work.
Nowadays, there are other types of sinks that are also widely used. For example, a sink above the washing machine is a great option for those who want to save space in the bathroom. They are installed above front-loading washing machines. A sink of this kind is very easy to install. A person who does not want to spend extra time on installation can certainly be
built-in washbasin
I'm interested in buying this particular unit. It allows you to expand the boundaries of the bathroom and gives it extra space and comfort. The option is especially good for small rooms, where there is not enough space anyway.
There is another option that can save space inside the bathroom. These are built-in sinks. They do not take up much space and allow you to install other plumbing without interfering with this process. In addition, various objects can be laid out around such a sink.
The principle of installation of such options is the same as that of the sink on the bracket. You will need the same tools and materials. Plus, additional. For each option, these are different materials and tools.
Thus, installing a sink in a bathroom is not so tricky, which can be handled by almost any person who knows how to use simple construction tools. The materials, as you can see, are all simple and are widely available in any hardware and plumbing store. The entire installation process, with a competent approach to work, can be completed within a few hours. Professionals take very little time.If an amateur is engaged, who first encounters this kind of work, then much more time and effort may be required. To help those who first decided to install a sink in their house or apartment, this article was created. It describes how to competently and professionally install a sink in your bathroom. In addition, a video is also attached, which clearly shows all the steps that you need to take in order to do all the work quickly and at minimal cost.
Connecting the sink to the water supply and sewerage
After the cabinet is assembled, and the mirror is fixed on the wall, you can install the sink on the cabinet and connect it to the water supply and sewerage network.
To do this, a mixer is fixed directly on the sink, to which flexible connections are attached, and outlet pipes are attached to the outlet and to the overflow, which will be connected to the sewer.
Check in advance whether the diameters of the sewer pipe at the connection point and the outlet pipe of the siphon or corrugation match. If you will be connecting a 32mm exhaust pipe to an existing 50mm pipe, you will need an adapter or a transitional rubber collar.
A sink with a mixer and an outlet pipe fixed to it is placed on a pedestal and pressed against the wall with nuts that are screwed onto previously installed metal studs. Don't forget to put plastic spacers under the nuts so as not to damage the fragile ceramic shell of the sink when tightening the nuts.
The nuts should be tightened very carefully, alternately making several turns, first one and then the other, until a noticeable resistance appears. After that, you should stop tightening so that cracks do not appear on the sink body from overtightening.
The sink fixed to the wall can be connected to water and sewerage.
To do this, flexible hoses are connected to ball valves or valves through a rubber gasket. And the siphon or corrugation assembled and fixed on the outlet pipe is inserted into the existing sewer.
The end of the pipe that is inserted into the existing sewer can be slightly lathered to make it easier to enter the hole.
A sink connected to the water supply and sewerage looks like this:
Below you can watch the installation video of the sink with cabinet:
The last step is to seal the gap between the sink and the wall so that water does not flow into it and dirt does not accumulate.
To do this, the gap is coated with silicone sealant.
An hour after sealing the joint, the sealant will dry completely and the sink can be used.
Turn on the water and carefully check for leaks at the joints. To do this, you can put a dry newspaper under the sink. In the event of a leak, you will immediately notice drops.
If any connection turned out to be insufficiently tight, you should turn off the water again, disassemble the connection, wind up several turns of sealing fluoroplastic tape (FUM) or a thin pigtail of combed flax onto the thread, and then twist it again, tightening with sufficient, but not excessive force.
Types of bathroom sinks
The modern market offers a wide range of sinks to choose from. Devices are made from various materials, have a variety of shapes and colors, have several types of installation.
The most common materials for the manufacture of sinks are faience and ceramics, there are also products made of glass, stainless steel, marble, and so on. According to the installation method, the sinks are divided into 3 groups:
- Mounted (suspended);
- With pedestal or semi-pedestal;
- Embedded;
Mounted models, in turn, are divided into linear and angular.
 Hinged (wall) sink
Products of this type are attached to the wall surface in 2 ways:
- With the help of brackets (including height-adjustable);
- With the help of studs (anchors) wrapped in dowels.
Pedestal sinks are also a subspecies of wall-hung sinks, but are distinguished by the presence of a full or partial profile pedestal.
 Washbasin with half pedestal
Pedestals serve to hide communications - water supply and sewerage, to give an aesthetic appearance.
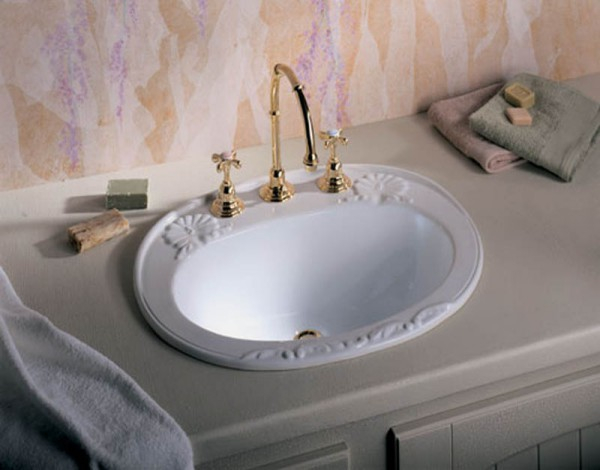
The third type of sinks are built-in. They are divided into mortise and overhead.
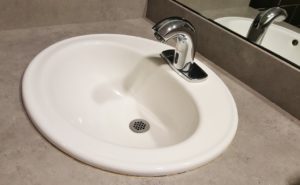 Built-in vanity sink
Mortise ones are installed in a hole previously cut in the tabletop or cabinet, overhead ones are installed and fastened on top of the tabletop. For overhead devices, holes are cut for the siphon and mixer (if it is separate).
In addition, sinks can be with or without a tap hole. If the model does not have a hole, the mixer is installed separately - on a countertop or wall. In the case of a bathroom, a swivel pipe (“gander”) of a bathroom faucet can serve as a water supply to the sink.
Height standard
The standard height of the sink in the bathroom is not regulated in any regulations. There are criteria that determine the level of installation at a height of 80 or 85 centimeters, but they are calculated based on the average height of a person. But it is different everywhere. In the Scandinavian countries, I recommend hanging washbasins above this indicator, and in the states of South America - below.
So do what is convenient for your family. If all its members are tall grenadiers, feel free to set higher, if vice versa, lower the level.
The only exceptions are sinks with a pedestal (“tulip”) and with a floor cabinet. In these cases, you will have to adjust to the height of the products.
Self-installed bathroom sink
Choosing a vanity unit
When choosing a cabinet for the bathroom, you need to follow some simple but important rules.
First of all, pay attention to the interior of the bathroom. If all its elements, including plumbing fixtures, hanging cabinets and shelves, are made in a soft style with smooth lines, a strictly rectangular cabinet will be out of place.
If the bathroom is decorated in a classic style, which is characterized by luxury and wealth, installing a sink with a cabinet in a minimalist style in this case will be unacceptable. Ideally, this piece of furniture should match the materials and colors of the overall interior design.
When choosing furniture, consider the overall color and interior of the bathroom.
In addition to design, it is necessary to pay attention to other important points, for example, the right choice of product fittings. Handles, legs and hinges must be made of chromed metal
A bedside table with plastic gilded or chrome fittings usually loses its original appearance after a couple of months. When buying furniture with a colored coating, you should know that the paint on its surface should lie evenly.
The arrangement of the bathroom is also of great importance. For example, if the room has a warm floor, you should not buy furniture with a plinth, it is better to buy a cabinet under the sink with legs
Such a thing will not heat up from the floor, will greatly facilitate the cleaning process, provide the necessary ventilation of the product, which is important for rooms with high humidity.
In terms of furniture functionality, you can be guided by personal preferences. A good option is a cabinet under the sink with a laundry basket, which significantly saves the space of the room. For small bathrooms, there are corner models that take up a minimum of space, while being quite practical and functional. It is good if the shelves in the cabinet are adjustable in height, so they can be adjusted to the height of detergents and cleaning products. A roll-out cabinet is another interesting solution for decorating the interior of a bathroom.It can be moved to any place, but it has a significant drawback - the complexity of embedding the sink, because all communications (water supply and sewer pipes) are installed permanently. So, it is necessary to choose this piece of furniture based on the purpose of its installation: it will be used to store all kinds of household items or simply hide the pipes leading to the sink.