If a repair is due dismantling flooring, most of us understand that this implies dirt, dust and moisture. However, all these troubles can be avoided by using dry screed technology. And if a wet screed is a labor-intensive and dirty process that stretches for a long time, then a dry screed has a simpler principle of implementation: granular backfill is placed on special floors, and sheet material is fixed on top. With this type of screed, a minimum amount of water is used, therefore waterproofing need not.

Advantages of dry screed
- No concrete or cement mortar is needed for repairs. The screed using these solutions is quite laborious and long, and the dry floor screed is carried out independently, backfilling in separate areas.
- High rates of thermal insulation, since when creating a dry floor screed, they use expanded clay, and for additional sound insulation, a polyethylene foam tape is used.
- Less time is spent on laying, so the floor repair process is faster.
- The work of loading, unloading and lifting materials is less and less labor intensive.
- No need to use special equipment in the apartment, for example, mixers, concrete mixers, etc.
- In a dry screed, it is possible to lay intra-apartment communications.
Dry screed is so light that it can be laid on the old wooden base. Ceilings between floors experience less load. This technology makes it possible to choose any floor finishwithout a long drying period.

Where is this type of screed used?
- In an apartment where an increased load on the floors is unacceptable.
- Do not use in apartments with a slope, dynamic or vibration loads.
- It is not recommended to use for repairs in small rooms, since it may be difficult to level and compact the backfill.
- Dry screed is not applicable in rooms with a high level of humidity, such as bathrooms, kitchens, etc.
How is the screed set up?
A dry screed consists of several layers of materials that are laid on a flat base.
- A polyethylene film is laid on the concrete base of the floors, which is used as a waterproofing protection.

- Then a special damper tape, which prevents the occurrence of cracks during changes in humidity and temperature.
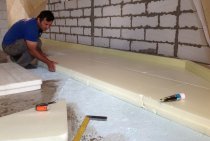
- The main filler is fine-grained expanded clay, slag and slag pumice, as well as perlite sand, which they begin to scatter over the surface, starting from the highest point. This layer provides sound and heat insulation.
- Maximum layer thickness should not exceed 12 cm. Communications can be laid in the backfill, covering them from above with a backfill of at least 2 cm. After that, the expanded clay layer is leveled, guided by lighthouses, and rammed with special rubber hammers.
- Sheet material is laid on top of the backfill, which takes on the main load, distributing it to the lower layer. Finishing coating for floor repair can be gypsum fiber sheets, moisture resistant plywood, chipboard or asbestos-cement boards. They are fixed with screws and glue. On top of the "rough" floor, the main coating is laid. According to the technology, the thickness of the floor must be at least 40 mm.

We prepare materials
Before you make a dry screed, you need to prepare the following materials for repair:
- Metal profiles for installing beacons;
- Polyethylene film, which is used as moisture insulation for floors;
- Edge tape for soundproofing;
- Expanded clay as backfill to create a flat floor surface;
- sheet material;
- Self-tapping screws and glue.
Stages of dry screeding
Installation of beacons
Floor repair begins with the installation of guides ─ beacons. They are used to level the backfill in height. You can't do without a laser level, a rule and a pencil. Next, you need to set the level to the center of the room and turn it on. Step back half a meter from the corner of the room and screw the screw into the floor, set the rule. Make a pencil marking along the light line. Another self-tapping screw is screwed in the opposite corner, also at a distance of half a meter. Set a rule, the pencil markup should match the light line. Intermediate self-tapping screws must be fixed between the extreme points every 20 cm. The lighthouse is fixed with a solution of cement or gypsum.
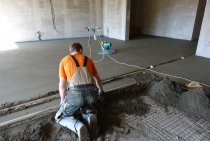
We fall asleep expanded clay
Expanded clay is poured in small portions so that there are no granules underfoot. The thickness of the backfill should be at least 3 cm. Having poured expanded clay according to the marking of the beacons, tiled material is installed on top. Then they move on to the next section, and so on over the entire surface of the floor. Some specialists have a different technology, they first completely fill the floor with expanded clay, and then level it. If necessary, communications are laid in the backfill layer.

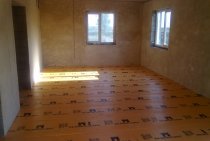
Sheet stacking process
- Gypsum-fiber sheets are recommended to be installed in 2 layers, fastened with glue or self-tapping screws. Modern manufacturers offer the so-called Knauf superfloor, which is a construction of double sheets with a seam connection.
- Plywood and chipboard with a thickness of more than 12 mm can be laid in one layer, on top of such a floor is covered with drying oil or bituminous mastic to impart protective properties.
- When laying, the sheets should fit snugly against each other, the gaps that appear are puttied.
- If expanded clay is covered in sections, then the laying of the slabs starts from the far corner. If the surface is completely covered with a layer of backfill, then the plates are mounted from the door.
- When used in the repair of the Knauf superfloor, the folds of the plates are coated with glue and fastened with special self-tapping screws, the heads of which are sunk into the material.
- At the final stage of the repair, the excess film and dumping tape are cut off, and the gap between the walls and the screed is covered with sealant.
- The performed dry screed allows you to immediately cover the floor with a top coat.

The technology for leveling floors in an apartment using the dry screed method is not very complicated, but it requires accuracy and patience.