Capital repairs of the apartment starts with floor screed. The screed is needed to level the concrete base. This procedure is especially relevant in old buildings. At that time, monolithic casting was not used, but floor slabs were used. Therefore, the base of the floor can have large slopes, sharp protrusions, and even protruding pieces of reinforcement. Laying a top coat on such a surface is very problematic. The screed helps to make the base of the floor perfectly even and prepare for the installation of the floor covering. Recently, the semi-dry method of floor screed is gaining popularity. Is it possible to do a semi-dry floor screed with your own hands? This question can be answered by considering the advantages and disadvantages of this method. We will tell you about all the features of such floor leveling.

Semi-dry floor screed technology
Of the features of this method, it can be noted that the mixture should contain a minimum of water. In addition, unlike the usual cement-sand mixture, propylene fiber is added to the composition.

This material performs the function of reinforcement and retains the solidity of the structure even when microcracks form. The recommended proportions do not differ from the classic cement mortar: 3 parts of sand to one share of cement. For example, 150 kilograms of sand, 50 kilograms of cement and 150 grams of fiber. For this volume you will need about 15 liters of water. It should be noted that the fiber comes in the amount of 800 - 900 grams per cubic meter of the mixture. The components are mixed until a homogeneous mass with the gradual addition of water. The amount of liquid in the composition is determined visually. A quality mixture can be determined by the following feature: the solution compressed in the hand retains its shape. This indicates the optimum water content in the solution. To make the mixture more workable, you can use special plasticizers.
Semi-dry floor screed device
The entire workflow can be divided into the following production steps:
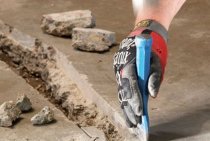
- Foundation preparation. Floor slabs are cleaned of dirt and debris. It is recommended to level the rough surface as much as possible. Deep cracks are sealed with mortar, sharp protrusions must be removed.
- Then it is recommended to level the surface of the future floor along the zero line. To do this, you need to use a laser level. The best option would be to search for the zero mark using a level. This construction device has a viewing angle of 360 degrees. Therefore, you can put a lot of marks on the walls, which will help you fill the screed to the required mark.
- Under the screed usually fits waterproofing layer. This precaution will protect your floors from leaking. You can choose any waterproofing, depending on your capabilities. Do not forget to take care of the tightness of the butt joints of the wall and floor. For this you can use reinforced tape. It should be noted that the semi-dry screed is of a floating type, and therefore, it does not have a reliable adhesion to the base. Therefore, the waterproofing layer plays the role of an intermediate link. The edge of the reinforced tape must be above the fill level. If this rule is neglected, the waterproofing layer will not be considered absolutely reliable.
- To ensure that the laying of the mixture does not cause problems, it is recommended to install special lighthouses. With the help of these devices, the pouring of the screed will occur as evenly as possible. In fact, the lighthouse is a kind of guide along which you can control the horizontal plane of the screed. Beacons are installed parallel to each other, to the width of the smoothing rule. To ensure that the guides do not move, they must be securely fastened.

Semi-dry floor screed: DIY
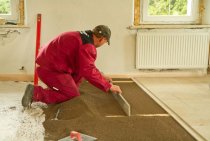
Having prepared the room, you can start laying the mixture. This process is simple, it is much more difficult to apply the markup, find the zero mark and set the beacons. Laying a semi-dry screed is a rather time-consuming process that requires attention and perseverance. It looks like this:
The mixture is laid on a small area of \u200b\u200bthe floor and leveled. This is done with a rule. When leveling, the solution is not just pulled together in one direction, but swayed from side to side. To make the process a little easier, it is recommended to pre-tamp the mixture with your feet. Installed beacons should not be removed, they remain in the screed.

The steps are repeated until the screed covers the entire surface of the floor. Screed thickness should not be less than 3 centimeters. Otherwise, after a while, cracks or chips will form on the surface.
After all the mixture has been laid, you can start grouting the surface. This is necessary for additional alignment and giving the screed additional strength. Tightening with grout is not worth it, you can start working within 30 minutes after laying the screed. After about 5 - 6 hours, the solution will begin to gain strength and the grout will lose all meaning. The work is carried out by a special machine equipped with steel discs.

If the screed is poured over a large area, it makes sense to cut special seams on the surface. Mortar and concrete tend to "shrink" over time, which leads to the formation of cracks. In order for the laid mortar to be monolithic, it is necessary to cut expansion joints. A seam is made to a width of 5 to 7 millimeters and deepens by 2/3 of the laid mixture.
In order for the solution to evenly gain strength and not dry out, it is recommended to periodically moisten the screed with water and cover with plastic wrap.
Advantages and disadvantages

The method of laying a semi-dry screed has a number of undeniable advantages:
- Saving time. The mortar is mixed with a minimum amount of liquid, which gives a significant savings in time compared to the traditional method of laying the screed. For comparison: a standard cement-sand mortar hardens for about three days, and the mixture reaches its maximum strength only after 28 days. The semi-dry screed can support the weight of an adult within 12 hours from the moment of pouring. It is possible to start installation of a floor covering in four days.
- Practicality. This type of screed gives a perfectly flat surface when laying, so it rarely needs additional leveling. This significantly reduces the time for repairs.
- Reliability. The presence of synthetic fiber in the composition makes the screed a reliable monolithic structure. A relatively small layer is able to withstand high loads, mechanical stress and temperature changes. In addition, the mixture practically does not dry out during the hardening period, which minimizes the formation of microcracks that destroy the structure of the screed.
- Light weight. The composition of the semi-dry screed includes fiber. This material not only serves to strengthen the structure, but also significantly reduces the overall weight. This approach reduces the load on the floor slabs, which is especially important in old houses.
The method also has significant drawbacks.
- A solution with a minimum amount of water is quite difficult to knead and stack. If a large pouring area is planned, you will have to use a mobile concrete mixer or order a ready-made mixture. You can also use a pneumatic blower, which will help facilitate the procedure for preparing the solution and its installation. Considering that special equipment is also used for grouting, this method is also called a mechanized semi-dry floor screed.Such equipment is unlikely to be found with neighbors or acquaintances. It will have to be purchased or rented, which entails additional financial costs.

- Freshly laid mixture is very afraid of excessive moisture. Therefore, it is necessary to water the solution with extreme caution, only when working on hot days. If you overdo it with watering, the screed will begin to swell, which will lead to the destruction of the monolithic structure.
- The small mass of the laid solution also plays a dual role. On the one hand, this reduces the pressure on the supporting structures, on the other hand, it prevents the mixture from self-compacting, which reduces the density of the flooring as a whole. There are two ways to solve this problem: tamp the solution directly at the time of laying, or apply a thick layer of material to the rough base.
Conclusion
Semi-dry screed is the best way to quickly level the floors in the apartment. Given that finishing can be carried out within four days from the moment of pouring, repairs are carried out as soon as possible. Doing the work yourself is very problematic, because you need to use special equipment. The best option would be to hire a team of specialists who will take over the filling. It may cost a little more than pouring an ordinary screed, but a semi-dry mixture can last you almost a lifetime. And once in a lifetime you can fork out!