Each person may have a moment when he suddenly realizes that he is tired of what he sees around every day. But far from always this understanding entails a readiness for a radical change in the interior and a global alteration of the apartment. Then a good design solution comes to the rescue - replacing the usual wallpaper with photo wallpaper. And if during the first finishing of a new-build apartment there are no doubts about the need for rough preparation of the walls, then during subsequent cosmetic repairs, the volume, cost and dustiness of the work cause a justified panic. There may also be a need to paste over with photo wallpaper not the entire wall, but only its section (as an option - a photo panel). In these cases, a logical question arises: is it possible to glue photo wallpapers on old wallpapers? The answer to it can be positive only under strict conditions.

Important! Despite the fact that it is planned to glue the new canvases on the old ones, the wall will still have to be prepared, and the preliminary work will depend on the materials of both coatings.
Conditions for gluing the second layer of wallpaper
If you plan not to remove the old finishing material from the wall, but to update it by gluing photo wallpapers, then first you need to make sure that the following conditions are met, which are mandatory for this type of repair work:
- During the previous gluing, the surface was prepared, i.e. leveled with plaster and putty.
- The first layer is firmly attached to the wall (especially at the joints), there are no defects or tears on it.
- Old wallpapers must be moisture resistant, i.e. when glue is applied to them, the coloring layer should not dissolve and leave marks.
- If the existing coating is textured, then the depth of the relief should not exceed 0.2–0.3 mm. Even subtle height differences can distort the picture, especially when it comes to trendy 3D photo wallpapers.

If the wall covering satisfies all the conditions, you can proceed. Well, if the old material does not fit at least one of the points - alas, this idea will have to be abandoned and prepare the surface for gluing according to all the rules.
Choice of photo wallpapers
When choosing wallpaper for gluing on a wall with wallpaper, you should focus on the material of the existing coating.
- If there are light paper quality glued canvases on the surface - this is an ideal option, the photo wallpaper material can be anything. In this case, the glue applied in several stages will impregnate both the old material and the wall under it, which means that the glued layer of photo wallpaper of any density and texture will adhere well to such a surface. Can be used paper based vinyl wallpaper or non-woven, paper, textile, non-woven.

- In the case when there is a reverse situation, and the new canvas is supposed to be glued to vinyl wallpaper, as well as dense and heavy non-woven, for the second layer it is better to choose a high-density paper-based coating.

Advice! When choosing photo wallpapers, it is worth considering that too soft pastel shades of paper material may not be able to hide the previous finish, so it is better to use brighter and more contrasting images.
How to paste photo wallpaper
The only difference between working with photo wallpapers and sticking ordinary canvases is the preparatory stage. In addition to bringing the working surface of the wall to the ideal, it includes its exact marking to eliminate errors when joining the picture.
Preparatory work
To prepare the wall, you must perform the following steps:
- Carefully glue (even reliable at first glance) the joints of old wallpaper.
- Putty defects (most often enough finishing mixture).
- Degrease "suspicious" stains.
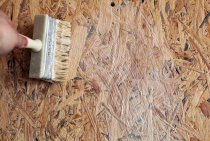
- Prime the wall.
- After 24 hours, you can start marking and gluing a new finishing material.

Surface marking
Each kit, as a rule, contains a description and a list of sizes of canvases with drawings, as well as recommendations regarding the gluing process.
- Using a tape measure, the required height of the entire pattern is measured and marked on the wall, in the place where it is planned to place the center of the image.
- Then measurements are taken along the width of the canvas, and with the help of a level, clear boundaries of each part of the picture are marked.

The choice of glue for photo wallpaper
The choice of wallpaper adhesive directly depends on the density of the coating materials. If the first layer is paper sheets, then it is enough to follow the manufacturer's recommendations indicated on the package. Usually these are the types of glue:
- Composition for light wallpaper, used for paper sheets.
- Adhesive for heavy wallpaper material, suitable for coverings made of textiles, vinyl, interlining.
In the presence of a base layer of increased density (even if the material to be glued is on a paper backing), it is recommended to choose "heavy" types of glue. When a special composition is used for photo wallpapers, it is usually included in the proposed kit.

Advice! In order to simplify sticking and make the adhesion of new wallpaper to old wallpaper more reliable, it is recommended to add PVA glue to the prepared solution, approximately 10-15% of the total.
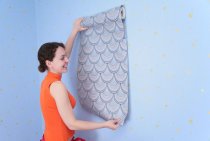
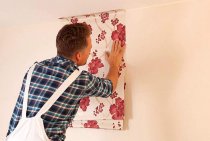
Bonding process
Qualitatively paste wallpaper on the wall a short guide will help.
- The material can be glued starting from any fragment, while carefully following the markings.
- When working with photo wallpaper, the glue is applied both to the canvas and to the wall and aged for several minutes (the exact time is in the manufacturer's instructions) without folding, so that the base is well saturated.
- It is important to ensure that there are no air bubbles, and smooth the canvases from the center to the edges, using rubber rollers or a spatula.
- After gluing all the fragments on the old wallpaper, the joints are checked, rolled up until completely fixed, excess glue is removed with a sponge.

- After drying, a special top coat can be applied to the surface to protect the image from fading.
In the room where it is planned to paste with photo wallpaper, there should not be the slightest movement of air for at least a day, and the temperature should be maintained in the range of 15–20 degrees.