Drywall is increasingly being used for wall cladding and creating partitions with your own hands. However, to successfully complete the repair, you need to know not only how to properly make a frame and fix drywall sheets, but also how to install sockets in such a wall, which you can’t do without in any room. Installing sockets in drywall is significantly different from the case with concrete walls: in general, the process is not so complicated and accessible to anyone who is ready to deal with electrics on their own.

Preparing to install sockets in a plasterboard wall
You need to start by preparing all the necessary tools and related materials to fix the outlet in the drywall sheet and connect it. In order to install an electrical product yourself, you must have at least the following set:
- Drill (you can use a screwdriver).
- Drill bit for making holes in drywall with a standard diameter of 68 mm.
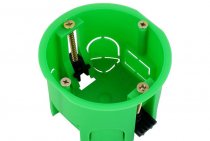
- Installation box for drywall.
- Construction level.
- Pencil or marker.
- Phillips screwdriver to secure the petals of the box (you can also use a slot, but this is not so convenient).
Instead of a drill bit, you can buy a special cutter. The principle of its operation is somewhat reminiscent of a compass and it is no less easy for them to cut a hole necessary for the box in a drywall sheet.

Cutting holes in drywall
When everything is ready to work, you need to devote enough time and attention height selection and good markup. Cutting a hole in drywall twice in the same place will not work. If, for example, a block of four outlets is installed, there is a risk that, due to poor-quality markings, the frame will end up crooked, and it will be quite difficult to correct the mistake. Therefore, measurements must be made with great care.

After measuring, draw a cross on the drywall in the center of the future outlet, put on it the central drill of the crown, pre-installed in your drill or cutter. Trying to hold the tool as evenly and firmly as possible (especially for an unbalanced cutter, if it crashes into the plaster too sharply, it will start to “step” to the side, ruining the plasterboard), we proceed to drilling the hole.
Important! The crown in the chuck must be firmly installed, it will be subject to quite a lot of stress.

Box installation
First you need to make sure that the gap between the wall and the drywall sheet is at least 45 mm, which will allow you to freely install the socket. If the distance is shorter, you will have to ditch the base surface with a lance or crown on concrete to achieve the desired size.
The installation process will look like this:
- A wire is pulled to the hole just made in the drywall, to which the outlet will subsequently be connected (it should already be under the drywall at the installation site). For convenience, it will be better to pull it out of the hole for a certain distance.
- Then you need to pick up the socket box and remove the plug from the most convenient side for threading the cable and pull the wire through it.
- Now the glass is very carefully installed in the hole. As a rule, the antennae of the fasteners are located horizontally, and the screws for fastening the socket itself to the box are vertical. This rule is flexible, in fact, it is much more important that the socket stand straight. Again, you need to spare no time, and, armed with a level, "measure seven times."
- When there is no doubt about the correct position of the box, it is necessary to turn the screws responsible for the fixing petals with a screwdriver.Do not be too zealous, if you overtighten, they will destroy the gypsum, after all, the material is very soft. But at the same time, it is also impossible to fasten it weakly: the socket will “hang out”. So you need to find some "golden mean".

Socket connection
Installation of sockets in a drywall wall begins with connecting the cable. To do this, the outlet itself must be partially disassembled, that is, throw off the frame. It is fastened, as a rule, with a screw on the front side.
Now let's check with a tester or multimeter whether electric current is supplied to the wires. There are 2 options here:
- two cores in the cable;
- three cores in the cable.
Option number 1. Connecting to a two-core cable
In the first case, it is difficult to make a mistake: after checking the presence of voltage with the probes of the tester, we turn off the circuit breaker responsible for the zone to which our future socket belongs.
Important! In no case do not forget about the de-energization of the wiring! Electric shock can cause death.
We clean about 8–10 mm of insulation for each core and lead them to equidistant socket terminals. The execution of sockets can be very different, but one thing is common - the power terminals are always equidistant from each other, so it will not be difficult to find them.
Remember that next to one terminal there may be a hole right there, also leading out of it, used for further parallel connection of electrical installation products. Do not connect there, it will cause a short circuit. Holes for different terminals should be at a respectful distance: from 1.5 cm apart.

The polarity of the role in this case will not play, because the current is alternating.
Option number 2. Three-core cable
The second option is used when protective grounding is carried out in the apartment - a very useful thing that will remove static voltage from devices.
The core responsible for grounding, according to the standard, should have a bright yellow-green color.
If our socket is provided earth connection, in its sockets there should be copper “antennae” at the top and bottom, and from the inside there should be a separate terminal for connecting this wire. If the socket is without grounding, this wire is well insulated and hidden behind drywall. Otherwise, the connection picture does not differ from the option considered above.

Fixing the socket
The socket is fixed very simply:
- We install the already connected socket in the box, fix it initially with the help of petals that cut into the inner surface of the socket.
- Then the socket must be fixed with screws, on each side of the socket mounting plate there are convenient semi-circular holes for them.
- After mounting the insides of the socket in the reverse order, we install a frame on it and fasten it with a screw.

Conclusion
The question of how to install an outlet in a drywall wall turned out to be very simple, although not without subtleties. A person without special training will cope with it. But still, it is recommended to use the services of an electrician who will accurately cope with the task and will do everything for your safety during the long-term operation of the outlet.