Heating radiators and plumbing to them often spoil the interior of the room. Especially if the room has old cast-iron radiators, completely devoid of any aesthetic appeal. Therefore, the desire of the owners to hide these elements of the heating system is understandable, but at the same time not to worsen the quality of their work. It is logical to use for these purposes an easy-to-process and affordable material - drywall. How to close pipes with drywall? How to hide radiators so that this does not affect their heating performance?

Design Options
Before you close the battery with drywall, you should analyze the placement of radiators and pipelines in the room. Depending on their location, you can choose one of two options for using drywall:
- GKL box with decorative grillecovering the battery.
- A false wall that hides radiators and the supply to them behind its plane.
Options demonstrating how to close the battery with drywall with your own hands are shown in the photo below. Both methods have their advantages and disadvantages:
- The installation of the box compares favorably with the smaller amount of material required. But such a design does not always organically fit into the interior of the room. In addition, pipes will have to build their own boxes, which will further complicate the task. In addition, the presence of such protrusions will seriously interfere with the installation of suspended ceilings or laying laminate on the floor.

- The construction of a decorative wall will require more material consumption, but it will allow you to get a flat plane that can be easily finished in accordance with the overall design of the room. In most cases, such a structure is even easier to build than a box that closes the battery.

Construction of the box
This drywall construction can be fixed to the floor or hung with a gap above its surface. The first option is preferable - so the frame has two planes for support, which makes it stiffer.
When designing the box, it should be taken into account that for the normal functioning of the device, a gap of at least 10 cm is required between the radiator and the drywall surface.
- With the help of a level (better than a laser one) and a tape measure, marking is carried out. The boundary of the upper edge of the structure is drawn on the wall, perpendiculars are lowered from it to the floor. With the help of a square, lines are laid by the depth of the box. By connecting them, they get the lower border on the floor. As a result, two rectangles are obtained - on the floor and on the wall.
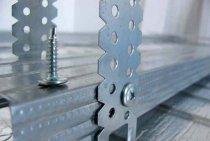
- The guide profile is fixed along the lines with dowel-nails in increments of 15–20 cm.
- Protruding vertical racks are made from a profile, bending it at an angle of 90˚. Preliminarily, the side shelves are cut on the details with metal scissors and bent. The bend points can be fixed with the help of "bugs" (small self-tapping screws for metal), but it is better to use cutter.

There is an opinion that fastening with a cutter is not strong enough. However, when using a professional tool, the connection not only turns out to be very reliable, but also compares favorably with the absence of protruding parts, which is inevitable when using "bugs".
- The required number of horizontal jumpers is mounted. The more of them, the more rigid the structure. For a drywall box, 1-2 is enough for each of the planes, with the exception of the front.
- Parts of a decorative lattice or a removable screen are attached to the frame.
It is necessary to create a solid structure, any vibrations of the frame after installation are unacceptable.
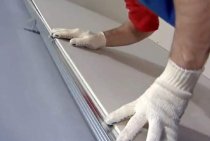
- At the final stage, drywall strips are cut to actual dimensions and fixed with self-tapping screws every 25 cm.In the future, drywall is puttied, fine finishing is carried out in accordance with the general interior of the room.

False wall installation
It is advisable to erect a decorative wall if, in addition to masking the radiators, it is necessary to decide how to close the heating pipes with drywall. With this method, not so much space is lost, but the appearance of the room wins very significantly.
At the first stage, markup is done:
- We mark the fastening lines of the profiles on the wall. They should be located in increments of 60 cm in order to join drywall sheets on them. In addition, two extreme guide profiles are attached at a distance of 30 cm from the corners.

- Additional guides will be required if there is a window on the wall: they are useful for attaching slopes. It is advisable to place a couple more profiles at a distance of 10 cm on each side of the radiator - for mounting a decorative grille.
- Using a square, the marking lines are transferred to the floor and ceiling, their length is the distance from the most protruding part of the radiator (usually a tap) to the wall plus 10 cm.
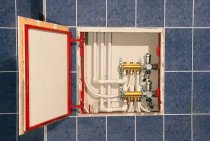
In the design of the decorative wall, it is necessary to provide technological openings for access to taps and other parts of the pipeline for preventive maintenance or inspection. Such inspection hatches are subsequently decorated with a fine finish and become invisible in the general interior.

After marking, the frame is assembled. Its installation is not fundamentally different from the assembly of a box or other drywall construction, so it makes no sense to give a detailed sequence of operations. The metal frame for the false wall will differ from the box design in a large number of horizontal lintels. They are needed not only for joining drywall sheets, but also for stiffening. Experts recommend installing these elements every 60 cm, securely attaching them to the racks using self-tapping screws or a notcher.
Elements cut from drywall are attached to the frame. When deciding how to close the radiators in an apartment with drywall, you should choose a moisture-resistant gypsum plasterboard: such a wall will not suffer from condensate that forms on pipes, or in case of possible leaks in the heating system.