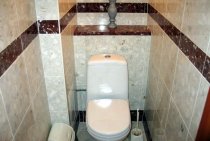
The piping of the apartment in the vast majority of cases is located in the toilet. Its main elements are cold and hot water supply risers, as well as sewage. Usually all three of these lines are behind the toilet or in the corner of the room. They do not look very aesthetically pleasing, therefore, during the repair work, they usually try to close them. The question of how to sew up the pipes in the toilet with drywall so that the room acquires an attractive appearance is relevant for many home craftsmen.

Where do we start?
Before you close the pipes in the toilet with drywall, you should audit the communication systems, otherwise problems may arise later, the solution of which can result in great trouble.
- Check all pipes for damage and severe defects.
- How tight are all pipe connections? If there are leaks, be sure to fix these problems.
- Remove old coatings from pipes, rid them of traces of rust, repaint them with a fresh coat of paint, if necessary, "dress" them in cases of insulating material.
- Make a plan drawing of your pipeline, put on it all the connections and locking devices. This scheme will help out a lot in case of emergency.
- Think about where in the drywall construction the inspection hatches will be located, providing access to the pipes during their operation and in case of emergencies.
- If you have old metal pipes installed, it may be more rational to replace them with modern ones. polypropylene products. Such pipes are just as strong, but they look more aesthetically pleasing, weigh less and are affordable.
It is recommended that in damp areas, such as toilets and bathrooms, only moisture-resistant drywall be used to mask pipes.

How can you hide pipes with drywall?
We propose to analyze the two most popular options for how to close the pipes in the toilet using GKL.
Method number 1. False wall
They resort to it if the pipes of the drain and sewer are located behind the toilet on the entire wall. The proposed design is easy to implement, its execution scheme looks something like this:
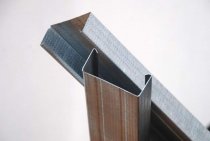
- Installation guide profiles UW or is made along the perimeter of the closed area (on the ceiling, on the walls, on the floor). They are fixed with ordinary dowel-nails.
- Racks made of CW profile are installed vertically. Do not forget about the need to leave a small space for the viewing window.
- We mount the crossbars from the CW profile. As a result, a cellular crate is formed.

- Based on the size of the sections of the frame, drywall sheets are cut, standard self-tapping screws for metal for drywall are used to fix them.
The toilet room is often only 0.75–0.8 m wide, so just one sheet of drywall can be enough to make a false wall to mask pipes., The standard dimensions of which are 2.5 × 1.2 m.
- The hole for the viewing window to monitor the condition of the pipes and take meter readings must be marked in advance, and it can be cut out after installing drywall. You can read about the three most convenient options for its design below.
- The seams between the sheets of drywall are sealed using paper reinforcing tape or sickle mesh.
- The surface of the false wall is primed and leveled with putty. After it dries, a new layer of primer is applied.
If the structure will be tiled, there is no need to level the wall with putty. It will be enough just to process the drywall with a primer.
Now you can proceed to the final finish (tile, painting, etc.).P.).

Method number 2 Drywall pipe box
It is used if the communications to be masked are located in the corner of the toilet. Such sewing is considered more difficult, since it is necessary to build a frame of an angular structure, and then sheathe it with drywall.
Determine exactly what the dimensions of the box being built will be. Keep in mind that it should be compact, but extremely functional, hide not only pipes, but also shut-off valves for both risers, and an inspection window will be located on it to audit the condition of the sewer system.
Installation steps:
- Apply markings to the ceiling, it will determine the contours and dimensions of the future box. The distance between the walls of the drywall box and the pipes is about 10–15 cm.
- Using a plumb line and a hydraulic level, transfer the contours to the floor.

- On the wall surface, draw lines along which the connections of walls and corners will pass.
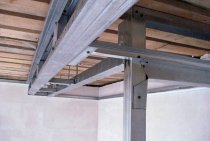
- After finishing the markup, proceed to assemble the frame. For its construction, it is necessary to install guide profiles on the floor, ceiling and walls according to the markings. For fastening, dowel-nails are used.
- Now we connect the opposite corners on the ceiling and floor with a vertical profile. It is he who will serve as the basis for the box that closes the pipes. For structural rigidity, this vertical profile should be connected to the rails installed on the walls. For this purpose, pieces of the ceiling profile cut to the required size are used. Crossbars are installed every 40 cm.
In this design, to mask the pipes, it is also necessary to leave room for a viewing window, place it opposite the shut-off valves.

Our frame can be considered ready, it remains only to cover it with drywall sheets. This action is performed according to the scheme described in the first paragraph. Then puttying work and final finishing are carried out.
You can clarify for yourself the moments that remain incomprehensible by watching a video that tells how to sew up pipes in a toilet with drywall.
How to secure access: 3 most convenient ways
To ensure easy and quick access, it is most convenient to use one of the options below:
- Roller shutters or blinds. An excellent solution when creating a false wall at the rear wall of the toilet. Attached to the frame, provide the widest access to the pipeline. In this case, the finishing area is reduced, there is no need to think over the ways of fastening for the hatch. In addition, behind them you can organize shelves for storing household chemicals.

- Sanitary hatch. You can make it yourself, but it's easier to buy it in a store. Can be metal or plastic, used alone or under tiles.
- Removable magnetic tiles. An interesting solution that can be used when decorating a toilet with large tiles. A hole is made according to the size of the element, magnets are inserted between the drywall and the tile on its surface, 4 metal plates are glued on the sides of the removable tile.
As you can see, the process of high-quality masking of water pipes and a sewer riser with drywall is not so complicated. With due care, attention and a little skill, it is quite possible to carry it out on your own, significantly saving your own money.