When planning finishing work, you have to decide on decorating the ceiling, where open communications or other details that spoil the appearance are unacceptable. If you hide them in a box, you can make the interior complete at minimal cost. This design becomes part of a multi-level plasterboard ceiling. The box can be located along the perimeter of the ceiling, in the center or in the form of a geometric figure. A spectacular addition can be elements covered with a stretch fabric, LED lighting or built-in lamps. Let's figure out how to make a drywall box on the ceiling. And instructions, useful tips and videos on the topic will help in this.

Advantages of a box from GKL
The arrangement of a plasterboard box on the ceiling has some advantages:
- the ability to install backlight;
- a variety of design options with different configurations;
- the ability to hide unnecessary details, problem areas, wiring or communications;
- ease of installation of drywall structures with your own hands;
- environmental friendliness and fire safety.

materials
When installing the box, materials are needed:
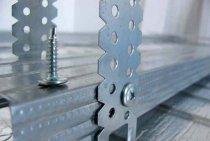
- guide profile (UD) - 28 × 27 mm;
- rack profile (CD) - 60 × 27 mm;
- fasteners - dowel-nails, self-tapping screws for metal;
- suspensions and crabs;
- drywall;
- acrylic primer;
- putty for joints between plasterboards;
- reinforcing mesh.

On sale there are 3 types of drywall:
- for dry rooms (gray);
- moisture resistant (green);
- flame retardant (pink or gray with red markings).
When buying materials, you should pay attention to the absence of chipped sheets and the uniformity of the zinc coating of the metal.
To make the frame durable, you should use all profiles for their intended purpose and from one manufacturer.
Tools
The following tools are required for work:
- perforator;
- screwdriver;
- metal scissors;
- hammer;
- plumb, tape measure, level, rule;
- narrow, wide and angular spatulas;
- construction knife.
You can understand how the tools are used during installation by watching the video instructions for installing plasterboard ceilings.

Preparatory work
Before making the frame, you must first map the location of the drywall sheets. This will facilitate the work and allow you to economically select the material. Standard sheet widths are 600mm and 1200mm. In length, they are from 2 m to 4 m. The thickness of the sheet for a box made of drywall on the ceiling is from 6.5 to 9.5 mm. If the box on the ceiling is small, it is enough for him to pick up pieces from the waste. Here it is important that they are free of chips and cracks.
The base surface is prepared as follows:
- The old finish is removed from the ceiling.
- Cracks, cracks and holes near the exit of pipes are closed.
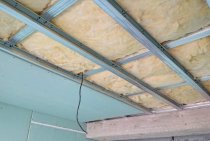
- A cable in a corrugated sleeve is attached to the ceiling, hanging from the ceiling at the locations of the lamps.
- The base ceiling is primed.

It is also necessary to take care of the hidden metal pipes: prime them and paint them. This will prevent rust spots from appearing on the box trim in the future.
Now you need to make a drawing and markup:
- A box frame diagram is drawn with the obligatory indication of dimensions. Holes for pipes and recessed lights are also marked on it.
- On the walls and ceiling, markings are made with a pencil and the lower level of the box is beaten off with a cord. The evenness of the lines is checked by the building level. Attachment points marked
The recommended distance between the false ceiling and the box representing the failure of the second level is 10–20 cm.
Frame mounting procedure
Installation of a drywall box on the ceiling is done in stages.
- Holes for dowels are made along the location line of the guide profile.
Each profile is glued sealing tape at the junction with the base to improve sound insulation. In the corners, it is better not to separate the profiles, but to bend them: this increases the strength of the structure.
- The guides are attached first along the perimeter of the upper part of the wall, where the top of the box will be.

In the event that the width of the box is small, the profile can be connected along the contour on the floor, fastened with self-tapping screws, and then transferred to the ceiling.
- U-shaped suspensions are mounted on the ceiling. They can be made from a UD profile by cutting with scissors. The carrier profile in the form of short pieces of CD, passing along the bottom of the box, is inserted into the guides and attached to the hangers.

- Also, guides (UD) are attached along the perimeter of the future structure, to the ends of the supporting profile, forming the edge of the structure.
- Cross profiles are fastened with a step of 60 cm.
The popular solution is plasterboard box with lighting. For such a case, wiring is laid, which is attached to the ceiling with plastic clamps. In this case, the cable should not sag.
After mounting the frame, check the evenness of the structure again. It is advisable to learn the basics of installation from video instructions, where you can choose your option.
Fastening drywall to frame
GKL box sheathing occurs in the following order:
- If necessary, insulation or sound insulation is laid inside the frame.
- Pieces of drywall are cut to the size of the box. Chamfers are made at the junction of the sheets so that the seams can be sealed with putty.
- The bottom sheets are installed. The joints must fall on the CD profile.
- Lastly, the side edges of the box are sewn up.
Each screw head is recessed into the sheet material by 1–2 mm, which will then allow these places to be puttied. To control the depth of screw tightening, it is convenient to use a special bit with a limiter.
- Drywall corners are not tightly screwed, otherwise cracks may appear.
- It is advisable to cut holes for spotlights before mounting the sheet. After its installation, the ends of the cables for connection are brought out through the holes.

Box finish
Puttying drywall is an important stage of work, because if it is performed poorly, the structure will have an unsightly appearance. On the video you can see what the drywall box looks like after finishing in reality.
Finishing sequence:
- The surface of the drywall is covered with a primer, special attention is paid to the seams
- After the primer dries, the seams and recesses of the screw heads are filled with a specialized putty. The joints of the sheets are glued with a reinforcing tape or a sickle mesh, after drying, the putty is applied again.
- At the inner and outer corners of the structure, perforated paint corners are attached to the putty.

- After processing the joints and corners, the entire surface of the box is puttyed. The mixture is applied in several layers in order to level the surface as qualitatively as possible. the last layer is the thinnest.
- After drying, the surface of the structure is polished with an emery cloth, after which it is painted, pasted over with wallpaper or finished with decorative plaster.
Conclusion
It is not so difficult to make a drywall box on the ceiling with your own hands if you correctly follow all the stages of preparation and installation. The appearance of the finished structure, as well as its reliability, depends on the correct manufacture of the frame and the fastening of drywall to it. A selection of videos will help to present the process of creating a ceiling structure more clearly.