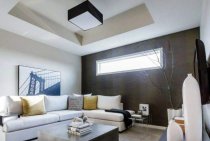
Combined plasterboard and stretch ceilings, photos of which are presented below, have gained immense popularity due to the relatively low cost of materials and the ability to create an exclusive interior. It is acceptable to use different configurations, two-three-level designs, bold color combinations. With the help of combined ceilings, it is possible to make room zoning and implement multifunctional lighting with point light sources and LED strips, ceiling and pendant lights. Complex ceiling structures are mounted in living rooms, bedrooms, nurseries, hallways, corridors.

Types of combined ceiling structures
Combined ceilings - plasterboard and stretch - are distinguished by a variety of designs:
- a combination of a GKL construction with a stretch ceiling;
- a combination of drywall with two or more tension fragments;
- a combination of a stretch ceiling with elements of suspended structures;
- a complex ceiling structure that combines several suspended and tension fragments.

How to choose a canvas for a combined stretch ceiling
One of the main tasks of the correct installation of the combined ceiling is choice of stretch fabric. This should take into account factors such as:
- room functionality;
- ceiling size;
- type of construction (single-level, multi-level).
You must select the type of ceiling surface:
- matte;
- glossy;
- satin.

The use of textile and film fabric in combined ceilings
Textile stretch ceilings are characterized by durability, fire resistance, environmental friendliness, high performance, excellent appearance, but they are only matte and rather limited in terms of colors and textures. Plasterboard and stretch ceilings made of textile fabric look great in the living room, study, bedroom of a typical Khrushchev, creating a special atmosphere of refined luxury and home comfort in the apartment.

A glossy surface with a variety of patterns, stars, patterns, photo prints, 3D photographs is created only when using film stretch fabrics. The combined two-level plasterboard and stretch film ceiling looks especially advantageous in the interiors of a nursery, living room, bedroom, hallway, kitchen, bathroom of a large apartment with high ceilings. A bright effect can be achieved by combining a textile fabric with a film.

How to make a combined ceiling with your own hands
You can make a combined ceiling of drywall and stretch fabric with your own hands, having previously prepared a sketch drawing and purchased the necessary materials and tools. A sketch drawing is important for the correct calculation of the amount of materials and the designation of complex elements, especially for two-level ceilings with complex configurations of stretch web inserts - ovals, circles, ellipses, curved paths.
Tip: in a small living room it is better not to get carried away with an abundance of decorative elements. The refined simplicity of one large rectangle or square of a stretch ceiling framed by a narrow drywall box, pasted over with wallpaper or painted to match the wall coverings, will look much more advantageous.

Preparing the premises for the installation of a combined ceiling structure
Before installing a combined plasterboard ceiling and stretch fabric, you need to prepare the room:
- remove furniture, curtains, lamps, wall and ceiling decor;
- remove wallpaper, paint, whitewash, plaster;
- cover cracks, cracks, irregularities with cement-based putty;
- apply a primer coat to increase the waterproofing properties of the ceiling and reduce dust formation.
How to make a sketch drawing:
- take measurements of the room;
- schematically depict a reduced rectangle or square on a large sheet of paper (depending on the specific room). If there are problem areas in the room - built-in wardrobes, corners, pipes - display them on the diagram;
- mark zones and distribute insertion points for tension elements in the form of geometric shapes, straight, broken and rounded lines, stripes;
- mark the places for spotlights and the main lighting devices, since holes for mortise fixtures should be drilled before installing a false ceiling from gypsum plasterboard;
- mark the ceiling and walls according to the drawing.

Materials and tools
To install a combined ceiling you will need:
- drywall;
- film or fabric stretch ceiling;
- metal profile;
- drill;
- self-tapping screws, dowels;
- screwdriver;
- heat gun;
- kapron construction cord;
- thread for marking the ceiling;
- hydro or laser level;
- sandpaper;
- building rule;
- spatulas of different sizes;
- cement and finishing putty, primer, paint;
- self-adhesive sickle;
- baguettes for film sheets;
- respirator and goggles.

Installation of a combined ceiling
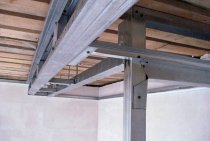
To make the plasterboard part of the combined ceiling, you need:
- Mount metal profile frame.
- Attach it to the ceiling along the marking lines.
- let down wiring to the places of installation of lamps.
- Sheathe the frame with drywall, fixing the sheets with self-tapping screws screwed every 0.3 m. Deepen the heads of the self-tapping screws into the cladding.
- Close the vertical parts of the box with drywall strips, secure with self-tapping screws.

Curvilinear structures are made by bending metal profiles.
- Paste over with a sickle mesh the joints of drywall with walls.
- Use a small spatula to seal gaps and fasteners with putty.
- Mark the locations of the fixtures on the drywall and drill holes if they have not already been made.
- Apply a layer of finishing putty to the surface of the box.
- When the putty dries, sand the surface.
- Use a damp cloth to remove fine dust formed as a result of the work carried out.
- Apply an additional coat of primer to improve the adhesion and protective properties of drywall.
- Cover the dried surface with acrylic paint or wallpaper.

Installation of the film web
Proceed to canvas installation can be after the paint or glue has dried. Experts recommend using film ceilings with a harpoon type of fastening, which are easily dismantled in case of unsuccessful installation. Textile fabrics with fastening of this type do not exist.
- The film sheet is installed in a room heated to +40°C, and during installation the temperature rises to +60°C. In an unheated room, it will not be possible to stretch the film with high quality. When pulling, a heat gun is used, the work with which requires certain skills.

- The film is attached to the baguettes installed on the vertical sides of the gypsum plasterboard box with the help of a harpoon, stretched in the opposite direction and fixed under the baguettes. Care must be taken to ensure that no wrinkles appear on the surface of the film. You can iron the canvas with a building hair dryer, without bringing it closer to the ceiling by less than 20 cm.
Tip: When working with a film with a glossy or mirror surface, you need to wear gloves so as not to leave fingerprints and fingerprints.

Installation of textile fabric
Combining GKL with a textile fabric, you must:
- fix the profile for clip-on fixation of the canvas along the perimeter of the box;
- fix the canvas in the center and evenly stretch to the corners;
- fix the fabric in baguettes and corners;
- carefully cut off the excess parts of the canvas;
- smooth the textile fragment with a building hair dryer.
Installation of a combined ceiling is an extremely time-consuming process that requires the skills of such work and patience. An unsuccessfully mounted structure will have to be reinstalled, which will require additional costs, so it is better to trust the professionals, and for many years the ceilings will delight you with an excellent view without spending on repairs.