Wallpapering
Now you can go directly to how to stick wallpaper on the ceiling alone. The work is uncomfortable, and therefore laborious, but still quite doable.
The ceiling is one of the largest planes in the room. It is also usually well lit. Any flaws on it will be noticeable. Therefore, the observance of technology is necessary. Actions are performed according to the following algorithm:
- Mark the width of the wallpaper on the ceiling. If thick and embossed materials are used, then a masking tape is glued along the strip in order to secure the joint as securely as possible. Also, this line will help you orient yourself and not move the sheet too much.
- With one of the folded sheets, they climb onto the goats or a table.
- On one side, peel off the corners and unfold the sheet a little. The folded residue is passed between the hands so that it goes behind the head. Then he will not interfere with work.
- Corners are applied to the ceiling. The wallpaper should overlap the walls or ceiling plinth a little, both on the short side and on the long side of the strip.
- The wallpaper is smoothed with a hand or a rag along the entire length. Movements are directed from the center to the edges. The protruding excess glue is collected with a rag.
- When the entire strip is glued to the ceiling, take a pin and pierce the sheet in different places. The frequency of punctures is 10-20 cm. This is necessary so that all the air comes out.
- Now proceed to smoothing and rolling. First, with a plastic spatula, all the air is expelled from under the wallpaper. Movements are also directed from the center to the edges. After that, the glued sheet is rolled up with a roller.
- Take the next strip and repeat all the steps. The joints of the sheets are especially carefully rolled.
When all the wallpaper is glued, it remains only to trim the edges. To make everything neat, you will need a sharp knife and spatula. The technology is simple. The wallpaper is pressed with a spatula. On it, as on a ruler, cut off excess material with a sharp knife. If the blade becomes dull (begins to pull rather than cut), it is broken or changed.
That's all for how to glue wallpaper on the ceiling. One person can handle this as well.
Pros and cons of foam products
Foam tiles have a lot of advantages. Among them are:
Ability to stick on almost all types of surfaces. This expands the scope of its application and reduces the necessary finishing measures.
 Styrofoam tiles are glued to any surface
Durability. The service life is calculated in decades, the material is not affected by dampness and temperature changes.
Foam plastic products allow you to carry out work even in the absence of experience. They are easy to process, which means that there is no need to use special tools. Pasting is carried out due to inexpensive compositions.
Great decorative look. Many people think that it is impossible to get a beautiful surface with the help of such plates. But these are misconceptions. Modern technologies have made it possible to obtain excellent decorative materials, which in their appearance can even imitate stucco molding. Excellent decorative solution
Low price. Indeed, the low cost makes them the most affordable.
We must not forget that there are some disadvantages:
- Cheap options are not durable. They fade quickly in sunlight.
- Lack of vapor permeability. The microclimate may be disturbed in the room.
- Fear of mechanical damage. Styrofoam material is easy to spoil, even at the installation stage.
On a note! Some types are amenable to additional processing. They can be painted with water-based paints.
 Styrofoam ceiling tiles can be painted in any color
Preparing the surface for work
In order for the repair to take place with ease and without damage to the material, a small preparatory process should be carried out.
Before gluing, the old tile is removed. If the ceiling is whitewashed, then everything must be washed off. Remove crumbling layer of plaster. Large chips re-plaster and dry. If the ceiling was covered with wallpaper, then they should be removed and the surface cleaned of glue. After cleaning the entire surface, prime it and dry it.
After the preparatory work done, you can start pasting.
Installation
There are several options for stickers, but for those who do it for the first time, it will be easier to install it parallel to the walls.
Laying the first tiles, start from the center of the ceiling or from the place where the chandelier is located. We cut a hole under it with a clerical knife. You can not care about the evenness of the edges, since in the future this place will be closed with a rosette.
It is important at the same time to stick the first rows evenly, because the distortions cannot be eliminated. If, nevertheless, the rows go crooked, you will have to tear off the tile and stick a new one, which will lead to additional costs.
In order to avoid this, make markings on the ceiling. Draw a few lines to guide you as you work.
- Apply glue dotted along the edges, in the center and diagonally. Try not to miss corners.
- After you apply the glue, you need to wait a few minutes and then press the product to the ceiling. In the case of installation on liquid nails, it can be glued immediately after application.
- Since the material is quite fragile, it is not necessary to make great efforts, otherwise dents will remain or it will break and the appearance will deteriorate.
All other products are laid in even, parallel rows. Leave a minimum gap between them. Remove excess adhesive immediately with a damp sponge. If seams occur during the process, they can be sealed with an acrylic sealant or putty.
For the snake in the center, mark a point, and from it draw two lines that cross diagonally. The first tile will be located at an angle to the center.
The remaining tiles in a spiral in two colors are glued around it. The chess arrangement also starts from the center. But the tiles are arranged, alternating colors, parallel to each other.
What kind of glue is better to glue, see above.
- After the entire ceiling is covered with products, install the skirting boards. Firstly, they will hide the defects between the wall and the ceiling, and secondly, they will add comfort and give the room a complete look.
- Now let the glue dry. After two or three days, apply a primer to the ceiling and baseboards, let it dry again and now you can paint the surface in any color you want.
- In this case, it is better to use water-dispersion paint. If you have used laminated tiles, no surface painting is required.
After you have learned the whole process of gluing, and what to glue the ceiling tiles on, you can now easily do it yourself. You just need to be careful in your work. For a more complete presentation, watch the video.
Placement and layout methods
Squares on the ceiling made of foam or polystyrene are placed with edges along the walls or diagonally. When gluing diagonally, the consumption of material is greater - more trimmings and not all of them can be used, but visually it looks better - it is more difficult to notice the seams.
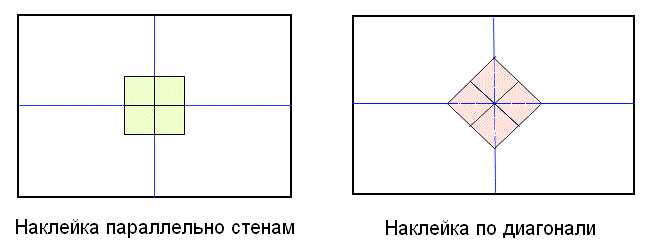
Ways to place squares on the ceiling
Gluing most often starts from the chandelier. In this case, it is easier to "fit" it, since the edges of the plates can be cut a little, and the resulting gap will then close the cartridge from the chandelier. But not all rooms have a chandelier - often there are several lamps and they can be located on the walls. Then they start gluing from one of the walls, most often from the opposite entrance. With this approach, most likely the outer row will be cut off, and near the entrance it will not be so noticeable.
If you need to glue tiles on the ceiling from the chandelier, markup is required. In a square room, everything is simple - we find the center, we start from it. To do this, we take a paint cord, one end to one corner, the other to the opposite, pulling the cord and releasing, we get a line on the ceiling. We repeat the operation with another pair of corners. The center was found, it is easy to glue tiles from it. For diagonal gluing, there are already guides, and for parallel gluing, you will have to make two more strips - through the center to opposite walls (in the figure above).
But this is a very rare case. More often the rooms are rectangular, and the chandelier is not located in the middle of the ceiling. Therefore, more complex markup will have to be done.
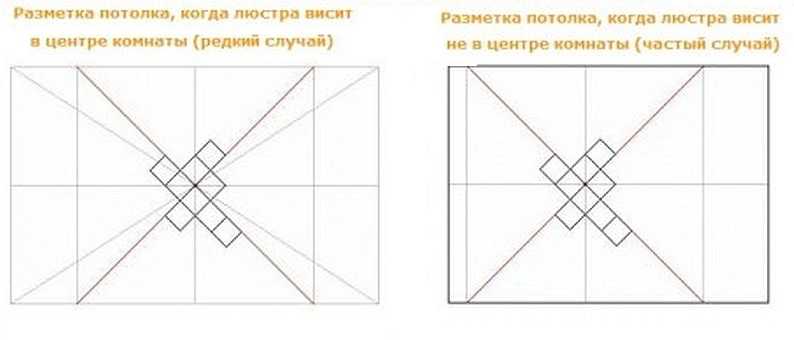
Marking methods for different locations of the chandelier
To begin with, we also find the center of the room (painting cord diagonally). If it coincides with the place where the chandelier is attached, great, we “dance” from it. If not, we shift the starting point to the chandelier. Further markup is the same. We measure the distance from the starting point of installation to the nearest wall. Using this value, draw the squares as shown in the picture above (use the masking cord). After drawing the diagonals, we get guides for laying flow tiles. On them we level the edge of the first row. The more precisely we set this row, the easier it will be to glue the tiles on the ceiling further.
Glue preparation and application
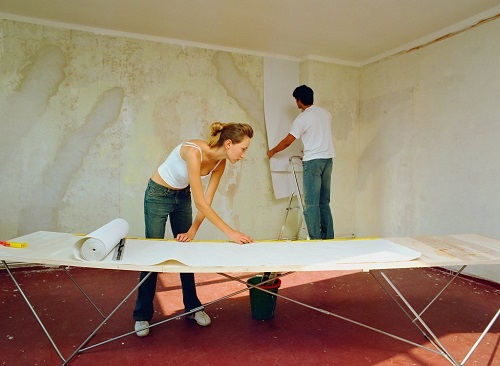
After the primer has completely dried, you can proceed to further work. First, prepare the wallpaper paste according to the instructions. Now there are many instant mixes, but there are also those that need to be aged for several hours. When preparing glue, it is necessary to strictly adhere to the proportions indicated in the instructions. As a rule, the finished mixture is similar to thick jelly, but it is easily smeared.
First, cut the strips to the desired length. The sheets are made a few centimeters longer than the ceiling. This allowance is necessary due to the possible unevenness of the surface itself or the curvature of the adjacent walls.
Now proceed to applying glue to the wallpaper strips:
- The prepared sheet is laid out on the floor with a pattern down, it is desirable that it be as straightened as possible. Further actions depend on the type of wallpaper. If they are made of paper or other thin material, then it is enough to simply smear them with glue with a brush or roller. Non-woven or any other thick ones, after smearing, are folded as follows: the edges are folded to the center so as to cover the glue with them. Thick material must be soaked, otherwise it will not stick. Coats 2 or 3 sheets at once. You should not be afraid that the strips will stick together.
- Now glue is applied to the ceiling. Many manufacturers write that the surface does not need to be coated, however, when wallpapering on the ceiling, it should also be processed, this will improve the adhesion quality. The glue is applied with a roller or brush slightly wider than the glued strip.
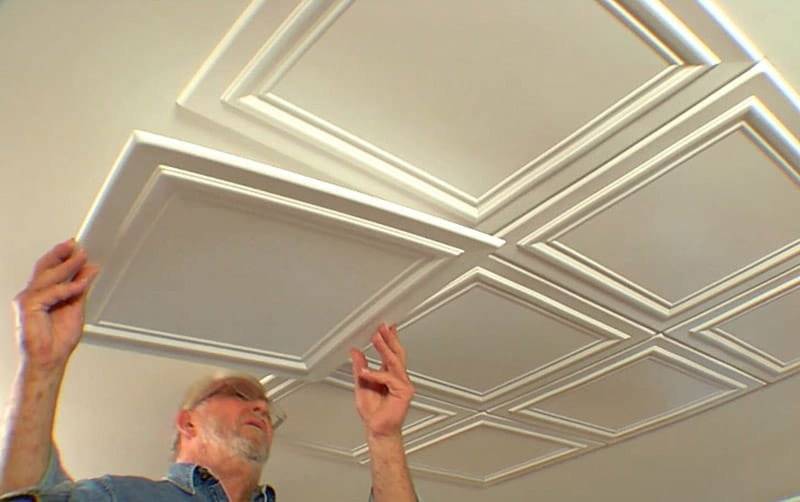
How to glue ceiling tiles. Instruction.
Step One - Preparing the Styrofoam Tile and Ceiling
Tile is not a capricious thing, but it reacts to changes in humidity and temperature. After you bring it into the room, open the packages and let it lie down for 2-3 hours. This will avoid its deformation after installation.
During this time, prepare the ceiling
We remove old wallpaper, tiles and whitewash. We check for the absence of loose or flaking areas. The ceiling surface must be clean, dry and even. Putty is needed only with significant surface differences. Potholes and minor chips are perfectly covered with ceiling tiles. But it is always desirable to prime.
Step two - Marking the ceiling
Now decide on the location of the tiles on the ceiling. You can glue tiles at any angle to the walls, but the most convenient way is to mount them parallel to the walls or diagonally. It is better to start installation from the center of the ceiling or the place where the chandelier is installed.To find the center, stretch 2 twine diagonally from one corner to the other. Draw two perpendicular lines through the center point with a marker (or also pull the threads)
It is important to align the first rows, it depends on how evenly the rest will lie.
Step Three - Lay the first row of non-plastic tiles
How to apply adhesive to ceiling tiles
Gluing rules may vary slightly depending on the adhesive used. It is necessary to apply glue completely or dotted on special ledges on the reverse side of the tile or in the middle and at the corners, as well as on the ceiling.
If you use a special adhesive such as ELTITAN (which is desirable), then the tiles can withstand 10-15 minutes before laying. It is convenient to apply glue on 3-4 tiles at once, so that by the time the glue is applied to 3 or 4 tiles, the first one can already be glued.
For a porous ceiling, it is desirable to apply a thicker layer of mastic.
The key to a beautiful, even ceiling is geometrically consistent tile sizes
Therefore, pay attention to its shape: sometimes it has uneven cuts, which will affect the quality of the coating.
We glue the first ceiling tile
We glue the first tile so that one of its corners is located exactly at the center point (here, as a result, 4 central tiles will converge). If there is a fixture for a chandelier at this point, they need to be cut off the corners. This place will later be covered with a chandelier plate or a special ceiling rosette.
Align the edges of the tiles along the marked perpendicular lines. When sticking, the tiles must be pressed tightly against the ceiling, but in such a way as not to leave dents.
Second and subsequent rows
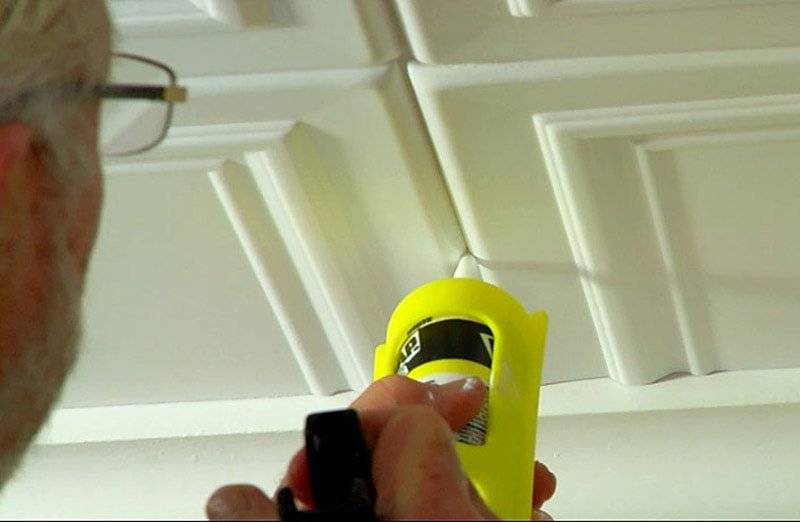
Arrange the next tiles in parallel rows, avoiding gaps between the edges. Focus on the triangular arrows on the back - they should look in the same direction. The last rows, most often, have to be cut with a knife to the desired size, and after trying on, apply glue. When buying, it is worth considering a certain supply of tiles for fitting. The gap between the extreme tiles and the wall will be closed with a ceiling plinth. Residues of glue are immediately removed with a sponge. Step 4: Fill in the cracks
Ceiling tiles without seams are, in principle, possible. To ensure that the coating looks like a single whole, and water does not penetrate between the seams, all gaps between the tiles must be filled with sealant. The silicone sealant is temperature and water resistant. After filling, smooth it with a trowel or fingers, and remove the excess with a damp cloth.
Final touches
Now glue the ceiling socket by cutting a hole in the middle for the chandelier. We mount the ceiling plinth. It is installed last, along with borders and stucco.
At the end of the work, the doors and windows in the rooms must be tightly closed to prevent air movement.
First walls
Many people decide to glue the wallpaper first, and then proceed to the choice of stretch ceiling. This option is suitable for beginners.
If you are worried that the walls will get dirty after installing the stretch ceiling, use the rules that will help you avoid this situation:
Before installing stretch ceilings, prepare the walls.
First, make a hole in which the profile or baguette will be attached. In the future, it will be necessary to hang the ceiling canvas itself to them. Such holes do not have any effect on the decoration of the room itself, as they will be hidden under the baguette.


-
Don't be afraid to ruin your wallpaper with high temperatures
. Despite the fact that the ceiling is heated with the help of special equipment to a temperature of 80 degrees, this indicator is not dangerous for paper wallpapers. Vinyl and liquid wallpaper are also not afraid of such influences. -
Wallpapering should be done on prepared walls
s. Before gluing, level the surface so that the repair made is of high quality.

-
You can not direct the flame of the cannon at the walls.
Every master should be familiar with this rule. -
The stretch fabric cannot be installed immediately after wallpapering.
Wait at least three days. This time will be enough for the glue to dry and the wallpaper to sit on the surface of the walls. If you neglect this rule, in places of contact with high temperatures, your wall pasting will begin to move away.
Advantages and disadvantages of each method
To determine which method suits you best, you should consider in more detail the advantages and disadvantages of each method.
If you decide to stretch the tension fabric forward, pay attention to the following advantages.
Pay attention to the material of the walls. If red bricks were used in your house during construction, when drilling walls you will encounter red dust that will stain the walls
For light wallpapers, such "communication" may be the last. When repairs are done by professionals, they keep the nozzle of the vacuum cleaner under the perforator to prevent dirt on the walls. You can remove concrete or wood dust with a soft brush or vacuum cleaner.
- Stretch ceiling coating is often installed earlier and if you cannot decide on the color of the wallpaper or are waiting for the delivery of the order. By choosing a similar sequence, you can save your time.
- If you have plans to install an expensive skirting board on the ceiling, it is better not to think about the topic of what to glue at the beginning. The sequence should be as follows: first the stretch ceiling, and then the wallpaper. With subsequent repairs, you run the risk of tearing off the cornice right with the wallpaper. Therefore, you need to glue them under the plinth, so that in the future you can simply cut off the excess with a knife.

Those who prefer to do the ceiling first run the risk of facing the following problems:
- The ceiling tension fabric has a small thickness and can be damaged when stretched. To minimize the risk of damage, smooth the wallpaper with a roller or cloth.
- The stretch ceiling can get dirty with glue and you will have to clean it from the sticky mass.
If you decide on the contrary, to glue the wallpaper earlier, and then start working on the ceiling, pay attention to the only but significant advantage of the chosen method - you will not encounter a situation in which you need to fit the wallpaper to the joints with the ceiling and cut extra pieces of material. Also, you do not need to glue the wallpaper to the very top.
After completing the work, you will hide the edge under the fasteners and get a perfectly flat surface.
Also, you do not need to glue the wallpaper to the very top. After completing the work, you will hide the edge under the fasteners and get a perfectly flat surface.
- installation of the cornice on the ceiling will be done on top of the wallpaper. This feature narrows the choice of installation type and increases the chances of getting the walls dirty;
- when you remove old wallpaper during subsequent repairs, you will need to cut them along the plinth or remove it right along with it;
- after pasting the walls, you will need to wait a few days, waiting for the glue to dry. This leads to an increase in the duration of repair work.
You will greatly facilitate the flow of your repair if you listen to the recommendations from experts:
- professionals do not recommend starting to install a stretch ceiling until you level the walls. You should also complete all the rough finishing. This is due to the fact that such processes are accompanied by a large amount of dirt and dust that will settle on the new ceiling covering;
- after you have completed the rough finish, you need to prime the walls. This procedure can leave stains on the stretch ceiling that cannot be washed off. To protect the edges of the stretch fabric from contamination, cover it with masking tape;
How to glue tiles on the ceiling two technologies
Styrofoam or polystyrene tiles on the ceiling are attractive because they allow you to quickly and cost-effectively put in order a far from ideal ceiling. If the ceiling is relatively even, the tiles are glued to a special glue. It is applied in a thin layer, but provides a secure fixation.
With uneven ceilings, this method will not work: the tile simply will not stick with large differences or the view will be deplorable. leveling is not always the time, desire or opportunity. Moreover, often this finishing option is considered as temporary, then planning to make a suspended or stretch ceiling. Therefore, it makes no sense to waste time and money. In this case, another technology is used - on the adhesive composition for drywall or putty. They work no worse than glue, at the same time leveling the base.
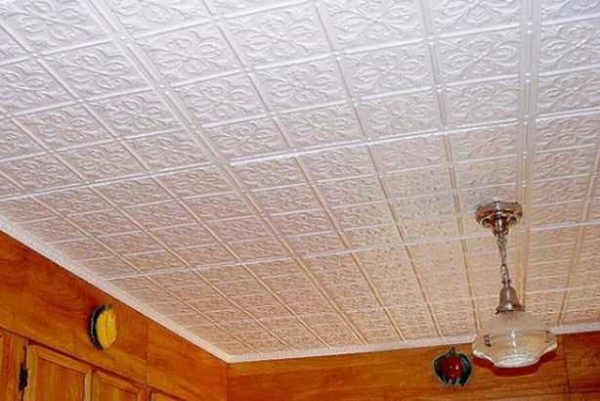
After sticking the ceiling tiles, you will get something like this
Before starting work, unpack all the material, make sure that it is the same color, size. If there are bumps, sagging, they are cut off with a blade or a sharp knife. Now you can proceed to the installation of ceiling tiles on the ceiling.
How to stick on a flat ceiling
If the ceiling is even, ordinary glue for polystyrene or foam tiles is used, the technology is as follows:
- We spread a thin strip of glue around the perimeter of the square and diagonally. The edges of the tiles do not need to be coated.
- We put the tile in place, smooth it with our hands.
- We hold for some time - until the glue "grabs".
- Do the same with the next tile. We apply it to the edge already glued, if necessary, we combine the pattern, after which we press the rest of it. Docking should be carried out as accurately and accurately as possible so that steps do not subsequently form. Align the edges to the nearest millimeter.
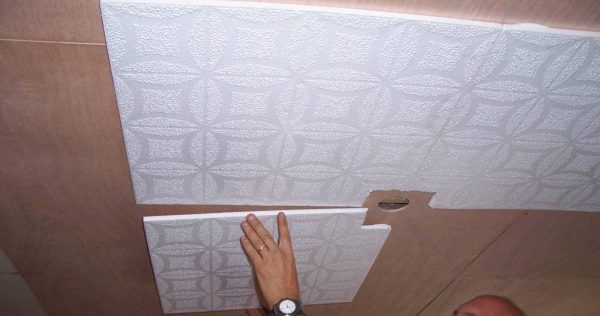
The main thing is to combine the edges and pattern
Repeat with the rest of the fragments.
If necessary, tiles on the ceiling can be cut. Do it conveniently
As you can see, everything is very simple and these are all the rules for how to glue tiles on the ceiling. Only one caveat: you need to press one square to another tightly. If you have already glued it, but there is a gap, you can move it by pressing a wooden plank to the free edge. When you try to do it with your hands, you can break the foam or polystyrene, and it’s easier to achieve what you want with a flat bar.
If the ceiling is uneven
If the ceiling has significant irregularities, gluing tiles to ordinary glue will not work. To remove significant differences, use drywall glue or putty. The mixture is diluted to a pasty state, applied to the ceiling, grooves are formed using a notched trowel. The amount of glue depends on the overall curvature, but it is advisable to start with a minimum layer. The area on which glue is applied at a time is approximately 4 fragments. During this time, the composition will not have time to grab, and it is not difficult to align such a fragment.
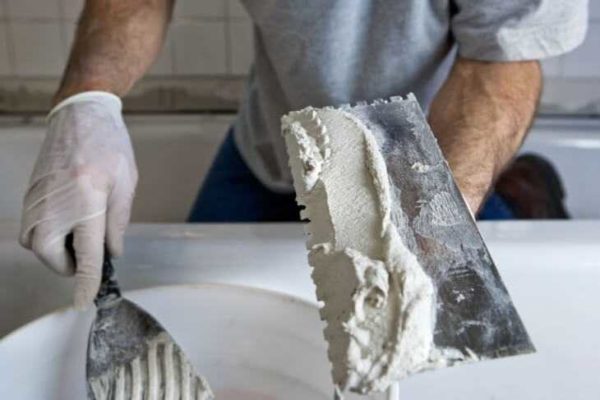
Apply a thin layer of putty to the ceiling
A tile is laid on a layer of glue. It sticks well, moves without problems. Aligning the edges of the stacked fragments, take the rule or the building level (preferably one and a half meters) and set the tiles in the same plane. Just press the fragments harder in the right place.
Then the composition is again applied to the ceiling, and, again, about 4 tiles. All of them are set in the same plane, or at least so that there are no sharp drops. Only in this case it is necessary to ensure that the necessary layer of glue does not grow too quickly - it is better not to apply more than 3-5 mm, otherwise everything will fall.
Cleaning and Sealing
You know how to glue tiles on the ceiling, but there are some nuances left, without knowing which a worthy result is unattainable. When working on the front side of the tile, the adhesive composition often gets. It must be removed immediately and completely. You can use a sponge or a soft non-shedding cloth.Wipe the surface immediately after putting the fragment in place. After a few minutes, this will no longer be possible and traces will remain. Therefore, while working, keep a bucket of water and a sponge / rag at hand.
Neatly sealed seams do not spoil the view
If there are small voids between the plates, you can fill them with the same mastic or putty (if it is white), just remove the excess immediately. Another option is white acrylic sealant. It perfectly masks all the cracks, adheres well to polystyrene foam and polystyrene. Thin cracks can be filled with a rubber spatula, and the excess can also be wiped immediately with a damp cloth.
Mounting methods
Opinions on this matter are strongly divided. To make it easier to make a choice, it is necessary to study the installation methods and the stretch ceiling device itself.
There are two ways to install a stretch ceiling:
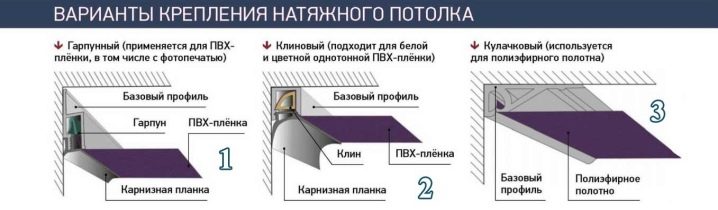
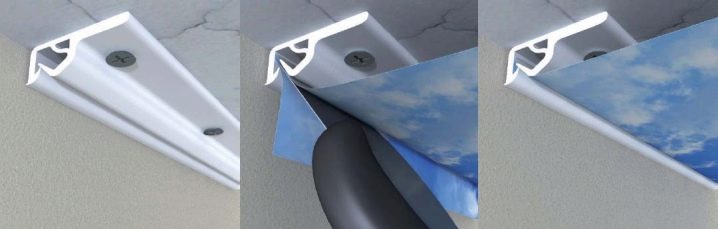
Harpoon.
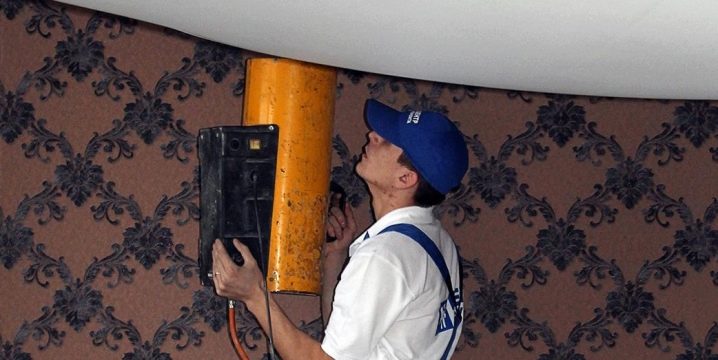
For him, you will need to first measure the area of \u200b\u200bthe room in order to make a canvas of the desired size. After that, the specialists will install the baguette into special nails that are driven into the walls. A similar design takes about four centimeters from the walls. The tension coating is heated by the action of a heat gun and stretched over the entire area. At the end, the material simply snaps into place;
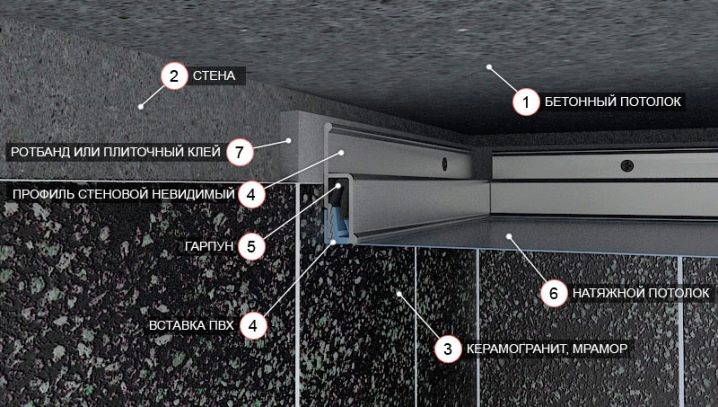
Harpoonless.
In it, the canvas is subjected to a tight clamp, like fabric on a hoop. This option is lighter and cheaper, because for its execution it is not required to make a preliminary measurement of the room and make a canvas for the specified parameters.
There is also a fabric stretch fabric. This material minimizes the risk of sagging, as the fabric has a high density. Installation of the structure is carried out without heating. At the moment, a fabric stretch ceiling with artistic painting is popular.
Factors in Choosing a Sequence
When the repair is started, the team arrives, offering two options: first install the tension base, then paste over the sides or decorate the side rails by completing the finishing operations, and then stretch the canvas. What is more correct?
Both variations are substantiated. Focus on choosing professionals. Difficulties will arise during work, which professionals can solve. Difficulties are caused by such moments:
- Is a ceiling plinth installed?
- Wall material (brick, concrete).
- How well the tension tape is used, the fastening technology.
- High-quality carrying out of draft procedures.