Types of grout for ceramic tiles
Starting to review the material, first of all we want to acquaint you with what types of grouts are and how to choose the most suitable type for your case, since the grout hides not only laying defects and gives a beautiful aesthetic appearance, but also protects the coating from the penetration of microorganisms (mold and fungus) and moisture.
 At the moment, two main types of grout can be distinguished, this is a cement-based mixture and an epoxy-based mixture.
Cement-based grout is produced in the form of a dry mixture, which must be diluted with water or liquid latex before use, as well as in the form of a finished composition. The main component of cement-based grout is Portland cement. Depending on the additives and composition, it is divided into three types: based on Portland cement, a mixture of latex and in the form of a dry hardener.
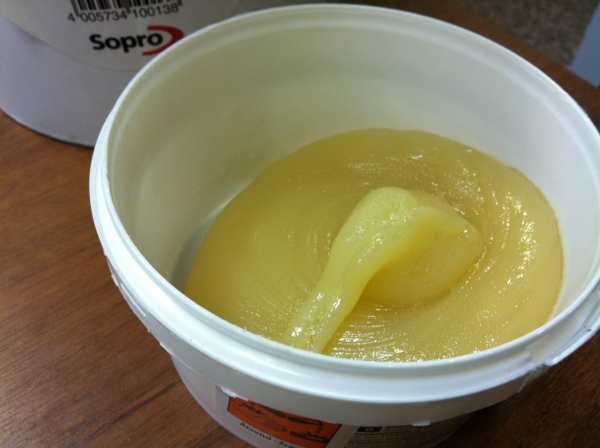
All work on grouting tiles in the bathroom can be done with your own hands, even without special skills, since the material is very elastic and fills even the narrowest joints without any problems.
Epoxy-based grout contains epoxy resin and a hardener, which gives the seams special strength and resistance to various chemical influences and substances. This type of grout is mainly used for ceramic tiling of commercial premises, swimming pools and production workshops, and is considered a rather expensive material in terms of cost.

It is very laborious to work with epoxy grout without skills and experience, since the finished composition has an increased viscosity. And besides, it is recommended to use it only with a tile thickness of at least 12 mm and a joint width of not more than 6 mm, otherwise the penetration of the grout into narrow joints will become more difficult, which may affect the quality of the work performed.
As a result, we want to note, when choosing a grout for processing ceramic tile joints, be sure to consider the following nuances:
- For which room do you want to apply the grout, that is, in the bathroom, in the kitchen or in an industrial room.
- The width of the seams and the distance between the tiles.
- Ceramic tile color.
Do-it-yourself grouting tiles in the bathroom. Nuances when choosing grout for tiles video
Try to purchase grout only from well-known suppliers and manufacturers who have proven themselves and their products over the years of work only from the best side.
Sealing the joint between the bathroom and the wall with foam
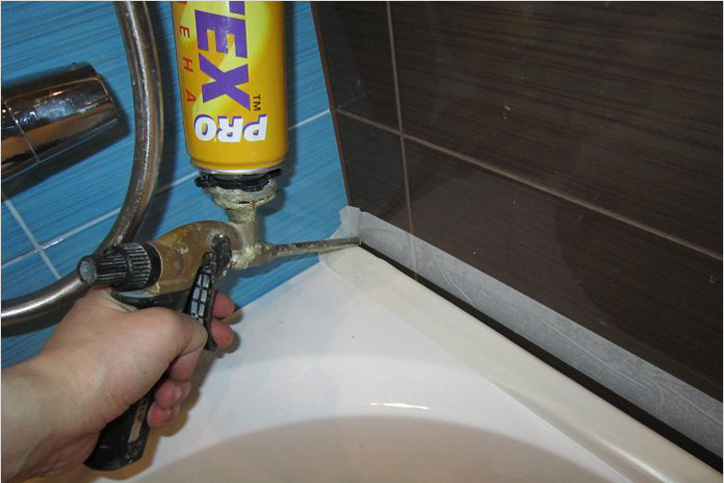
Filling the seam between the bathtub and the wall with mounting foam is one of the easiest ways to solve the problem. Especially compared to the outdated solution method. And one-component polyurethane foam, which has excellent water-resistant qualities, is best suited for these purposes. Only it will be necessary to work very carefully, since mounting foam that has fallen on tiles, painted surfaces or even hands is extremely difficult to clean later.
The "foamy" process of sealing seams is simple:
- first, the seam is cleaned, degreased and dried thoroughly;
- the foam in the balloon is shaken properly and poured into the cavity of the leaky joint;
- 40 minutes are allotted for complete foam drying in a room with high humidity;
- excess foam along the edge of the bath is carefully removed with a paint knife;
- further, the sealed joint is drawn up at the discretion of the master.
Important: in the process of drying, the mounting foam in volume increases several (up to 30) times. Therefore, it is necessary to accurately measure the amount of the composition to be laid.
You will see a detailed description of the process of sealing the joint with foam by viewing this review:
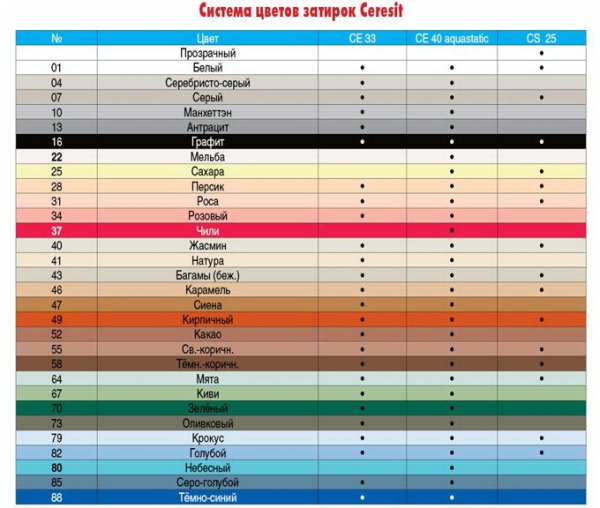
How to choose grout color and joint width
To obtain the effect of a single integrity of the entire surface, the color of the grout is of no small importance. Usually the color is matched to the color of the ceramic tile with slight deviations, very rarely a contrasting color is selected.
When choosing a color shade, the following important points should be considered:
- That white grout for the floor will soon turn dirty gray.
- The use of light tones gives the surface a monotony, which can typically hide some of the shortcomings of tile laying in the bathroom, and the use of dark shades contrasts separate geometric fragments and laying patterns.
- If you are finishing the walls in the bathroom with mosaic tiles, then the best option is to use a colorless grout.
- If you have presumably chosen a grout that matches the color, do not make hasty decisions, but rather apply a small amount of the mixture to the laying tile and wait for it to dry, as some grouts may change in hue as a result.
When laying tiles in the bathroom with your own hands, the width of the joints is of no small importance. There are factors to consider, that is:
- narrow seams visually suppress the tiles
- If you use elements with dimensions from 10 to 30 cm, then the width of the seam must be at least 3 mm.
- Wide seams are subject to frequent cracking, and therefore, in some cases, sand is added to the grout.
- Excessively narrow joints can lead to leaks in the installation, as a result of which water can seep under the tile.
In any case, you should try to calculate the seams so that they can be freely filled with grout, but at the same time do not lose water resistance and quality cushioning.
Sealing the seams between the bathroom and the tiles with mortar
One of the oldest methods of sealing joints between plumbing fixtures and walls in bathrooms is rightfully considered to be laying joints with mortar. And this method involves several mandatory technological steps:
- First of all, the seam is cleaned of old materials, and very carefully.
- If the gap is large, then it will first need to be plugged with a rag soaked in a sufficiently liquid cement-concrete mortar.
- The surface edges are wetted so that the solution sticks better.
- After the joint is poured and leveled with a medium density solution.
- The dried seam should be ennobled:
- putty and paint;
- arrange a ceramic plinth from a frieze or borders (if the bathroom walls are tiled);
- stick a plastic plinth or a special border tape.
The process of sealing the seam with a solution can be seen in the video review:
The choice of the composition of the grout mixture
It is wrong to focus on advertising when choosing a grout for tile joints in the bathroom. You need to decide on the following parameters:
- Appointment. The grout can be designed for thick or thin joints, or it can be universal. A seam is considered thick if its size exceeds 5 mm. If there is a small distance between the tiles, almost any composition is suitable for embedding it. But large gaps are covered with fugues containing coarse sand;
- Compound. Construction grouts are produced on the basis of cement, epoxy and furan resins. The seams of the tiles in the bathroom, if you are going to work with your own hands, are recommended to be sealed with cement compounds;
- Release form. Grout designed for tiles in the bathroom is available in the form of dry mixes or ready-to-use formulations packaged in plastic buckets. Dry mixes are packaged in paper or plastic bags and require water or water-based silicone to dilute them;
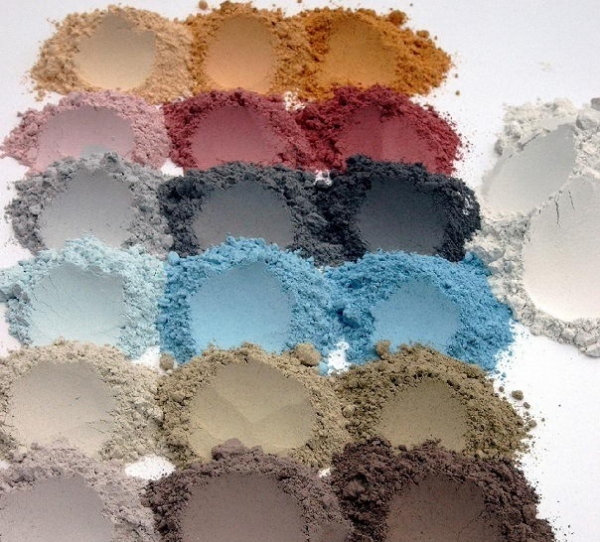
- Color. Manufacturers add various pigments to the grout that give it color. The fugue color palette is extensive, if you want to get a shade that is not in it, you can create it by mixing the composition of white with a special color scheme.
grouting process
Preparatory stage and solution preparation
To qualitatively perform the sealing of seams in the bathroom, it is necessary to prepare the place of work. To do this, the following measures should be taken:
- Inspect the seams, remove the mortar from the places where its excess remains, remove the crosses that were used to lay the tiles;
- With a sponge and a mild detergent, clean the tile from the remnants of tile adhesive;
- Wet the tile with a damp cloth for better adhesion with the grout.
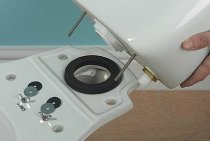
How to install a plastic corner on the bath with your own hands?
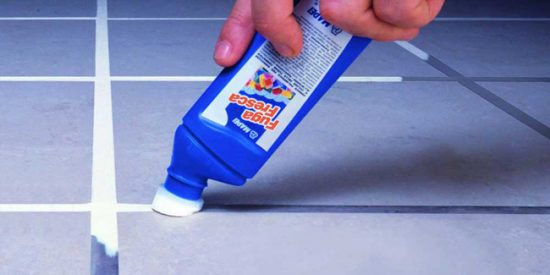
After the bathroom is ready for work, they begin to prepare the mixture for grouting. Pour the required amount of water or silicone, specified in the instructions, into the mixing container. Then, with the help of a construction mixer or with your own hands, a funnel is created on the surface of the water, into which the dry mixture is slowly poured in parts.
Grout technology
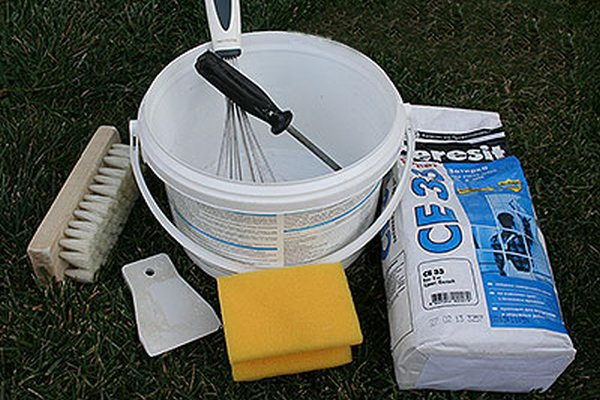
To do the grouting with your own hands, prepare the tools and materials that will be required in the process:
- cement grout;
- Water or an aqueous solution of silicone;
- A container for preparing a solution;
- Production mixer;
- Rubberized spatula or wooden spatula;
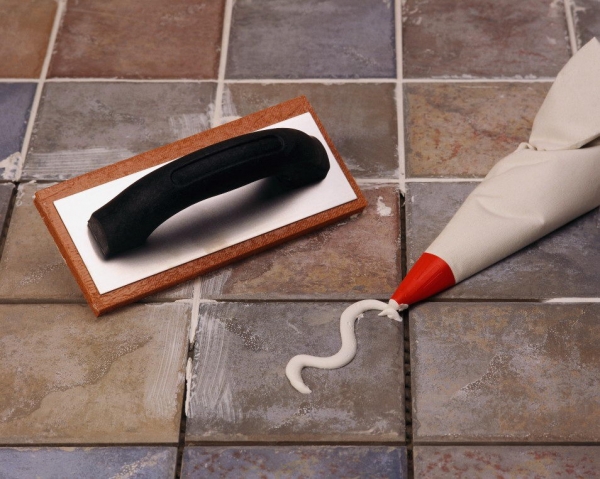
- Plastering trowel;
- Pure matter, sponge.
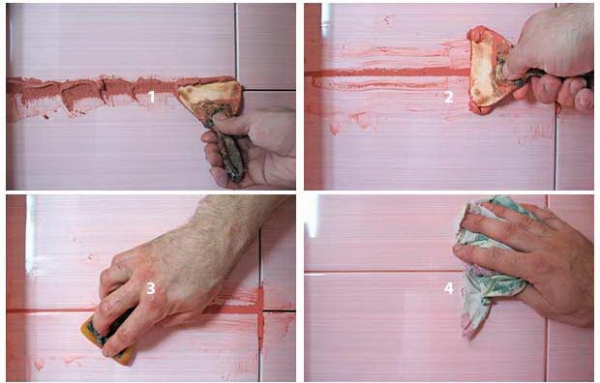
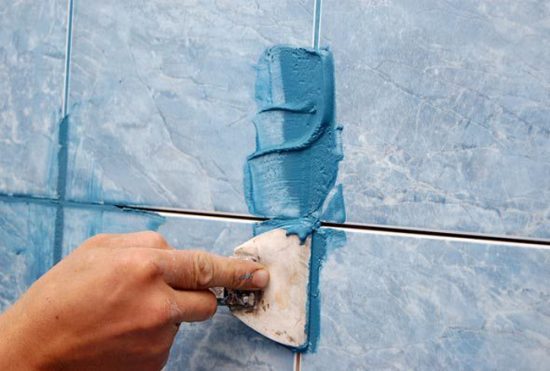
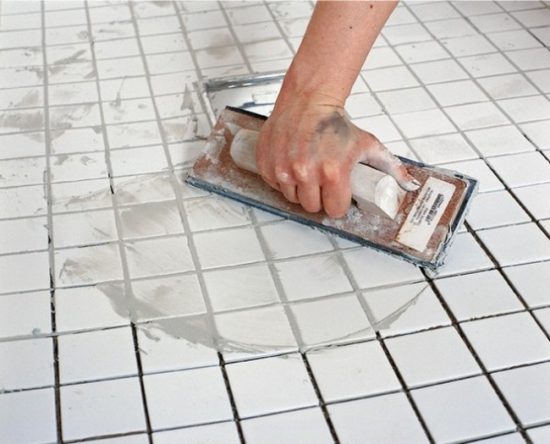
When everything is ready for work, start applying the grout, stirring the prepared solution from time to time:
- Pick up a small amount of mortar on a spatula, rub it with a firm movement on the seam so that it is completely filled. Thus, treat a plot of 1-1.5 square meters. m, then remove the excess, since after drying it is much more difficult to do;
- Rub the applied mortar with a plastering trowel so that there are no gaps in the seams. The trowel should be kept at an angle of 45 degrees to the seam;
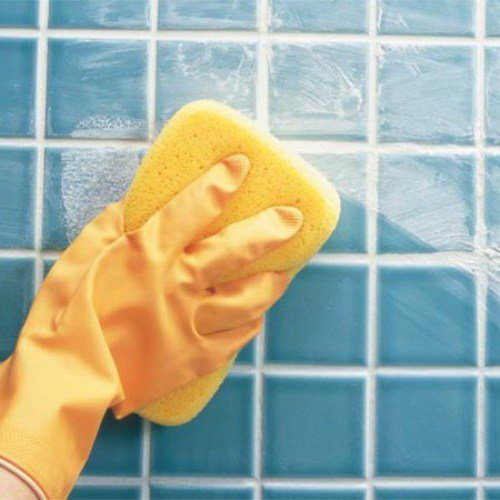
- With a damp sponge, immediately remove excess grout from the bathroom tiles. The more time has passed since application, the more difficult it is to eliminate the solution. After the surface has been cleaned, wipe it dry with a soft, clean cloth.
After the application is completed, you can evaluate the result. If it does not suit you, eliminate the shortcomings with the remnants of the solution and leave to dry.
Do-it-yourself grouting will not only protect the tiles and the surface of the walls, but also reveal the decorative potential of the finishing coating of the room.
Types of grout mixtures
The modern market today offers three types of grouts for grouting, which differ from each other in the main binder component. These are epoxy resin, cement and polymers.
Epoxy grouts
This is a two-component material in terms of a binder ingredient. To obtain it, epoxy resin and hardener are mixed in certain proportions. Both components are sold in separate jars. As a filler, sand is usually used, which is pre-stained with pigment. Hence the wide variety of design of tile joints.
The positive characteristics of epoxy grout include: high strength, inertness to acids and alkalis, which makes it possible to wash and clean tiles with any detergents, long-term operation.
Cement compositions
After applying inside the seam, already after half an hour, the putty can be cleaned with a foam rubber grater and water. An indicator of readiness is a white coating at the joints of the tiles. After 3-4 hours, repeat the procedure using a slightly damp clean cloth. It is necessary to clean off the grout in the seams between the tiles on the tiled floor along the diagonal of the laid material.
If you have to cover up the seams for the first time, then it is better to use this composition. It dries for a long time, so there is time to correct the flaws. The disadvantages include a slight moisture absorption, which eventually leads to cracking. But rewiring the seams is not a problem.
Polymer blends
Polymer grout for tiles is a relatively new variety that has a large list of positive characteristics.
- Virtually zero dry shrinkage.
- High moisture resistance.
- Dirt does not collect on the surface of the composition.
- Ease of application and high adhesive qualities.
- Some solutions are classified as "frost-resistant".
- This is a highly plastic material.
- The curing process is not affected by temperature changes.
- After drying, the seams between the tiles are not covered with cracks.
- Huge variety of colors.
The only negative: polymer grouts are inferior in strength to epoxy
Therefore, when the question is which grout to choose, it is necessary to pay attention to the operating conditions of the tiled floor. For example, in showers it is better to cover the floor with an epoxy option, in bathrooms located in apartments, polymer or cement is suitable
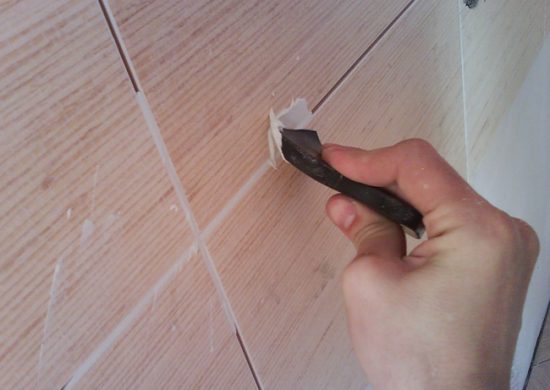
Trowel marker
A marker is usually used only if the old tile grout has faded, cracked, yellow stains and chips have appeared on it. That is, it is used to repair the seams of floor ceramic tiles.
In this case, there is no need to dismantle the old composition, embroider the seams and fill them with new putty. It is very easy to cover the joints in this way. Just a pencil is driven along the seam, which is covered with a new composition of small thickness.
Resin grouts
A resin grout consists of one of two types of resin (epoxy or furan) and a hardener that must be mixed prior to application. Its consistency is more viscous, viscous and sticky. It is much more difficult to work with it, an inexperienced master will not cope with the application with his own hands, we will lose a lot of time, but will remain dissatisfied with the result.
Epoxy grout is best suited for thin joints, 6-12 cm deep, it is not suitable for larger gaps. The strengths of this type of grout:
- High resistance to aggressive chemicals that make up modern household chemicals;
- Fungicidal and antiseptic effect, which is given to it by the natural essential oils that make up the resin;
- Pollution resistant. The smooth, non-porous surface does not absorb dirt, but repels it;
- The water resistance of the resin perfectly protects the base of the walls and floor from the penetration of moisture;
- Durability. The service life of furan, epoxy grout is unlimited, it exceeds the use of ceramic tiles.
The only disadvantages of this method of termination are the high cost, as well as the complexity of doing it yourself.