Calculation of the number of elements of the storm system
Having decided on the cross section of the stormwater, you need to calculate the required number of system elements. Such calculations are necessary so that the installation is carried out without delay and at the same time not to purchase unnecessary accessories. To calculate the drainage, it is enough to know a few basic dimensions:
- the length of the cornice around the perimeter of the house;
- the height of the walls of the building.

According to these dimensions, as well as using the data obtained as a result of previous calculations, you can easily produce the amount of necessary materials with your own hands:
It is quite easy to calculate the required number of gutters. These stormwater elements have standard sizes. The length of metal gutters is 2 meters, and plastic - 3 and 4 meters, depending on the manufacturer. Thus, knowing the length of the eaves, it is easy to find the right number of gutters. When obtaining intermediate values, for example, 15.5 meters, you need to take it in the big direction, that is, 16 meters of the gutter.
Corner gutters and fittings. The number of internal and external corner gutters is equal to the number of roof corners. This indicator depends on the complexity of the design and the number of roof slopes. Connecting elements are counted by the number of straight and corner gutters, as well as funnels.
Advice! Connecting elements will need one unit less than the number of funnels and gutters. For example, to connect three gutters, you need two connectors.
- Plugs are necessary if the calculation of the drainage system is not closed. Such accessories are installed on the ends of the extreme gutters and prevent the overflow of rainwater. When arranging a closed storm sewer, plugs are not needed.
- The number of funnels depends on how many downpipes there will be. Installed one funnel for each pipe. Most often, the installation of downpipes and funnels is carried out in the corners of the house. But in some cases it is more profitable to install one pipe in the center of the facade. In this case, the downpipe and funnel should be taken larger than the calculated diameter.
- The footage of downpipes is calculated by multiplying the height of the house by the number of risers. Pipes are fastened to the facade of the house using mounting clamps, at the rate of two fasteners per 1.5–2 meters of pipe.
- It is quite easy to calculate the number of special fasteners for funnels and gutters. Two brackets are installed on each funnel. The step between the brackets for fastening the gutters should be 50–60 cm.
Advice! Mounts (brackets) are the most inexpensive structural elements. Therefore, it is better to take them with a small margin.
The considered material clearly demonstrates the ease with which you can calculate and install a drainage system for a private house with your own hands. This does not require special skills and deep knowledge of engineering nuances, it is enough to independently make some measurements and calculations.
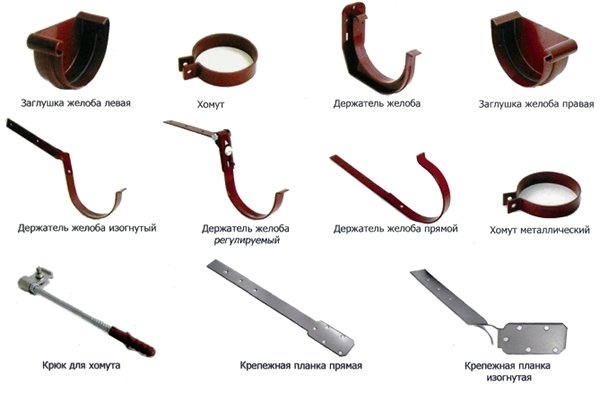
Using optional accessories
As additional accessories in the drainage system are used :
- plugs;
- knee (45° or 90°);
- taps (two or three streams);
- rubber seals (for plastic systems);
- compensators (elimination of the consequences of thermal expansion).
Plugs are used for both plastic and galvanized gutter systems of any shape. They are designed to cover a dead-end branch of the gutter that does not lead towards the funnel. The elbow serves to change the direction of the downpipes by a certain degree. This makes it possible to bypass various architectural features or hide the drain from the back.Branches to several streams allow you to reduce wastewater from all existing downpipes into one outlet pipe, thereby significantly saving time and money, since there is no need to additionally construct sewer drains for each funnel. Rubber seals are used when connecting gutters and downpipes, which serve both as a gap waterproofing and as an additional fastening factor. Compensators are modern elements of the drainage system, designed to prevent deformations during thermal expansion.
During the operation of drainage systems, difficulties often arise that were not observed during installation. Often this is due to clogging of the drainage system, violation of its integrity or mechanical damage. So, after the autumn period of the year, almost all gutters must be cleaned from the foliage that has accumulated there for the whole year. The way out in this situation can be the installation of a protective mesh that is superimposed on top of the gutter and has a perforated surface. This makes it possible for the water to pass freely into the drainage system, while at the same time retaining the leaves.
It is important to know that, despite the installation of a protective mesh, it is necessary to periodically clean the gutters from debris and leaves. Another common case is damage to plastic gutter systems due to freezing.
To avoid this, an anti-icing system is used, consisting of heating cables and a control panel.
Another common case is damage to plastic gutter systems due to freezing. To avoid this, an anti-icing system is used, consisting of heating cables and a control panel.
Calculation of components
Based on the size and shape of the roof, you can independently calculate: how many pipes, gutters, brackets and other parts of the drainage system will be needed.
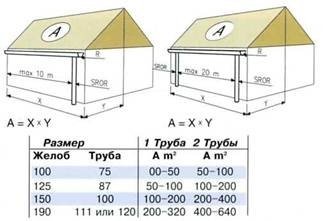
Based on the size of the roof, choose the diameter of the gutters:
- If the roof area is less than 50 m2, gutters 100 mm wide and pipes 75 mm in diameter are used.
- Up to 100 m 2, 125 mm gutters and 87 mm pipes are used.
- More than 100 m 2 - gutters 150 mm and pipes 100 mm (it is allowed to use gutters 190 mm and pipes 120 mm).
In the case of a complex roof structure, gutters and pipes are determined by the largest projection of the roof part.
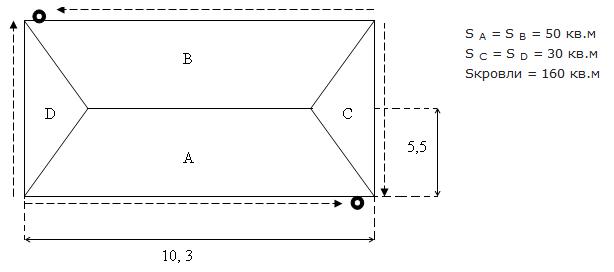
The area of the roof, consisting of parts, is 160 m 2 . Considering that one drain pipe is enough to serve 100 m 2 of the roof in the projection, for the roof from the example, you will need 2 drain pipes located at the corners of the house. The number of funnels corresponds to the number of pipes, i.e. - 2 pieces.
The number of vertical pipes is determined depending on the distance from the cornice to the blind area. 30 cm are subtracted from this distance - the height of the drain elbow above ground level.
For example, the height to the cornice is 7.5 m. Then 7.5 m -0.3 m = 7.2 m.
On each side, we need 3 pipes of 3 m each, which means there are 6 pipes on both sides.
The number of clamps will be equal to 5 for each side (between the elbow and the pipe, between the pipe and the ebb, and between the pipes) and, accordingly, 10 pcs for the entire roof.
Calculation of the number of gutters
The most commonly used gutter size is 3 meters. The length of cornice A and cornice B is 10.3 m. So we need:
- On eaves A - 4 gutters (3m + 3m + 3m + 1.3m). At the same time, we will have another 1.7 m of unused gutter.
- On cornice B - 3 gutters and the remainder (1.7 m) from cornice A.
- For cornices C and D we use 2 gutters each, that is 4 pcs on both sides.
- In total, 11 gutters of 3 m for the entire roof.
The number of gutter corners corresponds to the number of roof corners, in our example there are 4.
Calculation of the number of brackets and gutter locks
Brackets are installed at the rate of 1 piece for about 50-60 cm. We accept 50 cm and make calculations.
Summing up the numbers in the last column, we find out that in order to fix the gutters, we need 58 brackets.
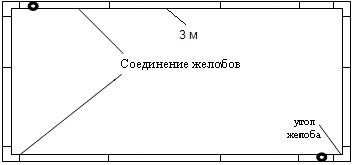
The number of locks between the gutters is equal to the number of joints. In our case, this is 16 pieces.
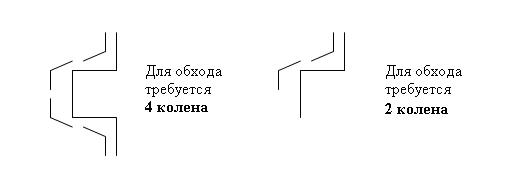
The number of ebbs (marks) is equal to the number of funnels. In this case, knees are needed 2 times more for each funnel. Then for 2 funnels you need:
- 4 knees;
- 2 low tides.
If the facade is not even, but has protrusions, it is necessary to purchase knees to bypass it. The figure below will help determine their number.
List of required items
In total, for this drainage system you will need:
- Gutter (3 m) - 8 pcs.
- Gutter (2.5 m) - 2 pcs.
- Gutter (1.3 m) - 2 pcs.
- Gutter lock - 16 pcs.
- Gutter corner - 4 pcs.
- Bracket - 58 pcs.
- Knee - 4 pcs.
- Drain elbow (mark) - 2 pcs.
- Pipe (3m) - 6 pcs.
- Funnel - 2 pcs.
- Clamp (with pin) - 10 pcs.
Pro tip:
Description of the elements of the truss system
The rafter roof takes its name from the name of the main element in the structure. A rafter is a beam with a rectangular section, forming the upper corner of a triangular roof.
The simplest gable roof consists of two rectangular planes connected at an angle and fixed over the top edge of the walls. The rafters of a gable roof take on not only the weight of all elements, but also the pressure or lifting force of the wind, and in winter also the weight of the accumulated snow. The margin of safety of the truss system should more than cover all possible loads, including the weight of people, fixtures and mechanisms necessary for the construction or repair of the roof.
 Elements of the truss system of a gable roof
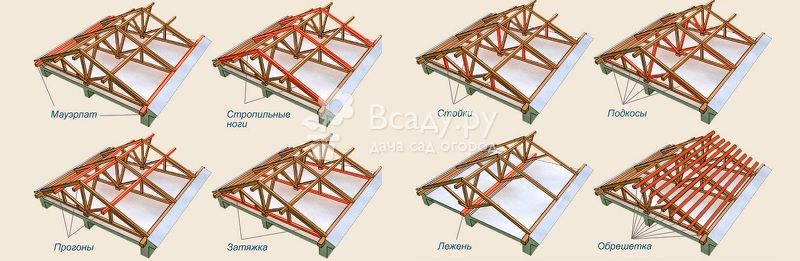
The gable roof truss system consists of the following elements:
- Mauerlat. Coniferous timber, laid and fixed along the perimeter of the walls. The rafter roof rests on it, and it plays a major role in evenly distributing the weight of the structure on the load-bearing walls of the building. The cross section depends on the specific design, but most often the standard value is taken 10x10, 10x15 or 15x15 cm. Mauerlat is installed on anchors or threaded rods fixed in the wall. The Mauerlat mount must withstand the force of tipping loads on the roof from the action of the wind.
- Rafter legs. Most often, they are what they mean when they say rafters on the roof - this is also a coniferous timber with a rectangular cross section. Section dimensions: 15x5 cm or 15x10 cm. Rafter legs form a triangular roof and bear the weight of the entire roof, snow and wind loads.
- Sill. It is laid on an internal load-bearing wall and plays the role of a mauerlat to evenly distribute the weight of the roof over all supporting walls. Section dimensions 10x10 cm or 15x15 cm.
- Racks. Intermediate support elements required to provide the desired roof rigidity. The dimensions of the section are the same as those of the bed.
- Puff. It prevents the rafters from spreading under the weight of the roof. The tightening tightens the lower parts of the rafters and completes the construction of the triangle.
- Struts. Structural strength and rigidity elements required for flat roofs with a long slope. They eliminate slack in the rafters and complete the construction of a large span truss. Thanks to the struts, the truss can withstand very heavy loads. When a gable roof is mounted, a truss system for a metal tile is impossible without these important components.
- Crate. Provides transverse mutual fastening of the rafter legs, evenly distributes the weight of the roof on the rafter legs. Considering the specifics of operation, it is better to take edged softwood dense lumber for the crate. In extreme cases, an unedged board is also suitable, but without bark and with a small roughness. Under a soft roof, a continuous crate is required, without gaps. The worst option is thick moisture-resistant plywood. Under no circumstances should any type of fiber chipboard be used for this purpose!
- Roof ridge. It is an element of fastening of two adjacent slopes. The size and shape of the section of the ridge is determined by the roof structure, taking into account the estimated weight of the truss structure and the roof.
- Roof overhang and filly. Protruding roof elements that protect the walls from the effects of precipitation and weather factors. Fillies do not experience serious stress, but must withstand the weight of hanging roofs and gutters filled with rainwater or snow.
Principles for the selection and installation of a roof drain funnel
When installing flat roof drains, there are a few simple rules to keep in mind. Without their observance, the efficiency of drainage structures will drop sharply:
On a roof made of a metal profile or a fold, they are installed metal funnels
.
For bitumen roofing or polymer coatings, choose polymer funnels
.
The connection of the funnel with the roof must be completely sealed
. To do this, you can stick an additional waterproofing layer, extending it directly on the sides of the funnel. If there are several layers of waterproofing on the roof, the funnel is installed between them.
The funnel must have removable cover
and protection against dirt so that the latter does not fall into the drain. In addition, the protection system will help to avoid clogging with leaves, branches, sand and other types of street debris.
Need to conduct heating
to the funnels so that the water in them does not freeze.

What kind of drainage system can be installed
When installing a drain, the owner of the house will have to make decisions:
- regarding the choice of form and materials from which it is made;
- purchase of a ready-made kit or assembly of individual elements, the number of which and the installation scheme will need to be calculated;
- inviting third-party specialists or doing it on your own.
The gutter for the drain in shape can be:
- semicircular;
- rectangular;
- trapezoidal.
As a material for manufacturing, preference may be given to:
- copper or metal alloys (zinc and titanium, for example), characterized by durability, aesthetic appeal and high cost;
- galvanized steel. If earlier this material was practically the only one suitable for the manufacture of a sufficiently durable structure, now the situation is rapidly changing, and consumers have a choice. However, despite the appearance of plastic structures, galvanized steel is still considered as the main material for arranging drainage from the roof surface;
- plastic, usually polypropylene.
Drainage systems made of polymeric materials are lightweight and quickly installed.
The advantages of choosing polypropylene pipes and fittings include:
- resistance to corrosion, which means the possibility of operation for half a century, a period that is absolutely unattainable for galvanizing;
- the ability to give plastic almost any shape and color, which allows you to implement existing ideas regarding design solutions;
- the availability of an offer in the form of ready-to-assemble kits that can be installed independently by following the instructions.
It should be noted that the cost of purchasing such kits will be higher than in the case of purchasing all the required materials separately. But preliminary calculations of the required amount of consumables will fall on the shoulders of the building owner.
Placement of gutters
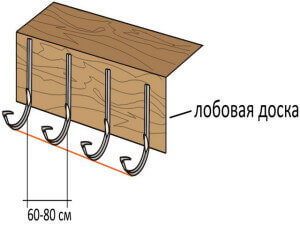
- Before installing the horizontal section of the gutter, measure the total length of the cornice and mark the places where the fastener brackets are fixed. The gaps between the brackets should not exceed 60 centimeters. However, if you are not sure about the strength of the plastic construction of the gutter, then supporting brackets can be placed after 30 centimeters - this will make the system more stable and protect it from destruction during heavy rains or heavy snowfall.
- After that, determine the slope angle of the horizontal gutter. To do this, mark the position of the first and last brackets, stretch a cord between them.Then make markings for fixing the remaining brackets, observing the frequency of their placement.
- The gutter installation process should start from their edges, while keeping in mind that the vertical section of the downpipe should be no further than 15 centimeters from the nearest bracket.
Systems of internal cold and hot water supply
20. Internal gutters
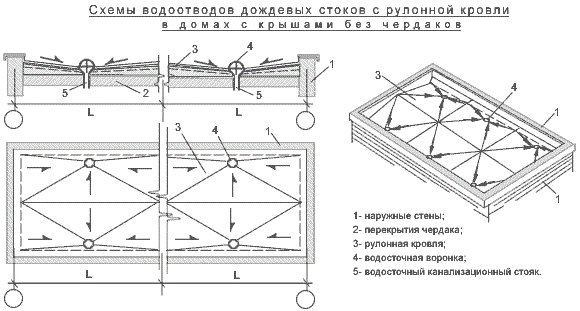
20.1. Internal drains should ensure the removal of rain and melt water from the roofs of buildings.
Note. When installing internal drains in unheated buildings, measures should be taken to ensure a positive temperature in pipelines and drain funnels at a negative outdoor temperature (electric heating, heating with steam, etc.). The feasibility of installing heated internal drains should be justified by a feasibility study.
20.2. Water from internal drainage systems should be diverted to external rainwater or general sewage networks.
Notes: 1. When justified, it is allowed to provide for the removal of water from the system of internal drains to the industrial sewerage system of uncontaminated or reused wastewater.
2. It is not allowed to divert water from internal drains to domestic sewerage and connect sanitary appliances to the system of internal drains.
20.3. In the absence of rainwater drainage, the release of rainwater from internal drains should be accepted openly into flumes near the building (open outlet); at the same time, measures should be taken to prevent erosion of the earth's surface near the building.
Note. When arranging an open outlet on a riser inside the building, a hydraulic seal should be provided with the removal of melt water in the winter season to the domestic sewer.
20.4. At least two drain funnels must be installed on the flat roof of the building and in one valley.
Drainage funnels on the roof should be placed taking into account its relief, the allowable catchment area per one funnel and the building structure.
The maximum distance between the drain funnels for any type of roof should not exceed 48 m.
Note. On flat roofs of residential and public buildings, it is allowed to install one drain funnel for each section.
20.5. Accession to one riser of funnels located at different levels is allowed in cases where the total estimated flow rate for the riser does not exceed the values \u200b\u200bgiven in Table. 10.
Drainpipe diameter, mm
20.6. The minimum slopes of branch pipelines should be taken: for overhead pipelines 0.005, for underground pipelines - in accordance with the requirements of Sec. eighteen.
20.7. To clean the network of internal drains, it is necessary to provide for the installation of revisions, cleanings and manholes, taking into account the requirements of Sec. 17. On risers, revisions must be installed on the lower floor of buildings, and if there are indents, above them.
Note. With a length of suspended horizontal lines up to 24 m, it is allowed not to provide for cleaning at the beginning of the section.
20.8. The connection of drain funnels to the risers should be provided with the help of expansion sockets with an elastic seal.
20.9. Estimated rainwater discharge Q, l/s, from the catchment area should be determined by the formulas:
for roofs with a slope up to 1.5% inclusive
for roofs with a slope over 1.5%
In formulas (34) and (35):
F — catchment area, sq.m;
— rain intensity, l/s per 1 ha (for a given area), lasting 20 minutes with a period of a single excess of the design intensity equal to 1 year (accepted in accordance with SNiP 2.04.03-85);
- rain intensity, l / s from 1 ha (for a given area), lasting 5 minutes with a period of a single excess of the calculated intensity equal to 1 year, determined by the formula
here n is a parameter accepted in accordance with SNiP 2.04.03-85.
20.10.The estimated flow of rainwater attributable to the gutter riser should not exceed the values \u200b\u200bgiven in Table. 10, and for a drain funnel is determined according to the passport data of the accepted type of funnel.
20.11. When determining the calculated catchment area, an additional 30% of the total area of the vertical walls adjacent to the roof and rising above it should be taken into account.
20.12. Drainpipes, as well as all discharge pipelines, including those laid below the floor of the first floor, should be designed for pressure that can withstand hydrostatic head during blockages and overflows.
20.13. For internal drains, plastic, asbestos-cement and cast iron pipes should be used, taking into account the requirements of paragraphs. 17.7, 17.9.
On horizontal overhead lines in the presence of vibration loads, it is allowed to use steel pipes.
Fastening the drain pipe to the wall when laying from the bottom up
When fixing a downpipe, in most cases, the mounting option from above is considered, sometimes as the only possible one. However, many masters also use the installation option, starting from the bottom. The same option is also offered in the instructions of individual drain manufacturers.
The installation of the downpipe begins with the installation of fixtures in the wall - brackets or pins. When marking is carried out, work is carried out in the following order:
The lower clamp (or two lower clamps) is used to fasten the drain elbow or mark (a piece of pipe with a cut corner).
- When installing subsequent links, a clamp is provided on each of them. With a length of a downpipe link exceeding two meters, you should take care of an additional fastener in its middle part. The distance between the clamps, not exceeding 1800 mm, is considered optimal.
- The distance between the top of the downpipe and the nearest gutter fixture must not exceed 150 mm.
In the case of purchasing a ready-made set of drainage system, the user has not only all the elements necessary for its installation, but also a detailed guide that allows you to navigate how to properly install in general and fasten downpipes to walls, in particular.
In order to attach a drain pipe to the wall, it is not necessary to have professional skills and complex tools. The work may well be carried out independently, provided that the instructions are carefully followed. You should not neglect the instructions, because they are developed on the basis of practice, when the reliable operation of the system for a long time is at the forefront. Proper execution of fastening and other work allows you to expect that the drain will last at least twelve to fifteen years.
Gutter systems are not just an element of building decor - they perform an important function of collecting rainwater falling on the roof surface and draining it from the walls of the building and from its foundation. Thus, the structure of the building is protected from excessive moisture.
Usually, roofing specialists are invited to install gutter systems, but this is not the most difficult construction operation and almost any homeowner with minimal technological skills will be able to carry it out on their own.
Fastening the drain pipe to the wall when laying the drain from top to bottom
As a rule, downpipes are mounted from top to bottom with the installation of a knee, a coupling and a drain with a bell. The installation sequence is as follows:
- Determines where the top bracket will be fixed. The width of the overhang of the roof eaves and the dimensions of the pipe elbow are taken into account. With a gutter inlet funnel placed at a considerable distance from the wall, it is worth resorting to using a bend on the downpipe, which allows it to be brought closer to the wall.To perform a bend, you can use a shaped element (elbow with a certain angle) or a short piece of pipe.
- Having installed the upper bracket, with the help of a plumb line, a vertical is outlined, along which the marking of places for the installation of other fasteners for fixing the downpipe is made. The estimated distance between the fasteners is about 1000 mm.
- Upon completion of the placement of the brackets, a branch is mounted, which ensures the supply of water coming from the gutter, passing the catchment funnel, into the downpipe.
- Having brought the upper end of the drainpipe into the curly part, expose it vertically with a plumb line and attach it to the wall with clamps. One of the fasteners is considered as fixing, the others as guides. Manufacturers of some drainage systems strongly recommend the use of clamps - thermal expansion joints. The clamp is fastened under the connector, where the subsequent pipe is led.
- At the lower end of the pipe fixed by means of clamps, a drain elbow is installed. In this case, from the lower edge to the blind area, the distance will be 250-300 mm. In the presence of a drainage system or a storm water inlet, the lower end of the drainpipe is brought there directly.
As a rule, the installation of the downpipe is made from top to bottom.
Features of the calculation of gutters and pipes
When arranging an external drainage system, the entire building should be carefully examined for the presence of architectural features, protruding parts and depressions. The drainage system should not spoil the appearance of the building, so if it does not fit harmoniously on the facade, it should be hidden from the back. For these purposes, numerous accessories are used, which are mass-produced today.
The calculation of the gutter system must always begin with a measurement of the roof area from which water will be removed. This can be done quite simply, knowing the simplest geometric formulas. Nominally, it can be assumed that a water drain pipe with a diameter of 100 mm is able to work effectively on a roof area of up to 220 m2.
The calculation of the cross section of the gutter is carried out taking into account the angle of the roof slope, the steeper it is, the higher the side height at the gutter should be. This is primarily due to the increase in the area of collection of precipitation, which is the main source of water. The number of gutters is selected based on the perimeter of the cornice and the components offered on the market. So, most plastic gutters have a length of 3 or 4 meters, and galvanized - 2 meters. If the length of the cornice is 10 meters, then we will need 5 galvanized gutters or 2 pieces of 4 meters each and one of 3 meters in the case of plastic parts.
The number of fastening hooks is counted according to the following formula:
N=(L - 0.3)÷(0.6 +1);
where N is the number of hooks;
L is the length of the cornice;
0.6 - the step between the hooks recommended by the regulatory documentation.
The downpipe count can be found using the formula:
N=(0.2×Neaves–Nbending+Linserts)÷ Lpipes;
where N is the number of drainpipes;
Heaves - height from the ground to the eaves;
Hbending is the height of the pipe bend;
Linserts – funnel insertion length;
Lpipes - the length of the drainpipe (usually 3 or 4 meters).
In order to calculate the internal drainage according to the pipe section, it is necessary to determine the maximum amount of water that can come from the roof. For this purpose, the geometric parameters of the roof (length and width) are measured and multiplied by the maximum amount of precipitation determined for the area.
In most cases, a simplified formula is used, taking into account that about 1 m2 of roofing falls on 1 cm2 of the downpipe section.
The calculation of the drainage system SNiP regulates taking into account the influence of a very large number of factors, among which:
- the amount of precipitation per year;
- climatic zone and maximum negative temperature;
- roof area;
- availability of rainwater drainage;
- other factors.
Timely made competent calculation of the gutter for the roof allows you to save significant money on optimizing the number of purchased parts of the drainage system.
Calculation of the number of funnels of the external drain, pipe diameter
There is a gable roof, the length of the slope is 24 m, the distance from the eaves to the ridge is 10.5 m. It is required to calculate the number of funnels and the diameter of the downpipes for each slope. There are conflicting data on the number of sinkholes and the diameter of the waters. pipes:1- SP 17 Roofs 9.7 “In case of an external organized drainage of water from the roof, the distance between the downpipes should be taken no more than 24 m, the cross-sectional area of the downpipes should be taken from the calculation 1.5 cm2 per 1 m2 roof area. Calculation: For a gable roof with an area of one slope 24 * 10.5 \u003d 252 m2 With a pipe with a diameter of 10 cm - the area of \u200b\u200bthe cross. pipe section: S \u003d Pi * R (squared) \u003d 3.14 * 25 \u003d 78.5 cm2 Required. cross-sectional area of downpipes: 1.5 * 252 = 378 cm2 Number of pipes with a diameter of 10 cm: 378 / 78.5 = 4.81. Those. 5 pipes2.- The vast majority of sources on the Internet talk about a smaller number of pipes: either about 100 m2 per 1 pipe. It turns out 252/100=2.52=3 pipes Or they provide tables, according to which in general 2 pipes with a diameter of 10 cm. In the technical documentation of the Grand Line company (they refer to the calculation according to DIN EN 612-2005), the Grand Line system 150mm-dia. funnels/100mm-dia. pipes - designed for 178 m2Those. 2 pipes are enough for 250 m2 Where is the truth? in the joint venture or in the vast majority of Internet sites? How many drains to take?
Last edited by MaxKad on 02/08/2017 at 21:34.
Where is the truth? in the joint venture or in the vast majority of Internet sites? How many drains to take?
I believe that the truth is in the joint venture, but not only in one joint venture 17.13330.2011, but also in the joint venture 30.13330.2012 and joint venture 32.13330.2012: 9.2. The number of funnels, depending on its throughput, roof area and construction area, is determined according to SP 30.13330 and SP 32.13330. I believe that the number of funnels, at least internal, at least external drain, and the diameter of the pipe (riser) primarily depends on the estimated rainwater flow rate (l / s), and not just on the area of \u200b\u200bthe roof. In SP 17, for the external drainage, a too approximate calculation method is given, which does not take into account the intensity of rain for a particular construction area. (clause 8.6.9 of SP 30.13330.2012).
DIN EN 612-2005 is good, but “what is good for a German is death for a Russian” (c) Gutter manufacturers have the right to refer to anything, especially if they provide a guarantee to the buyer that there will be no overflow during rain. And the designer must justify his decisions himself, referring to the norms in force in the country.
__________________Architecture is a diagnosis.